lock PONTIAC GRAND AM 1998 Repair Manual
[x] Cancel search | Manufacturer: PONTIAC, Model Year: 1998, Model line: GRAND AM, Model: PONTIAC GRAND AM 1998Pages: 370, PDF Size: 16.11 MB
Page 257 of 370
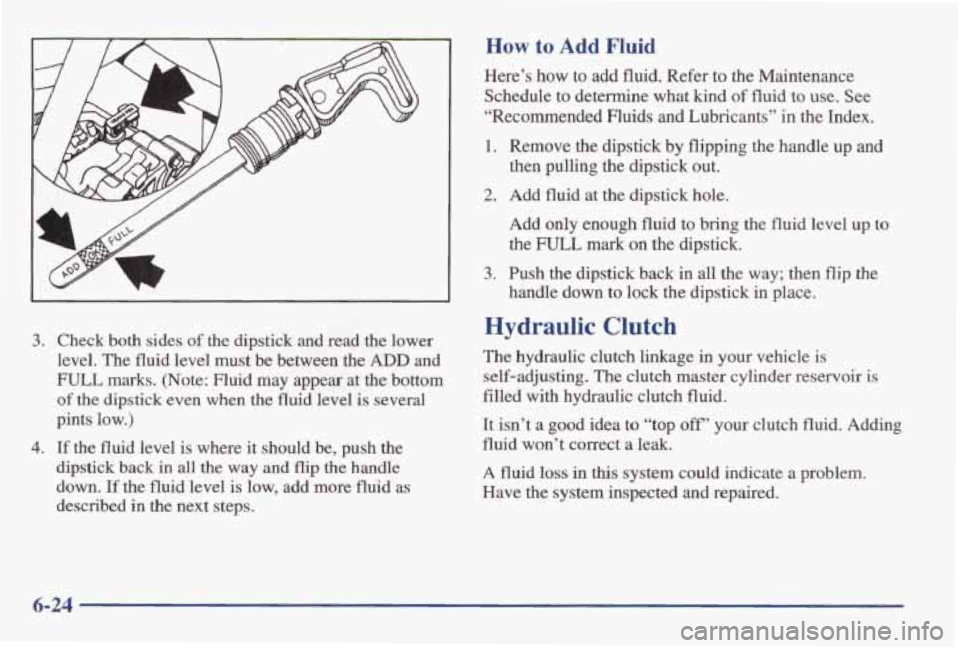
3. Check both sides of the dipstick and read the lower
level. The fluid level must be between the ADD and
FULL marks. (Note: Fluid may appear at the bottom
of the dipstick even when the fluid level is several
pints low.)
4. If the fluid level is where it should be, push the
dipstick back in all the way and flip the handle
down.
If the fluid level is low, add more fluid as
described in the next steps.
How to Add Fluid
Here’s how to add fluid. Refer to the Maintenance
Schedule to determine what kind
of fluid to use. See
“Recommended Fluids and Lubricants” in the Index.
1. Remove the dipstick by flipping the handle up and
then pulling the dipstick out.
2. Add fluid at the dipstick hole.
Add
only enough fluid to bring the fluid level up to
the FULL mark on the dipstick.
handle down to lock the dipstick in place.
3. Push the dipstick back in all the way; then flip the
Hydraulic Clutch
The hydraulic clutch linkage in your vehicle is
self-adjusting. The clutch master cylinder reservoir
is
filled with hydraulic clutch fluid.
It isn’t
a good idea to “top off’ your clutch fluid. Adding
fluid won’t correct
a leak.
A fluid
loss in this system could indicate a problem.
Have the system inspected and repaired.
6-24
Page 273 of 370
Turn Signal, Back-up and Stop/Taillarnp
Bulb Replacement
For the type of bulb, see “Replacement Bulbs” in
the Index.
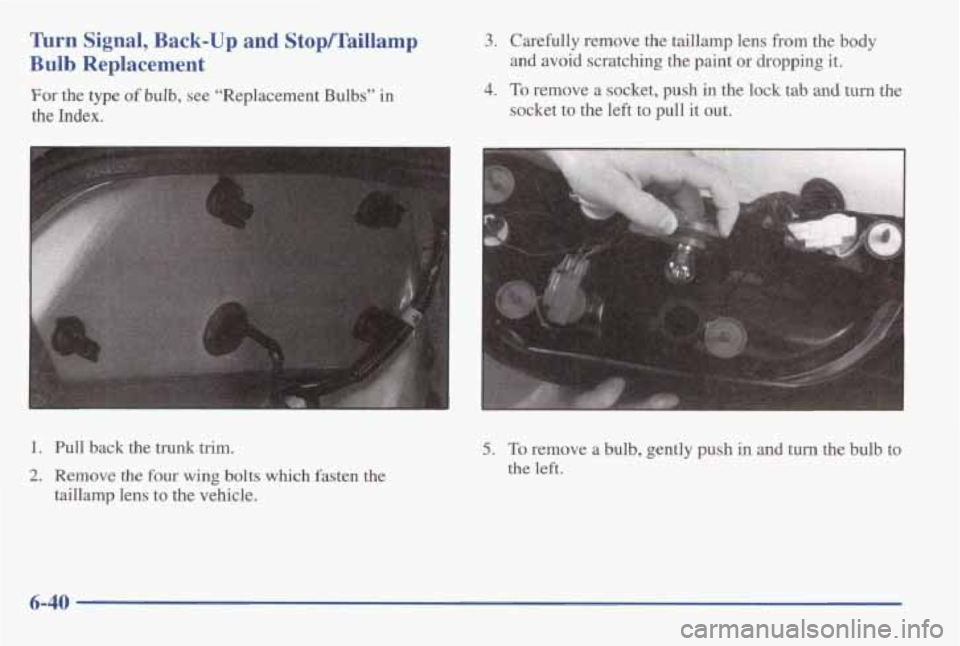
3. Carefully remove the taillamp lens from the body
and avoid scratching the paint or dropping it.
4. To remove a socket, push in the lock tab and turn the
socket to the left to pull it out.
1. Pull back the trunk trim.
2. Remove the four wing bolts which fasten the
taillamp lens to the vehicle.
5. To remove a bulb, gently push in and turn the bulb to
the left.
6-40
Page 292 of 370
Electrical System
Add-on Electrical Equipment
I NOTICE:
Don’t add anything electrical to your vehicle
unless you check with your dealer first. Some
electrical equipment can damage your vehicle
and the damage wouldn’t be covered by your
warranty. Some add-on electrical equipment
can keep other components from working as
they should.
Your vehicle has an air bag system. Before attempting to
add anything electrical to your vehicle, see “Servicing
Your Air Bag-Equipped Vehicle” in the Index.
Headlamp Wiring
The headlamp wiring is protected by a circuit breaker
located
in the instrument panel fuse block. An electrical
overload
will cause the headlamps to go on and off, or in
some cases to remain off. If this happens, have your
headlamp system checked right away.
Windshield Wipers
The windshield wiper motor is protected by a circuit
breaker and a fuse. If the motor overheats due to heavy
snow, etc., the wiper will stop until the motor cools.
If
the overload is caused by some electrical problem, have
it fixed.
Power Windows and Other Power Options
Circuit breakers in the fuse panel protect the power windows and other power accessories. When the current
load is too heavy, the circuit breaker opens and closes,
protecting the circuit until the problem is fixed.
6-59
Page 293 of 370
Fuses and Circuit Breakers
The wiring circuits in your vehicle are protected from
short circuits by a combination of fuses, circuit breakers
and fusible links. This greatly reduces the chance
of
damage caused by electrical problems.
Look at the silver-colored band inside the fuse. If the
band is broken or melted, replace the fuse.
Be sure to
replace a bad fuse
with a new one of the identical size
and rating.
If
you ever have a problem on the road and don’t have a
spare fuse,
you can “borrow” one that has the same
amperage. Just pick
a feature of your vehicle that you
can get along without
-- like the radio or cigarette
lighter
-- and use its fuse, if it is the correct amperage.
Replace it as
soon as you can.
There
are two fuse blocks in your vehicle: the
instrument panel fuse block and the engine compartment
fuse block.
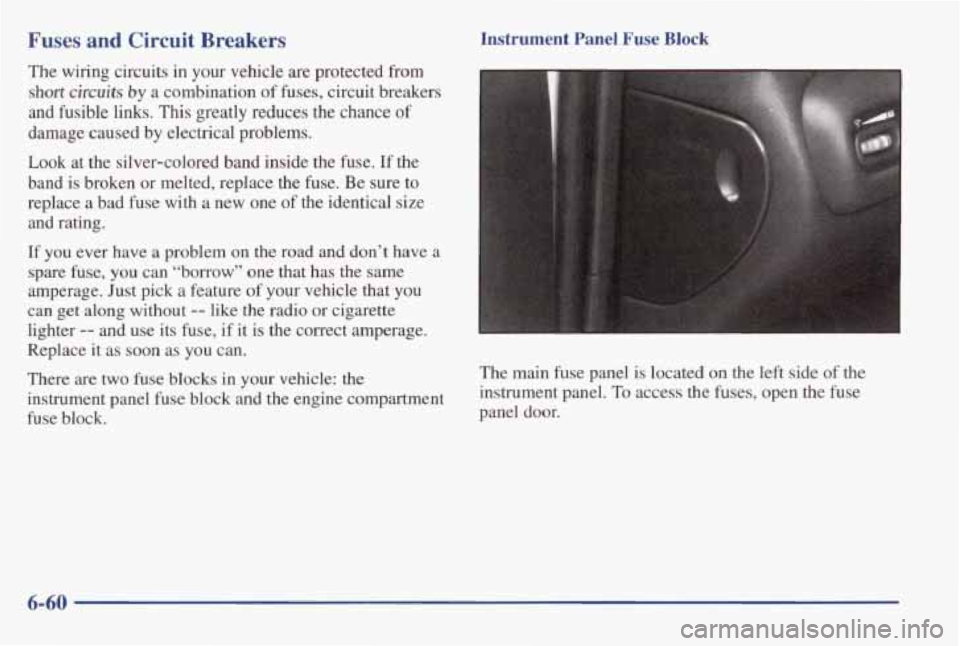
Instrument Panel Fuse Block
The main fuse panel is located on the left side of the
instrument panel.
To access the fuses, open the fuse
panel door.
6-60
Page 294 of 370
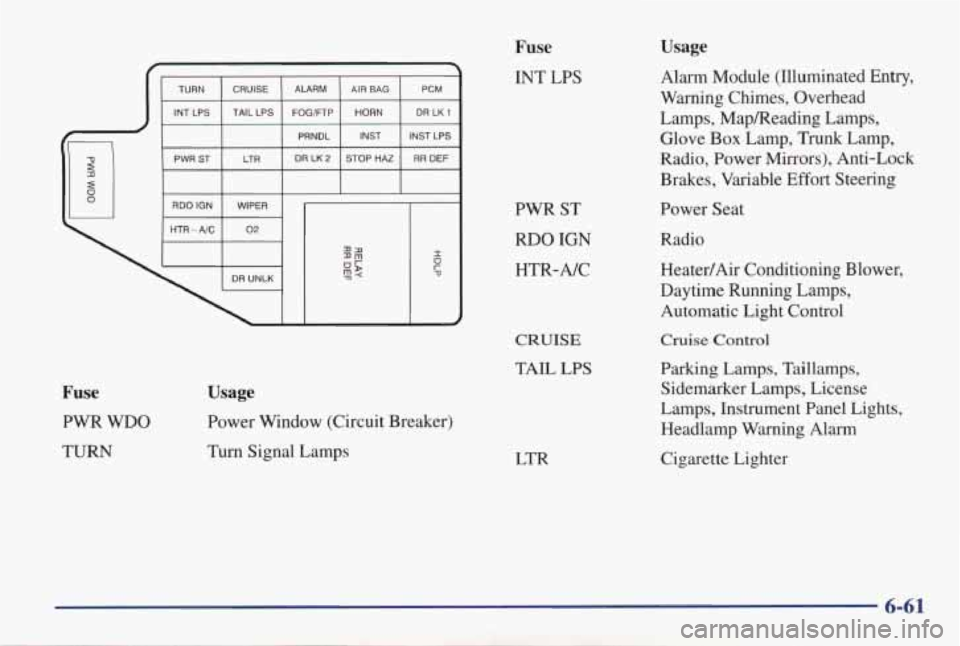
Fuse
PWR WDO
TURN
Usage
Power Window (Circuit Breaker)
Turn Signal Lamps
Fuse
INT LPS
PWR ST
RDO IGN
HTR-A/C
CRUISE
TAIL LPS
LTR
Usage
Alarm Module (Illuminated Entry,
Warning Chimes, Overhead
Lamps, MapReading Lamps,
Glove Box Lamp, Trunk Lamp,
Radio, Power Mirrors), Anti-Lock
Brakes, Variable Effort Steering
Power Seat
Radio
Heater/Air Conditioning Blower,
Daytime Running Lamps, Automatic Light Control
Cruise Control
Parking Lamps, Taillamps, Sidemarker Lamps, License
Lamps, Instrument Panel Lights,
Headlamp Warning Alarm
Cigarette Lighter
6-61
Page 295 of 370
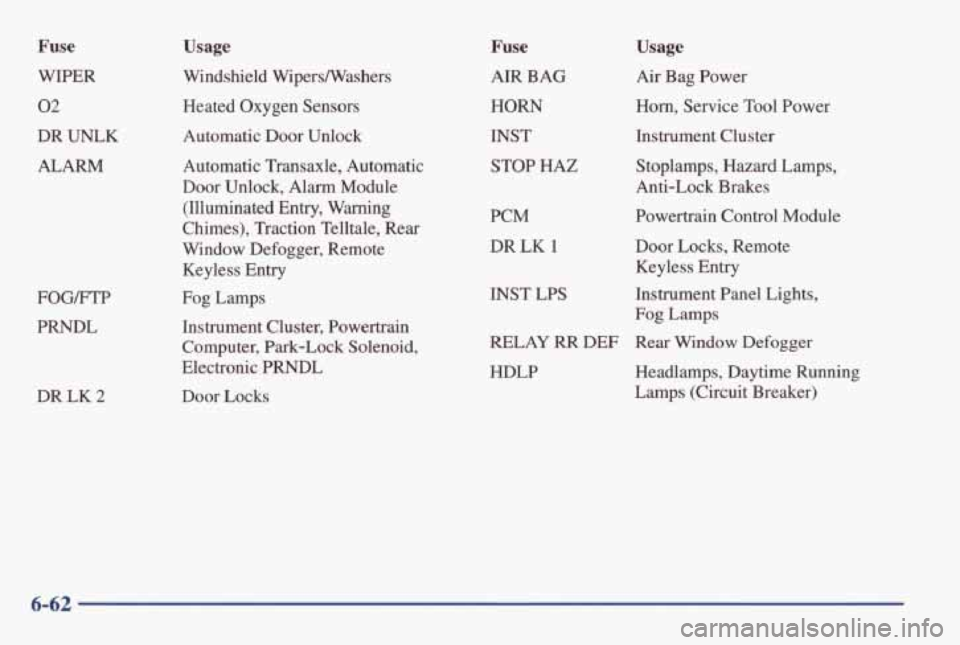
Fuse
WIPER
02
DR UNLK
ALARM
FOG/FTP
PRNDL
DR LK
2
Usage
Windshield Wipersmashers
Heated Oxygen Sensors
Automatic Door Unlock
Automatic Transaxle, Automatic
Door Unlock, Alarm Module (Illuminated Entry, Warning
Chimes), Traction Telltale, Rear
Window Defogger, Remote
Keyless Entry
Fog Lamps
Instrument Cluster, Powertrain
Computer,
Park-Lock Solenoid,
Electronic PRNDL
Door Locks
Fuse
AIR BAG
HORN
INST
STOP HAZ
PCM
DR LK
1
Usage
Air Bag Power
Horn, Service Tool Power
Instrument Cluster
Stoplamps, Hazard Lamps,
Anti-Lock Brakes
Powertrain Control Module
Door Locks, Remote
Keyless Entry
Fog Lamps
INST LPS Instrument Panel Lights,
RELAY RR DEF Rear Window Defogger
HDLP Headlamps, Daytime Running Lamps (Circuit Breaker)
6-62
Page 296 of 370
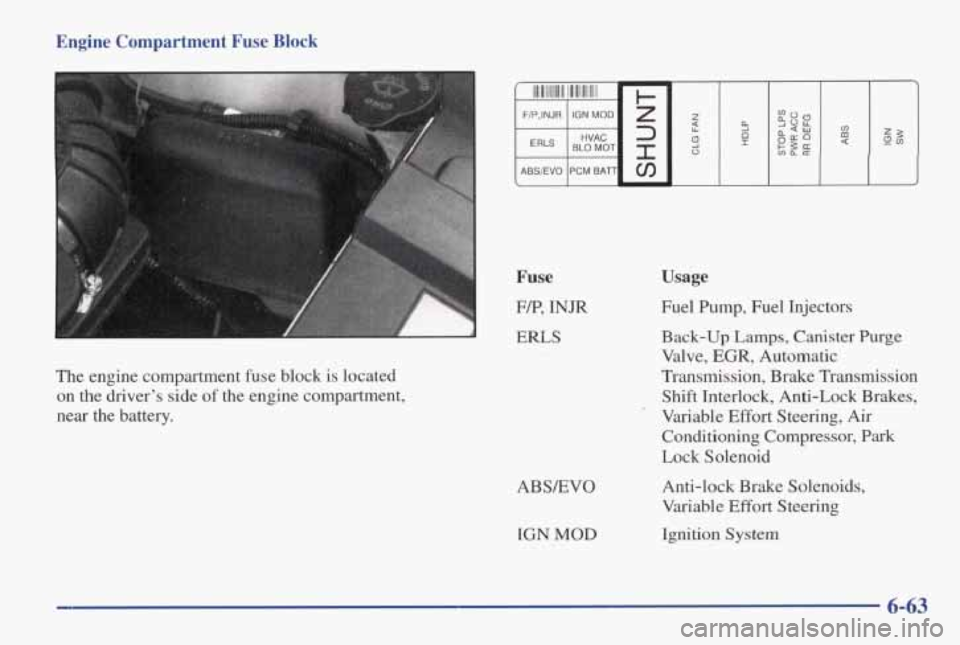
Engine Compartment Fuse Block
Fuse
FA?, INJR
ERLS
The engine compartment fuse block is located
on the driver’s side of the engine compartment,
near the battery.
ABSEVO IGN
MOD
Usage
Fuel Pump, Fuel Injectors
Back-up Lamps, Canister Purge
Valve, EGR, Automatic
Transmission, Brake Transmission
Shift Interlock, Anti-Lock Brakes,
Conditioning Compressor,
Park
Lock Solenoid
* Variable Effort Steering, Air
Anti-lock Brake Solenoids,
Variable
Effort Steering
Ignition
System
6-63
Page 297 of 370
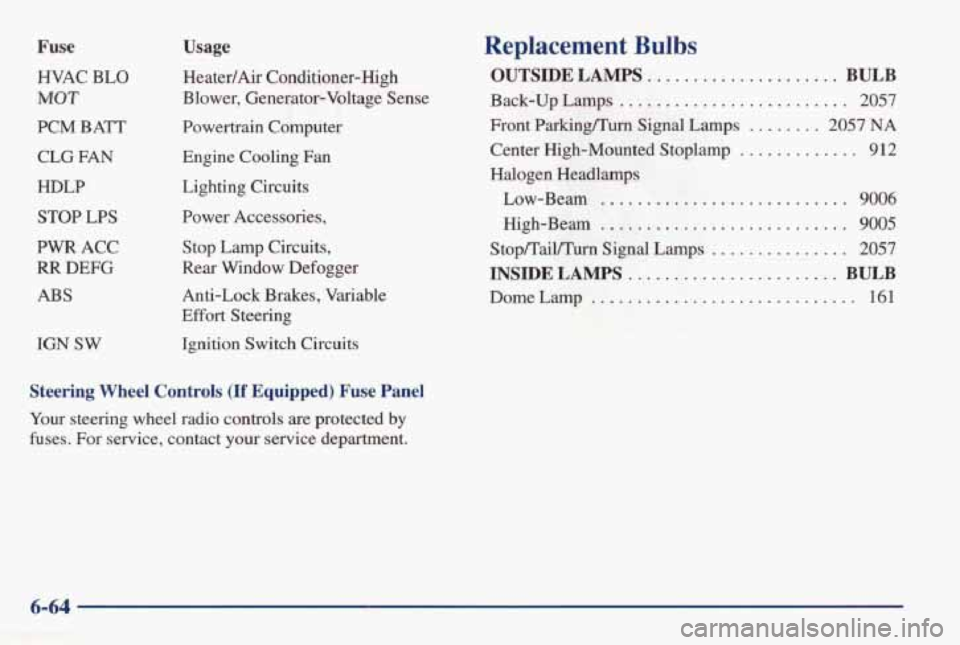
Fuse
HVAC BLO
MOT
PCM BATT
CLG FAN
HDLP
STOP LPS
PWR ACC
RR DEFG
ABS
IGN SW
Usage
Heater/Air Conditioner-High
Blower, Generator-Voltage Sense
Powertrain Computer
Engine Cooling
Fan
Lighting Circuits
Power Accessories,
Stop Lamp Circuits,
Rear Window Defogger
Anti-Lock Brakes, Variable
Effort Steering
Ignition Switch Circuits
Steering Wheel Controls (If Equipped) Fuse Panel
Your steering wheel radio controls are protected by
fuses.
For service, contact your service department.
Replacement Bulbs
OUTSIDE LAMPS ..................... BULB
Back-up Lamps ......................... 2057
Front Parking/Turn Signal Lamps ........ 2057 NA
Halogen Headlamps Center High-Mounted Stoplamp
............. 9 12
Low-Beam ................... - _. . 9006
High-Beam ........................... 9005
Stop/Tail/Turn Signal Lamps ............... 2057
INSIDE LAMPS ....................... BULB
Dome Lamp ............................. 16 1
6-64
Page 332 of 370
At Least Twice a Year
Restraint System Check
Make sure the safety belt reminder light and all your
belts, buckles, latch plates, retractors and anchorages are
wwking properly. Look for any other loose or damaged
safety belt system parts. If you see anythng that might
keep a safety belt system from doing its job, have it
repaired. Have any torn or frayed safety belts replaced.
Also look for any opened or broken air bag coverings,
and have them repaired or replaced. (The
air bag system
does not need regular maintenance.)
Wiper Blade Check
Inspect wiper blades for wear or cracking. Replace blade
inserts that appear worn or damaged or that streak
or
miss areas of the windshield. Also see “Wiper Blades,
Cleaning” in the Index.
Manual Transaxle Check
Check the transaxle fluid level; add if needed. See
“Manual Transaxle” in the Index. Check for
leaks.
A fluid loss may indicate a problem. Have the system
inspected and repaired if needed.
Automatic Transaxle Check
Check the transaxle fluid level; add if needed. See
“Automatic Transaxle” in the Index. A fluid loss
may indicate a problem. Check the system and repair
if needed.
Hydraulic Clutch System Check
Check the fluid level in the clutch reservoir. See
“Hydraulic Clutch Fluid” in the Index. A fluid loss in
this system could indicate
a problem. Have the system
inspected and repaired at once.
At Least Once a Year
Key Lock Cylinders Service
Lubricate the key lock cylinders with the lubricant
specified in
Part D.
Body Lubrication Service
Lubricate all body door hinges. Also lubricate all hinges
and latches, including those for the hood,
trunk lid,
glove box door and console door. Part
D tells you what
to use. More frequent lubrication may
be required when
exposed to a corrosive environment.
7-31
Page 333 of 370
Starter Switch Check
A CAUTION:
Brake-Transaxle Shift Interlock (BTSI) Check (Automatic Transaxle)
!
- m
When you are doing this check, the vehicle could
move suddenly.
If it does, you or others could be
injured. Follow the steps below.
1
1. Before you start, be sure you have enough room
around the vehicle.
2. Fdy apply both the parking brake (see “Parking
Brake”
in the Index if necessary) and the regular brake.
NOTE: Do not use the accelerator pedal, and be
ready to
turn off the engine immediately if it starts.
3. On automatic transaxle vehicles, try to start the
engine in each gear. The starter should work only in
PARK (P) or NEUTRAL (N). If the starter works in
any other position, your vehicle needs service,
On manual transaxle vehicles, put the shift lever in
NEUTRAL (N), push the clutch down halfway and
try to start the engine. The starter should work only
when
the clutch is pushed down all the way to the
floor. If the starter works when the clutch isn’t
pushed all the way down, your vehicle needs service.
I /i CAUTION:
When you are doing this check, the vehicle could
move suddenly.
If it does, you or others could be
injured. Follow the steps below.
1. Before you start, be sure you have enough room
around the vehicle. It should be parked on a
level surface.
2. Firmly apply the parking brake (see “Parking Brake’
in the Index if necessary).
NOTE: Be ready to apply the regular brake
immediately if
the vehicle begins to move.
3. With the engine off, turn the key to the RUN
position, but don’t start the engine. Without applying
the regular brake,
try to move the shift lever out of
PARK (P) with normal effort. If the shift lever
moves out
of PARK (P), your vehicle’s BTSI
needs service.