brake PONTIAC GRAND AM 2005 Workshop Manual
[x] Cancel search | Manufacturer: PONTIAC, Model Year: 2005, Model line: GRAND AM, Model: PONTIAC GRAND AM 2005Pages: 334, PDF Size: 2.27 MB
Page 266 of 334
If you need to replace any of your wheels, wheel bolts
or wheel nuts, replace them only with new GM
original equipment parts. This way, you will be sure to
have the right wheel, wheel bolts and wheel nuts
for your vehicle.
{CAUTION:
Using the wrong replacement wheels, wheel
bolts or wheel nuts on your vehicle can be
dangerous. It could affect the braking and
handling of your vehicle, make your tires lose
air and make you lose control. You could have
a collision in which you or others could be
injured. Always use the correct wheel, wheel
bolts and wheel nuts for replacement.Notice:The wrong wheel can also cause problems
with bearing life, brake cooling, speedometer or
odometer calibration, headlamp aim, bumper height,
vehicle ground clearance and tire or tire chain
clearance to the body and chassis.
SeeChanging a Flat Tire on page 5-61for more
information.
Used Replacement Wheels
{CAUTION:
Putting a used wheel on your vehicle is
dangerous. You can’t know how it’s been used
or how far it’s been driven. It could fail
suddenly and cause a crash. If you have to
replace a wheel, use a new GM original
equipment wheel.
5-58
Page 267 of 334
Tire Chains
{CAUTION:
If your vehicle has P225/50R16 size tires, don’t
use tire chains, there’s not enough clearance.
Tire chains used on a vehicle without the
proper amount of clearance can cause damage
to the brakes, suspension or other vehicle
parts. The area damaged by the tire chains
could cause you to lose control of your vehicle
and you or others may be injured in a crash.
Use another type of traction device only if its
manufacturer recommends it for use on your
vehicle and tire size combination and road
conditions. Follow that manufacturer’s
instructions. To help avoid damage to your
vehicle, drive slowly, readjust or remove the
device if it’s contacting your vehicle, and don’t
spin your wheels.
If you do nd traction devices that will t,
install them on the front tires.Notice:If your vehicle has a tire size other than
P225/50R16 size tires, use tire chains only where
legal and only when you must. Use only SAE Class
“S” type chains that are the proper size for your
tires. Install them on the front tires and tighten them
as tightly as possible with the ends securely
fastened. Drive slowly and follow the chain
manufacturer’s instructions. If you can hear the
chains contacting your vehicle, stop and retighten
them. If the contact continues, slow down until
it stops. Driving too fast or spinning the wheels with
chains on will damage your vehicle.
5-59
Page 268 of 334
If a Tire Goes Flat
It’s unusual for a tire to “blowout” while you’re driving,
especially if you maintain your tires properly. If air goes
out of a tire, it’s much more likely to leak out slowly.
But if you should ever have a “blowout,” here are a few
tips about what to expect and what to do:
If a front tire fails, the flat tire will create a drag that
pulls the vehicle toward that side. Take your foot off the
accelerator pedal and grip the steering wheel firmly.
Steer to maintain lane position, and then gently brake to
a stop well out of the traffic lane.
A rear blowout, particularly on a curve, acts much like a
skid and may require the same correction you’d use
in a skid. In any rear blowout, remove your foot from the
accelerator pedal. Get the vehicle under control by
steering the way you want the vehicle to go. It may be
very bumpy and noisy, but you can still steer. Gently
brake to a stop, well off the road if possible.{CAUTION:
Lifting a vehicle and getting under it to do
maintenance or repairs is dangerous without
the appropriate safety equipment and training.
The jack provided with your vehicle is
designed only for changing a at tire. If it is
used for anything else, you or others could be
badly injured or killed if the vehicle slips off
the jack. Use the jack provided with your
vehicle only for changing a at tire.
If a tire goes flat, the next part shows how to use your
jacking equipment to change a flat tire safely.
5-60
Page 269 of 334
Changing a Flat Tire
If a tire goes flat, avoid further tire and wheel damage
by driving slowly to a level place. Turn on your
hazard warning flashers.
{CAUTION:
Changing a tire can be dangerous. The vehicle
can slip off the jack and roll over or fall on you
or other people. You and they could be badly
injured or even killed. Find a level place to
change your tire. To help prevent the vehicle
from moving:
1. Set the parking brake rmly.
2. Put the shift lever in PARK (P).
CAUTION: (Continued)
CAUTION: (Continued)
3. Turn off the engine and do not restart
while the vehicle is raised.
4. Do not allow passengers to remain in the
vehicle.
To be even more certain the vehicle will not
move, you should put blocks at the front and
rear of the tire farthest away from the one
being changed. That would be the tire, on the
other side, at the opposite end of the vehicle.
5-61
Page 276 of 334
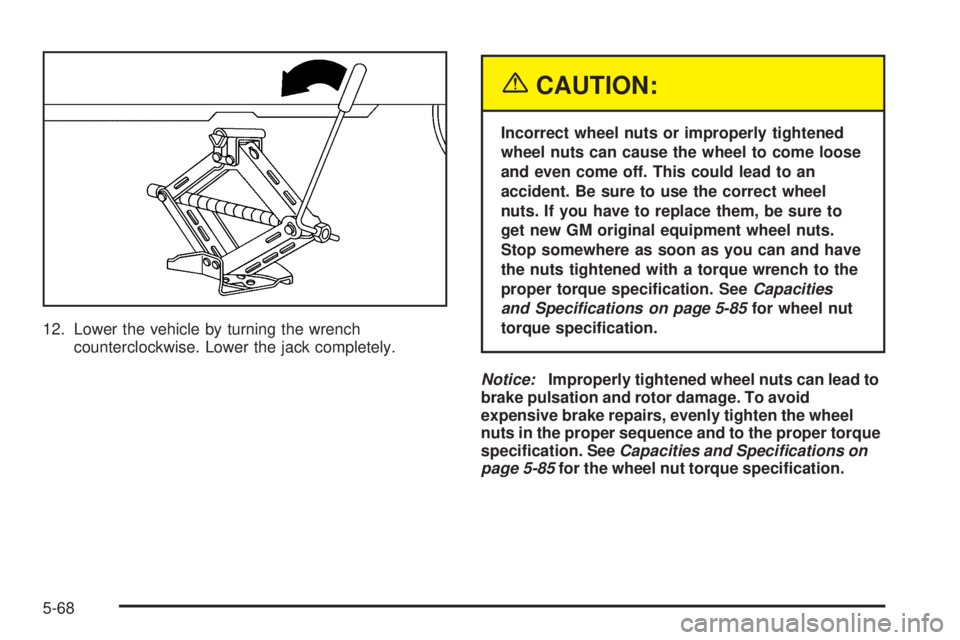
12. Lower the vehicle by turning the wrench
counterclockwise. Lower the jack completely.
{CAUTION:
Incorrect wheel nuts or improperly tightened
wheel nuts can cause the wheel to come loose
and even come off. This could lead to an
accident. Be sure to use the correct wheel
nuts. If you have to replace them, be sure to
get new GM original equipment wheel nuts.
Stop somewhere as soon as you can and have
the nuts tightened with a torque wrench to the
proper torque specication. SeeCapacities
and Specifications on page 5-85for wheel nut
torque specication.
Notice:Improperly tightened wheel nuts can lead to
brake pulsation and rotor damage. To avoid
expensive brake repairs, evenly tighten the wheel
nuts in the proper sequence and to the proper torque
specication. SeeCapacities and Specifications on
page 5-85for the wheel nut torque specication.
5-68
Page 291 of 334

Engine Compartment Fuse Block
Your vehicle may not be equipped with all the fuses and
features listed.
The engine compartment fuse block is located on the
driver’s side of the vehicle, near the battery.
Fuse Usage
1 Ignition Switch
2Right Electrical Center-Fog Lamps,
Radio, Body Function Control
Module, Interior Lamps
Fuse Usage
3Left Electrical Center-Stop Lamps,
Hazard Lamps, Body Function
Control Module, Cluster, Climate
Control System
4 Anti-Lock Brakes
5Left Electrical Center-Power Seats,
Power Mirrors, Door Locks, Trunk
Release, Audio Amplifier, Remote
Keyless Entry
6 Not Used
7 Ignition Switch
8 Cooling Fan #1
Relays Usage
9 Rear Defog
10 Not Used
11 Starter (V6 only)
12 Cooling Fan #1
13 HVAC Blower (Climate Control)
14 Cooling Fan #2
15 Cooling Fan
16 Air Conditioning Compressor
17 Not Used
18 Fuel Pump
5-83
Page 292 of 334

Relays Usage
19 Automatic Headlamp System
20 Automatic Headlamp System
21 Horn
22 Daytime Running Lamps (DRL)
Fuses Usage
23–32 Spare Fuse Holder
33 Rear Defog
34Accessory Power Outlets, Cigarette
Lighter
35 Generator
36 Not Used
37Air Conditioning Compressor, Body
Function Control Module
38 Automatic Transaxle
39 Powertrain Control Module (PCM)
40 Anti-Lock Brakes (ABS)
41 Ignition System
42Back-Up Lamps, Brake Transaxle
Shift Interlock
Fuses Usage
43 Horn
44 PCM
45 Parking Lamps
46Climate Control System, Air
Conditioning
47Canister Vent Valve, Exhaust
Oxygen Sensors
48 Fuel Pump, Injectors
49 Not Used
50 Right Headlamp
51 Left Headlamp
52 Cooling Fan #2
53 HVAC Blower (Climate Control)
54 Crank (V6 only)
55 Cooling Fan #2 Ground
56 Fuse Puller for Mini Fuses
57 Not Used
5-84
Page 299 of 334
Scheduled Maintenance
Service MaintenanceIMaintenanceII
Change engine oil and filter. SeeEngine Oil on page 5-15. Reset oil life
system. SeeEngine Oil Life System on page 5-18.An Emission Control
Service.••
Visually check for any leaks or damage.See footnote (j).••
Inspect engine air cleaner filter. If necessary, replace filter. SeeEngine Air
Cleaner/Filter on page 5-20.An Emission Control Service. See footnotes †
and (k).•
Rotate tires and check inflation pressures and wear. SeeTires on page 5-46.••
Inspect brake system.See footnote (a).••
Check engine coolant and windshield washer fluid levels and add fluid as
needed.••
Perform any needed additional services. See “Additional Required Services” in
this section.••
Inspect suspension and steering components.See footnote (b).•
Inspect engine cooling system.See footnote (c).•
Inspect wiper blades.See footnote (d).•
Inspect restraint system components.See footnote (e).•
Lubricate body components.See footnote (f).•
Inspect throttle system.See footnote (g).•
6-5
Page 301 of 334
Maintenance Footnotes
†The U.S. Environmental Protection Agency or the
California Air Resources Board has determined that the
failure to perform this maintenance item will not nullify
the emission warranty or limit recall liability prior to
the completion of the vehicle’s useful life. We, however,
urge that all recommended maintenance services be
performed at the indicated intervals and the
maintenance be recorded.
(a)Visually inspect brake lines and hoses for proper
hook-up, binding, leaks, cracks, chafing, etc. Inspect
disc brake pads for wear and rotors for surface
condition. Inspect drum brake linings for wear or cracks.
Inspect other brake parts, including drums, wheel
cylinders, calipers, parking brake, etc.
(b)Visually inspect front and rear suspension and
steering system for damaged, loose or missing parts or
signs of wear. Inspect power steering lines and hoses for
proper hook-up, binding, leaks, cracks, chafing, etc.
(c)Visually inspect hoses and have them replaced if they
are cracked, swollen or deteriorated. Inspect all pipes,
fittings and clamps; replace with genuine GM parts as
needed. To help ensure proper operation, a pressure test
of the cooling system and pressure cap and cleaning the
outside of the radiator and air conditioning condenser is
recommended at least once a year.(d)Visually inspect wiper blades for wear or cracking.
Replace blade inserts that appear worn or damaged
or that streak or miss areas of the windshield.
(e)Make sure the safety belt reminder light and all your
belts, buckles, latch plates, retractors and anchorages
are working properly. Look for any other loose or
damaged safety belt system parts. If you see anything
that might keep a safety belt system from doing its
job, have it repaired. Have any torn or frayed safety belts
replaced. Also look for any opened or broken airbag
coverings, and have them repaired or replaced.
(The airbag system does not need regular maintenance.)
(f)Lubricate all key lock cylinders, door hinges and
latches, hood hinges and latches and trunk lid hinges and
latches. More frequent lubrication may be required when
exposed to a corrosive environment. Applying silicone
grease on weatherstrips with a clean cloth will make them
last longer, seal better and not stick or squeak.
(g)Check system for interference or binding and for
damaged or missing parts. Replace parts as needed.
Replace any components that have high effort or
excessive wear. Do not lubricate accelerator or cruise
control cables.
6-7
Page 303 of 334
Engine Coolant Level Check
Check the engine coolant level and add
DEX-COOL®coolant mixture if necessary. SeeEngine
Coolant on page 5-22for further details.
Windshield Washer Fluid Level Check
Check the windshield washer fluid level in the windshield
washer tank and add the proper fluid if necessary.
At Least Once a Month
Tire Ination Check
Visually inspect your tires and make sure tires are
inflated to the correct pressures. Do not forget to check
your spare tire. SeeTires on page 5-46for further
details. Check to make sure the spare tire is stored
securely. Push, pull and then try to turn the spare tire. If
it moves, tighten it. SeeChanging a Flat Tire on
page 5-61.
At Least Once a Year
Starter Switch Check
{CAUTION:
When you are doing this inspection, the
vehicle could move suddenly. If the vehicle
moves, you or others could be injured.
1. Before you start, be sure you have enough room
around the vehicle.
2. Firmly apply both the parking brake and the regular
brake. SeeParking Brake on page 2-23if
necessary.
Do not use the accelerator pedal, and be ready to
turn off the engine immediately if it starts.
3. Try to start the engine in each gear. The starter
should work only in PARK (P) or NEUTRAL (N).
If the starter works in any other position, contact
your GM Goodwrench dealer for service.
6-9