ECU PONTIAC GRAND-PRIX 1993 User Guide
[x] Cancel search | Manufacturer: PONTIAC, Model Year: 1993, Model line: GRAND-PRIX, Model: PONTIAC GRAND-PRIX 1993Pages: 338, PDF Size: 17.3 MB
Page 172 of 338
Torque Lock
If you are parking on a hill and you
don’t shift your transaxle into P (Park)
properly, the weight of the vehicle may
put too much force on the parking pawl
in the transaxle.
You may find it
difficult to pull the shift lever out of
P (Park). This is called “torque lock.”
To prevent torque lock, always be sure
to shift into
P (Park) properly before
you leave the driver’s seat. To find out
how, see the
lndex under Shifting Into
P (Park).
When you are ready to drive, move the
shift lever out
of P (Park) before you
release the parking brake.
If torque lock does occur, you may need
to have another vehicle push yours
a
little uphill to take some of the pressure
from the transaxle,
so you can pull the
shift lever out
of P (Park).
Winter Driving
Here are some tips for winter driving:
Have your Pontiac in good shape for
winter. Be sure your engine coolant
mix is correct.
Snow tires can help in loose snow,
but they may give
you less traction on
ice than regular tires. If you do not
expect to be driving in deep snow, but
may have to travel over ice,
you may
not want to switch to snow tires at all.
.. “I
. ..
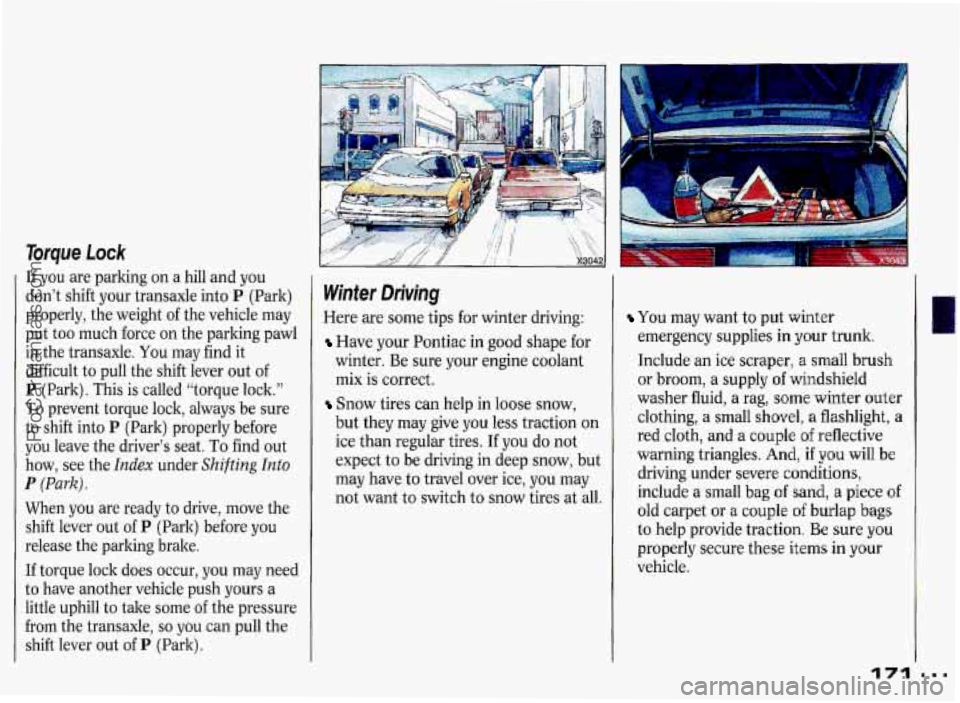
You may want to put winter
emergency supplies
in your trunk.
Include an ice scraper, a small brush
or broom, a supply of windshield
washer fluid, a rag,
some winter outer
clothing, a small shovel,
a flashlight, a
red cloth, and a couple of reflective
warning triangles.
And, if you will be
driving under severe conditions,
include
a small bag of sand, a piece of
old carpet or a couple of burlap bags
to help provide traction. Be sure you
properly secure these items in your
vehicle.
171
ProCarManuals.com
Page 180 of 338
Will the trailer brake parts take 3,000
psi (20 650 1tPa) of pressure? If not,
the trailer brake system must not be
used with your vehicle.
If everything checks out this far, then
make the brake fluid tap at the upper
rear master cylinder port. But don’t
use copper tubing for this. If you do,
it will bend and finally break
off. Use
steel brake tubing.
Driving with a Trailer
Towing a trailer requires a certain
amount of experience. Before setting
out for the open road, you’ll want to get
to know your rig. Acquaint yourself
with the feel of handling and braking
with the added weight of the trailer.
And always keep in mind that the
vehicle you are driving is now a good
deal longer and not nearly
so responsive
as your vehicle is by itself.
Before you start, check the trailer hitch
and platform, safety chains, electrical
connector, lights, tires and mirror
adjustment. If the trailer has electric
brakes, start your vehicle and trailer
moving and then apply the trailer brake
controller by hand to be sure the brakes
are working. This lets
you check your
electrical connection at the same time.
During your trip, check occasionally to
be sure that the load is secure, and that
the lights and any trailer brakes are still
working.
Following Distance
Stay at least twice as far behind the
vehicle ahead as you would when
driving your vehicle without
a trailer.
This can help you avoid situations that
require heavy braking and sudden
turns.
Passing
You’ll need more passing distance up
ahead when you’re towing a trailer.
And, because you’re a
good deal longer,
you’ll need to
go much farther beyond
the passed vehicle before you can return
to your lane.
Backing Up
Hold the bottom of the steering wheel
with one hand. Then, to move
the
trailer to the left, just move that hand to
the left.
To move the trailer to the right,
move your hand to the right. Always
back up slowly and, if possible, have
someone guide you.
ProCarManuals.com
Page 190 of 338
A
B
C
X51 01
Towing Your Pontiac
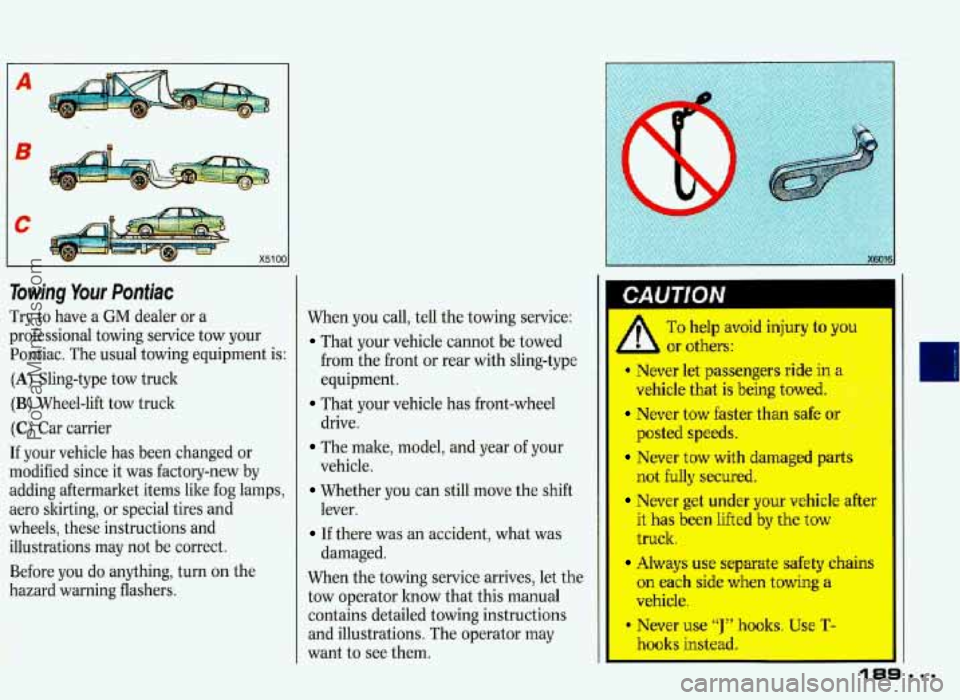
Try to have a GM dealer or a
professional towing service tow your
Pontiac. The usual towing equipment is:
(A) Sling-type tow truck
(B) Wheel-lift tow truck
(C) Car carrier
If your vehicle has been changed or
modified since it was factory-new by
adding aftermarket items like fog lamps,
aero skirting, or special tires and
wheels, these instructions and
illustrations may not be correct.
Before you do anything, turn on the
hazard warning flashers. When you call, tell
the towing service:
That your vehicle cannot be towed
from the front or rear with sling-type
equipment.
drive.
vehicle.
lever.
damaged.
That your vehicle has front-wheel
The make, model, and year of your
Whether you can still move the shift
If there was an accident, what was
When the towing service arrives, let the
tow operator know that this manual
contains detailed towing instructions
and illustrations. The operator may
want to see them.
To help avoid injury to you
or others:
* Never let passengers ride in a
vehicle that is being towed.
Never tow faster thar -3fe
posted speeds.
Never tow with damaged part
not fully secured.
Never get under your vehicle after
it
has been lifted by the tow
truck.
Always use separate safety chains
hooks instead. '
ProCarManuals.com
Page 191 of 338
Problems on the Road
Towing Your P onfiac (c0N;T.j
When your vehicle is being towed!, have
the ignition key
off. The steering wheel
should be clamped
in a straight-ahead
position, with a clamping device
designed for
towing service. Do not use
the vehicle's steering
column lock for
this. The transaxle should be in
N [Neutral) and the parking brake
re1,eased.
Don't have your vehicle towed
on the
front wheels, unless
you must. If the
vehicle must be towed
on the front
wheels, don't go more than 35 mph
(56 km/h) or farther than 50 miles
(80 km) or your transaxle will be
damaged. If these limits must be
exceeded, then the front wheels have to
be supported on a dolly.
II
CAUTION
* A vehicle can fall from a car
scb,red. This can cause a collision,
serious personal injury and vehicle
damage. The vehicle should be
tightly secured with chains or steel
cables before it is transported.
Don't use substitutes (ropes,
leather straps, canvas webbing,
etc.) that can be cut
by sharp e('- :s
underneath the tou hicle .
I b carrier if it isn't properly
Towing from the Front-
Vehicle
Hook-up
Before hooking up to a tow truck, be
sure to read all the information on
Towing Your Pontiac earlier in this
section.
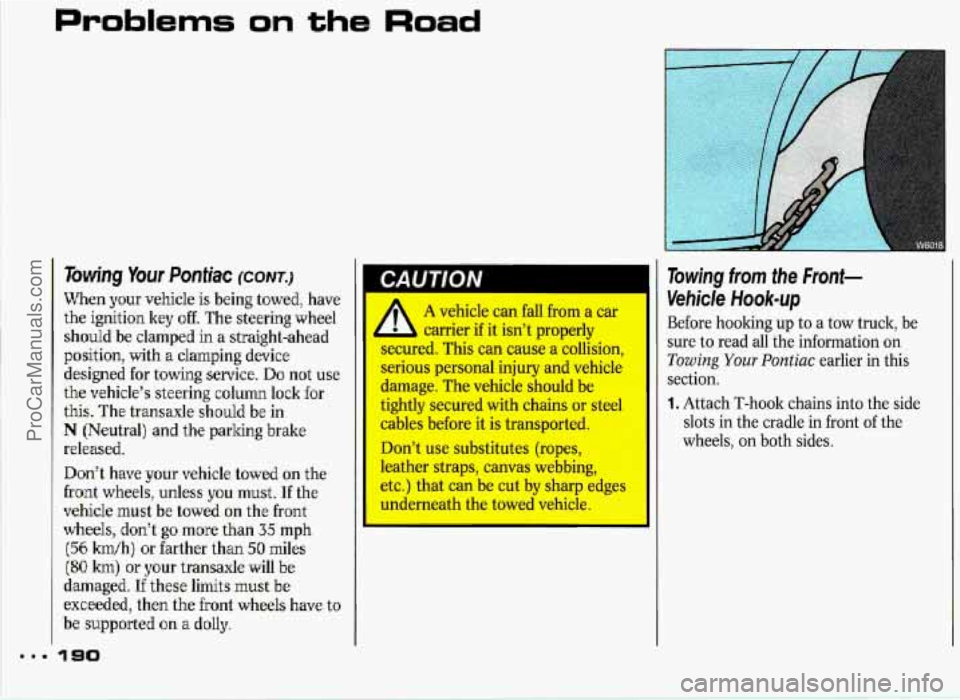
1. Attach T-hook chains into the side
slots in the cradle in front of the
wheels, on both sides.
ProCarManuals.com
Page 203 of 338
m..
Problems on the Road
Changing a Flat Tire (CONT.)
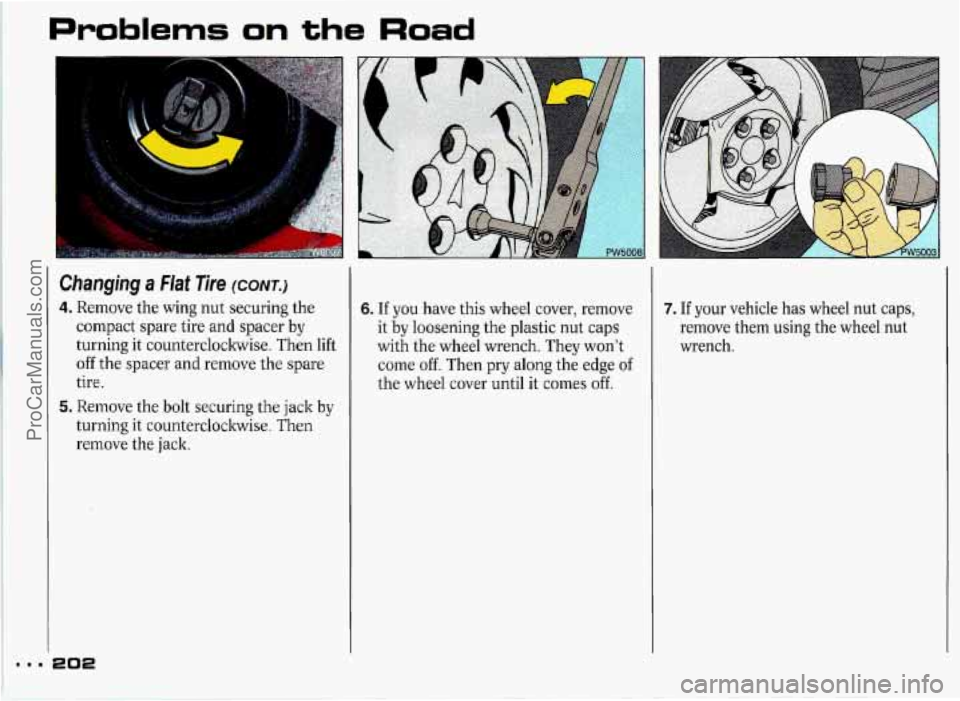
4. Remove the wing nut securing the
compact spare tire and spacer
by
turning it countercloclnvise. Then lift
off the spacer and remove the spare
tire.
5. Remove the bolt securing the jack by
turning it countercloclwise. Then
remove the jack.
202
6. If you have this wheel cover, remove
it by loosening the plastic nut caps
with the wheel wrench. They won't
come off. Then pry along the edge
of
the wheel cover until it comes off.
7. If your vehicle has wheel nut caps,
remove them using the wheel nut
wrench.
ProCarManuals.com
Page 240 of 338
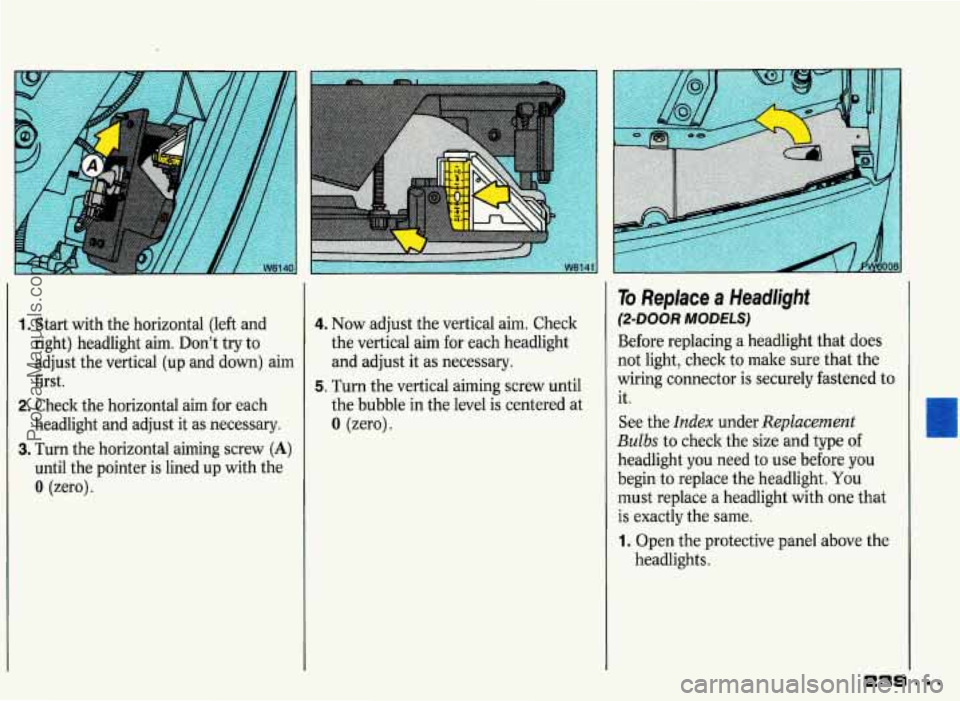
1. Start with the horizontal (left and
right) headlight aim. Don’t try
to
adjust the vertical (up and down) aim
first.
2. Check the horizontal aim for each
headlight and adjust it as necessary.
3. Turn the horizontal aiming screw (A)
until the pointer is lined up with the
0 (zero).
4. Now adjust the vertical aim. Check
the vertical
aim for each headlight
and adjust it as necessary.
5. Turn the Vertical aiming screw until
the bubble in the level is centered at
0 (zero).
To Replace a Headlight
(2-DOOR MODELS)
Before replacing a headlight that does
not light, check to make sure that the
wiring connector is securely fastened to
it.
See the
Index under Replacement
Bulbs to check the size and type of
headlight you need to use before you
begin to replace the headlight. You
must replace a headlight with one that
is exactly the same.
1. Open the protective panel above the
headlights.
I_
ProCarManuals.com
Page 244 of 338
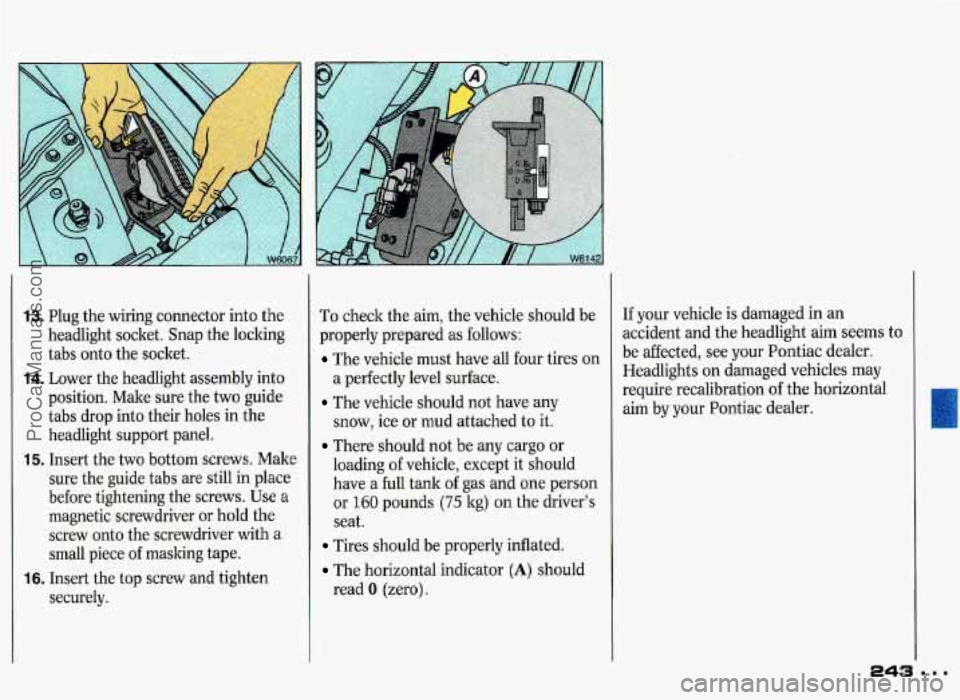
13. Plug the wiring connector into the
headlight socket. Snap the locking
tabs onto the socket.
14. Lower the headlight assembly into
position. Make sure the two guide
tabs
drop into their holes in the
headlight support panel.
15. Insert the two bottom screws. Make
sure the guide tabs are still in place
before tightening the screws. Use a
magnetic screwdriver or hold the
screw onto the screwdriver with a
small piece
of masking tape.
16. Insert the top screw and tighten
securely. To check
the aim, the vehicle should be
properly prepared as follows:
The vehicle must have all four tires on
a perfectly level surface.
The vehicle should not have any
snow, ice or mud attached to it.
There should not be any cargo or
loading of vehicle, except it should
have a full tank of gas and one person
or
160 pounds (75 kg) on the driver’s
seat.
Tires should be properly inflated.
The horizontal indicator (A) should
read
0 (zero). If
your vehicle
is damaged in an
accident and the headlight aim seems to
be affected, see your Pontiac dealer.
Headlights on damaged vehicles may
require recalibration of the horizontal
aim by your Pontiac dealer.
U
ProCarManuals.com
Page 245 of 338
Service & Appearance Care
Driver Side
Headlight Replacement
(4-DOOR MODELS)
See the Index under Replacement
Bulbs to check the type of bulb to use.
To Replace a Bulb:
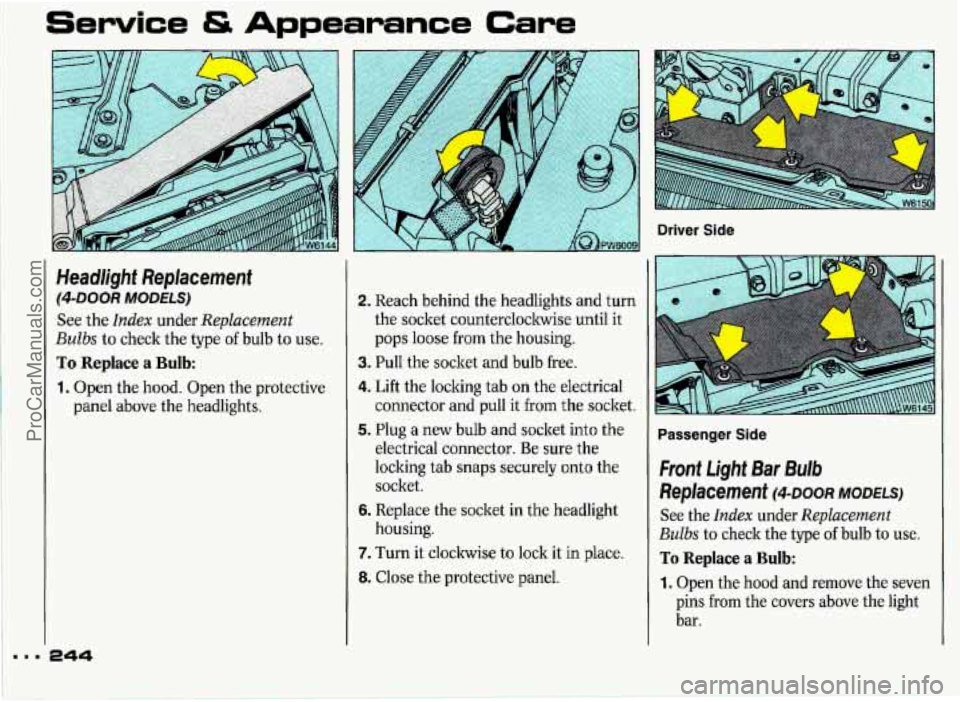
1. Open the hood. Open the protective
panel above the headlights.
2. Reach behind the headlights and turn
the socket counterclockwise until it
pops loose from the housing.
3. Pull the socket and bulb free.
4. Lift the locking tab on the electrical
connector and pull it from the socket.
5. Plug a new bulb and socket into the
electrical connector. Be sure the
locking tab snaps securely onto the
socket.
6. Replace the socket in the headlight
7. Turn it clockwise to lock it in place.
8. Close the protective panel.
housing.
Passenger Side
Front
light Bar Bulb
Replacement
DOOR MODELS)
See the Index under Replacement
Bulbs
to check the type of bulb to use.
To Replace a Bulb:
1. Open the hood and remove the seven
pins from the covers above the light
bar.
ProCarManuals.com
Page 248 of 338
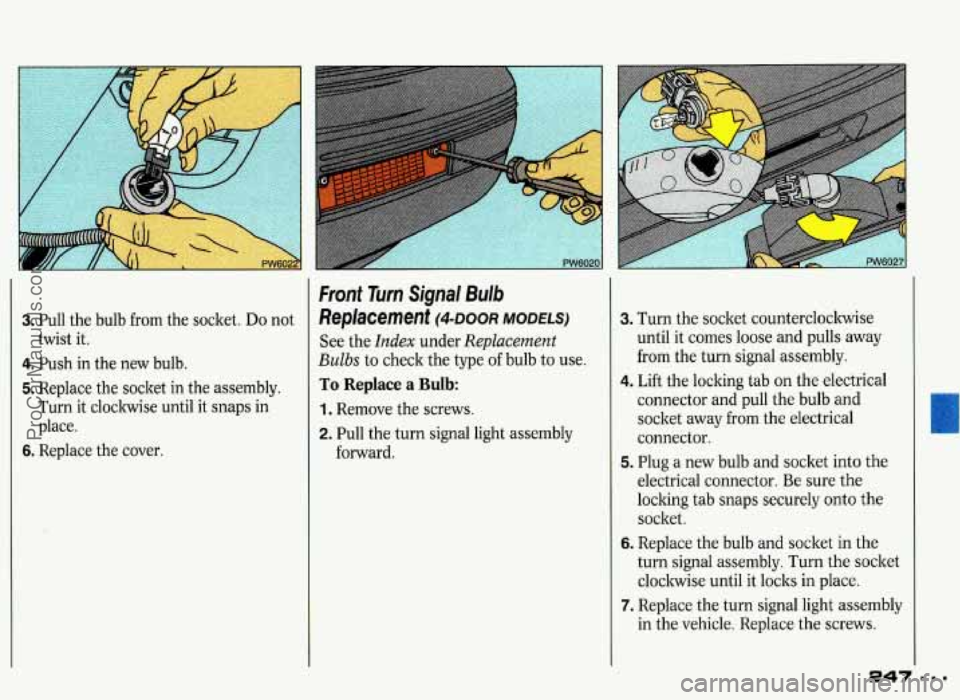
3. Pull the bulb from the socket. Do not
4. Push in the new bulb.
5. Replace the socket in the assembly.
Turn it clockwise until it snaps in
place.
twist
it.
6. Replace the cover.
Front Tim Signal Bulb
Replacement DOOR MODELS)
See the Index under Replacement
Bulbs to check the type of bulb to use.
To Replace a Bulb:
1. Remove the screws.
2. Pull the turn signal light assembly
forward.
3. Turn the socket counterclockwise
until it comes loose
and pulls away
from the turn signal assembly.
4. Lift the locking tab on the electrical
connector and pull the bulb
and
socket away from the electrical
connector.
5. Plug a new bulb and socket into the
electrical connector. Be sure the
locking tab snaps securely onto the
socket.
6. Replace the bulb and socket in the
turn signal assembly. Turn the socket
clockwise until it locks in place.
7. Replace the turn signal light assembly
in the vehicle. Replace the screws.
ProCarManuals.com
Page 250 of 338
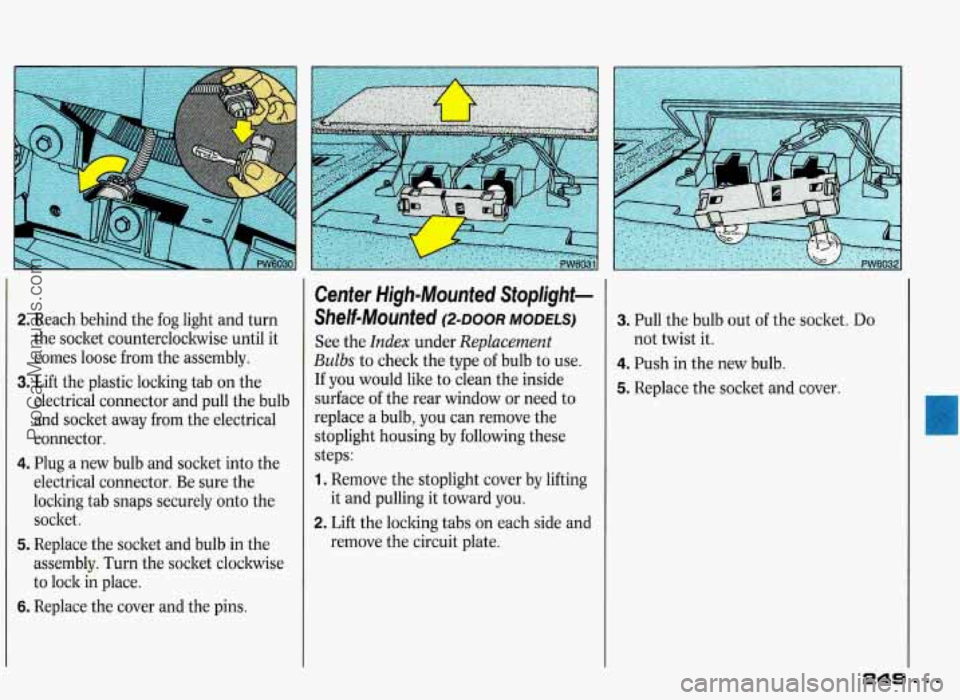
2. Reach behind the fog light and turn
the socket counterclockwise until it
comes loose from the assembly.
3. Lift the plastic locking tab on the
electrical connector and pull the bulb
and socket away
from the electrical
connector.
4. Plug a new bulb and socket into the
electrical connector. Be sure the
locking tab snaps securely onto the
socket.
5. Replace the socket and bulb in the
assembly.
Turn the socket clockwise
to lock in place.
6. Replace the cover and the pins.
Center High-Mounted Stoplight-
Shelf-Mounted DOOR MODELS)
See the Index under Replacement
Bulbs to check the type of bulb to use.
If you would like to clean the inside
surface
of the rear window or need to
replace a bulb, you can remove the
stoplight housing by following these
steps:
1. Remove the stoplight cover by lifting
2. Lift the locking tabs on each side and
it
and pulling it toward you.
remove the circuit plate.
3. Pull the bulb out of the socket. Do
4. Push in the new bulb.
5. Replace the socket and cover.
not
twist it.
249 =
ProCarManuals.com