PONTIAC GRAND-PRIX 1993 Owners Manual
Manufacturer: PONTIAC, Model Year: 1993, Model line: GRAND-PRIX, Model: PONTIAC GRAND-PRIX 1993Pages: 338, PDF Size: 17.3 MB
Page 241 of 338
Service & Appearance Care
, M.8
To Replace a Headlight (CONT.)
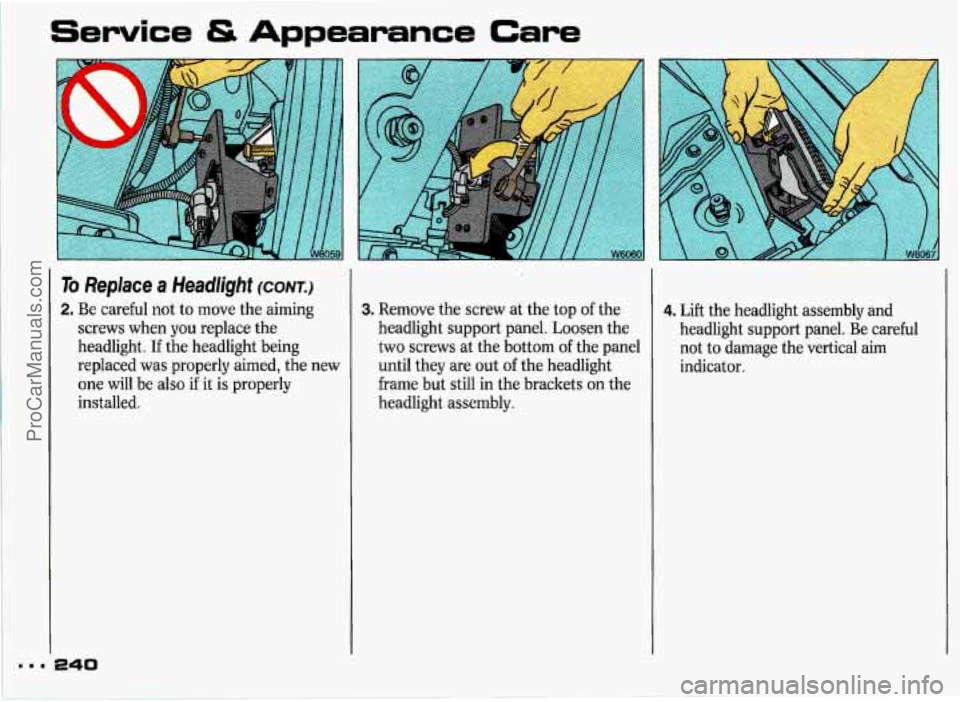
2. Be careful not to move the aiming
screws when you replace the
headlight. If the headlight being
replaced was properly aimed, the new
one will be also
if it is properly
installed.
240
3. Remove the screw at the top of the
headlight support panel. Loosen the
two screws at the bottom
of the panel
until they are out
of the headlight
frame but still in the brackets on the
headlight assembly.
4. Lift the headlight assembly and
headlight support panel. Be careful
not to damage the vertical aim
indicator.
ProCarManuals.com
Page 242 of 338
5. Remove the wiring connector from
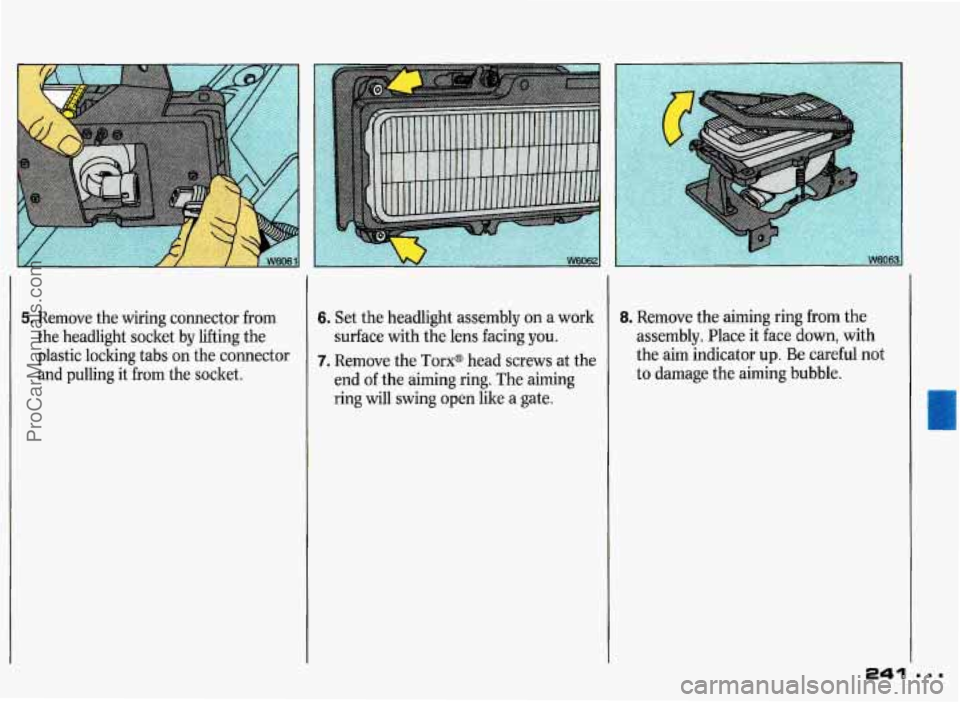
the headlight socket by lifting the
plastic locking tabs on the connector
and pulling it from the socket. 6. Set the headlight assembly on a work
surface with the lens facing
you.
7. Remove the Torx@ head screws at the
end of the aiming ring. The aiming
ring
will swing open like a gate.
8. Remove the aiming ring from the
assembly. Place it face down, with
the aim indicator up.
Be careful not
to damage the aiming bubble.
241
L
e..
ProCarManuals.com
Page 243 of 338
..I
Service & Appearance Care
To Replace a Headlight (CONT.)
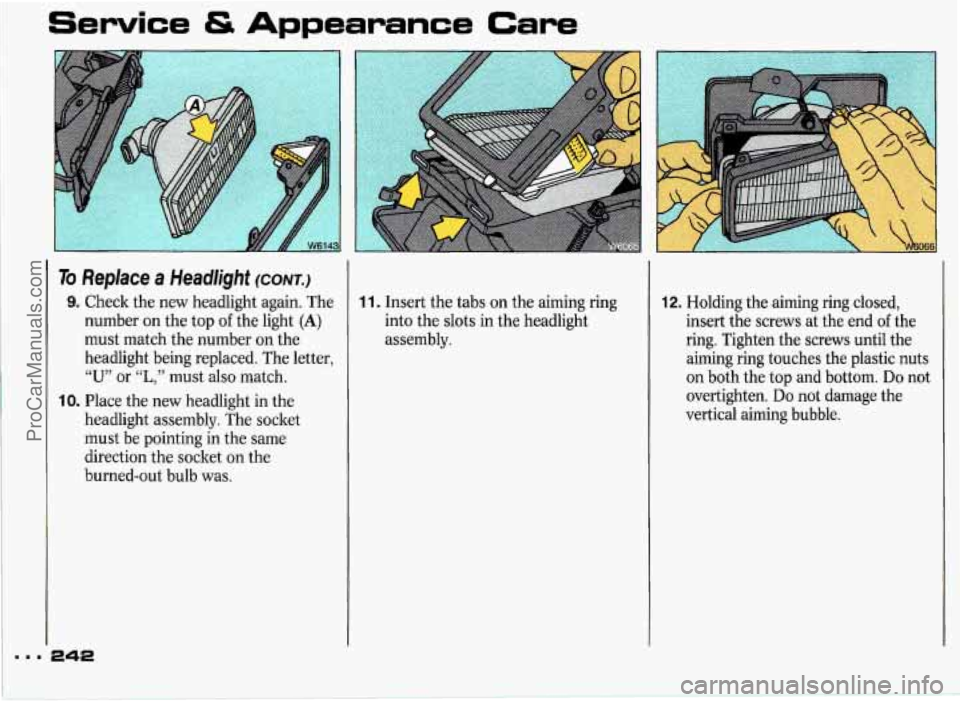
9. Check the new headlight again. The
number on the top
of the light (A)
must match the number on the
headlight being replaced. The letter,
“U” or “L,” must also match.
10. Place the new headlight in the
headlight assembly. The socket
must be pointing in the same
direction the socket on the
burned-out bulb
was.
242
1 1. Insert the tabs on the aiming ring
into the slots in the headlight
assembly. 12. Holding the aiming ring closed,
insert the screws at the end
of the
ring. Tighten the screws until the
aiming ring touches the plastic nuts
on both the top and bottom.
Do not
overtighten.
Do not damage the
vertical aiming bubble.
ProCarManuals.com
Page 244 of 338
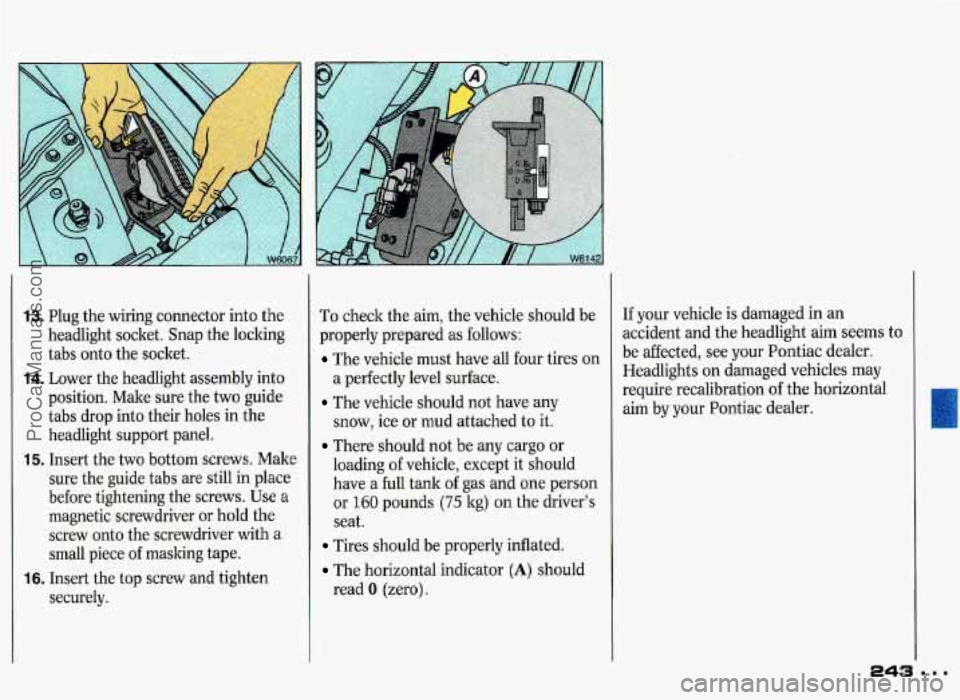
13. Plug the wiring connector into the
headlight socket. Snap the locking
tabs onto the socket.
14. Lower the headlight assembly into
position. Make sure the two guide
tabs
drop into their holes in the
headlight support panel.
15. Insert the two bottom screws. Make
sure the guide tabs are still in place
before tightening the screws. Use a
magnetic screwdriver or hold the
screw onto the screwdriver with a
small piece
of masking tape.
16. Insert the top screw and tighten
securely. To check
the aim, the vehicle should be
properly prepared as follows:
The vehicle must have all four tires on
a perfectly level surface.
The vehicle should not have any
snow, ice or mud attached to it.
There should not be any cargo or
loading of vehicle, except it should
have a full tank of gas and one person
or
160 pounds (75 kg) on the driver’s
seat.
Tires should be properly inflated.
The horizontal indicator (A) should
read
0 (zero). If
your vehicle
is damaged in an
accident and the headlight aim seems to
be affected, see your Pontiac dealer.
Headlights on damaged vehicles may
require recalibration of the horizontal
aim by your Pontiac dealer.
U
ProCarManuals.com
Page 245 of 338
Service & Appearance Care
Driver Side
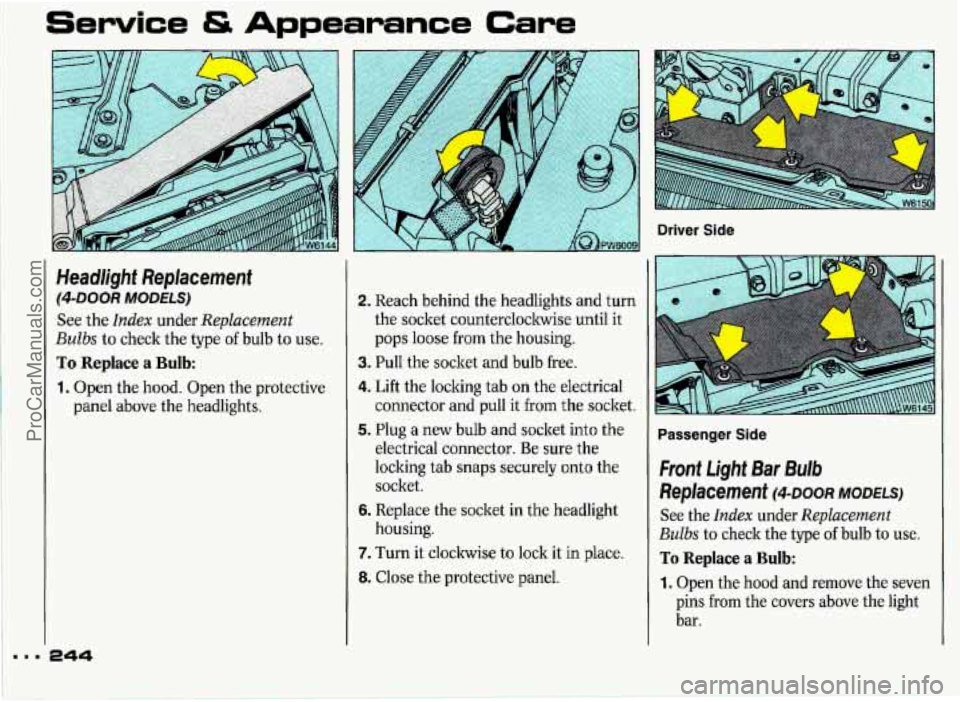
Headlight Replacement
(4-DOOR MODELS)
See the Index under Replacement
Bulbs to check the type of bulb to use.
To Replace a Bulb:
1. Open the hood. Open the protective
panel above the headlights.
2. Reach behind the headlights and turn
the socket counterclockwise until it
pops loose from the housing.
3. Pull the socket and bulb free.
4. Lift the locking tab on the electrical
connector and pull it from the socket.
5. Plug a new bulb and socket into the
electrical connector. Be sure the
locking tab snaps securely onto the
socket.
6. Replace the socket in the headlight
7. Turn it clockwise to lock it in place.
8. Close the protective panel.
housing.
Passenger Side
Front
light Bar Bulb
Replacement
DOOR MODELS)
See the Index under Replacement
Bulbs
to check the type of bulb to use.
To Replace a Bulb:
1. Open the hood and remove the seven
pins from the covers above the light
bar.
ProCarManuals.com
Page 246 of 338
Driver Side Passenger Side
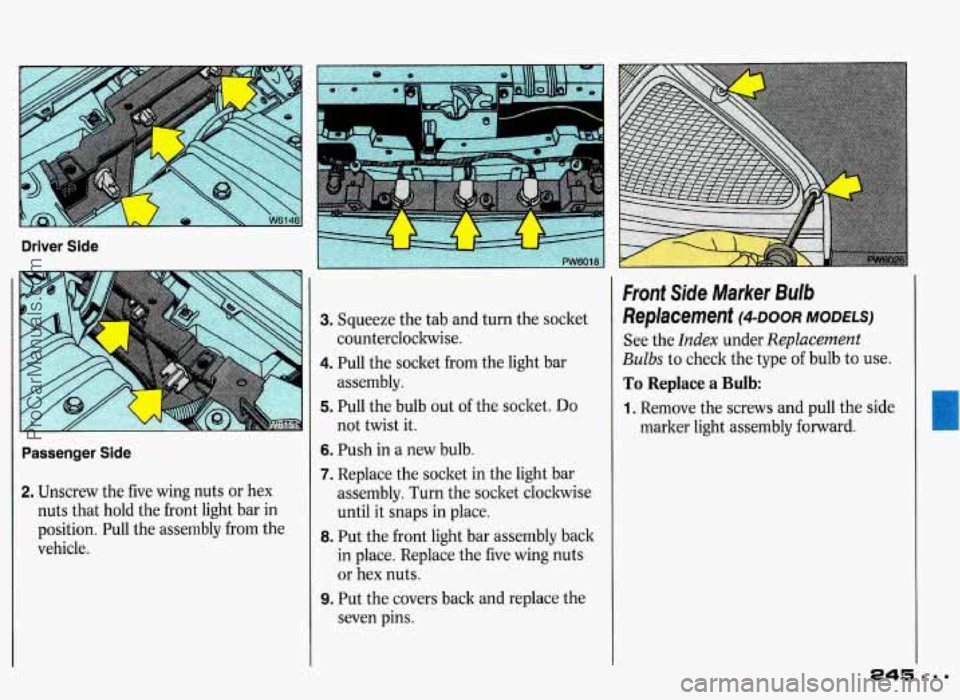
2. Unscrew the five wing nuts or hex
nuts that hold the front light bar in
position. Pull the assembly from the
vehicle.
- :-
3. Squeeze the tab and turn the socket
4. Pull the socket from the light bar
5. Pull the bulb out of the socket. Do
6. Push in a new bulb.
7. Replace the socket in the light bar
counterclockwise.
assembly.
not twist it.
assembly. Turn the socket clockwise
until it snaps in place.
8. Put the front light bar assembly back
in place. Replace the five wing nuts
or hex nuts.
9. Put the covers back and replace the
seven pins.
Front Side Marker Bulb
Replacement (4-1100~ MODELS)
See the Index under Replacement
Bulbs to check the type of bulb to use.
To Replace a Bulb:
1. Remove the screws and pull the side
marker light assembly forward.
ProCarManuals.com
Page 247 of 338
Service Appearance Care
Front Side Marker Bulb
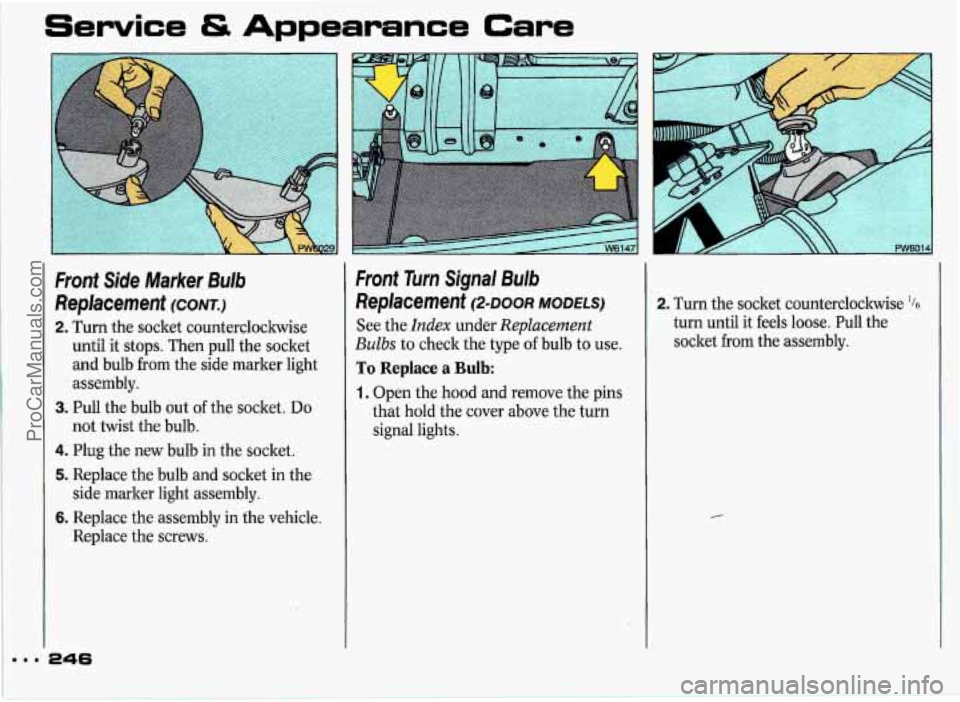
Replacement
(CONT.)
2. Turn the socket countercloclwise
until it stops. Then pull the socket
and bulb from the side marker light
assembly.
not twist the bulb.
3. Pull the bulb out of the socket. Do
4. Plug the new bulb in the socket.
5. Replace the bulb and socket in the
6. Replace the assembly in the vehicle.
side marker light assembly.
Replace the screws.
Front Turn Signal Bulb
Replacement
(2410012 MODELS)
See the Index under Replacement
Bulbs to check the type of bulb to use.
To Replace a Bulb:
1. Open the hood and remove the pins
that hold the cover above the turn
signal lights.
2. Turn the socket countercloclcwise '16
turn until it feels loose. Pull the
socket from the assembly.
ProCarManuals.com
Page 248 of 338
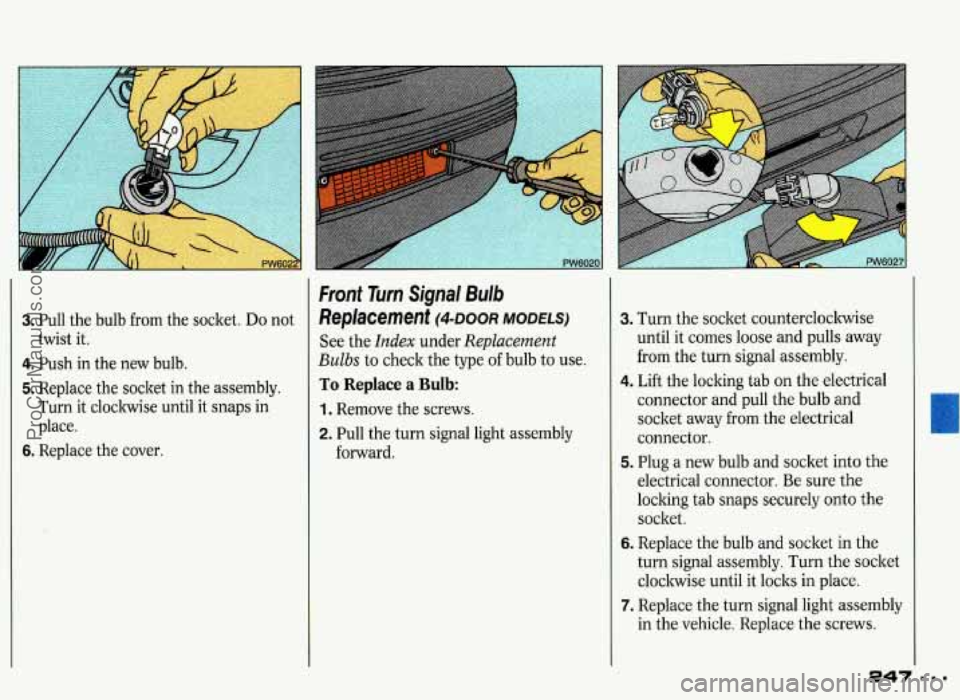
3. Pull the bulb from the socket. Do not
4. Push in the new bulb.
5. Replace the socket in the assembly.
Turn it clockwise until it snaps in
place.
twist
it.
6. Replace the cover.
Front Tim Signal Bulb
Replacement DOOR MODELS)
See the Index under Replacement
Bulbs to check the type of bulb to use.
To Replace a Bulb:
1. Remove the screws.
2. Pull the turn signal light assembly
forward.
3. Turn the socket counterclockwise
until it comes loose
and pulls away
from the turn signal assembly.
4. Lift the locking tab on the electrical
connector and pull the bulb
and
socket away from the electrical
connector.
5. Plug a new bulb and socket into the
electrical connector. Be sure the
locking tab snaps securely onto the
socket.
6. Replace the bulb and socket in the
turn signal assembly. Turn the socket
clockwise until it locks in place.
7. Replace the turn signal light assembly
in the vehicle. Replace the screws.
ProCarManuals.com
Page 249 of 338
Service & Appearance Care
...
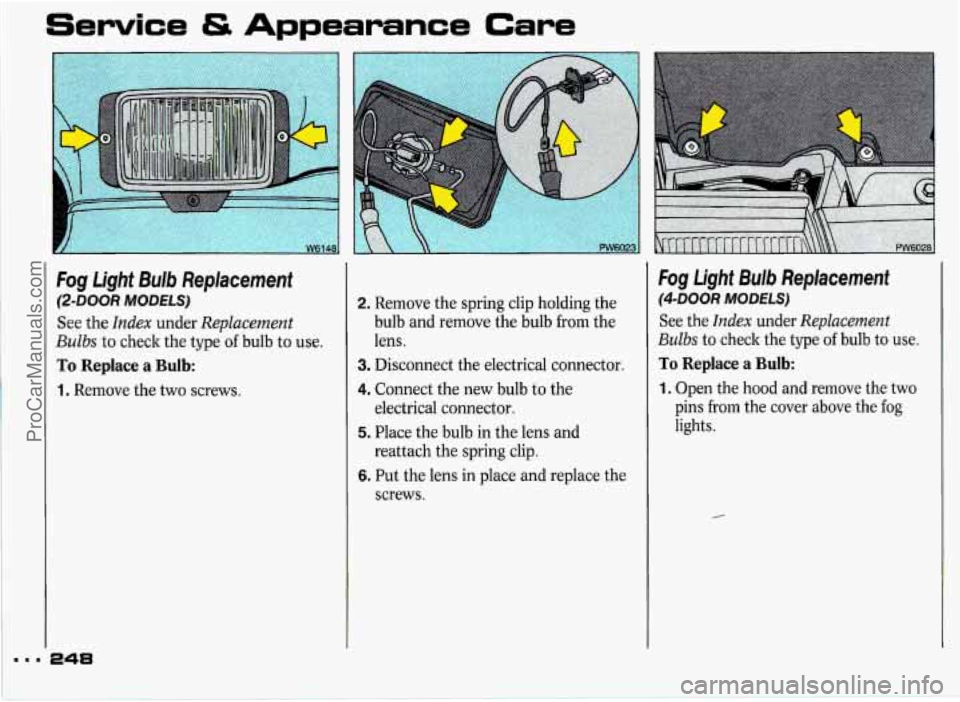
Fog Light Bulb Replacement
@-DOOR MODELS)
See the Index under Replacement
Bulbs to check the type of bulb to use.
To Replace a Bulb:
1. Remove the two screws.
248
2. Remove the spring clip holding the
bulb and remove the bulb from the
lens.
3. Disconnect the electrical connector.
4. Connect the new bulb to the
5. Place the bulb in the lens and
6. Put the lens in place and replace the
electrical
connector.
reattach the spring clip.
screws.
Fog light Bulb Replacement
(4-DOOR MODELS)
See the Index under Replacement
Bulbs to check the type of bulb to use.
To Replace a Bulb:
1. Open the hood and remove the two
pins from the cover above the fog
lights.
ProCarManuals.com
Page 250 of 338
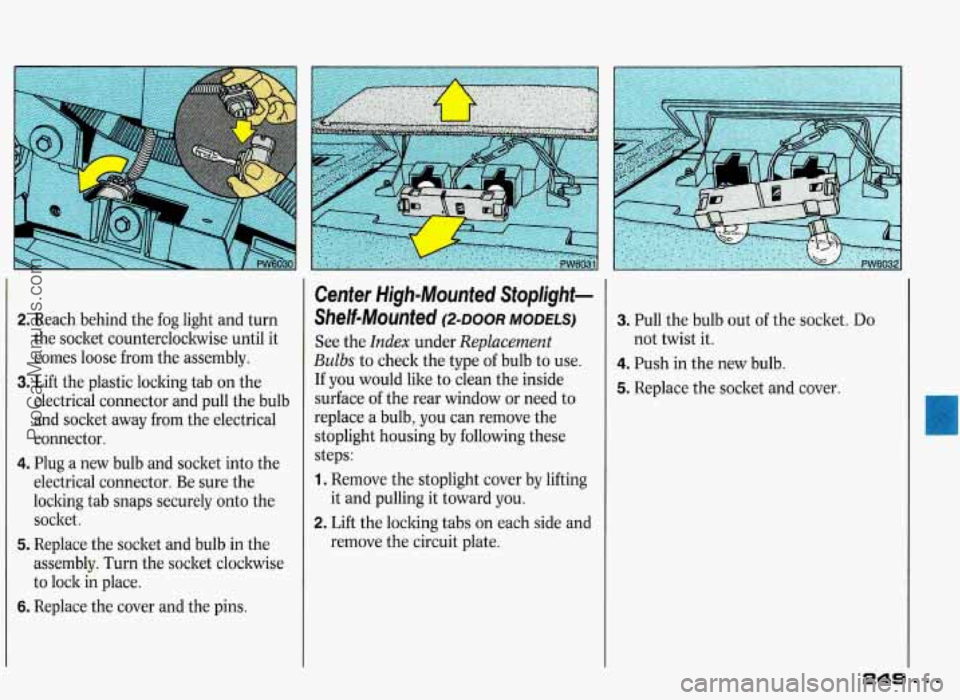
2. Reach behind the fog light and turn
the socket counterclockwise until it
comes loose from the assembly.
3. Lift the plastic locking tab on the
electrical connector and pull the bulb
and socket away
from the electrical
connector.
4. Plug a new bulb and socket into the
electrical connector. Be sure the
locking tab snaps securely onto the
socket.
5. Replace the socket and bulb in the
assembly.
Turn the socket clockwise
to lock in place.
6. Replace the cover and the pins.
Center High-Mounted Stoplight-
Shelf-Mounted DOOR MODELS)
See the Index under Replacement
Bulbs to check the type of bulb to use.
If you would like to clean the inside
surface
of the rear window or need to
replace a bulb, you can remove the
stoplight housing by following these
steps:
1. Remove the stoplight cover by lifting
2. Lift the locking tabs on each side and
it
and pulling it toward you.
remove the circuit plate.
3. Pull the bulb out of the socket. Do
4. Push in the new bulb.
5. Replace the socket and cover.
not
twist it.
249 =
ProCarManuals.com