air conditioning PONTIAC GRAND PRIX 2003 Owners Manual
[x] Cancel search | Manufacturer: PONTIAC, Model Year: 2003, Model line: GRAND PRIX, Model: PONTIAC GRAND PRIX 2003Pages: 378, PDF Size: 17.64 MB
Page 141 of 378
Climate Controls
Dual Climate Control System
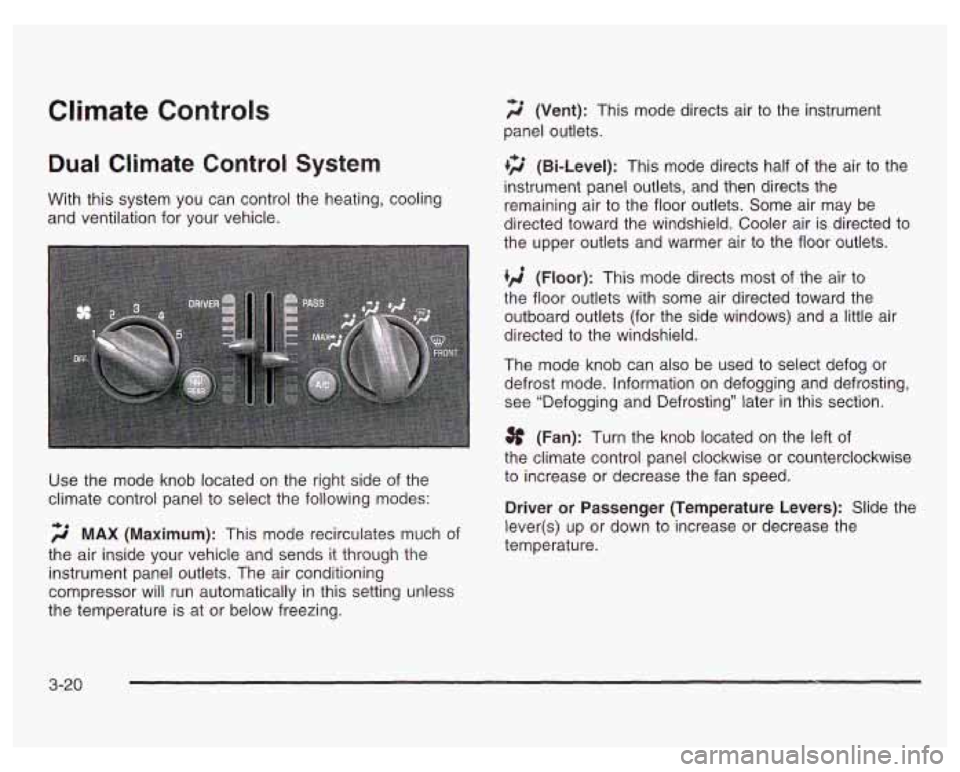
f;' (Vent): This mode directs air to the instrument
panel outlets.
+2 (Bi-Level): This mode directs half of the air to the
instrument panel outlets, and then directs the
With this system you can control the heating, cooling
and ventilation for your vehicle. remaining air
to the floor outlets. Some air may be
directed toward the windshield. Cooler air is directed to
the upper outlets and warmer air to the floor outlets.
(Floor): This mode directs most of the air to
the floor outlets with some air directed toward the
outboard outlets (for the side windows) and a little air
directed to the windshield.
The mode knob can also be used to select defog or
defrost mode. Information on defogging and defrosting,
see "Defogging and Defrosting" later in this section.
3f (Fan): Turn the knob located on the left of
the climate control panel clockwise or counterclockwise
Use the mode knob located on the right side of the to increase or decrease the fan speed.
climate control panel to select the following modes:
Driver or Passenger (Temperature Levers): Slide the
2 MAX (Maximum): This mode recirculates much of
the air inside your vehicle and sends it through the
instrument panel outlets. The air conditioning
compressor will run automatically in this setting unless
the temperature is at or below freezing. lever(s)
up or down to increase or decrease the
temperature.
3-20
Page 142 of 378
A/C (Air Conditioning): Press this button to turn the
air-conditioning system on or
off. When A/C is pressed,
an indicator light above the button will come on to let
you know that
A/C is active. The instrument brightness
control may have to be adjusted to
the highest setting
during the daytime in order to see the indicator light.
On hot days, open the windows to let hot inside
air escape; then close them. This helps to reduce the
time it takes for your vehicle to cool down. It also helps
the system to operate more efficiently.
For quick cool down
on hot days:
1. Select the MAX recirculation mode.
2. Select A/C.
3. Select the coolest temperature.
4. Select the highest fan speed.
Using these settings together for long periods of time
may cause the air inside your vehicle to become too dry.
To prevent this from happening, after the air in your
vehicle has cooled, change the mode from MAX
to another mode such as bi-level.
The air-conditioning system removes moisture from the
air,
so you may sometimes notice a small amount of
water dripping underneath your vehicle while idling
or after turning
off the engine. This is normal.
Defogging and Defrosting
There are two modes to clear fog from your windshield.
Use the floor/defog mode
to clear the windows of fog
or moisture and warm the passengers. Use the defrost
mode to remove fog or frost from the windshield
more quickly.
Turn the mode knob to select the defog or defrost mode.
,2 (Floor/Defog): This mode directs the air equally
between the windshield and the floor outlets. When you
select this mode, the system turns on the
air-conditioning compressor unless the outside
temperature is at or below freezing.
9 FRONT (Defrost): Pressing FRONT directs most
of the air to the windshield and the side window
outlets, with some air directed to the floor outlets. In this
mode, the system will automatically run the
air-conditioning compressor, unless the outside
temperature is at or below freezing.
3-21
Page 326 of 378
I
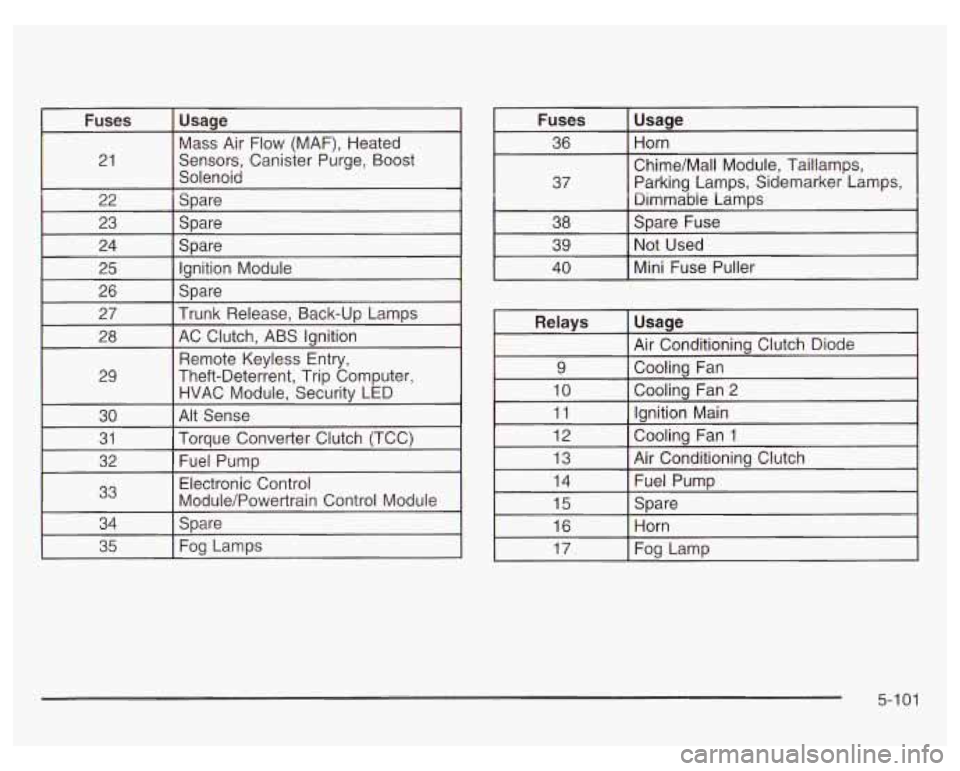
21
22
I 27
Usaqe
Mass Air Flow (MAF), Heated
Sensors, Canister Purge, Boost
Solenoid
Spare
SDare
Spare lanition Module
Spare
trunk Release. Back-UD Lamps I
28 I AC Clutch, ABS Ignition
I I Remote Kevless Entrv. I
29 Theft-Deterient, Trip Computer,
HVAC Module, Security LED
30
Torque Converter Clutch (TCC) 31
Alt Sense idemarker Lamps,
Relays
Usage
Air Conditionina Clutch Diode I
9 I Coolina Fan
4
I
I 10 I Coolina Fan 2
v
1
I 11 I lanition Main I ~ ~
12 Cooling Fan 1
13 Air Conditioning Clutch
5-1 01
Page 327 of 378
Capacities and Specifications
Please refer to Part D: Recommended Fluids and Lubricants on page 6-15 for more information.
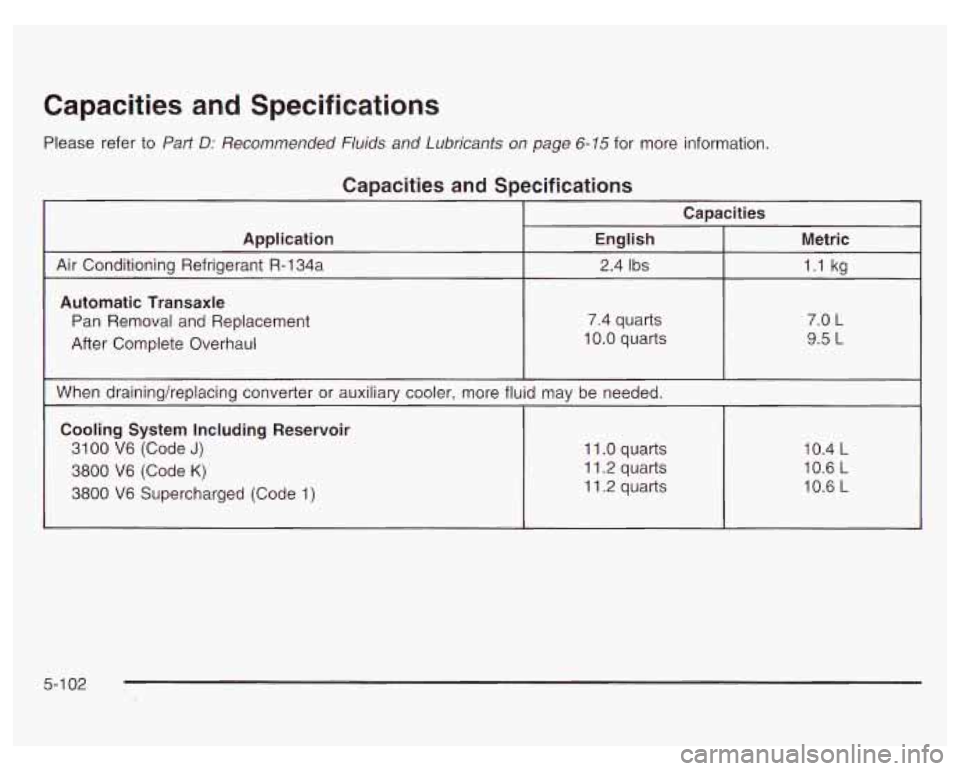
Capacities and Specifications
Capacities
Application
Automatic Transaxle
1.1 kg
2.4 Ibs Air
Conditioning Refrigerant R-l34a
Metric
English
Pan Removal and Replacement
9.5 L
10.0 quarts
After Complete Overhaul
7.0 L 7.4 quarts
When drainingheplacing converter or auxiliary cooler, more fluid may be needed.
Cooling System Including Reservoir
3100 V6 (Code J)
11 -2 quarts
3800 V6 Supercharged (Code 1) 10.6
L
11.2 quarts
3800
V6 (Code
K)
10.4 L 11 .O quarts
10.6 L
5-1
02
Page 342 of 378
Part C: Periodic Maintenance
Inspections
Listed in this part are inspections and services which
should be performed at least twice a year (for instance,
each spring and fall).
You should let your dealer’s
service department
or other qualified service center do
these
jobs. Make sure any necessary repairs are
completed at once.
Proper procedures to perform these services may be
found in a service manual. See Service Publications
Ordering lnformation
on page 7- 10.
Steering, Suspension and Front
Drive Axle Boot and Seal Inspection
Inspect the front and rear suspension and steering
system for damaged, loose
or missing parts, signs of
wear or lack of lubrication. Inspect the power steering
lines and hoses for proper hook-up, binding, leaks,
cracks, chafing, etc. Clean and then inspect the drive
axle boot seals for damage, tears or leakage. Replace
seals
if necessary.
Exhaust System Inspection
Inspect the complete exhaust system. Inspect the body
near the exhaust system. Look for broken, damaged,
missing or out-of-position parts as well as open seams,
holes, loose connections or other conditions which
could cause a heat build-up in the floor pan or could let
exhaust fumes into the vehicle. See Engine Exhaust
on page
2-3 1.
Fuel System Inspection
Inspect the complete fuel system for damage or leaks.
Engine Cooling System Inspection
Inspect the hoses and have them replaced if they
are cracked, swollen or deteriorated. Inspect all pipes,
fittings and clamps; replace as needed. Clean the
outside of the radiator and air conditioning condenser.
To help ensure proper operation, a pressure test of
the cooling system and pressure cap is recommended
at least once a year.
6-1 3