tow PONTIAC GRAND PRIX 2006 Owner's Manual
[x] Cancel search | Manufacturer: PONTIAC, Model Year: 2006, Model line: GRAND PRIX, Model: PONTIAC GRAND PRIX 2006Pages: 472, PDF Size: 2.82 MB
Page 166 of 472
If the Light is Flashing
The following may prevent more serious damage to
your vehicle:
Reducing vehicle speed
Avoiding hard accelerations
Avoiding steep uphill grades
If you are towing a trailer, reduce the amount of
cargo being hauled as soon as it is possible
If the light stops ashing and remains on steady, see “If
the Light Is On Steady” following.
If the light continues to ash, when it is safe to do so,
stop the vehicle. Find a safe place to park your vehicle.
Turn the key off, wait at least 10 seconds and restart
the engine. If the light remains on steady, see “If
the Light Is On Steady” following. If the light is still
ashing, follow the previous steps, and see your dealer
for service as soon as possible.
If the Light Is On Steady
You may be able to correct the emission system
malfunction by considering the following:
Did you recently put fuel into your vehicle?
If so, reinstall the fuel cap, making sure to fully install
the cap. SeeFilling the Tank on page 5-7. The
diagnostic system can determine if the fuel cap has
been left off or improperly installed. A loose or missing
fuel cap will allow fuel to evaporate into the atmosphere.
A few driving trips with the cap properly installed
should turn the light off.
Did you just drive through a deep puddle of water?
If so, your electrical system may be wet. The condition
will usually be corrected when the electrical system
dries out. A few driving trips should turn the light off.
3-48
Page 217 of 472
Setting the Tone
(Bass/Midrange/Treble)
TONE:Press and release this button until BASS, MID,
or TREB appears on the display. The SELECT LED
indicator will light to show that the tone control can be
adjusted. Turn the SELECT knob to increase or to
decrease. If a station is weak or noisy, decrease
the treble.
To return all of the tone controls to the middle position,
press and hold the TONE button until FLAT appears
on the display
EQ (Equalizer):Press this button to select customized
equalization settings.
Up to six customized equalization settings, can be
programmed, by performing the following steps:
1. Turn the radio on.
2. Use the TONE button and the SELECT knob to
create the equalization.
3. Press and hold the EQ button for two seconds.
SELECT EQ # will appear on the display and the
EQ symbol will ash.
4. Press EQ or turn the SELECT knob to select the
EQ number.5. Press and hold the EQ button or push the SELECT
knob to store the equalization setting and the
number. EQ SAVED will appear on the display and
you will hear a beep.
6. Repeat the steps for the other EQ settings
and numbers.
EQ 5 has been programmed at the factory for use with
talk radio, but it can be preset to a different tone.
Adjusting the Speakers (Balance/Fade)
BAL (Balance):To adjust the balance between the
right and the left speakers, press and release this button
until BAL appears on the display. The SELECT LED
indicator will light to show that the speakers can
be adjusted. Turn the SELECT knob to move the sound
toward the right or the left speakers.
FADE:To adjust the fade between the front and the
rear speakers, press and release this button until FADE
appears on the display. The SELECT LED indicator
will light to show that the speakers can be adjusted. Turn
the SELECT knob to move the sound toward the front
or the rear speakers.
Pressing and holding the BAL FADE button for
two seconds will return all speaker settings to the
middle position.
3-99
Page 228 of 472
Pressing and holding the TONE button until FLAT
appears on the display will return all of the tone controls
to the middle position.
EQ (Equalizer):Press this button to select customized
bass, midrange, and treble equalization settings.
Up to six customized equalization settings, can be
programmed on the six numbered pushbuttons,
by performing the following steps:
1. Turn the radio on.
2. Use the TONE button and the SELECT knob to
create the desired equalization.
3. Press and hold the EQ button for two seconds.
SELECT EQ # will appear on the display and the
EQ symbol will ash.
4. Press EQ or turn the SELECT knob to select the
desired EQ number.
5. Press and hold the EQ button or push the SELECT
knob to store the equalization setting and the
number. You will hear a beep and EQ SAVED will
appear on the display.
6. Repeat the steps for the other EQ settings and
numbers.
EQ 5 has been programmed at the factory for use with
talk radio, but it can be set to a different tone.Adjusting the Speakers (Balance/Fade)
BAL (Balance):To adjust the balance between the
right and the left speakers, press and release this button
until BAL appears on the display. The SELECT LED
indicator will light to show that the speakers can
be adjusted. Turn the SELECT knob to move the sound
toward the right or the left speakers.
FADE:To adjust the fade between the front and the
rear speakers, press and release this button until FADE
appears on the display. The SELECT LED indicator
will light to show that the speakers can be adjusted. Turn
the SELECT knob to move the sound toward the front
or the rear speakers.
Pressing and holding the BAL FADE button for
two seconds will return all speaker settings to the
middle position.
3-110
Page 245 of 472
Adjusting the Speakers (Balance/Fade)
AUDIO:To adjust the balance between the right
and the left speakers, push the AUDIO knob until BAL
appears on the display. Turn the knob to move the
sound toward the right or the left speakers.
To adjust the fade between the front and rear speakers,
push and hold the AUDIO knob until FAD appears on
the display. Turn the knob to move the sound toward the
front or the rear speakers.
To adjust the balance and the fade to the middle
position, select balance or fade and push and hold the
AUDIO knob. The display level will be adjusted to
the middle position and you will hear a beep.
To adjust all tone and speaker controls to the middle
position, push and hold the AUDIO knob when no tone
or speaker controls are displayed. CENTERED will
appear on the display and you will hear one beep.
Finding a Program Type (PTY) Station
(RDS and XM™)
To select and nd a desired PTY perform the following:
1. Press the P-TYPE button to activate program
type select mode. P-TYPE and the last selected
PTY will appear on the display.
2. Turn the P-TYPE knob to select a PTY.
3. Once the desired PTY is displayed, press either
SEEK arrow to select and to take you to the
PTY’s rst station.
4. To go to another station within that PTY, and the
PTY is displayed, press either SEEK arrow once.
If the PTY is not displayed, press either SEEK
arrow twice to display the PTY and then to go to
another station.
5. Press P-TYPE to exit program type select mode.
If PTY times out and is no longer on the display,
go back to Step 1.
If both P-TYPE and TRAF are on, the radio will search
for stations with the selected PTY and traffic
announcements.
3-127
Page 261 of 472
Your Driving, the Road, and Your Vehicle..........4-2
Defensive Driving...........................................4-2
Drunken Driving.............................................4-3
Control of a Vehicle........................................4-5
Braking.........................................................4-6
Anti-Lock Brake System (ABS).........................4-7
Braking in Emergencies...................................4-8
Traction Control System (TCS).........................4-9
Enhanced Traction System (ETS)....................4-11
StabiliTrak
®Plus System...............................4-12
Steering......................................................4-13
Off-Road Recovery.......................................4-16
Passing.......................................................4-16
Loss of Control.............................................4-18
Driving at Night............................................4-19Driving in Rain and on Wet Roads..................4-20
City Driving..................................................4-22
Freeway Driving...........................................4-23
Before Leaving on a Long Trip.......................4-24
Highway Hypnosis........................................4-25
Hill and Mountain Roads................................4-26
Winter Driving..............................................4-28
If Your Vehicle is Stuck in Sand, Mud,
Ice or Snow..............................................4-32
Rocking Your Vehicle to Get It Out.................4-33
Loading Your Vehicle....................................4-33
Towing..........................................................4-38
Towing Your Vehicle.....................................4-38
Recreational Vehicle Towing...........................4-38
Towing a Trailer...........................................4-40
Section 4 Driving Your Vehicle
4-1
Page 293 of 472
Rocking Your Vehicle to Get It Out
First, turn your steering wheel left and right. That will
clear the area around your front wheels. If your vehicle
has traction control, you should turn your traction control
system off. SeeTraction Control System (TCS) on
page 4-9. Then shift back and forth between
REVERSE (R) and a forward gear, spinning the wheels
as little as possible. Release the accelerator pedal while
you shift, and press lightly on the accelerator pedal when
the transaxle is in gear. By slowly spinning your wheels in
the forward and reverse directions, you will cause a
rocking motion that may free your vehicle. If that does not
get you out after a few tries, you may need to be towed
out. If you do need to be towed out, seeTowing Your
Vehicle on page 4-38.
Loading Your Vehicle
It is very important to know how much weight your
vehicle can carry. Two labels on your vehicle show
how much weight it may properly carry, the Tire
and Loading Information label and the Vehicle
Certication label.
{CAUTION:
Do not load your vehicle any heavier than the
Gross Vehicle Weight Rating (GVWR), or either
the maximum front or rear Gross Axle Weight
Rating (GAWR). If you do, parts on your
vehicle can break, and it can change the way
your vehicle handles. These could cause you
to lose control and crash. Also, overloading
can shorten the life of your vehicle.
4-33
Page 295 of 472
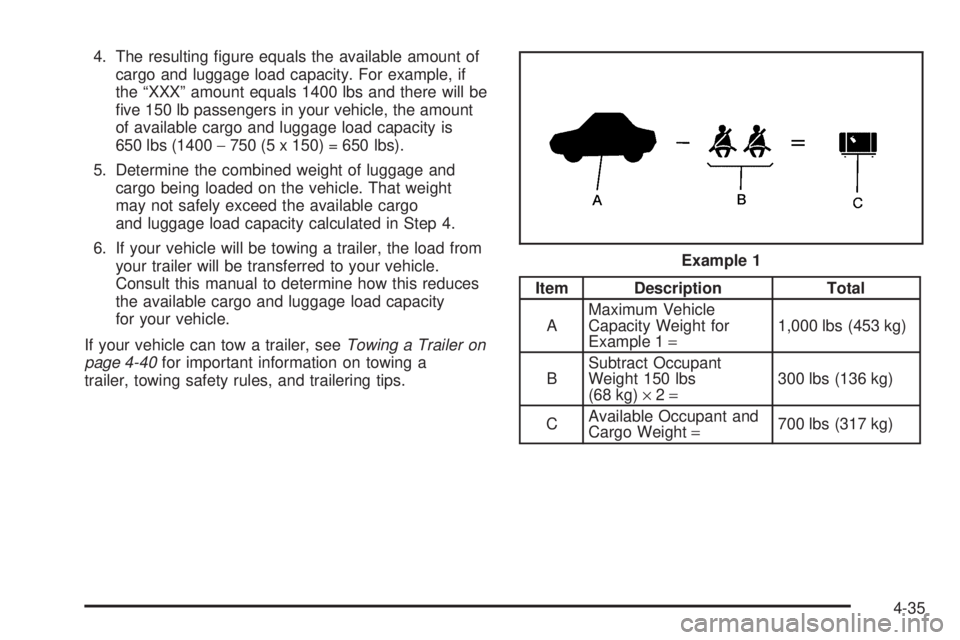
4. The resulting gure equals the available amount of
cargo and luggage load capacity. For example, if
the “XXX” amount equals 1400 lbs and there will be
ve 150 lb passengers in your vehicle, the amount
of available cargo and luggage load capacity is
650 lbs (1400−750 (5 x 150) = 650 lbs).
5. Determine the combined weight of luggage and
cargo being loaded on the vehicle. That weight
may not safely exceed the available cargo
and luggage load capacity calculated in Step 4.
6. If your vehicle will be towing a trailer, the load from
your trailer will be transferred to your vehicle.
Consult this manual to determine how this reduces
the available cargo and luggage load capacity
for your vehicle.
If your vehicle can tow a trailer, seeTowing a Trailer on
page 4-40for important information on towing a
trailer, towing safety rules, and trailering tips.
Item Description Total
AMaximum Vehicle
Capacity Weight for
Example 1=1,000 lbs (453 kg)
BSubtract Occupant
Weight 150 lbs
(68 kg)×2=300 lbs (136 kg)
CAvailable Occupant and
Cargo Weight=700 lbs (317 kg) Example 1
4-35
Page 298 of 472
If things like suitcases, tools, packages, or anything else
are put inside the vehicle, they will go as fast as the
vehicle goes. If you have to stop or turn quickly,
or if there is a crash, they will keep going.
{CAUTION:
Things you put inside your vehicle can strike
and injure people in a sudden stop or turn, or
in a crash.
Put things in the trunk of your vehicle. In a
trunk, put them as far forward as you can.
Try to spread the weight evenly.
Never stack heavier things, like suitcases,
inside the vehicle so that some of them
are above the tops of the seats.
Do not leave an unsecured child restraint
in your vehicle.
When you carry something inside the
vehicle, secure it whenever you can.
Do not leave a seat folded down unless
you need to.
Towing
Towing Your Vehicle
Consult your dealer or a professional towing service if
you need to have your disabled vehicle towed. See
Roadside Assistance Program on page 7-6.
If you want to tow your vehicle behind another vehicle
for recreational purposes (such as behind a motorhome),
see “Recreational Vehicle Towing” following.
Recreational Vehicle Towing
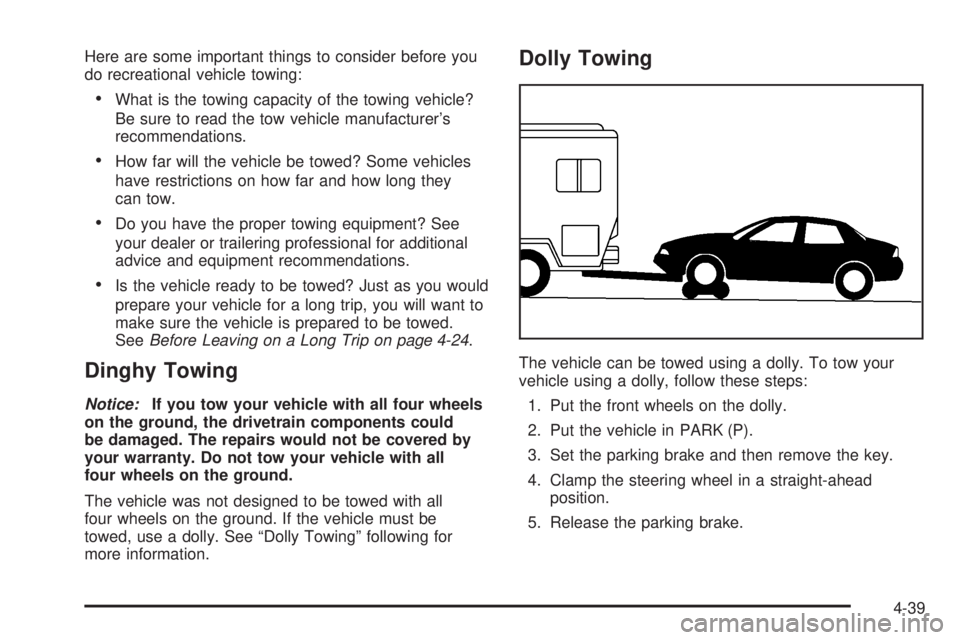
Recreational vehicle towing means towing your vehicle
behind another vehicle – such as behind a motorhome.
The two most common types of recreational vehicle
towing are known as dinghy towing, towing your vehicle
with all four wheels on the ground, and dolly towing,
towing your vehicle with two wheels on the ground and
two wheels up on a device known as a dolly.
With the proper preparation and equipment, many
vehicles can be towed in these ways. See “Dinghy
Towing” and “Dolly Towing,” following.
4-38
Page 299 of 472
Here are some important things to consider before you
do recreational vehicle towing:
What is the towing capacity of the towing vehicle?
Be sure to read the tow vehicle manufacturer’s
recommendations.
How far will the vehicle be towed? Some vehicles
have restrictions on how far and how long they
can tow.
Do you have the proper towing equipment? See
your dealer or trailering professional for additional
advice and equipment recommendations.
Is the vehicle ready to be towed? Just as you would
prepare your vehicle for a long trip, you will want to
make sure the vehicle is prepared to be towed.
SeeBefore Leaving on a Long Trip on page 4-24.
Dinghy Towing
Notice:If you tow your vehicle with all four wheels
on the ground, the drivetrain components could
be damaged. The repairs would not be covered by
your warranty. Do not tow your vehicle with all
four wheels on the ground.
The vehicle was not designed to be towed with all
four wheels on the ground. If the vehicle must be
towed, use a dolly. See “Dolly Towing” following for
more information.
Dolly Towing
The vehicle can be towed using a dolly. To tow your
vehicle using a dolly, follow these steps:
1. Put the front wheels on the dolly.
2. Put the vehicle in PARK (P).
3. Set the parking brake and then remove the key.
4. Clamp the steering wheel in a straight-ahead
position.
5. Release the parking brake.
4-39
Page 300 of 472
Towing a Trailer
{CAUTION:
If you do not use the correct equipment and
drive properly, you can lose control when you
pull a trailer. For example, if the trailer is too
heavy, the brakes may not work well — or even
at all. You and your passengers could be
seriously injured. You may also damage your
vehicle; the resulting repairs would not be
covered by your warranty. Pull a trailer only if
you have followed all the steps in this section.
Ask your dealer for advice and information
about towing a trailer with your vehicle.The vehicle can tow a trailer if it is equipped with the
proper trailer towing equipment. To identify the trailering
capacity of the vehicle, read the information in “Weight
of the Trailer” that appears later in this section. Trailering
is different than just driving the vehicle by itself.
Trailering means changes in handling, durability, and
fuel economy. Successful, safe trailering takes correct
equipment, and it has to be used properly.
That is the reason for this part. In it are many
time-tested, important trailering tips and safety rules.
Many of these are important for your safety and that of
your passengers. So please read this section carefully
before pulling a trailer.
Load-pulling components such as the engine, transaxle,
wheel assemblies, and tires are forced to work harder
against the drag of the added weight. The engine
is required to operate at relatively higher speeds and
under greater loads, generating extra heat. The
trailer also adds considerably to wind resistance,
increasing the pulling requirements.
4-40