fuse PONTIAC GTO 2005 Owners Manual
[x] Cancel search | Manufacturer: PONTIAC, Model Year: 2005, Model line: GTO, Model: PONTIAC GTO 2005Pages: 318, PDF Size: 2.06 MB
Page 72 of 318

If the engine still does not start, and the key appears to
be undamaged, try another ignition key. At this time,
you may also want to check the fuse. SeeFuses
and Circuit Breakers on page 5-86for more information
on fuses. If the engine still does not start with the
other key, your vehicle needs service. If your vehicle
does start, the first key may be faulty. See your dealer
who can service the theft-deterrent system to have
a new key made.
If you are ever driving and the security light comes on
and stays on, you will be able to restart your engine
if you turn it off. The theft-deterrent system, however, is
not working properly and must be serviced by your
dealer. Your vehicle is not protected by the
theft-deterrent system at this time.
In an emergency, contact Roadside Assistance.
SeeRoadside Assistance Program on page 7-6.Content Theft-Deterrent
Your vehicle has a theft-deterrent alarm system.
Arming the System
The alarm system is turned on when the LOCK button
on the key is pressed. Therefore, locking the doors
by pressing LOCK not only locks all the doors but, after
a short delay, also sets the alarm system. When the
system is armed, the alarm is triggered when any of the
doors, hood or trunk are opened or a hot-wire
attempted. The alarm system thinks a break-in has
occurred. An alarm sounds and the turn signals
and dome light will flash.
When the alarm system is turned on, you may open the
trunk by pressing the trunk symbol button on the key.
This does not set off the alarm, but leaves the alarm
system on and undisturbed. Closing the trunk re-arms
the trunk alarm after a short delay.
The LOCK button on the key will not function when the
ignition is turned ON or the driver’s door is open.
Disarming the System
To disarm the system, press UNLOCK on the key or
turn the ignition to ON.
2-14
Page 102 of 318

Turn and Lane-Change Signals
To signal a turn, move the lever all the way up to signal
right turn and all the way down to signal a left turn.
When the turn is finished, the lever will return
automatically.
An arrow on the instrument
panel cluster will flash in
the direction of the
turn or lane change.
To signal a lane change, just raise or lower the lever
until the arrow starts to flash. Hold it there until you
complete your lane change. The lever will return by itself
when you release it.
As you signal a turn or a lane change, if the arrows
flash rapidly, a signal bulb may be burned out and other
drivers won’t see your turn signal.
If a bulb is burned out, replace it to help avoid an
accident. If the arrows don’t go on at all when you signal
a turn, check for burned-out bulbs and then check the
fuse. SeeFuses and Circuit Breakers on page 5-86.
Headlamp High/Low-Beam Changer
To change the headlamps from low beam to high
beam with the headlamps on, push the turn
signal/multifunction lever away from you. The headlamps
will change from low beam to high beam.
When the high beams are
on, a light on the
instrument panel cluster
also will be on if the
ignition is on.
If the fog lamps are on when the high-beam headlamps
are activated, the fog lamps will turn off. The fog
lamp indicator in the instrument panel cluster will
turn off.
3-8
Page 112 of 318

Certain electrical accessories may not be compatible
with the accessory power outlet and could result
in blown vehicle or adapter fuses. If you experience a
problem, see your dealer for additional information
on accessory power outlets.
Notice:Adding any electrical equipment to your
vehicle may damage it or keep other components
from working as they should. The repairs would not
be covered by your warranty. Check with your
dealer before adding electrical equipment.
When adding electrical equipment, be sure to follow the
proper installation instructions included with the
electrical equipment you install.
Notice:Improper use of the power outlet can cause
damage not covered by your warranty. Do not
hang any type of accessory or accessory bracket
from the plug because the power outlets are
designed for accessory power plugs only.
Ashtrays and Cigarette Lighter
Notice:If you put papers, pins, or other �ammable
items in the ashtray, hot cigarettes or other
smoking materials could ignite them and possibly
damage your vehicle. Never put �ammable items in
the ashtray.
Ashtray
If your vehicle has this accessory, the front ashtray is
located in the center of the instrument panel under
the audio controls. The rear ashtray is located at the rear
of the center console. To use the ashtray, push the
cover inwards and the ashtray will slide open.
To empty the ashtray, open it and grip it at the
depressions located on each side. Then pull the
ashtray out.
Cigarette Lighter
Notice:Holding a cigarette lighter in while it is
heating will not allow the lighter to back away from
the heating element when it is hot. Damage from
overheating may occur to the lighter or heating
element, or a fuse could be blown. Do not hold a
cigarette lighter in while it is heating.
If your vehicle has this accessory, the cigarette lighter is
located inside the ashtray and can be operated
whenever the ignition is turned on.
Press the lighter all the way in and release it. It will pop
back out once the element is ready for use.
The cigarette lighter should not be used as an accessory
power outlet. Use the accessory power outlet provided
in the center console.
3-18
Page 188 of 318

Tire Chains..................................................5-67
If a Tire Goes Flat........................................5-68
Changing a Flat Tire.....................................5-68
Removing the Spare Tire and Tools................5-70
Removing the Flat Tire and Installing
the Spare Tire..........................................5-71
Storing a Flat or Spare Tire and Tools............5-75
Compact Spare Tire......................................5-76
Appearance Care............................................5-76
Fabric/Carpet...............................................5-77
Vinyl...........................................................5-78
Leather.......................................................5-79
Instrument Panel..........................................5-79
Interior Plastic Components............................5-79
Glass Surfaces.............................................5-79
Care of Safety Belts......................................5-79
Weatherstrips...............................................5-80
Washing Your Vehicle...................................5-80
Cleaning Exterior Lamps/Lenses.....................5-80Finish Care..................................................5-80
Windshield and Wiper Blades.........................5-81
Aluminum Wheels.........................................5-81
Tires...........................................................5-82
Sheet Metal Damage.....................................5-82
Finish Damage.............................................5-82
Underbody Maintenance................................5-83
Chemical Paint Spotting.................................5-83
Vehicle Care/Appearance Materials..................5-84
Vehicle Identi�cation......................................5-85
Vehicle Identification Number (VIN).................5-85
Service Parts Identification Label.....................5-85
Electrical System............................................5-85
Add-On Electrical Equipment..........................5-85
Fuses and Circuit Breakers............................5-86
Instrument Panel Fuse Block..........................5-86
Engine Compartment Fuse Block....................5-88
Capacities and Speci�cations..........................5-90
Section 5 Service and Appearance Care
5-2
Page 190 of 318

Doing Your Own Service Work
If you want to do some of your own service work, you
will want to use the proper service manual. It tells
you much more about how to service your vehicle than
this manual can. To order the proper service manual,
seeService Publications Ordering Information on
page 7-11.
Your vehicle has an airbag system. Before attempting to
do your own service work, seeServicing Your
Airbag-Equipped Vehicle on page 1-50.
You should keep a record with all parts receipts and list
the mileage and the date of any service work you
perform. SeeMaintenance Record on page 6-15.{CAUTION:
You can be injured and your vehicle could be
damaged if you try to do service work on a
vehicle without knowing enough about it.
Be sure you have sufficient knowledge,
experience, the proper replacement parts,
and tools before you attempt any vehicle
maintenance task.
Be sure to use the proper nuts, bolts, and
other fasteners. English and metric
fasteners can be easily confused. If you
use the wrong fasteners, parts can later
break or fall off. You could be hurt.
5-4
Page 199 of 318

A. Engine Compartment Fuse Block. SeeEngine
Compartment Fuse Block on page 5-88.
B. Windshield Washer Fluid Reservoir. See “Adding
Washer Fluid” underWindshield Washer Fluid
on page 5-35.
C. Battery. SeeBattery on page 5-39.
D. Radiator Pressure Cap. SeeRadiator Pressure Cap
on page 5-26.
E. Engine Oil Dipstick. See “Checking Engine Oil”
underEngine Oil on page 5-13.
F. Engine Oil Fill Cap. See “When to Add Engine Oil”
underEngine Oil on page 5-13.
G. Automatic Transmission Dipstick (If Equipped). See
“Checking the Fluid Level” underAutomatic
Transmission Fluid on page 5-19.
H. Power Steering Fluid Reservoir. SeePower Steering
Fluid on page 5-34.
I. Brake Fluid Reservoir. See “Brake Fluid” under
Brakes on page 5-36.
J. Hydraulic Clutch Fluid Reservoir (If Equipped). See
Hydraulic Clutch on page 5-22.
K. Engine Air Cleaner/Filter. SeeEngine Air
Cleaner/Filter on page 5-18.
L. Engine Coolant Overflow Reservoir. SeeEngine
Coolant on page 5-23.Engine Oil
If the Check Oil message appears on the trip computer
display, it means you need to check your engine oil
level right away. For more information, seeTrip
Computer on page 3-33. You should check your engine
oil level regularly; this is an added reminder.
Checking Engine Oil
It is a good idea to check your engine oil every time you
get fuel. In order to get an accurate reading, the oil
must be warm and the vehicle must be on level ground.
The engine oil dipstick handle is a yellow loop. See
Engine Compartment Overview on page 5-12for
the location of the engine oil dipstick.
1. Turn off the engine and give the oil several minutes
to drain back into the oil pan. If you do not do this,
the oil dipstick might not show the actual level.
2. Pull out the dipstick and clean it with a paper towel
or cloth, then push it back in all the way. Remove it
again, keeping the tip down, and check the level.
5-13
Page 272 of 318

Fuses and Circuit Breakers
The wiring circuits in your vehicle are protected from
short circuits by fuses, circuit breakers and thermal links
in the wiring itself. This greatly reduces the chance of
fires caused by electrical problems.
Look at the metallic band inside the fuse. If the band is
broken or melted, replace the fuse. Be sure you
replace a bad fuse with a new one of the correct size.
If you ever have a problem on the road and don’t have
a spare fuse, you can borrow one. Just pick some
feature of your vehicle that you can get along
without — like the radio or cigarette lighter — and use
its fuse, if it is the size you need. Replace it as soon as
you can.
Before replacing a fuse, turn every vehicle electrical
switch off.
There are two fuse blocks in your vehicle: the
instrument panel fuse block and the engine compartment
fuse block.
Instrument Panel Fuse Block
This fuse block is located under the driver’s side of the
instrument panel. The fuses here protect each
separate circuit including headlamps. There are spare
fuses inside the fuse box. If you have electrical
failure, check here first.
Fuses Usage
FLASHER
UNITHazard Warning Flashers
POWER
WINDOWSPower Window Switches
5-86
Page 273 of 318

Fuses Usage
POWER
SEATSPower Seat Controls
FRONT WIPER
WASHERFront Windshield Wiper Washer
PARK LAMPS Parking Lamps
STOP LAMPS Stop Lamps
INTERIOR
ILLUM.Interior light Controls
HAZARD
WARNINGHazard Warning Flashers
SPARE Spare
HORN Horn
IGNITION Ignition Switch
INSTRUMENT
ILLUM.Instrument Panel Lighting
TURN SIGNAL,
BACK UP
LAMPSTurn Signal Lamp, Back-Up Lamps
HVAC CONT.
HEAT, REAR
WINDOW,
INSTRUMENTSHeater Controls, Rear Window, Trip
Computer
CIGAR
LIGHTERCigarette LighterFuses Usage
CRUISE CONT.
POWER
MIRRORSCruise Control, Power Mirror
RADIO, CELL
PHONERadio System, Cell Phone
ACC. SOCKET Accessory Power Outlet
SPARE Spare
ENG. CONT.
SIGNALEngine Control Signal
POWER DOOR
LOCKS,
WINDOWS &
THEFT HORNPower Door Locks, Power Windows,
Theft System, Horn
INSTRUMENTS Instruments
SPARE Spare
RADIO & CELL
PHONERadio System, Cell Phone
SUB WOOFER
& AMPLIFIERSub Woofer and Amplifier
SPARE Spare
AIRBAG Airbag
ABS &
TRACTION
CONT.Anti-Lock Brake System, Traction
Control System
5-87
Page 274 of 318

Relays Usage
ACC RELAY Accessory Power Outlet
IGNITION
RELAYIgnition Switch
POWER
WINDOW
RELAYPower Windows
BLOWER
INHIBIT RELAYBlower
PARK LAMPS
RELAYParking Lamps
SPARE Spare
INTERIOR
ILLUM RELAYInterior Light Controls
ECM/TCM
CONTROL
RELAY 1Engine Control Module,
Transmission Control Module 1
ECM/TCM
CONTROL
RELAY 2Engine Control Module,
Transmission Control Module 2
SPARE SpareEngine Compartment Fuse Block
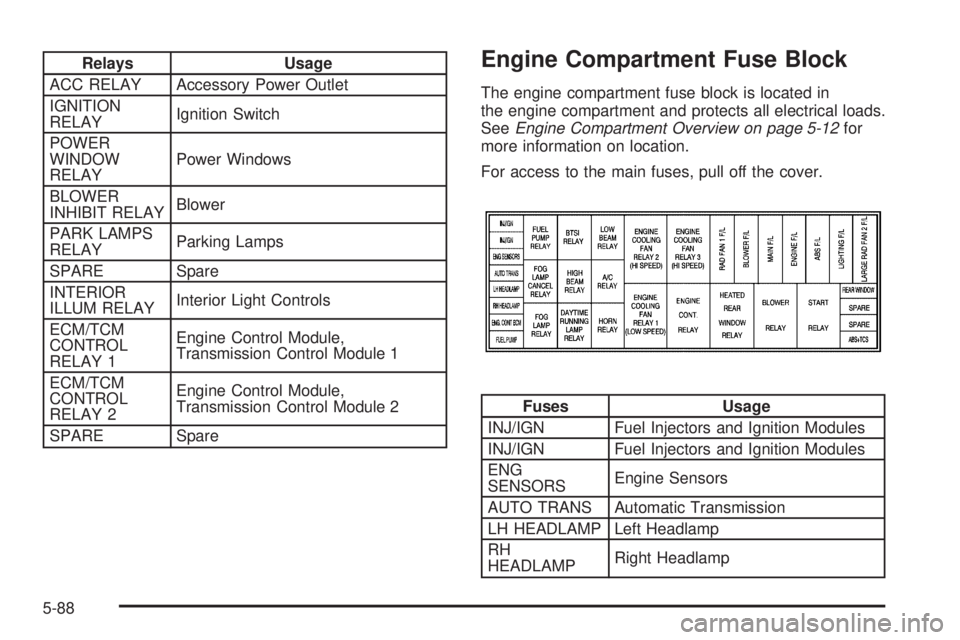
The engine compartment fuse block is located in
the engine compartment and protects all electrical loads.
SeeEngine Compartment Overview on page 5-12for
more information on location.
For access to the main fuses, pull off the cover.
Fuses Usage
INJ/IGN Fuel Injectors and Ignition Modules
INJ/IGN Fuel Injectors and Ignition Modules
ENG
SENSORSEngine Sensors
AUTO TRANS Automatic Transmission
LH HEADLAMP Left Headlamp
RH
HEADLAMPRight Headlamp
5-88
Page 275 of 318

Fuses Usage
ENG CONT.
BCMEngine, Body Control Module
FUEL PUMP Fuel Pump
RAD FAN 1 F/L Engine Cooling Fan 1
BLOWER F/L Blower Fan
MAIN F/L Main
ENGINE F/L Engine
ABS F/L Anti-lock Brakes
LIGHTING F/L Lighting
RAD FAN 2 F/L Engine Cooling Fan 2
REAR
WINDOWHeated Rear Window
SPARE Spare
SPARE Spare
ABS/TCSAnti-lock Brake System, Traction
Control System
Relays Usage
FUEL PUMP
RELAYFuel Pump
FOG LAMP
CANCEL
RELAYFog Lamp Cancel
FOG LAMP
RELAYFog Lamp
Relays Usage
BTSI RELAY Brake Transmission Shift Interlock
HIGH BEAM
RELAYHigh-Beam Headlamp
DAYTIME
RUNNING
LAMP RELAYDaytime Running Lamps
LOW BEAM
RELAYLow-Beam Headlamp
A/C RELAY Air Conditioning
HORN RELAY Horn
ENGINE COOL
FAN 2 RELAYEngine Cooling Fan 2
ENGINE COOL
FAN 1 RELAYEngine Cooling Fan 1
ENGINE COOL
FAN 3 RELAYEngine Cooling Fan 3
ENGINE
CONT. RELAYEngine Controls
HEATED REAR
WINDOW
RELAYRear Window Defogger
BLOWER
RELAYBlower
START RELAY Start
5-89