tow PONTIAC GTO 2006 Owner's Manual
[x] Cancel search | Manufacturer: PONTIAC, Model Year: 2006, Model line: GTO, Model: PONTIAC GTO 2006Pages: 326, PDF Size: 1.62 MB
Page 210 of 326

Get the vehicle warmed up by driving about 15 miles
(24 km) when outside temperatures are above 50ÉF
(10ÉC). If it is colder than 50ÉF (10ÉC), drive the vehicle
in DRIVE (D) until the engine temperature gage
moves and then remains steady for 10 minutes.
A cold ¯uid check can be made after the vehicle has
been sitting for eight hours or more with the engine off,
but this is used only as a reference. Let the engine
run at idle for ®ve minutes if outside temperatures are
50ÉF (10ÉC) or more. If it is colder than 50ÉF (10ÉC), you
may have to idle the engine longer. Should the ¯uid
level be low during this cold check, you must check the
¯uid hot before adding ¯uid. Checking the ¯uid hot
will give you a more accurate reading of the ¯uid level.
Checking the Fluid Level
Prepare your vehicle as follows:
1. Park your vehicle on a level place. Keep the engine
running.
2. With the parking brake applied, place the shift lever
in PARK (P).
3. With your foot on the brake pedal, move the shift
lever through each gear range, pausing for about
three seconds in each range. Then, position
the shift lever in PARK (P).
4. Let the engine run at idle for three minutes or more.Then, without shutting off the engine, follow these steps:
The automatic transmission dipstick is located at the
rear of the engine compartment, on the passenger's side
of the vehicle. See
Engine Compartment Overview on
page 5-12for more information on location.
1. Unclip the handle and remove the dipstick; wipe it
clean with a clean rag or paper towel and re-insert
it fully. Remove it again and read the ¯uid level.
2. Check both sides of the dipstick, and read the lower
level. The ¯uid level must be in the COLD area for
a cold check or in the cross-hatched HOT area
for a hot check.
3. If the ¯uid level is in the acceptable range, push the
dipstick back in all the way.
Remember to always replace the dipstick and lock
the handle down.
How to Add Automatic Transmission
Fluid
Refer to the Maintenance Schedule to determine what
kind of transmission ¯uid to use. SeeRecommended
Fluids and Lubricants on page 6-12.
Add ¯uid only after checking the transmission ¯uid while
it is hot. A cold check is used only as a reference. If
the ¯uid level is low, add only enough of the proper ¯uid
to bring the level up to the HOT area for a hot check.
5-20
2006 - Pontiac GTO Owner Manual
Page 223 of 326

Power Steering Fluid
The power steering ¯uid reservoir is located toward the
front of the engine compartment on the driver's side
of the vehicle. See
Engine Compartment Overview on
page 5-12for reservoir location.
When to Check Power Steering Fluid
It is not necessary to regularly check power steering ¯uid
unless you suspect there is a leak in the system or
you hear an unusual noise. A ¯uid loss in this system
could indicate a problem. Have the system inspected
and repaired.
How to Check Power Steering Fluid
The ¯uid level should be checked after the vehicle has
been driven for at least 20 minutes, so that the ¯uid
is warm. A cold level check can be done after the engine
has been off for at least ®ve hours. However, the hot
level check is recommended.
The ¯uid level can be viewed through the reservoir. The
level markings are next to the ¯uid window. When the
¯uid is cold, the level should be between the COLD MIN
(Minimum) and MAX (Maximum) marks. When the
vehicle has been driven for at least 20 minutes and the
¯uid is hot, the level should be between the HOT
MIN and MAX marks.
If ¯uid must be added, turn the cap counterclockwise to
the stop; then the cap can be lifted off. Do not over®ll
the reservoir and remember to replace the cap
tightly when you are ®nished and clean up any
spilled ¯uid.
If you often need to add ¯uid, you should see
your dealer.
What to Use
To determine what kind of ¯uid to use, seeRecommended Fluids and Lubricants on page 6-12.
Always use the proper ¯uid. Failure to use the proper
¯uid can cause leaks and damage hoses and seals.
5-33
2006 - Pontiac GTO Owner Manual
Page 236 of 326
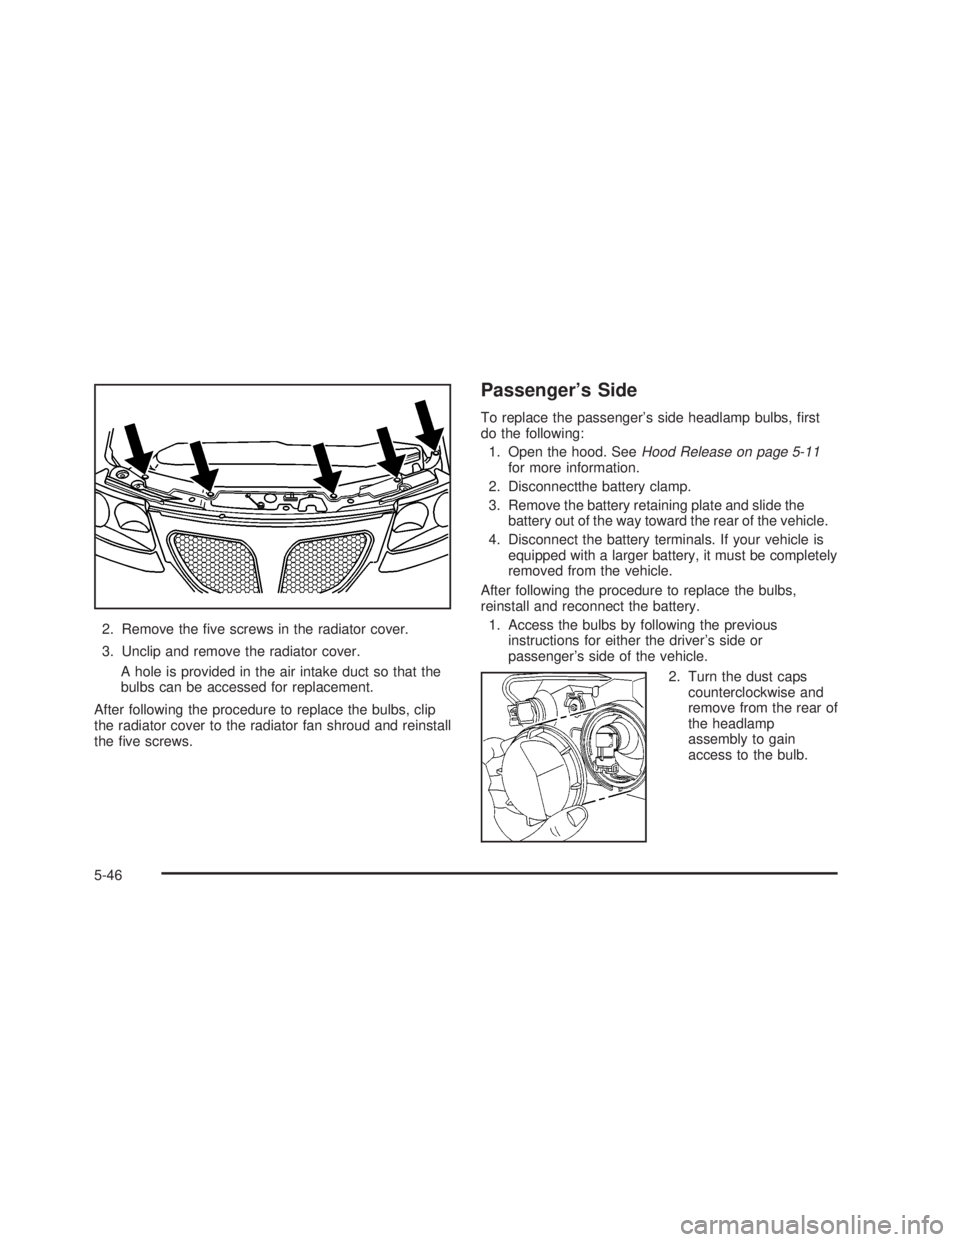
2. Remove the ®ve screws in the radiator cover.
3. Unclip and remove the radiator cover.
A hole is provided in the air intake duct so that the
bulbs can be accessed for replacement.
After following the procedure to replace the bulbs, clip
the radiator cover to the radiator fan shroud and reinstall
the ®ve screws.
Passenger's Side
To replace the passenger's side headlamp bulbs, ®rst
do the following:
1. Open the hood. See
Hood Release on page 5-11for more information.
2. Disconnectthe battery clamp.
3. Remove the battery retaining plate and slide the
battery out of the way toward the rear of the vehicle.
4. Disconnect the battery terminals. If your vehicle is
equipped with a larger battery, it must be completely
removed from the vehicle.
After following the procedure to replace the bulbs,
reinstall and reconnect the battery.
1. Access the bulbs by following the previous
instructions for either the driver's side or
passenger's side of the vehicle.
2. Turn the dust caps
counterclockwise and
remove from the rear of
the headlamp
assembly to gain
access to the bulb.
5-46
2006 - Pontiac GTO Owner Manual
Page 252 of 326

After the tires have been rotated, adjust the front and
rear in¯ation pressures as shown on the Tire and
Loading Information label. Make certain that all wheel
nuts are properly tightened. See ªWheel Nut Torqueº
under
Capacities and Speci®cations on page 5-90.
{CAUTION:
Rust or dirt on a wheel, or on the parts to
which it is fastened, can make wheel nuts
become loose after a time. The wheel could
come off and cause an accident. When you
change a wheel, remove any rust or dirt from
places where the wheel attaches to the vehicle.
In an emergency, you can use a cloth or a
paper towel to do this; but be sure to use a
scraper or wire brush later, if needed, to get all
the rust or dirt off. See
Changing a Flat Tire on
page 5-69
.
When It Is Time for New Tires
One way to tell when it is
time for new tires is to
check the treadwear
indicators, which will
appear when your tires
have only 1/16 inch
(1.6 mm) or less of tread
remaining.
You need a new tire if any of the following statements
are true:
·You can see the indicators at three or more places
around the tire.
·You can see cord or fabric showing through the
tire's rubber.
·The tread or sidewall is cracked, cut, or snagged
deep enough to show cord or fabric.
·The tire has a bump, bulge, or split.
·The tire has a puncture, cut or other damage that
cannot be repaired well because of the size or
location of the damage.
5-62
2006 - Pontiac GTO Owner Manual
Page 258 of 326
If a Tire Goes Flat
It is unusual for a tire to blowout while you are driving,
especially if you maintain your vehicle's tires properly.
If air goes out of a tire, it is much more likely to leak out
slowly. But if you should ever have a blowout, here
are a few tips about what to expect and what to do:
If a front tire fails, the ¯at tire will create a drag that pulls
the vehicle toward that side. Take your foot off the
accelerator pedal and grip the steering wheel ®rmly.
Steer to maintain lane position, and then gently brake to
a stop well out of the traffic lane.
A rear blowout, particularly on a curve, acts much like a
skid and may require the same correction you would
use in a skid. In any rear blowout remove your foot from
the accelerator pedal. Get the vehicle under control
by steering the way you want the vehicle to go. It may
be very bumpy and noisy, but you can still steer. Gently
brake to a stop, well off the road if possible.{CAUTION:
Lifting a vehicle and getting under it to do
maintenance or repairs is dangerous without
the appropriate safety equipment and training.
The jack provided with your vehicle is
designed only for changing a ¯at tire. If it is
used for anything else, you or others could be
badly injured or killed if the vehicle slips off
the jack. Use the jack provided with your
vehicle only for changing a ¯at tire.
If a tire goes ¯at, the next part shows how to use the
jacking equipment to change a ¯at tire safely.
5-68
2006 - Pontiac GTO Owner Manual
Page 263 of 326
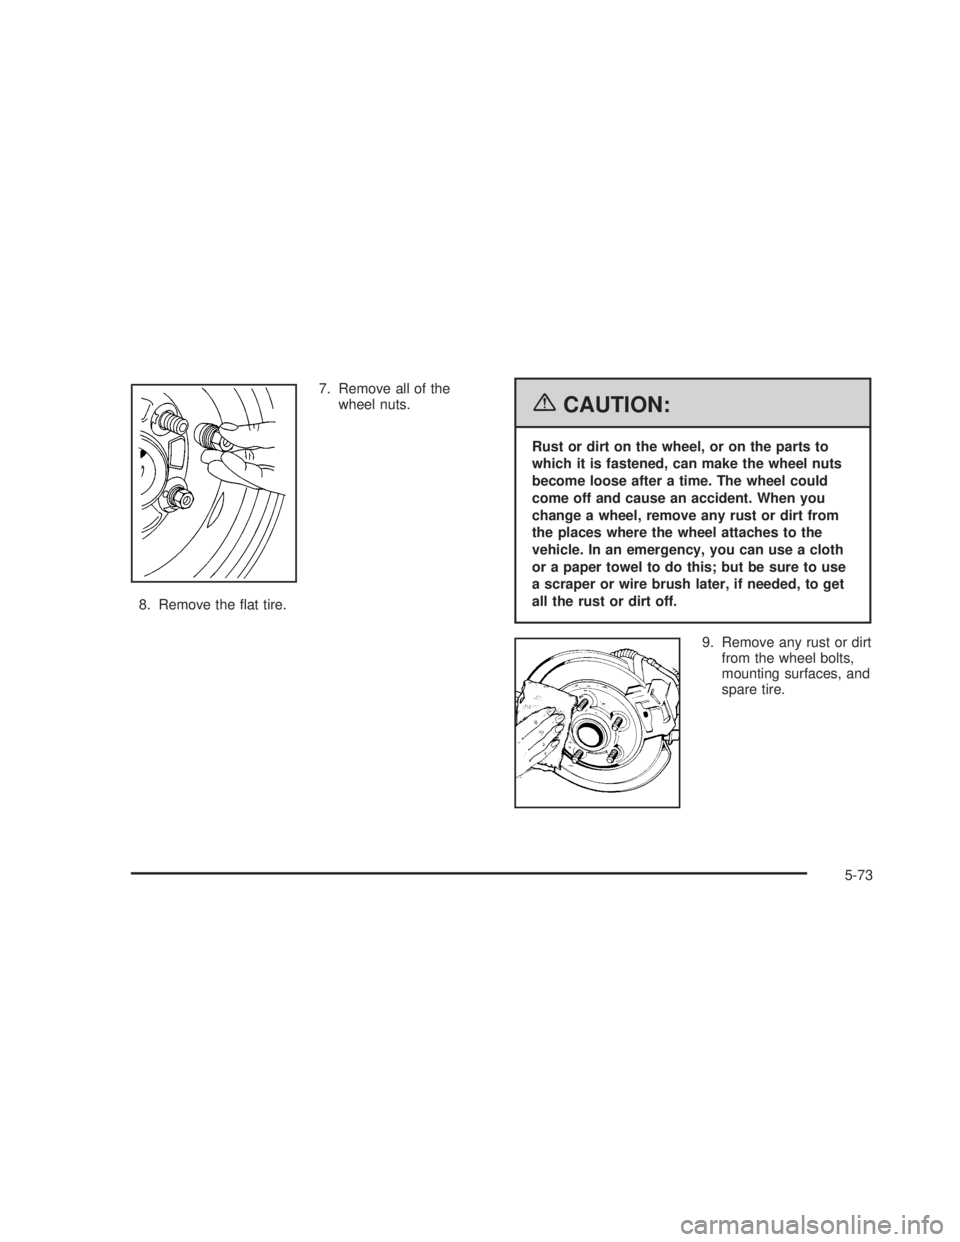
7. Remove all of the
wheel nuts.
8. Remove the ¯at tire.
{CAUTION:
Rust or dirt on the wheel, or on the parts to
which it is fastened, can make the wheel nuts
become loose after a time. The wheel could
come off and cause an accident. When you
change a wheel, remove any rust or dirt from
the places where the wheel attaches to the
vehicle. In an emergency, you can use a cloth
or a paper towel to do this; but be sure to use
a scraper or wire brush later, if needed, to get
all the rust or dirt off.
9. Remove any rust or dirt
from the wheel bolts,
mounting surfaces, and
spare tire.
5-73
2006 - Pontiac GTO Owner Manual
Page 264 of 326

10. Install the compact spare tire.
{CAUTION:
Never use oil or grease on studs or nuts. If
you do, the nuts might come loose. Your wheel
could fall off, causing a serious accident.
11. Put the wheel nuts back on with the rounded end of
the nuts toward the wheel. Tighten each nut by
hand until the wheel is held against the hub.
12. Lower the vehicle by turning the wheel wrench
counterclockwise. Lower the jack completely.
{CAUTION:
Incorrect wheel nuts or improperly tightened
wheel nuts can cause the wheel to come loose
and even come off. This could lead to an
accident. Be sure to use the correct wheel
nuts. If you have to replace them, be sure to
get new GM original equipment wheel nuts.
CAUTION: (Continued)
CAUTION: (Continued)
Stop somewhere as soon as you can and have
the nuts tightened with a torque wrench to the
proper torque speci®cation. See
Capacities
and Speci®cations on page 5-90
for wheel nut
torque speci®cation.
Notice:Improperly tightened wheel nuts can lead to
brake pulsation and rotor damage. To avoid
expensive brake repairs, evenly tighten the wheel
nuts in the proper sequence and to the proper torque
speci®cation. See
Capacities and Speci®cations on
page 5-90for the wheel nut torque speci®cation.
13. Tighten the wheel nuts
®rmly in a crisscross
sequence, as shown.
5-74
2006 - Pontiac GTO Owner Manual
Page 268 of 326

Fabric/Carpet
Use a vacuum cleaner with a soft brush attachment
frequently to remove dust and loose dirt. A canister
vacuum with a beater bar in the nozzle may only
be used on ¯oor carpet and carpeted ¯oor mats. For
soils, always try to remove them ®rst with plain water or
club soda. Before cleaning, gently remove as much
of the soil as possible using one of the following
techniques:
·For liquids: gently blot the remaining soil with a
paper towel. Allow the soil to absorb into the
paper towel until no more can be removed.
·For solid dry soils: remove as much as possible
and then vacuum.
To clean, use the following instructions:
1. Saturate a lint-free, clean white cloth with water or
club soda.
2. Wring the cloth to remove excess moisture.
3. Start on the outside edge of the soil and gently rub
toward the center. Continue cleaning, using a clean
area of the cloth each time it becomes soiled.
4. Continue to gently rub the soiled area until the
cleaning cloth remains clean.
5. If the soil is not completely removed, use a mild
soap solution and repeat the cleaning process
that was used with plain water.If any of the soil remains, a commercial fabric cleaner or
spot lifter may be necessary. When a commercial
upholstery cleaner or spot lifter is to be used, test a
small hidden area for colorfastness ®rst. If the locally
cleaned area gives any impression that a ring formation
may result, clean the entire surface.
After the cleaning process has been completed, a paper
towel can be used to blot excess moisture from the
fabric or carpet.
Leather
A soft cloth dampened with water may be used to
remove dust. If a more thorough cleaning is necessary,
a soft cloth dampened with a mild soap solution can
be used. Allow the leather to dry naturally. Do not use
heat to dry. Never use steam to clean leather. Never
use spot lifters or spot removers on leather. Many
commercial leather cleaners and coatings that are sold
to preserve and protect leather may permanently
change the appearance and feel of your leather and are
not recommended. Do not use silicone or wax-based
products, or those containing organic solvents to clean
your vehicle's interior because they can alter the
appearance by increasing the gloss in a non-uniform
manner. Never use shoe polish on your leather.
5-78
2006 - Pontiac GTO Owner Manual
Page 270 of 326
Weatherstrips
Silicone grease on weatherstrips will make them last
longer, seal better, and not stick or squeak. Apply
silicone grease with a clean cloth. During very cold,
damp weather frequent application may be required. See
Recommended Fluids and Lubricants on page 6-12.
Washing Your Vehicle
The paint ®nish on the vehicle provides beauty, depth of
color, gloss retention, and durability.
The best way to preserve the vehicle's ®nish is to keep it
clean by washing it often with lukewarm or cold water.
Do not wash the vehicle in the direct rays of the sun.
Use a car washing soap. Do not use strong soaps
or chemical detergents. Be sure to rinse the vehicle well,
removing all soap residue completely. GM-approved
cleaning products can be obtained from your dealer. See
Vehicle Care/Appearance Materials on page 5-84.Do
not use cleaning agents that are petroleum based,
or that contain acid or abrasives. All cleaning agents
should be ¯ushed promptly and not allowed to dry on the
surface, or they could stain. Dry the ®nish with a soft,
clean chamois or an all-cotton towel to avoid surface
scratches and water spotting.
High pressure car washes may cause water to enter the
vehicle.
Cleaning Exterior Lamps/Lenses
Use only lukewarm or cold water, a soft cloth and a car
washing soap to clean exterior lamps and lenses.
Follow instructions under
Washing Your Vehicle on
page 5-80.
Finish Care
Occasional waxing or mild polishing of the vehicle by
hand may be necessary to remove residue from
the paint ®nish. GM-approved cleaning products can be
obtained from your dealer. See
Vehicle
Care/Appearance Materials on page 5-84.
Notice:Machine compounding or aggressive
polishing on a basecoat/clearcoat paint ®nish may
damage it. Use only non-abrasive waxes and
polishes that are made for a basecoat/clearcoat
paint ®nish on your vehicle.
The vehicle has a ªbasecoat/clearcoatº paint ®nish. The
clearcoat gives more depth and gloss to the colored
basecoat. Always use waxes and polishes that are
non-abrasive and made for a basecoat/clearcoat
paint ®nish.
5-80
2006 - Pontiac GTO Owner Manual
Page 271 of 326
Foreign materials such as calcium chloride and other
salts, ice melting agents, road oil and tar, tree sap, bird
droppings, chemicals from industrial chimneys, etc.,
can damage the vehicle's ®nish if they remain on painted
surfaces. Wash the vehicle as soon as possible. If
necessary, use non-abrasive cleaners that are marked
safe for painted surfaces to remove foreign matter.
Exterior painted surfaces are subject to aging, weather,
and chemical fallout that can take their toll over a
period of years. To help keep the paint ®nish looking
new, keep the vehicle in a garage or covered whenever
possible.
Windshield and Wiper Blades
If the windshield is not clear after using the windshield
washer, or if the wiper blade chatters when running,
wax, sap, or other material may be on the blade
or windshield.
Clean the outside of the windshield with a glass
cleaning liquid or powder and water solution. The
windshield is clean if beads do not form when it is rinsed
with water.
Grime from the windshield will stick to the wiper blades
and affect their performance. Clean the blade by
wiping vigorously with a cloth soaked in full-strength
windshield washer solvent. Then rinse the blade
with water.
Check the wiper blades and clean them as necessary;
replace blades that look worn.
Aluminum Wheels
Notice:If you use strong soaps, chemicals,
abrasive polishes, cleaners, brushes, or cleaners
that contain acid on aluminum or chrome-plated
wheels, you could damage the surface of the
wheel(s). The repairs would not be covered by your
warranty. Use only GM-approved cleaners on
aluminum or chrome-plated wheels.
Keep the wheels clean using a soft clean cloth with mild
soap and water. Rinse with clean water. After rinsing
thoroughly, dry with a soft clean towel. A wax may then
be applied.
Notice:Using chrome polish on aluminum wheels
could damage the wheels. The repairs would not
be covered by your warranty. Use chrome polish on
chrome wheels only.
The surface of these wheels is similar to the painted
surface of the vehicle. Do not use strong soaps,
chemicals, abrasive polishes, abrasive cleaners,
cleaners with acid, or abrasive cleaning brushes on
them because the surface could be damaged. Do not
use chrome polish on aluminum wheels.
5-81
2006 - Pontiac GTO Owner Manual