ECO mode PONTIAC VIBE 2004 Owners Manual
[x] Cancel search | Manufacturer: PONTIAC, Model Year: 2004, Model line: VIBE, Model: PONTIAC VIBE 2004Pages: 370, PDF Size: 2.68 MB
Page 61 of 370

In many crashes severe enough to in¯ate an air bag,
windshields are broken by vehicle deformation.
Additional windshield breakage may also occur from the
right front passenger air bag.
·Air bags are designed to in¯ate only once. After an
air bag in¯ates, you'll need some new parts for
your air bag system. If you don't get them, the air
bag system won't be there to help protect you
in another crash. A new system will include air bag
modules and possibly other parts. The service
manual for your vehicle covers the need to replace
other parts.
·Your vehicle is equipped with two electronic frontal
sensors, which help the sensing system distinguish
between a moderate frontal impact and a more
severe frontal impact. Additionally, your vehicle has
two sensors which detect side impacts. These
sensors signal the appropriate side air bag to in¯ate.
Your vehicle is also equipped with a crash sensing
and diagnostic module, which records information
about the frontal air bag system. The module
records information about the readiness of the
system, system status and the driver's and
passenger's safety belt usage at deployment.
·Let only quali®ed technicians work on your air bag
systems. Improper service can mean that an air
bag system won't work properly. See your dealer for
service.
Notice:If you damage the covering for the driver's
or the right front passenger's air bag, or the air
bag covering on the driver's and right front
passenger's seatback, the bag may not work
properly. You may have to replace the air bag
module in the steering wheel, both the air bag
module and the instrument panel for the right front
passenger's air bag, or both the air bag module
and seatback for the driver's and right front
passenger's side impact air bag. Do not open or
break the air bag coverings.
If your vehicle ever gets into a lot of water ± such as
water up to the carpeting or higher ± or if water enters
your vehicle and soaks the carpet, the air bag
controller can be soaked and ruined. If this ever
happens, and then you start your vehicle, the damage
could make the frontal and side impact air bags
in¯ate and safety belt pretensioners activate, even if
there's no crash. You would have to replace the
air bags, all the sensors and related parts, parts of the
safety belt system and parts of the driver and right
front passenger's seatbacks. If your vehicle is ever in a
¯ood, or if it's exposed to water that soaks the carpet,
you can avoid needless repair costs by turning off
the vehicle immediately and disconnecting the battery
cables. Don't let anyone start the vehicle under any
circumstances. See your dealer for service.
1-55
Page 149 of 370
Playing the Radio
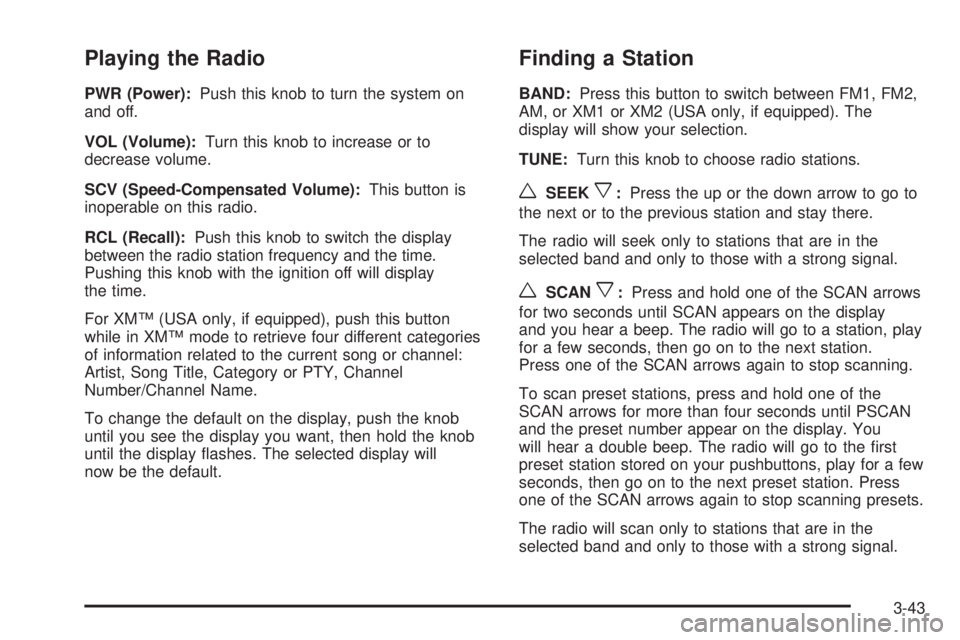
PWR (Power):Push this knob to turn the system on
and off.
VOL (Volume):Turn this knob to increase or to
decrease volume.
SCV (Speed-Compensated Volume):This button is
inoperable on this radio.
RCL (Recall):Push this knob to switch the display
between the radio station frequency and the time.
Pushing this knob with the ignition off will display
the time.
For XMŸ (USA only, if equipped), push this button
while in XMŸ mode to retrieve four different categories
of information related to the current song or channel:
Artist, Song Title, Category or PTY, Channel
Number/Channel Name.
To change the default on the display, push the knob
until you see the display you want, then hold the knob
until the display ¯ashes. The selected display will
now be the default.
Finding a Station
BAND:Press this button to switch between FM1, FM2,
AM, or XM1 or XM2 (USA only, if equipped). The
display will show your selection.
TUNE:Turn this knob to choose radio stations.
wSEEKx:Press the up or the down arrow to go to
the next or to the previous station and stay there.
The radio will seek only to stations that are in the
selected band and only to those with a strong signal.
wSCANx:Press and hold one of the SCAN arrows
for two seconds until SCAN appears on the display
and you hear a beep. The radio will go to a station, play
for a few seconds, then go on to the next station.
Press one of the SCAN arrows again to stop scanning.
To scan preset stations, press and hold one of the
SCAN arrows for more than four seconds until PSCAN
and the preset number appear on the display. You
will hear a double beep. The radio will go to the ®rst
preset station stored on your pushbuttons, play for a few
seconds, then go on to the next preset station. Press
one of the SCAN arrows again to stop scanning presets.
The radio will scan only to stations that are in the
selected band and only to those with a strong signal.
3-43
Page 151 of 370
Adjusting the Speakers (Balance/Fade)
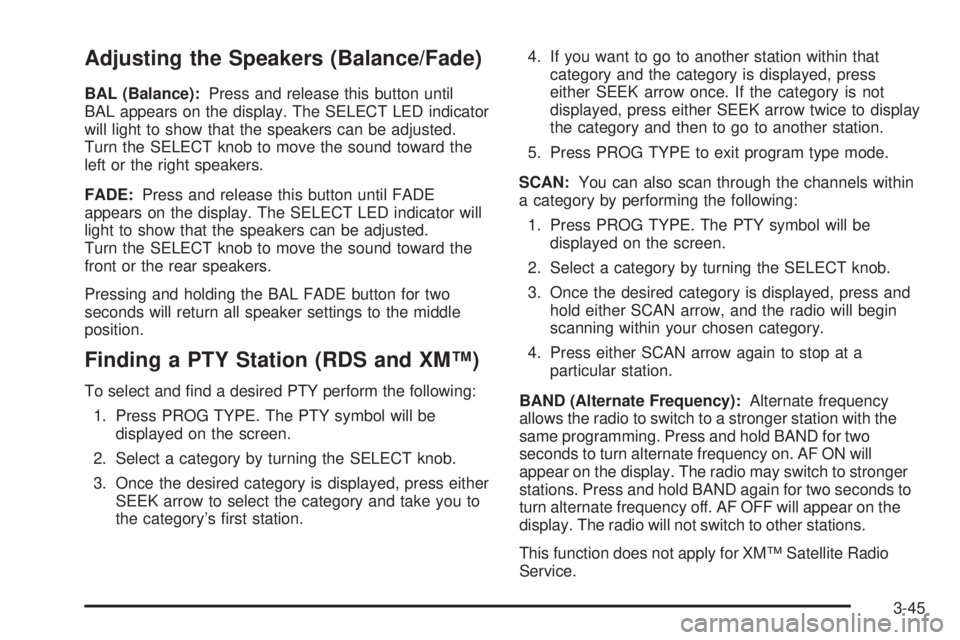
BAL (Balance):Press and release this button until
BAL appears on the display. The SELECT LED indicator
will light to show that the speakers can be adjusted.
Turn the SELECT knob to move the sound toward the
left or the right speakers.
FADE:Press and release this button until FADE
appears on the display. The SELECT LED indicator will
light to show that the speakers can be adjusted.
Turn the SELECT knob to move the sound toward the
front or the rear speakers.
Pressing and holding the BAL FADE button for two
seconds will return all speaker settings to the middle
position.
Finding a PTY Station (RDS and XMŸ)
To select and ®nd a desired PTY perform the following:
1. Press PROG TYPE. The PTY symbol will be
displayed on the screen.
2. Select a category by turning the SELECT knob.
3. Once the desired category is displayed, press either
SEEK arrow to select the category and take you to
the category's ®rst station.4. If you want to go to another station within that
category and the category is displayed, press
either SEEK arrow once. If the category is not
displayed, press either SEEK arrow twice to display
the category and then to go to another station.
5. Press PROG TYPE to exit program type mode.
SCAN:You can also scan through the channels within
a category by performing the following:
1. Press PROG TYPE. The PTY symbol will be
displayed on the screen.
2. Select a category by turning the SELECT knob.
3. Once the desired category is displayed, press and
hold either SCAN arrow, and the radio will begin
scanning within your chosen category.
4. Press either SCAN arrow again to stop at a
particular station.
BAND (Alternate Frequency):Alternate frequency
allows the radio to switch to a stronger station with the
same programming. Press and hold BAND for two
seconds to turn alternate frequency on. AF ON will
appear on the display. The radio may switch to stronger
stations. Press and hold BAND again for two seconds to
turn alternate frequency off. AF OFF will appear on the
display. The radio will not switch to other stations.
This function does not apply for XMŸ Satellite Radio
Service.
3-45
Page 152 of 370
Setting Preset PTYs (RDS Only)
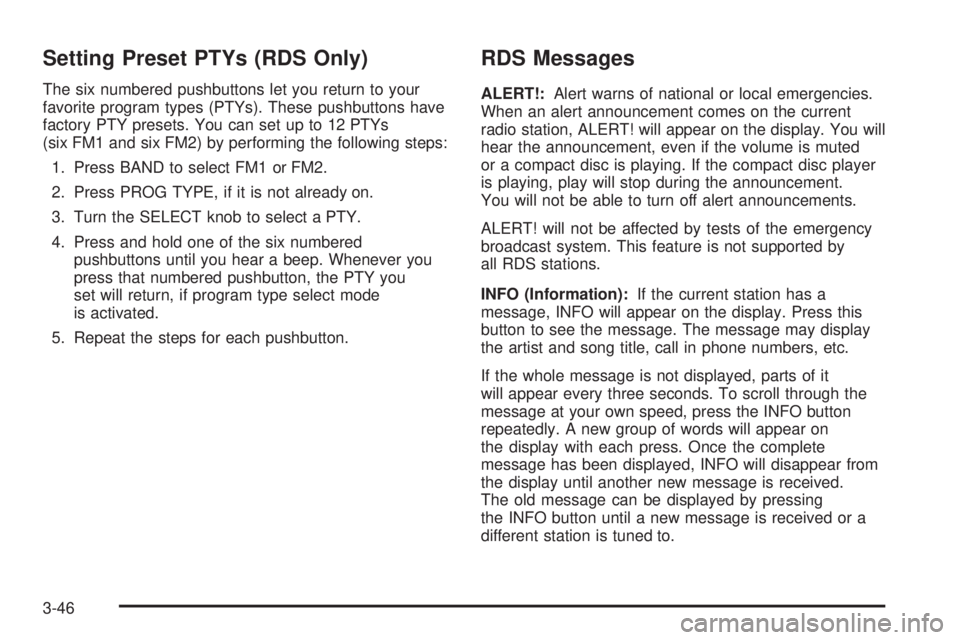
The six numbered pushbuttons let you return to your
favorite program types (PTYs). These pushbuttons have
factory PTY presets. You can set up to 12 PTYs
(six FM1 and six FM2) by performing the following steps:
1. Press BAND to select FM1 or FM2.
2. Press PROG TYPE, if it is not already on.
3. Turn the SELECT knob to select a PTY.
4. Press and hold one of the six numbered
pushbuttons until you hear a beep. Whenever you
press that numbered pushbutton, the PTY you
set will return, if program type select mode
is activated.
5. Repeat the steps for each pushbutton.
RDS Messages
ALERT!:Alert warns of national or local emergencies.
When an alert announcement comes on the current
radio station, ALERT! will appear on the display. You will
hear the announcement, even if the volume is muted
or a compact disc is playing. If the compact disc player
is playing, play will stop during the announcement.
You will not be able to turn off alert announcements.
ALERT! will not be affected by tests of the emergency
broadcast system. This feature is not supported by
all RDS stations.
INFO (Information):If the current station has a
message, INFO will appear on the display. Press this
button to see the message. The message may display
the artist and song title, call in phone numbers, etc.
If the whole message is not displayed, parts of it
will appear every three seconds. To scroll through the
message at your own speed, press the INFO button
repeatedly. A new group of words will appear on
the display with each press. Once the complete
message has been displayed, INFO will disappear from
the display until another new message is received.
The old message can be displayed by pressing
the INFO button until a new message is received or a
different station is tuned to.
3-46
Page 162 of 370
SCAN:You can also scan through the channels within
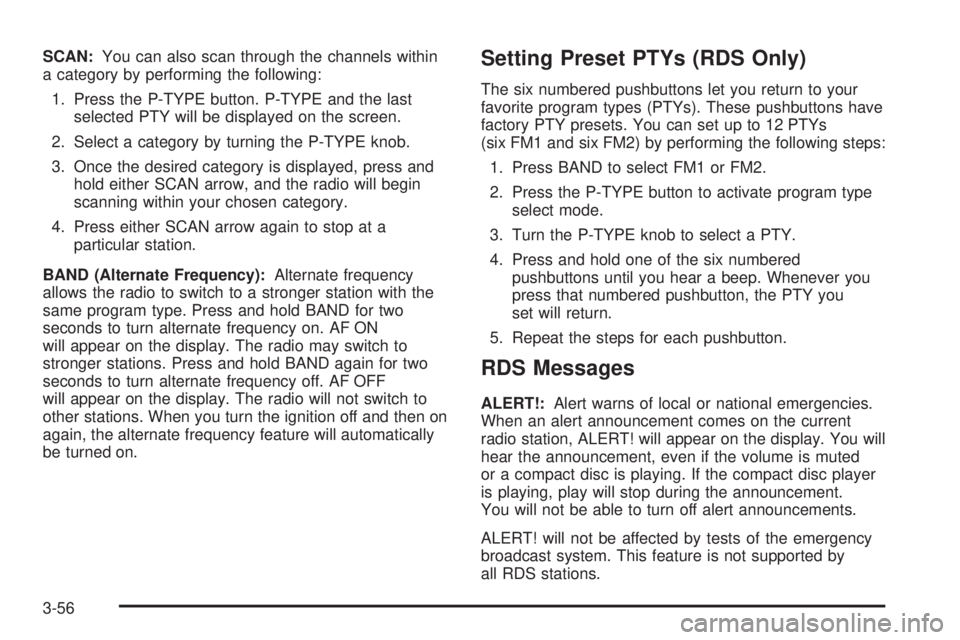
a category by performing the following:
1. Press the P-TYPE button. P-TYPE and the last
selected PTY will be displayed on the screen.
2. Select a category by turning the P-TYPE knob.
3. Once the desired category is displayed, press and
hold either SCAN arrow, and the radio will begin
scanning within your chosen category.
4. Press either SCAN arrow again to stop at a
particular station.
BAND (Alternate Frequency):Alternate frequency
allows the radio to switch to a stronger station with the
same program type. Press and hold BAND for two
seconds to turn alternate frequency on. AF ON
will appear on the display. The radio may switch to
stronger stations. Press and hold BAND again for two
seconds to turn alternate frequency off. AF OFF
will appear on the display. The radio will not switch to
other stations. When you turn the ignition off and then on
again, the alternate frequency feature will automatically
be turned on.Setting Preset PTYs (RDS Only)
The six numbered pushbuttons let you return to your
favorite program types (PTYs). These pushbuttons have
factory PTY presets. You can set up to 12 PTYs
(six FM1 and six FM2) by performing the following steps:
1. Press BAND to select FM1 or FM2.
2. Press the P-TYPE button to activate program type
select mode.
3. Turn the P-TYPE knob to select a PTY.
4. Press and hold one of the six numbered
pushbuttons until you hear a beep. Whenever you
press that numbered pushbutton, the PTY you
set will return.
5. Repeat the steps for each pushbutton.
RDS Messages
ALERT!:Alert warns of local or national emergencies.
When an alert announcement comes on the current
radio station, ALERT! will appear on the display. You will
hear the announcement, even if the volume is muted
or a compact disc is playing. If the compact disc player
is playing, play will stop during the announcement.
You will not be able to turn off alert announcements.
ALERT! will not be affected by tests of the emergency
broadcast system. This feature is not supported by
all RDS stations.
3-56
Page 167 of 370

Using Song List Mode
The integrated six-disc CD changer has a feature called
song list. This feature is capable of saving 20 track
selections.
To save tracks into the song list feature, perform the
following steps:
1. Turn the CD player on and load it with at least one
disc. See ªLOAD CDº listed previously in this
section for more information.
2. Check to see that the disc changer is not in song
list mode. S-LIST should not appear in the display.
If S-LIST is present, press the SONG LIST
button to turn it off.
3. Select the desired disc by pressing the numbered
pushbutton and then use the SEEK SCAN right
arrow button to locate the track that you want
to save. The track will begin to play.
4. Press and hold the SONG LIST button for two or
more seconds to save the track into memory.
When SONG LIST is pressed a beep will be heard
immediately. After two seconds of pressing
SONG LIST continuously, two beeps will sound to
con®rm that the track has been saved.
5. Repeat Steps 3 and 4 for saving other selections.If you attempt to save more than 20 selections, S-LIST
FULL will appear on the display.
To play the song list, press the SONG LIST button.
One beep will be heard and S-LIST will appear on the
display. The recorded tracks will begin to play in
the order that they were saved.
You may seek through the song list by using the SEEK
SCAN arrows. Seeking past the last saved track will
return you to the ®rst saved track.
To delete tracks from the song list, perform the
following steps:
1. Turn the CD player on.
2. Press the SONG LIST button to turn song list on.
S-LIST will appear on the display.
3. Press the SEEK SCAN arrows to select the desired
track to be deleted.
4. Press and hold the SONG LIST button for two
seconds. When pressing SONG LIST, one beep
will be heard immediately. After two seconds
of pressing the SONG LIST button continuously,
two beeps will be heard to con®rm that the track has
been deleted.
3-61
Page 168 of 370

After a track has been deleted, the remaining tracks are
moved up the list. When another track is added to the
song list, the track will be added to the end of the list.
To delete the entire song list, perform the following
steps:
1. Turn the CD player on.
2. Press the SONG LIST button to turn song list on.
S-LIST will appear on the display.
3. Press and hold the SONG LIST button for more
than four seconds. A beep will be heard, followed
by two beeps after two seconds and a ®nal beep will
be heard after four seconds. S-LIST EMPTY will
appear on the display indicating that the song
list has been deleted.
If a disc is ejected, and the song list contains saved
tracks from that disc, those tracks are automatically
deleted from the song list. Any tracks saved to the song
list again are added to the bottom of the list.
To end song list mode, press the SONG LIST button.
One beep will be heard and S-LIST will be removed from
the display.Compact Disc Messages
CHECK CD:If this message appears on the radio
display, it could be due to one of the following reasons:
·You're driving on a very rough road. When the
road becomes smoother, the disc should play.
·The disc is dirty, scratched, wet, or upside down.
·The air is very humid. If so, wait about an hour and
try again.
·There may have been a problem while burning
the CD.
·The label may be caught in the CD player.
If the CD is not playing correctly, for any other reason,
try a known good CD.
If any error occurs repeatedly or if an error can not be
corrected, contact your dealer. If your radio displays
an error message, write it down and provide it to your
dealer when reporting the problem.
3-62
Page 276 of 370

Load Index:An assigned number ranging from 1 to
279 that corresponds to the load carrying capacity of
a tire.
Maximum Load Rating:The load rating for a tire at
the maximum permissible in¯ation pressure for that tire.
Maximum Loaded Vehicle Weight:The sum of
curb weight; accessory weight; vehicle capacity weight;
and production options weight.
Maximum Permissible In¯ation Pressure:The
maximum cold in¯ation pressure to which a tire may
be in¯ated.
Normal Occupant Weight:The number of occupants a
vehicle is designed to seat multiplied by 150 pounds
(68 kg). See
Loading Your Vehicle on page 4-32.
Occupant Distribution:Designated seating positions.
Outward Facing Sidewall:The side of a asymmetrical
tire that has a particular side that faces outward
when mounted on a vehicle. The side of the tire that
contains a whitewall, bears white lettering or bears
manufacturer, brand and or model name molding that is
higher or deeper than the same moldings on the
other sidewall of the tire.Passenger (P-Metric) Tire:A tire used on passenger
cars and some light duty trucks and multipurpose
vehicles.
Recommended In¯ation Pressure:Vehicle
manufacturer's recommended tire in¯ation pressure
shown on the tire placard. See
In¯ation -- Tire Pressure
on page 5-67andLoading Your Vehicle on page 4-32.
Radial Ply tire:A pneumatic tire in which the ply cords
that extend to the beads are laid at substantially
90 degrees to the centerline of the tread.
Rim:A metal support for a tire or a tire and tube
assembly upon which the tire beads are seated.
Sidewall:The portion of a tire between the tread and
the bead.
Speed Rating:An alphanumeric code assigned to a
tire indicating the maximum speed at which a tire
can operate.
Traction:The friction between the tire and the road
surface. The amount of grip provided.
Treadwear Indicators:Narrow bands, sometimes
called ªwear bars,º that show across the tread of a tire
when only 2/32 inch of tread remains. See
When It
Is Time for New Tires on page 5-70.
5-66
Page 351 of 370
We have quick, easy access to telephone numbers
of the following additional services depending on
your needs:
·Hotels
·Glass replacement
·Tire repair facilities
·Rental vehicle or taxis
·Airports or train stations
·Police, ®re departments or hospitals
In many instances, mechanical failures are covered
under Pontiac's comprehensive warranty. However,
when other services are utilized, our advisors will explain
any payment obligations you might incur.For prompt and efficient assistance when calling, please
provide the following information to give the advisor:
·Location of vehicle
·Telephone number of your location
·Vehicle model, year and color
·Mileage of vehicle
·Vehicle Identi®cation Number (VIN)
·Vehicle license plate number
Pontiac reserves the right to limit services or
reimbursement to an owner or driver when, in Pontiac's
judgement, the claims become excessive in frequency
or type of occurrence.
While we hope you never have the occasion to use our
service, it is added security while traveling for you
and your family. Remember, we're only a phone call
away. Pontiac Roadside Assistance: 1-800-ROADSIDE
or 1-800-762-3743, text telephone (TTY) users, call
1-888-889-2438.
7-7
Page 369 of 370

Tires (cont.)
If a Tire Goes Flat.......................................5-76
In¯ation Ð Tire Pressure..............................5-67
Inspection and Rotation................................5-68
Uniform Tire Quality Grading.........................5-72
Wheel Alignment and Tire Balance.................5-73
Wheel Replacement.....................................5-74
When It Is Time for New Tires......................5-70
To Use the Engine Coolant Heater....................2-19
Top Strap......................................................1-36
Top Strap Anchor Location...............................1-38
Torque Lock...................................................2-30
Total Weight on Your Vehicle's Tires..................4-36
Towing..........................................................4-30
Recreational Vehicle.....................................4-30
Towing a Trailer..........................................4-34
Your Vehicle...............................................4-30
Trailer Brakes.................................................4-37
Transaxle.......................................................5-23
Fluid, Automatic...........................................5-23
Fluid, Manual..............................................5-25
Transaxle Operation, Automatic.........................2-20
Transaxle Operation, Manual............................2-23
Transfer Case (Power Transfer Unit)..................5-51
Transmission, Transaxle, Transfer Case Unit
Repair Manual............................................7-11
Transportation Options...................................... 7-8
Trip Odometers..............................................3-27
Turn and Lane-Change Signals.......................... 3-6
Turn Signal/Multifunction Lever........................... 3-5Turn Signals When Towing a Trailer..................4-39
U
Underbody Flushing Service.............................6-23
Understanding Radio Reception........................3-63
Uniform Tire Quality Grading............................5-72
United States ± Customer Assistance.................. 7-4
Used Replacement Wheels..............................5-75
Using Cleaner on Fabric..................................5-90
Using Song List Mode.....................................3-61
Using the Recovery Hook................................4-29
V
Vehicle............................................................ 4-5
Control........................................................ 4-5
Damage Warnings........................................... iv
Loading......................................................4-32
Parking Your...............................................2-31
Symbols......................................................... iv
Vehicle Identi®cation........................................5-97
Number (VIN).............................................5-97
Service Parts Identi®cation Label...................5-97
Vehicle Storage..............................................5-44
Ventilation Adjustment......................................3-22
Visor Vanity Mirror..........................................2-13
Visors...........................................................2-13
13