power steering PONTIAC VIBE 2004 Owners Manual
[x] Cancel search | Manufacturer: PONTIAC, Model Year: 2004, Model line: VIBE, Model: PONTIAC VIBE 2004Pages: 370, PDF Size: 2.68 MB
Page 81 of 370
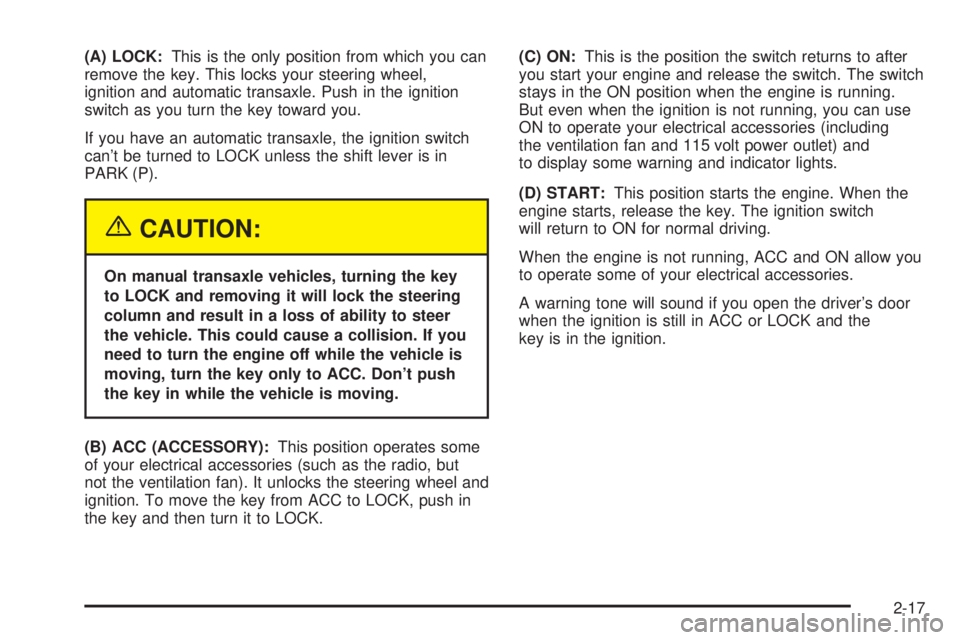
(A) LOCK:This is the only position from which you can
remove the key. This locks your steering wheel,
ignition and automatic transaxle. Push in the ignition
switch as you turn the key toward you.
If you have an automatic transaxle, the ignition switch
can't be turned to LOCK unless the shift lever is in
PARK (P).
{CAUTION:
On manual transaxle vehicles, turning the key
to LOCK and removing it will lock the steering
column and result in a loss of ability to steer
the vehicle. This could cause a collision. If you
need to turn the engine off while the vehicle is
moving, turn the key only to ACC. Don't push
the key in while the vehicle is moving.
(B) ACC (ACCESSORY):This position operates some
of your electrical accessories (such as the radio, but
not the ventilation fan). It unlocks the steering wheel and
ignition. To move the key from ACC to LOCK, push in
the key and then turn it to LOCK.(C) ON:This is the position the switch returns to after
you start your engine and release the switch. The switch
stays in the ON position when the engine is running.
But even when the ignition is not running, you can use
ON to operate your electrical accessories (including
the ventilation fan and 115 volt power outlet) and
to display some warning and indicator lights.
(D) START:This position starts the engine. When the
engine starts, release the key. The ignition switch
will return to ON for normal driving.
When the engine is not running, ACC and ON allow you
to operate some of your electrical accessories.
A warning tone will sound if you open the driver's door
when the ignition is still in ACC or LOCK and the
key is in the ignition.
2-17
Page 101 of 370
Storage Areas
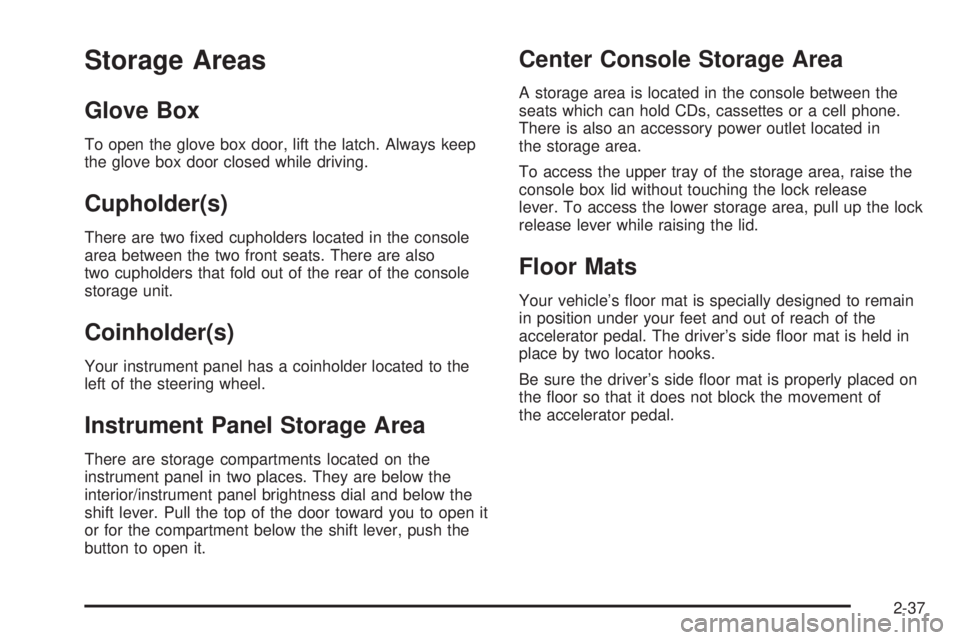
Glove Box
To open the glove box door, lift the latch. Always keep
the glove box door closed while driving.
Cupholder(s)
There are two ®xed cupholders located in the console
area between the two front seats. There are also
two cupholders that fold out of the rear of the console
storage unit.
Coinholder(s)
Your instrument panel has a coinholder located to the
left of the steering wheel.
Instrument Panel Storage Area
There are storage compartments located on the
instrument panel in two places. They are below the
interior/instrument panel brightness dial and below the
shift lever. Pull the top of the door toward you to open it
or for the compartment below the shift lever, push the
button to open it.
Center Console Storage Area
A storage area is located in the console between the
seats which can hold CDs, cassettes or a cell phone.
There is also an accessory power outlet located in
the storage area.
To access the upper tray of the storage area, raise the
console box lid without touching the lock release
lever. To access the lower storage area, pull up the lock
release lever while raising the lid.
Floor Mats
Your vehicle's ¯oor mat is specially designed to remain
in position under your feet and out of reach of the
accelerator pedal. The driver's side ¯oor mat is held in
place by two locator hooks.
Be sure the driver's side ¯oor mat is properly placed on
the ¯oor so that it does not block the movement of
the accelerator pedal.
2-37
Page 179 of 370

Braking in Emergencies
At some time, nearly every driver gets into a situation
that requires hard braking.
If you have anti-lock, you can steer and brake at the
same time. However, if you do not have anti-lock, your
®rst reaction Ð to hit the brake pedal hard and hold
it down Ð may be the wrong thing to do. Your wheels
can stop rolling. Once they do, the vehicle can not
respond to your steering. Momentum will carry it
in whatever direction it was headed when the wheels
stopped rolling. That could be off the road, into the very
thing you were trying to avoid, or into traffic.
If you do not have anti-lock, use a ªsqueezeº braking
technique. This will give you maximum braking
while maintaining steering control. You can do this by
pushing on the brake pedal with steadily increasing
pressure.
In an emergency, you will probably want to squeeze the
brakes hard without locking the wheels. If you hear or
feel the wheels sliding, ease off the brake pedal.This will help you retain steering control. If you
dohave
anti-lock, it is different. See ªAnti-Lock Brake Systemº
in this section.
In many emergencies, steering can help you more than
even the very best braking.
All-Wheel Drive (AWD) System
If your vehicle has all-wheel drive (AWD), the AWD
system operates automatically without any action
required by the driver. If the front drive wheels begin to
slip, the rear wheels will automatically begin to drive
the vehicle as required. There may be a slight
engagement noise during hard use but this is normal.
Steering
Power Steering
If you lose power steering assist because the engine
stops or the system is not functioning, you can steer but
it will take much more effort.
4-9
Page 201 of 370

Dinghy Towing
For front-wheel-drive vehicles with manual transaxles
only do the following:
When dinghy towing, be sure to follow the posted legal
speed limit.
1. Put the shift lever in neutral.
2. Turn the ignition to ACC to avoid locking the
steering wheel. Make sure the audio system is
turned off and that nothing is plugged into the
power outlets.
3. Release the parking brake.After dinghy towing, let the engine idle for more than
three minutes before driving the vehicle.
Do not tow your vehicle from the rear. Your vehicle
could be badly damaged and the repairs would not be
covered by your warranty.
Notice:Towing an all-wheel-drive vehicle with all
four wheels on the ground, or even with only two of
its wheels on the ground, will damage drivetrain
components. Do not tow an all-wheel-drive vehicle if
any of its wheels will be on the ground.
4-31
Page 211 of 370
Service............................................................5-3
Doing Your Own Service Work.........................5-3
Adding Equipment to the Outside of
Your Vehicle..............................................5-4
Fuel................................................................5-4
Gasoline Octane............................................5-4
Gasoline Speci®cations....................................5-5
California Fuel...............................................5-5
Additives.......................................................5-6
Fuels in Foreign Countries...............................5-6
Filling Your Tank............................................5-7
Filling a Portable Fuel Container.......................5-9
Checking Things Under the Hood....................5-10
Hood Release..............................................5-10
Engine Compartment Overview.......................5-12
Engine Oil...................................................5-16
Engine Air Cleaner/Filter................................5-21
Automatic Transaxle Fluid..............................5-23
Manual Transaxle Fluid..................................5-25
Hydraulic Clutch...........................................5-26
Engine Coolant.............................................5-27
Radiator Pressure Cap..................................5-29
Engine Overheating.......................................5-30
Cooling System............................................5-32
Power Steering Fluid.....................................5-38
Windshield Washer Fluid................................5-39Brakes........................................................5-40
Battery........................................................5-44
Jump Starting...............................................5-45
All-Wheel Drive..............................................5-51
Bulb Replacement..........................................5-52
Halogen Bulbs..............................................5-52
Headlamps..................................................5-52
Front Turn Signal Lamps...............................5-54
Center High-Mounted Stoplamp (CHMSL).........5-55
Rear Combination Lamps...............................5-56
Back-Up Lamps............................................5-58
Replacement Bulbs.......................................5-59
Windshield Wiper Blade Replacement..............5-60
Tires..............................................................5-61
In¯ation Ð Tire Pressure...............................5-67
Tire Inspection and Rotation...........................5-68
When It Is Time for New Tires.......................5-70
Buying New Tires.........................................5-71
Uniform Tire Quality Grading..........................5-72
Wheel Alignment and Tire Balance..................5-73
Wheel Replacement......................................5-74
Tire Chains..................................................5-75
If a Tire Goes Flat........................................5-76
Changing a Flat Tire.....................................5-77
Compact Spare Tire......................................5-88
Section 5 Service and Appearance Care
5-1
Page 223 of 370
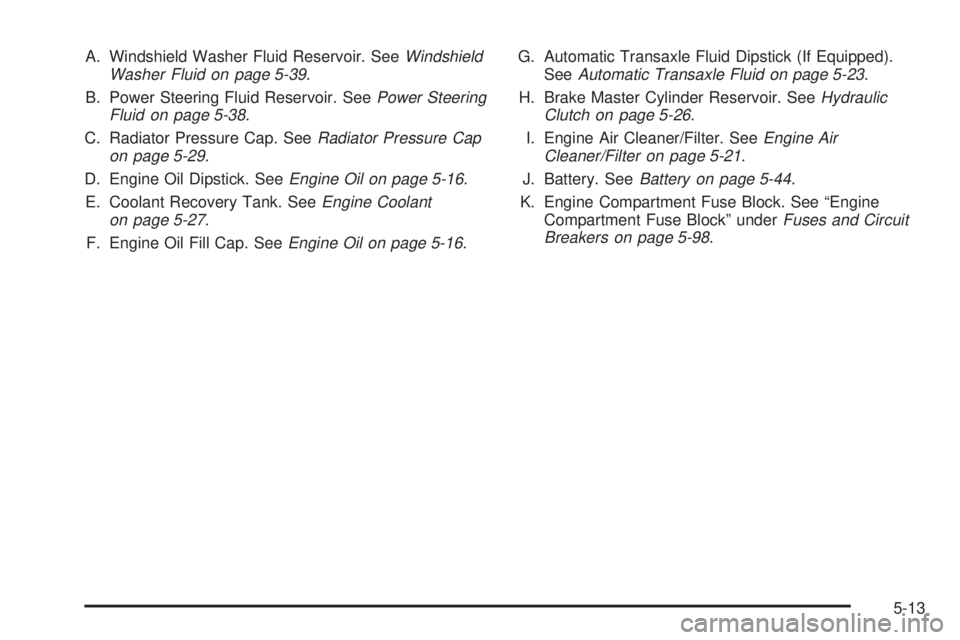
A. Windshield Washer Fluid Reservoir. SeeWindshield
Washer Fluid on page 5-39.
B. Power Steering Fluid Reservoir. See
Power Steering
Fluid on page 5-38.
C. Radiator Pressure Cap. See
Radiator Pressure Cap
on page 5-29.
D. Engine Oil Dipstick. See
Engine Oil on page 5-16.
E. Coolant Recovery Tank. See
Engine Coolant
on page 5-27.
F. Engine Oil Fill Cap. See
Engine Oil on page 5-16.G. Automatic Transaxle Fluid Dipstick (If Equipped).
See
Automatic Transaxle Fluid on page 5-23.
H. Brake Master Cylinder Reservoir. See
Hydraulic
Clutch on page 5-26.
I. Engine Air Cleaner/Filter. See
Engine Air
Cleaner/Filter on page 5-21.
J. Battery. See
Battery on page 5-44.
K. Engine Compartment Fuse Block. See ªEngine
Compartment Fuse Blockº under
Fuses and Circuit
Breakers on page 5-98.
5-13
Page 225 of 370
A. Windshield Washer Fluid Reservoir. SeeWindshield
Washer Fluid on page 5-39.
B. Power Steering Fluid Reservoir. See
Power Steering
Fluid on page 5-38.
C. Radiator Pressure Cap. See
Radiator Pressure Cap
on page 5-29.
D. Engine Oil Dipstick. See
Engine Oil on page 5-16.
E. Coolant Recovery Tank. See
Engine Coolant
on page 5-27.
F. Engine Oil Fill Cap. See
Engine Oil on page 5-16.G. Automatic Transaxle Fluid Dipstick (If Equipped).
See
Automatic Transaxle Fluid on page 5-23.
H. Brake Master Cylinder Reservoir. See
Hydraulic
Clutch on page 5-26.
I. Engine Air Cleaner/Filter. See
Engine Air
Cleaner/Filter on page 5-21.
J. Battery. See
Battery on page 5-44.
K. Engine Compartment Fuse Block. See ªEngine
Compartment Fuse Blockº under
Fuses and Circuit
Breakers on page 5-98.
5-15
Page 248 of 370

Power Steering Fluid
When to Check Power Steering Fluid
It is not necessary to regularly check power steering ¯uid
unless you suspect there is a leak in the system or
you hear an unusual noise. A ¯uid loss in this system
could indicate a problem. Have the system inspected
and repaired.
The power steering ¯uid
reservoir is located in the
engine compartment
on the passenger's side of
the vehicle. See
Engine
Compartment Overview on
page 5-12
for reservoir
location.
How to Check Power Steering Fluid
You can check your ¯uid without taking the cap off. Just
look at the reservoir.
·When the engine compartment is hot, the level
should be between the HOT marks.
·When the engine compartment is cool, the level
should be between the COLD marks.
What to Use
To determine what kind of ¯uid to use, seePart D: Recommended Fluids and Lubricants on
page 6-26.
Notice:When adding power steering ¯uid or
making a complete ¯uid change, always use the
proper ¯uid. Failure to use the proper ¯uid can
cause leaks and damage hoses and seals.
5-38
Page 275 of 370

Tire Terminology and De®nitions
Air Pressure:The amount of air inside the tire pressing
outward on each square inch of the tire. Air pressure
is expressed in pounds per square inch (psi) or
kilopascal (kPa).
Accessory Weight:This means the combined weight
of optional accessories, for example, automatic
transmission, power steering, power brakes, power
windows, power seats, radio and air conditioning.
Aspect Ratio:The relationship of a tire's height to
its width.
Belt:A rubber coated layer of cords that is located
between the plies and the tread. Cords may be made
from steel or other reinforcing materials.
Bead:The tire bead contains steel wires that hold the
tire onto the rim.
Bias Ply Tire:A pneumatic tire in which the ply cords
that extend to the beads are laid at alternate angles
substantially less than 90 degrees to the centerline of
the tread.
Cold In¯ation Pressure:The amount of air pressure in
a tire, measured in pounds per square inch (psi) or
kilopascal (kPa), before a tire has built up heat
from driving. See
In¯ation -- Tire Pressure on page 5-67.Curb Weight:This means the weight of a motor
vehicle with standard and optional equipment including
the maximum capacity of fuel, oil and coolant, without
passengers and cargo.
DOT Markings:A code molded into the sidewall of a
tire signifying that the tire is in compliance with the
U.S. Department of Transportation motor vehicle safety
standards. The DOT code includes the Tire Identi®cation
Number (TIN), an alphanumeric designator which can
also identify the tire manufacturer, production plant,
brand and date of production.
GVWR:Gross Vehicle Weight Rating, see
Loading
Your Vehicle on page 4-32.
GAWR FRT:Gross Axle Weight Rating for the front
axle, see
Loading Your Vehicle on page 4-32.
GAWR RR:Gross Axle Weight Rating for the rear axle,
see
Loading Your Vehicle on page 4-32.
Intended Outboard Sidewall:The side of an
asymmetrical tire that must always face outward when
mounted on a vehicle.
Kilopascal (kPa):The metric unit for air pressure.
There are 6.9 kPa's to one psi.
Light Truck (LT-Metric) Tire:A tire used on light duty
trucks and some multipurpose passenger vehicles.
5-65
Page 334 of 370
At Least Twice a Year
Restraint System Check
Make sure the safety belt reminder light and all your
belts, buckles, latch plates, retractors and anchorages
are working properly. Look for any other loose or
damaged safety belt system parts. If you see anything
that might keep a safety belt system from doing its
job, have it repaired. Have any torn or frayed safety belts
replaced.
Also look for any opened or broken air bag coverings,
and have them repaired or replaced. (The air bag
system does not need regular maintenance.)
Wiper Blade Check
Inspect wiper blades for wear or cracking. Replace
blade inserts that appear worn or damaged or that
streak or miss areas of the windshield. Also see
Cleaning the Outside of Your Vehicle on page 5-92.
Weatherstrip Lubrication
Silicone grease on weatherstrips will make them last
longer, seal better, and not stick or squeak. Apply
silicone grease with a clean cloth. During very cold,
damp weather more frequent application may be
required. See
Part D: Recommended Fluids and
Lubricants on page 6-26.
Fluid Level Check
Check the power steering pump and automatic or
manual transaxle ¯uid levels and add as needed. See
Power Steering Fluid on page 5-38andAutomatic
Transaxle Fluid on page 5-23orManual Transaxle Fluid
on page 5-25. Check for leaks. A ¯uid loss in these
systems could indicate a problem. Have the system
inspected and repaired at once.
6-20