PONTIAC VIBE 2006 Owners Manual
Manufacturer: PONTIAC, Model Year: 2006, Model line: VIBE, Model: PONTIAC VIBE 2006Pages: 388, PDF Size: 2.48 MB
Page 171 of 388
TRAF (Traffic):If TRAF appears on the display, the
tuned station broadcasts traffic announcements.
To receive the traffic announcement from the tuned
station, press this button. Brackets will be displayed
around TRAF and when a traffic announcement comes
on the tuned radio station you will hear it.
If the station does not broadcast traffic announcements,
press the TRAF button and the radio will seek to a
station that does. When a station that broadcasts traffic
announcements is found, the radio will stop seeking
and brackets will be displayed around TRAF. If no
station is found that broadcasts traffic announcements,
NO TRAFFIC will appear on the display.
If the brackets are on the display and TRAF is not,
press the TRAF button to remove the brackets or use
the TUNE knob or the SEEK arrows to go to a
station that supports traffic announcements. If no station
is found that broadcasts traffic announcements, NO
TRAFFIC will appear on the display.
The radio will play the traffic announcement if the
volume is low. The radio will interrupt the play of a CD if
the last tuned station broadcasts traffic announcements
and the brackets are displayed.Playing a CD
Insert a CD partway into the slot, label side up. The
player will pull it in and READING DISC and the
CD symbol will appear on the display. If you want to
insert a CD with the ignition off, �rst press the eject
button or push the RCL button.
If the ignition or radio is turned off with a CD in the
player it will stay in the player. When the ignition or radio
is turned on, the CD will start to play where it stopped,
if it was the last selected audio source.
When the CD is inserted, the CD symbol will appear on
the display. As each new track starts to play, the
track number will appear on the display.
The CD player can play the smaller 3 inch (8 cm) single
CDs with an adapter ring. Full-size CDs and the
smaller CDs are loaded in the same manner.
If playing a CD-R, the sound quality may be reduced due
to CD-R quality, the method of recording, the quality of
the music that has been recorded, and the way the CD-R
has been handled. There may be an increase in skipping,
difficulty in �nding tracks, and/or difficulty in loading and
ejecting. If these problems occur, check the bottom
surface of the CD. If the surface of the CD is damaged,
such as cracked, broken, or scratched, the CD will not
play properly. If the surface of the CD is soiled, seeCare
of Your CDs on page 3-78for more information.
3-59
Page 172 of 388
If there is no apparent damage, try a known good CD.
Do not add any label to a CD, it could get caught in the
CD player. If a CD is recorded on a personal computer
and a description label is needed, try labeling the top of
the recorded CD with a marking pen instead.
Notice:If you add any label to a CD, insert more
than one CD into the slot at a time, or attempt
to play scratched or damaged CDs, you could
damage the CD player. When using the CD player,
use only CDs in good condition without any
label, load one CD at a time, and keep the CD player
and the loading slot free of foreign materials,
liquids, and debris.
If an error appears on the display, see “CD Messages”
later in this section.
\1 (Forward):Press and hold this pushbutton to
advance quickly within a track. You will hear sound at a
reduced volume. Release this pushbutton to play the
passage. The elapsed time of the track will appear
on the display.
RDM 2 (Random):Press this pushbutton to hear the
tracks in random, rather than sequential, order.
RDM and the track number will appear on the display.
Press RDM again to turn off random play.
#3 (Next Folder):This button does not have a
function for non-MP3 CDs.4
s(Reverse):Press and hold this pushbutton to
reverse quickly within a track. You will hear sound at a
reduced volume. Release this pushbutton to play the
passage. The elapsed time of the track will appear
on the display.
6
!(Previous Folder):This button does not have a
function for non-MP3 CDs.
EQ (Equalizer):Press EQ to select the desired
customized equalization setting while playing a CD. The
equalization will be automatically set whenever a CD is
played. See “EQ” listed previously for more information.
wSEEKx:Press the up arrow to go to the start of
the next track. Press the down arrow to go to the start
of the previous track. Pressing either arrow for more
than two seconds will search the previous or next
tracks at two tracks per second. When the track number
that you would like to play appears on the display,
release the arrow to stop searching and to play
the track.
wSCANx:Press and hold either arrow for more
than two seconds until SCAN and the track number
appear on the display and you hear a beep. The CD will
go to the next track, play for a few seconds, then go
on to the next track. Press either arrow again to
stop scanning.
3-60
Page 173 of 388
RCL (Recall):Push this button to see how long the
current track has been playing. To change the default on
the display, track and elapsed time, push the button
until you see the display you want, then hold the button
until the display �ashes. The selected display will
now be the default. While elapsed time appears on the
display, CD TIME will appear on the display.
BAND:Press this button to listen to the radio when a
CD is playing. The inactive CD will remain safely
inside the radio for future listening.
CD AUX (Auxiliary):Press this button to play a CD
when listening to the radio. The CD symbol will appear
on the display when a CD is loaded.
Z(Eject):Press this button to eject a CD. Eject may
be activated with either the ignition or radio off. CDs
may be loaded with the radio and ignition off if this
button is pressed �rst.
Using an MP3 CD
MP3 Format
If you burn your own MP3 disc on a personal computer:
Make sure the MP3 �les are recorded on a
CD-R disc.
Make sure to �nalize the disc when burning an MP3
disc, using multiple sessions. It is usually better to
burn the disc all at once.
Files can be recorded with a variety of �xed or
variable bit rates. Song title, artist name, and album
will be available for display by the radio when
recorded using ID3 tags version 1 and 2.
Do not mix standard audio and MP3 �les on
one disc.
Make sure playlists have a.pls, or.m3u, or.rmp
extension, other �le extensions may not work.
Create a folder structure that makes it easy to �nd
songs while driving. Organize songs by albums
using one folder for each album. Each folder
or album should contain 18 songs or less.
The player will be able to read and play a maximum of
50 folders, 50 playlists, 10 sessions, and 255 �les.
Long �le names, folder names, or playlist names may
use more disc memory space than necessary. To
conserve space on the disc, minimize the length of the
�le, folder or playlist names. You can also play an
MP3 CD that was recorded using no �le folders. The
system can support up to 11 folders in depth, though,
keep the depth of the folders to a minimum in order
to keep down the complexity and confusion in trying to
locate a particular folder during playback. If a CD
contains more than the maximum of 50 folders,
50 playlists, 10 sessions, and 255 �les the player will let
you access and navigate up to the maximum, but all
items over the maximum will be ignored.
3-61
Page 174 of 388
Root Directory
The root directory will be treated as a folder. If the root
directory has compressed audio �les, the directory
will be displayed as F1 ROOT. All �les contained directly
under the root directory will be accessed prior to any
root directory folders. However, playlists (Px) will always
be accessed before root folders or �les.
Empty Directory or Folder
If a root directory or a folder exists somewhere in the
�le structure that contains only folders/subfolders and no
compressed �les directly beneath them, the player will
advance to the next folder in the �le structure that
contains compressed audio �les and the empty folder
will not be displayed or numbered.
No Folder
When the CD contains only compressed �les, the �les will
be located under the root folder. The next and previous
folder functions will have no function on a CD that was
recorded without folders or playlists. When displaying the
name of the folder the radio will display ROOT.
When the CD contains only playlists and compressed
audio �les, but no folders, all �les will be located under
the root folder. The folder down and the folder up
buttons will search playlists (Px) �rst and then go to the
root folder. When the radio displays the name of the
folder the radio will display ROOT.
Order of Play
Tracks will be played in the following order:
Play will begin from the �rst track in the �rst playlist
and will continue sequentially through all tracks in
each playlist. When the last track of the last playlist
has been played, play will continue from the �rst
track of the �rst playlist.
If the CD does not contain any playlists, then play will
begin from the �rst track under the root directory.
When all tracks from the root directory have been
played, play will continue from �les according to their
numerical listing. After playing the last track from the
last folder, play will begin again at the �rst track of
the �rst folder or root directory.
When play enters a new folder, the display will not
automatically show the new folder name unless
you have chosen the folder mode as the default display.
See RCL later in this section for more information.
The new track name will appear on the display.
3-62
Page 175 of 388

File System and Naming
The song name that will be displayed will be the song
name that is contained in the ID3 tag. If the song name
is not present in the ID3 tag, then the radio will
display the �le name without the extension (such as
.mp3) as the track name.
Track names longer than 39 characters or 3 pages will
be shortened. The display will not show parts of
words on the last page of text and the extension of the
�lename will not be displayed.
Preprogrammed Playlists
You can access preprogrammed playlists which were
created by WinAmp™, MusicMatch™, or Real
Jukebox™ software, however, you will not have editing
capability. These playlists will be treated as special
folders containing compressed audio song �les.
Playing an MP3
Insert a CD partway into the slot, label side up. The
player will pull it in, and READING DISC will appear on
the display. The CD should begin playing and the
CD symbol will appear on the display. If you want to
insert a CD with the ignition off, �rst press the eject
button or the RCL button.If the ignition or radio is turned off with a CD in the
player it will stay in the player. When the ignition or radio
is turned on, the CD will start to play where it stopped,
if it was the last selected audio source.
As each new track starts to play, the track number will
appear on the display.
The CD player can play the smaller 3 inch (8 cm) single
CDs with an adapter ring. Full-size CDs and the
smaller CDs are loaded in the same manner.
If playing a CD-R, the sound quality may be reduced
due to CD-R quality, the method of recording, the quality
of the music that has been recorded, and the way the
CD-R has been handled. There may be an increase
in skipping, difficulty in �nding tracks, and/or difficulty in
loading and ejecting. If these problems occur, check
the bottom surface of the CD. If the surface of the CD is
damaged, such as cracked, broken, or scratched, the
CD will not play properly. If the surface of the CD
is soiled, seeCare of Your CDs on page 3-78for more
information.
If there is no apparent damage, try a known good CD.
3-63
Page 176 of 388

Do not add any label to a CD, it could get caught in the
CD player. If a CD is recorded on a personal computer
and a description label is needed, try labeling the top of
the recorded CD with a marking pen instead.
Notice:If you add any label to a CD, insert more
than one CD into the slot at a time, or attempt
to play scratched or damaged CDs, you could
damage the CD player. When using the CD player,
use only CDs in good condition without any
label, load one CD at a time, and keep the CD player
and the loading slot free of foreign materials,
liquids, and debris.
If an error appears on the display, see “CD Messages”
later in this section.
\1 (Forward):Press and hold this pushbutton to
advance quickly within a track. Press and hold this
pushbutton for less than two seconds to advance
at 10 times the normal playing speed. Press and hold it
for more than two seconds to advance at 20 times
the normal playing speed. Release this pushbutton to
play the track. FWD and the elapsed time of the
track will appear on the display.
RDM 2 (Random):To repeat the tracks in the current
folder or playlist, press and release this pushbutton.
FOLDER RANDOM will appear on the display. Once all
of the tracks in the current folder or playlist have
been played, the system will move on to the next folder
or playlist and play all of the tracks in random order.To repeat the tracks on the CD, press and hold this
pushbutton for two seconds. You will hear a beep and
DISC RANDOM will appear on the display. This
feature will not work with playlists.
When in random, pressing and releasing either SEEK
arrow will take you to the next or previous random track.
Press and release this pushbutton again to turn off
random play. NO RANDOM will appear on the display.
#3 (Next Folder):Press this pushbutton to go
to the �rst track in the next folder or playlist. If the disc
contains playlists, it will go through the playlist, then
the folders. Pressing this button while in folder random
mode will take you to the next folder and random
the tracks in that folder. This function will not work on a
CD that does not contain folders or playlists.
4
s(Reverse):Press and hold this pushbutton to
reverse quickly within a track. Press and hold this
pushbutton for less than two seconds to reverse at
10 times the normal playing speed. Press and hold it for
more than two seconds to reverse at 20 times the
normal playing speed. Release this pushbutton to play
the track. REV and the elapsed time of the track
will appear on the display. If this pushbutton is pressed
for more than 20 seconds, the radio will stop reversing
and begin to play.
3-64
Page 177 of 388

6!(Previous Folder):Press this pushbutton to go to
the �rst track in the previous folder or playlist. If the disc
contains playlists, it will go through the playlist, then the
folders. Pressing this pushbutton while in folder random
mode will take you to the previous folder and random the
tracks in that folder. This function will not work on a CD
that does not contain folders or playlists.
wSEEKx:Press the up arrow to go to the start of the
next track. Press the down arrow to go to the start of the
previous track. Pressing either arrow for more than
two seconds will search the previous or next tracks at
two tracks per second. When the track number that you
would like to play appears on the display, release the
arrow to stop searching and to play the track.
TUNE:Turn this knob to fast track reverse or advance
through tracks in all folders or playlists. The track
number and �le name will appear on the display for
each track. Turn this knob while in random to fast track
reverse or advance the tracks in sequential order.
RCL (Recall):Push this button to switch between track
mode, folder or playlist mode, and time of day mode.
The display will show only 13 characters, but there can
be up to three pages of text. If there are more than
13 characters in the song, folder, or playlist name
pushing this button within two seconds will take you to
the next page of text. If there are no other pages to
be shown, pushing this button within two seconds will
take you to the next display mode.Track mode will display the current track number and
the ID3 tag song name.
Folder/playlist mode will display the current folder or
playlist number and the folder/playlist name.
Time of day mode will display the time of day and the
ID3 tag song name.
To change the default on the display, push this button
until you see the display you want, then hold this button
for two seconds. The radio will produce one beep and
the selected display will now be the default.
INFO (Information):INFO will appear on the display
whenever a current track has ID3 tag information. Press
this button to display the artist name and album
contained in the tag. INFO will disappear from the
display when the information in the ID3 tag has �nished.
BAND:Press this button to listen to the radio when a
CD is playing. The inactive CD will remain safely
inside the radio for future listening.
CD AUX (Auxiliary):Press this button to play a CD
when listening to the radio. The CD symbol will appear
on the display when a CD is loaded.
Z(Eject):Press this button to eject a CD. Eject may
be activated with either the ignition or radio off. CDs
may be loaded with the radio and ignition off if this
button is pressed �rst.
3-65
Page 178 of 388
CD Messages
CHECK CD:If this message appears on the display
and/or the CD comes out, it could be for one of the
following reasons:
It is very hot. When the temperature returns to
normal, the CD should play.
You are driving on a very rough road. When the
road becomes smoother, the CD should play.
The CD is dirty, scratched, wet, or upside down.
The air is very humid. If so, wait about an hour and
try again.
The format of the CD may not be compatible. See
“MP3 Format” earlier in this section.
There may have been a problem while burning
the CD.
The label may be caught in the CD player.
If the CD is not playing correctly, for any other reason,
try a known good CD.
If any error occurs repeatedly or if an error cannot be
corrected, contact your GM dealer. If the radio displays
an error message, write it down and provide it to
your GM dealer when reporting the problem.
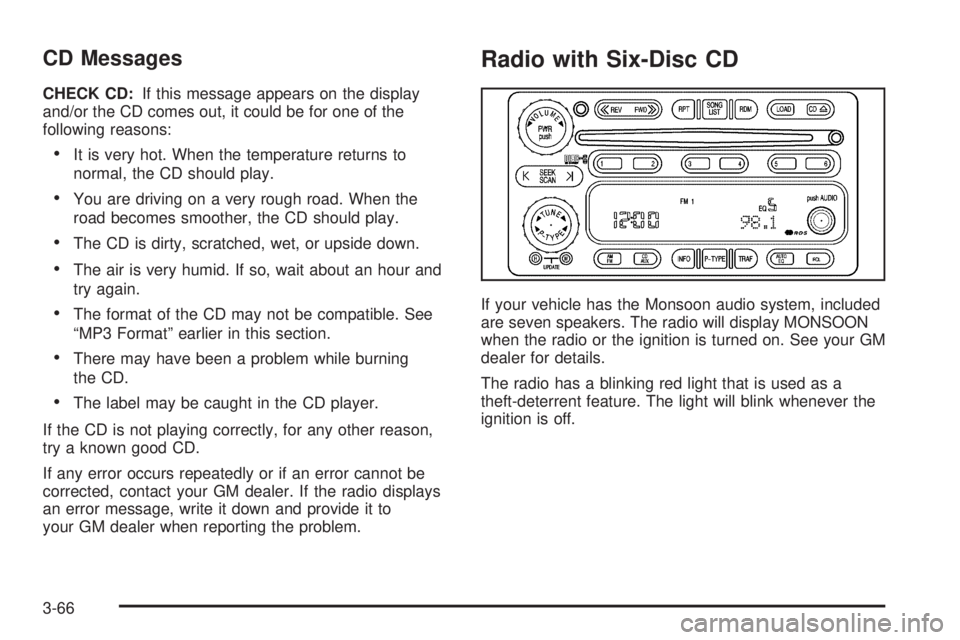
Radio with Six-Disc CD
If your vehicle has the Monsoon audio system, included
are seven speakers. The radio will display MONSOON
when the radio or the ignition is turned on. See your GM
dealer for details.
The radio has a blinking red light that is used as a
theft-deterrent feature. The light will blink whenever the
ignition is off.
3-66
Page 179 of 388
Playing the Radio
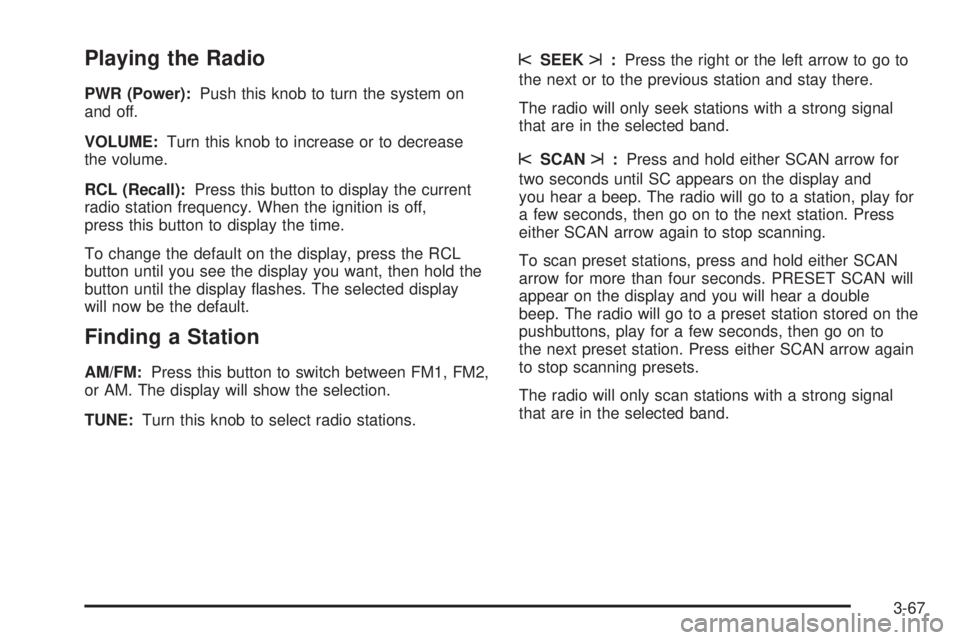
PWR (Power):Push this knob to turn the system on
and off.
VOLUME:Turn this knob to increase or to decrease
the volume.
RCL (Recall):Press this button to display the current
radio station frequency. When the ignition is off,
press this button to display the time.
To change the default on the display, press the RCL
button until you see the display you want, then hold the
button until the display �ashes. The selected display
will now be the default.
Finding a Station
AM/FM:Press this button to switch between FM1, FM2,
or AM. The display will show the selection.
TUNE:Turn this knob to select radio stations.
sSEEKt:Press the right or the left arrow to go to
the next or to the previous station and stay there.
The radio will only seek stations with a strong signal
that are in the selected band.
sSCANt:Press and hold either SCAN arrow for
two seconds until SC appears on the display and
you hear a beep. The radio will go to a station, play for
a few seconds, then go on to the next station. Press
either SCAN arrow again to stop scanning.
To scan preset stations, press and hold either SCAN
arrow for more than four seconds. PRESET SCAN will
appear on the display and you will hear a double
beep. The radio will go to a preset station stored on the
pushbuttons, play for a few seconds, then go on to
the next preset station. Press either SCAN arrow again
to stop scanning presets.
The radio will only scan stations with a strong signal
that are in the selected band.
3-67
Page 180 of 388
Setting Preset Stations
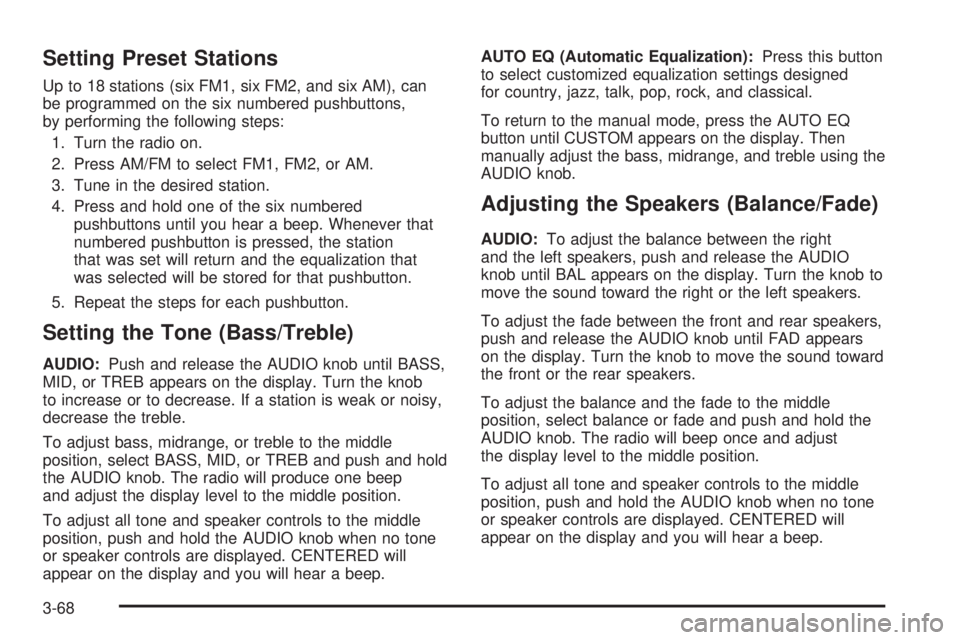
Up to 18 stations (six FM1, six FM2, and six AM), can
be programmed on the six numbered pushbuttons,
by performing the following steps:
1. Turn the radio on.
2. Press AM/FM to select FM1, FM2, or AM.
3. Tune in the desired station.
4. Press and hold one of the six numbered
pushbuttons until you hear a beep. Whenever that
numbered pushbutton is pressed, the station
that was set will return and the equalization that
was selected will be stored for that pushbutton.
5. Repeat the steps for each pushbutton.
Setting the Tone (Bass/Treble)
AUDIO:Push and release the AUDIO knob until BASS,
MID, or TREB appears on the display. Turn the knob
to increase or to decrease. If a station is weak or noisy,
decrease the treble.
To adjust bass, midrange, or treble to the middle
position, select BASS, MID, or TREB and push and hold
the AUDIO knob. The radio will produce one beep
and adjust the display level to the middle position.
To adjust all tone and speaker controls to the middle
position, push and hold the AUDIO knob when no tone
or speaker controls are displayed. CENTERED will
appear on the display and you will hear a beep.AUTO EQ (Automatic Equalization):Press this button
to select customized equalization settings designed
for country, jazz, talk, pop, rock, and classical.
To return to the manual mode, press the AUTO EQ
button until CUSTOM appears on the display. Then
manually adjust the bass, midrange, and treble using the
AUDIO knob.
Adjusting the Speakers (Balance/Fade)
AUDIO:To adjust the balance between the right
and the left speakers, push and release the AUDIO
knob until BAL appears on the display. Turn the knob to
move the sound toward the right or the left speakers.
To adjust the fade between the front and rear speakers,
push and release the AUDIO knob until FAD appears
on the display. Turn the knob to move the sound toward
the front or the rear speakers.
To adjust the balance and the fade to the middle
position, select balance or fade and push and hold the
AUDIO knob. The radio will beep once and adjust
the display level to the middle position.
To adjust all tone and speaker controls to the middle
position, push and hold the AUDIO knob when no tone
or speaker controls are displayed. CENTERED will
appear on the display and you will hear a beep.
3-68