warning PONTIAC VIBE 2010 Owner's Manual
[x] Cancel search | Manufacturer: PONTIAC, Model Year: 2010, Model line: VIBE, Model: PONTIAC VIBE 2010Pages: 318, PDF Size: 1.7 MB
Page 163 of 318
The number displayed in the
instrument cluster is the highest
gear that the transmission will
be allowed to operate in. However,
your vehicle can automatically
shift to lower gears as required
by various driving conditions.
This means that all gears below
that number are available.
The display in the instrument cluster
will change from the currently
displayed message to 4 (Fourth)
when you enter S (Shift Control), and
change to indicate the requested
gear range when moving the shift
lever forward or rearward.
While using the DSC feature the
transmission will have firmer shifting
and sportier performance. You can
use this for sport driving or when
climbing hills to stay in gear longer
or to downshift for more power or
engine braking.The transmission will only allow
shifting into gears appropriate
for the vehicles speed and engine
revolutions per minute (RPM):
•The transmission will not
automatically shift to the next
higher gear if the vehicle speed
or engine RPM is too high.
•The transmission will not allow
shifting to the next lower gear if
the vehicle speed or engine RPM
is too high. An audible warning
will sound and the downshift will
not be allowed. The downshift
request will have to be made
again once the vehicle reaches
an acceptable speed.
Downshift
Requested Required
Vehicle Speed
4 (Fourth) to
3 (Third) Below 95 mph
(153 km/h)
3 (Third) to
2 (Second) Below 60 mph
(97 km/h)
2 (Second) to
1 (First) Below 30 mph
(48 km/h)
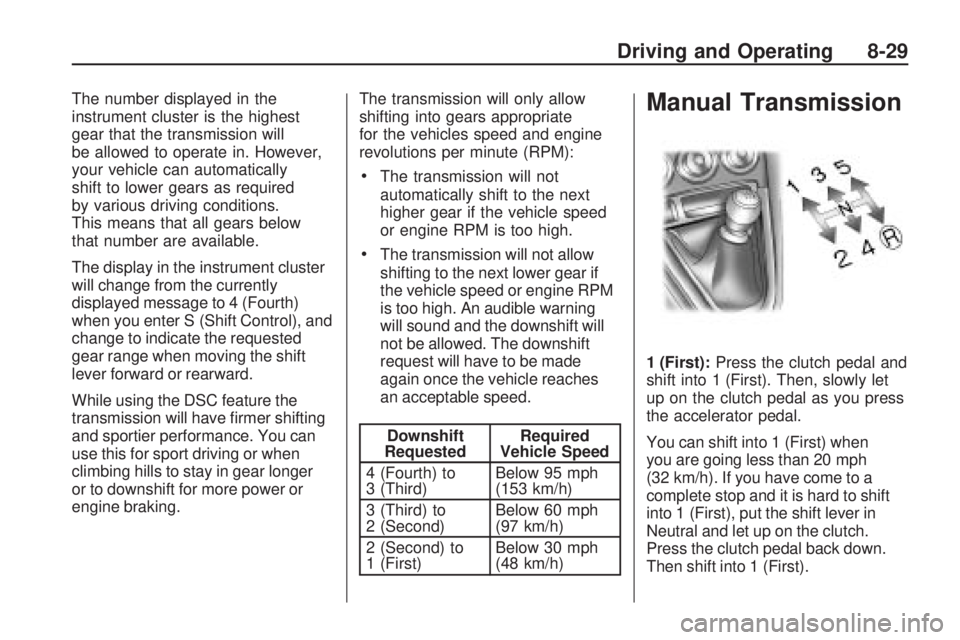
Manual Transmission
1 (First):
Press the clutch pedal and
shift into 1 (First). Then, slowly let
up on the clutch pedal as you press
the accelerator pedal.
You can shift into 1 (First) when
you are going less than 20 mph
(32 km/h). If you have come to a
complete stop and it is hard to shift
into 1 (First), put the shift lever in
Neutral and let up on the clutch.
Press the clutch pedal back down.
Then shift into 1 (First).
Driving and Operating 8-29
Page 166 of 318
Brakes
Antilock Brake
System (ABS)
This vehicle has the Antilock Brake
System (ABS), an advanced
electronic braking system that
helps prevent a braking skid.
When the engine is started and the
vehicle begins to drive away, ABS
checks itself. A momentary motor or
clicking noise might be heard while
this test is going on, and it might
even be noticed that the brake pedal
moves a little. This is normal.
If there is a problem with ABS, this
warning light stays on. SeeAntilock
Brake System (ABS) Warning Light
on page 4-17. Let us say the road is wet and you
are driving safely. Suddenly, an
animal jumps out in front of you.
You slam on the brakes and continue
braking. Here is what happens
with ABS:
A computer senses that the wheels
are slowing down. If one of the
wheels is about to stop rolling, the
computer will separately work the
brakes at each wheel.
ABS can change the brake pressure
to each wheel, as required, faster
than any driver could. This can help
the driver steer around the obstacle
while braking hard.
As the brakes are applied, the
computer keeps receiving updates
on wheel speed and controls braking
pressure accordingly.
Remember: ABS does not change
the time needed to get a foot up to
the brake pedal or always decrease
stopping distance. If you get too
close to the vehicle in front of you,
there will not be enough time to apply
the brakes if that vehicle suddenly
slows or stops. Always leave
enough room up ahead to stop,
even with ABS.
Using ABS
Do not pump the brakes. Just hold
the brake pedal down firmly and
let antilock work. The antilock pump
or motor might be heard operating,
and the brake pedal might be
felt to pulsate, but this is normal.
Braking in Emergencies
ABS allows the driver to steer and
brake at the same time. In many
emergencies, steering can help more
than even the very best braking.
United States
Canada
8-32 Driving and Operating
Page 167 of 318
Parking Brake
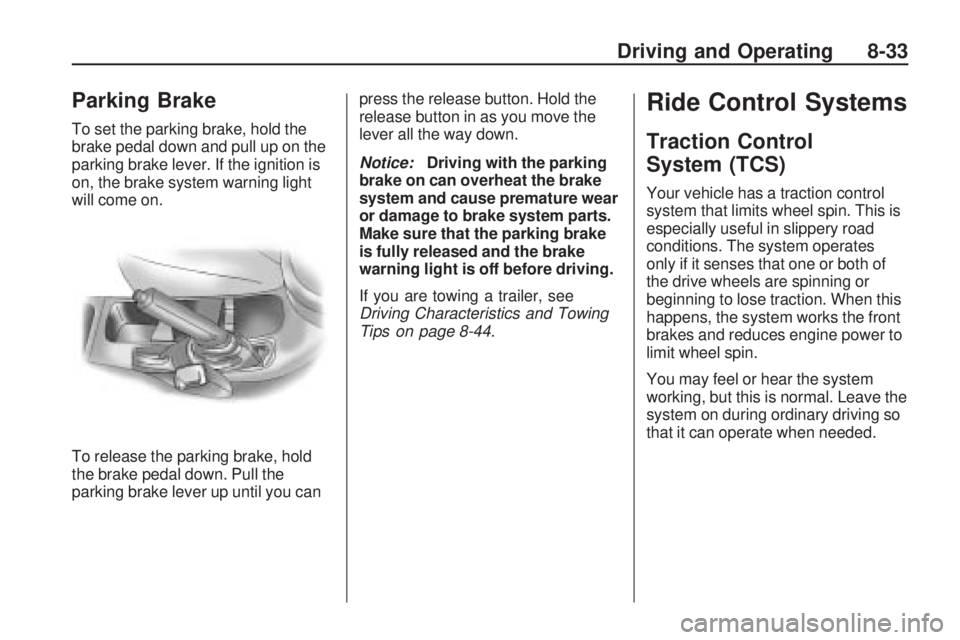
To set the parking brake, hold the
brake pedal down and pull up on the
parking brake lever. If the ignition is
on, the brake system warning light
will come on.
To release the parking brake, hold
the brake pedal down. Pull the
parking brake lever up until you canpress the release button. Hold the
release button in as you move the
lever all the way down.
Notice:
Driving with the parking
brake on can overheat the brake
system and cause premature wear
or damage to brake system parts.
Make sure that the parking brake
is fully released and the brake
warning light is off before driving.
If you are towing a trailer, see
Driving Characteristics and Towing
Tips on page 8-44.
Ride Control Systems
Traction Control
System (TCS)
Your vehicle has a traction control
system that limits wheel spin. This is
especially useful in slippery road
conditions. The system operates
only if it senses that one or both of
the drive wheels are spinning or
beginning to lose traction. When this
happens, the system works the front
brakes and reduces engine power to
limit wheel spin.
You may feel or hear the system
working, but this is normal. Leave the
system on during ordinary driving so
that it can operate when needed.
Driving and Operating 8-33
Page 168 of 318
When the ignition is turned to
ON/RUN, the system automatically
turns on. If the system has been
turned off, it will automatically turn on
at 55 km/h (35 mph). TCS cannot be
turned off above 55 km/h (35 mph).
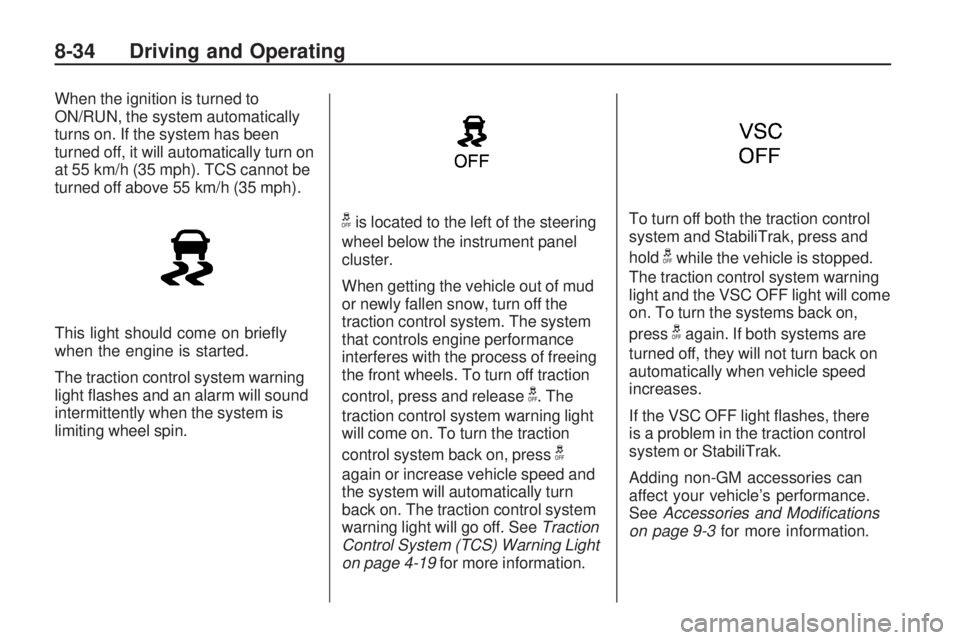
This light should come on briefly
when the engine is started.
The traction control system warning
light flashes and an alarm will sound
intermittently when the system is
limiting wheel spin.
gis located to the left of the steering
wheel below the instrument panel
cluster.
When getting the vehicle out of mud
or newly fallen snow, turn off the
traction control system. The system
that controls engine performance
interferes with the process of freeing
the front wheels. To turn off traction
control, press and release
g. The
traction control system warning light
will come on. To turn the traction
control system back on, press
g
again or increase vehicle speed and
the system will automatically turn
back on. The traction control system
warning light will go off. See Traction
Control System (TCS) Warning Light
on page 4-19 for more information. To turn off both the traction control
system and StabiliTrak, press and
hold
gwhile the vehicle is stopped.
The traction control system warning
light and the VSC OFF light will come
on. To turn the systems back on,
press
gagain. If both systems are
turned off, they will not turn back on
automatically when vehicle speed
increases.
If the VSC OFF light flashes, there
is a problem in the traction control
system or StabiliTrak.
Adding non-GM accessories can
affect your vehicle’s performance.
See Accessories and Modi�cations
on page 9-3 for more information.
8-34 Driving and Operating
Page 169 of 318
StabiliTrak System
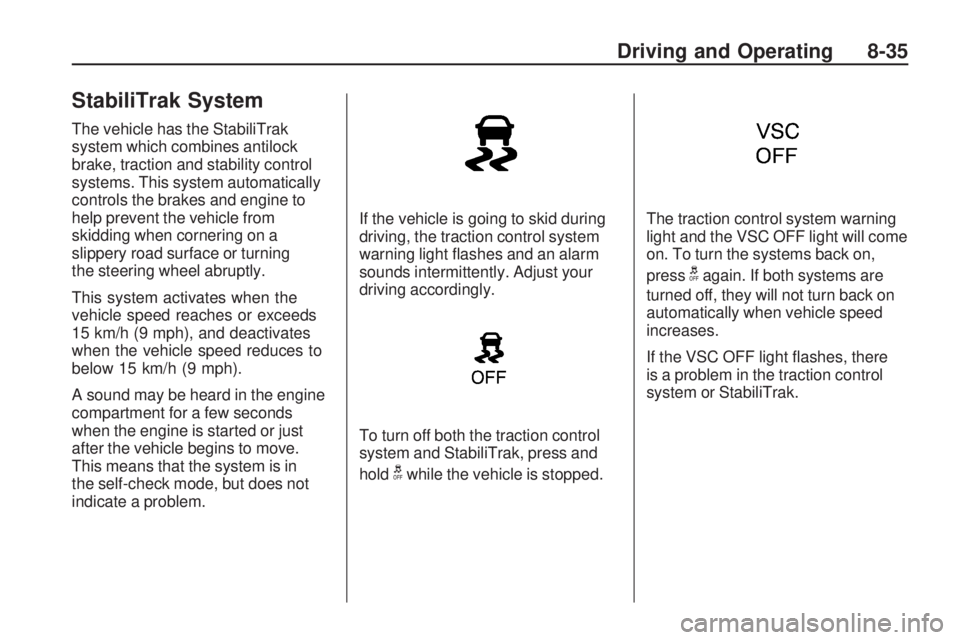
The vehicle has the StabiliTrak
system which combines antilock
brake, traction and stability control
systems. This system automatically
controls the brakes and engine to
help prevent the vehicle from
skidding when cornering on a
slippery road surface or turning
the steering wheel abruptly.
This system activates when the
vehicle speed reaches or exceeds
15 km/h (9 mph), and deactivates
when the vehicle speed reduces to
below 15 km/h (9 mph).
A sound may be heard in the engine
compartment for a few seconds
when the engine is started or just
after the vehicle begins to move.
This means that the system is in
the self-check mode, but does not
indicate a problem.If the vehicle is going to skid during
driving, the traction control system
warning light flashes and an alarm
sounds intermittently. Adjust your
driving accordingly.
To turn off both the traction control
system and StabiliTrak, press and
hold
gwhile the vehicle is stopped.
The traction control system warning
light and the VSC OFF light will come
on. To turn the systems back on,
press
gagain. If both systems are
turned off, they will not turn back on
automatically when vehicle speed
increases.
If the VSC OFF light flashes, there
is a problem in the traction control
system or StabiliTrak.
Driving and Operating 8-35
Page 180 of 318
Making Turns
Notice:Making very sharp turns
while trailering could cause the
trailer to come in contact with the
vehicle. The vehicle could be
damaged. Avoid making very
sharp turns while trailering.
When turning with a trailer, make
wider turns than normal. Do this so
the trailer won’t strike soft shoulders,
curbs, road signs, trees or other
objects. Avoid jerky or sudden
maneuvers. Signal well in advance.
Turn Signals When Towing a
Trailer
The arrows on the instrument panel
flash whenever signaling a turn or
lane change. Properly hooked up,
the trailer lamps also flash, telling
other drivers the vehicle is turning,
changing lanes or stopping. When towing a trailer, the arrows on
the instrument panel flash for turns
even if the bulbs on the trailer are
burned out. For this reason you may
think other drivers are seeing the
signal when they are not. It is
important to check occasionally to be
sure the trailer bulbs are still working.
Driving On Grades
Reduce speed and shift to a lower
gear before starting down a long or
steep downgrade. If the transmission
is not shifted down, the brakes
might have to be used so much that
they would get hot and no longer
work well.
Vehicles with an automatic
transmission can tow in D (Drive).
Shift the transmission to a lower gear
if the transmission shifts too often
under heavy loads and/or hilly
conditions. For vehicles with a
manual transmission, it is better
not to use the highest gear.When towing at high altitude on
steep uphill grades, consider the
following: Engine coolant will boil at a
lower temperature than at normal
altitudes. If the engine is turned off
immediately after towing at high
altitude on steep uphill grades, the
vehicle may show signs similar to
engine overheating. To avoid this,
let the engine run while parked,
preferably on level ground, with the
automatic transmission in P (Park)
for a few minutes before turning the
engine off. For vehicles with manual
transmissions, let the engine run
while parked, preferably on level
ground, with the transmission out of
gear and the parking brake applied,
for a few minutes before turning the
engine off. If the overheat warning
comes on, see
Engine Overheating
on page 9-23.
8-46 Driving and Operating
Page 185 of 318
Vehicle Care
General InformationGeneral Information..............
.9-2
California Proposition 65 Warning ........................
.9-2
California Perchlorate Materials Requirements ........9-3
Accessories and Modifications ......................
.9-3
Vehicle ChecksDoing Your Own
Service Work .....................
.9-4
Hood ..................................
.9-5
Engine Compartment Overview ...........................
.9-6
Engine Oil ...........................
.9-9
Automatic Transmission Fluid ...............................
.9-12
Manual Transmission Fluid . . . .9-14
Hydraulic Clutch .................
.9-15
Engine Air Cleaner/Filter .......9-16
Cooling System ..................
.9-19
Engine Coolant ..................
.9-19Engine Overheating
.............9-23
Power Steering Fluid ............9-24
Washer Fluid .....................
.9-24
Brakes ..............................
.9-26
Brake Fluid ........................
.9-27
Battery ..............................
.9-28
All-Wheel Drive ..................
.9-29
Starter Switch Check ............9-30
Wiper Blade Replacement .....9-30
Headlamp AimingHeadlamp Aiming...............
.9-32
Bulb ReplacementBulb Replacement ..............
.9-33
Halogen Bulbs ...................
.9-33
Headlamps and Parking Lamps .............................
.9-33
Taillamps ...........................
.9-35
License Plate Lamp .............9-36
Replacement Bulbs .............
.9-37
Electrical SystemElectrical System Overload . . . .9-37
Fuses and Circuit Breakers . . .9-38
Engine Compartment Fuse Block ..............................
.9-38
Instrument Panel Fuse Block ..............................
.9-41
Wheels and TiresTires.................................
.9-43
Tire Sidewall Labeling ..........9-44
Tire Designations ................
.9-46
Tire Terminology and Definitions ........................
.9-46
Tire Pressure .....................
.9-49
Tire Pressure Monitor System ............................
.9-50
Tire Pressure Monitor Operation .........................
.9-52
Tire Inspection ...................
.9-54
Tire Rotation ......................
.9-55
When It Is Time for New Tires ...............................
.9-56
Buying New Tires ...............
.9-56
Different Size Tires and Wheels ............................
.9-58
Uniform Tire Quality Grading ...........................
.9-58
Wheel Alignment and Tire Balance ...........................
.9-60
Wheel Replacement .............9-60
Tire Chains ........................
.9-61
If a Tire Goes Flat ..............
.9-62
Tire Changing ....................
.9-63
Compact Spare Tire .............9-68
Vehicle Care 9-1
Page 186 of 318
Jump StartingJump Starting....................
.9-69
TowingTowing the Vehicle .............
.9-73
Recreational Vehicle Towing ............................
.9-73
Appearance CareExterior Care.....................
.9-75
Interior Care ......................
.9-80
Floor Mats .........................
.9-83
General Information
For service and parts needs, visit
your dealer/retailer. You will receive
genuine GM parts and GM-trained
and supported service people.
Genuine GM parts have one of
these marks:
California Proposition
65 Warning
Most motor vehicles, including this
one, contain and/or emit chemicals
known to the State of California to
cause cancer and birth defects
or other reproductive harm. Engine
exhaust, many parts and systems
(including some inside the vehicle),
many fluids, and some component
wear by-products contain and/or emit
these chemicals.
9-2 Vehicle Care
Page 196 of 318
What to Do with Used Oil
Used engine oil contains certain
elements that can be unhealthy for
your skin and could even cause
cancer. Do not let used oil stay on
your skin for very long. Clean your
skin and nails with soap and water,
or a good hand cleaner. Wash or
properly dispose of clothing or rags
containing used engine oil. See the
manufacturer’s warnings about the
use and disposal of oil products.
Used oil can be a threat to the
environment. If you change your own
oil, be sure to drain all the oil from the
filter before disposal. Never dispose
of oil by putting it in the trash, pouring
it on the ground, into sewers, or into
streams or bodies of water. Recycle
it by taking it to a place that collects
used oil.
Automatic Transmission
Fluid
When to Check and Change
Automatic Transmission Fluid
Check the fluid in the transmission
and differential at the intervals listed
inScheduled Maintenance on
page 10-3, and be sure to use
the transmission fluid listed in
Recommended Fluids and
Lubricants on page 10-15 .
How to Check Automatic
Transmission Fluid
This operation can be difficult, you
may choose to have this done at the
dealer/retailer service department.
If you do it yourself, be sure to
follow all the instructions here,
or you could get a false reading
on the dipstick. Wait at least 30 minutes before
checking the transmission fluid level
if you have been driving:
•When outside temperatures are
above 90°F (32°C).
•At high speed for quite a while.
•In heavy traffic — especially
in hot weather.
•While pulling a trailer.
To get the right reading, the fluid
should be at normal operating
temperature, which is 158°F to
176°F (70°C to 80°C).
Get the vehicle warmed up by
driving about 15 miles (24 km)
when outside temperatures
are above 50°F (10°C). If it is
colder than 50°F (10°C), you
may have to drive longer.
9-12 Vehicle Care
Page 204 of 318
What to Use
Use a 50/50 mixture of clean,
drinkable water and DEX-COOL®
coolant, which will not damage
aluminum parts. If this coolant
mixture is used, nothing else
needs to be added.
{CAUTION
Adding only plain water to the
cooling system can be dangerous.
Plain water, or some other liquid
such as alcohol, can boil before
the proper coolant mixture will.
The vehicle’s coolant warning
system is set for the proper coolant
mixture. With plain water or the
wrong mixture, the engine could
get too hot but would not get the
overheat warning. The engine
could catch fire and you or
others could be burned. Use a
50/50 mixture of clean, drinkable
water and DEX-COOL
®coolant.Notice:
If an improper coolant
mixture is used, the engine could
overheat and be badly damaged.
The repair cost would not be
covered by the vehicle warranty.
Too much water in the mixture
can freeze and crack the engine,
radiator, heater core, and other
parts.
•Gives freezing protection down to
−34°F (− 38°C).
•Gives boiling protection up to
265°F (129°C).
•Protects against rust and
corrosion.
•Helps keep the proper engine
temperature.
•Lets the warning lights and gages
work as they should.
Notice: Using coolant other than
DEX-COOL can cause premature
engine, heater core or radiator
corrosion. In addition, the engine
coolant may require changing sooner, at 30,000 miles
(50 000 km) or 24 months,
whichever occurs �rst. Any
repairs would not be covered
by the vehicle warranty. Always
use DEX-COOL (silicate-free)
coolant in your vehicle.
Checking Coolant
The vehicle must be on a level
surface. When the engine is cold,
the coolant level should be at LOW,
or a little higher. When the engine
is warm, the level should be up to
FULL, or a little higher. If it is not,
there could be a leak at the pressure
cap or in the radiator hoses, heater
hoses, radiator, water pump, or
somewhere else in the cooling
system.
See
Engine Compartment Overview
on page 9-6 for the location of
the coolant recovery tank.
9-20 Vehicle Care