left instrument PORSCHE 911 2009 5.G Owners Manual
[x] Cancel search | Manufacturer: PORSCHE, Model Year: 2009, Model line: 911, Model: PORSCHE 911 2009 5.GPages: 310, PDF Size: 3.39 MB
Page 114 of 310

112
Instruments, On-Board Computer, Warnings
Instrument Panel USA Models Also refer to the corresponding chapters in
the Owner’s Manual.
1. Engine oil temperature gage
2. Speedometer with analogue display
3. Tire pressure warning light
4. Turn signal indicator light, left
5. Tachometer
6. High beam indicator light
7. Turn signal indicator light, right
8. ABS warning light
9. Cooling system
Temperature gage, warning light
10.Fuel
Level gage, warning light
11.Engine oil pressure gage
12.Adjustment button for instrument illumination
and trip counter
13.Odometer and daily trip mileage display
14.Automatic speed control indicator light15.Light sensor for instrument illumination
16.Airbag warning light
17.Check Engine warning light
(Emission control warning light)
18.Central warning light
19.On-board computer display
20.Porsche Stability Management
PSM Multifunctional light
21.Brake warning light
22.Safety belt warning light
23.PDK transmission, gear display
24.PDK transmission, selector lever position
25.Clock and outside temperature display
26.Adjustment button for clockWhen the ignition is switched on, the warning
lights light up for a lamp check.
Note
Warnings that have been given are stored in the
appropriate control unit memory and can be read
out at an authorized Porsche dealer.
This information can help to warn you about situa-
tions which may be hazardous to you or your car.
Page 116 of 310

114
Instruments, On-Board Computer, Warnings
Instrument Panel Canada Models Also refer to the corresponding chapters in
the Owner’s Manual.
1. Engine oil temperature gage
2. Speedometer with analogue display
3. Tire pressure warning light
4. Turn signal indicator light, left
5. Tachometer
6. High beam indicator light
7. Turn signal indicator light, right
8. ABS warning light
9. Cooling system
Temperature gage, warning light
10.Fuel
Level gage, warning light
11.Engine oil pressure gage
12.Adjustment button for instrument illumination
and trip counter
13.Odometer and daily trip mileage display
14.Automatic speed control indicator light15.Light sensor for instrument illumination
16.Airbag warning light
17.Check Engine warning light
(Emission control warning light)
18.Central warning light
19.On-board computer display
20.Porsche Stability Management
PSM Multifunctional light
21.Brake warning light
22.Safety belt warning light
23.PDK transmission, gear display
24.PDK transmission, selector lever position
25.Clock and outside temperature display
26.Adjustment button for clockWhen the ignition is switched on, the warning
lights light up for a lamp check.
Note
Warnings that have been given are stored in the
appropriate control unit memory and can be read
out at an authorized Porsche dealer.
This information can help to warn you about situa-
tions which may be hazardous to you or your car.
Page 118 of 310

116
Instruments, On-Board Computer, Warnings The engine oil temperature is indicated in the left
instrument.
A- Adjustment button for instrument illumination and
trip counter Indicates automatic speed control readiness.
Instrument Illumination The illumination is automatically adjusted to the
ambient brightness by the light sensor in the
tachometer.
In addition, when the car lights are switched on,
the instrument and switch symbol brightness can
be manually adjusted.
Warning!
Risk of loss of control or accident, resulting
in serious personal injury or death.
fDo not reach through the steering-wheel spokes while driving.
Note
When the car lights are switched on, the instru-
ment lighting for light dials switches on and off
automatically depending on the ambient bright-
ness.
Engine Oil Temperature
Automatic Speed Control
Indicator light
Page 121 of 310
Instruments, On-Board Computer, Warnings
119
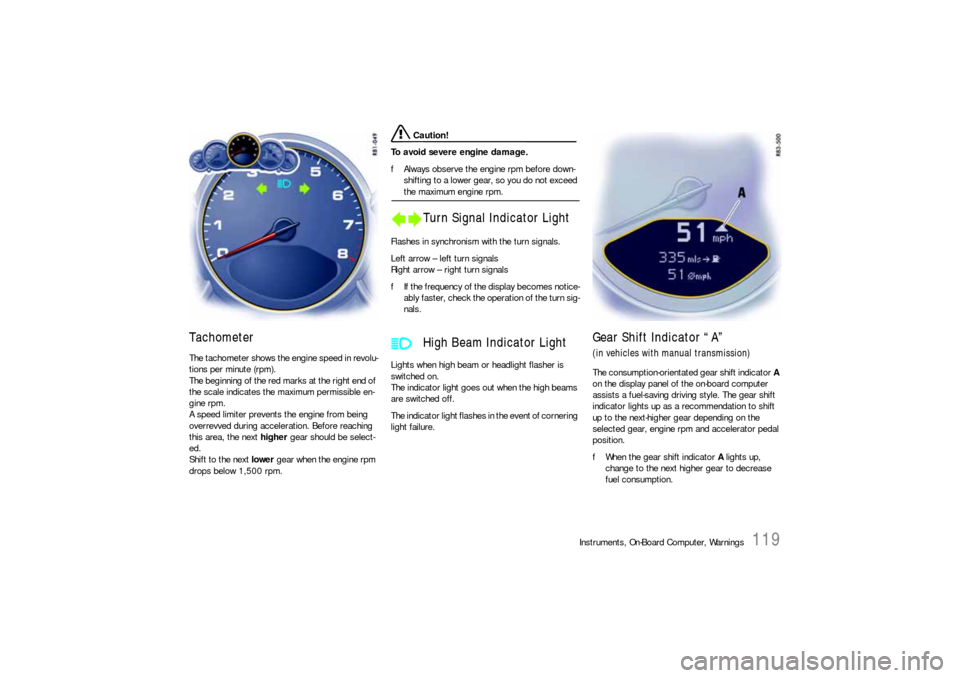
Tachometer The tachometer shows the engine speed in revolu-
tions per minute (rpm).
The beginning of the red marks at the right end of
the scale indicates the maximum permissible en-
gine rpm.
A speed limiter prevents the engine from being
overrevved during acceleration. Before reaching
this area, the next higher gear should be select-
ed.
Shift to the next lower gear when the engine rpm
drops below 1,500 rpm.
Caution!
To avoid severe engine damage.
fAlways observe the engine rpm before down-
shifting to a lower gear, so you do not exceed the maximum engine rpm.
Flashes in synchronism with the turn signals.
Left arrow – left turn signals
Right arrow – right turn signals
fIf the frequency of the display becomes notice-
ably faster, check the operation of the turn sig-
nals.
Lights when high beam or headlight flasher is
switched on.
The indicator light goes out when the high beams
are switched off.
The indicator light flashes in the event of cornering
light failure.
Gear Shift Indicator “A”(in vehicles with manual transmission)The consumption-orientated gear shift indicator A
on the display panel of the on-board computer
assists a fuel-saving driving style. The gear shift
indicator lights up as a recommendation to shift
up to the next-higher gear depending on the
selected gear, engine rpm and accelerator pedal
position.
fWhen the gear shift indicator A lights up,
change to the next higher gear to decrease
fuel consumption.
Turn Signal Indicator Light
High Beam Indicator Light
Page 122 of 310
120
Instruments, On-Board Computer, Warnings
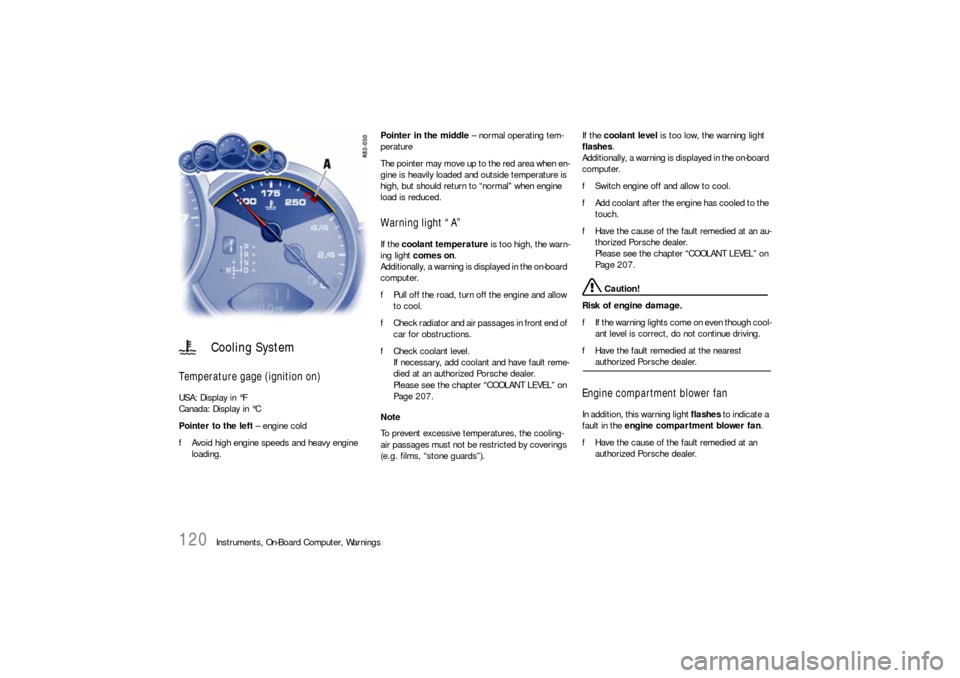
Temperature gage (ignition on) USA: Display in °F
Canada: Display in °C
Pointer to the left – engine cold
fAvoid high engine speeds and heavy engine
loading. Pointer in the middle – normal operating tem-
perature
The pointer may move up to the red area when en-
gine is heavily loaded and outside temperature is
high, but should return to “normal” when engine
load is reduced.
Warning light “A” If the coolant temperature is too high, the warn-
ing light comes on.
Additionally, a warning is displayed in the on-board
computer.
fPull off the road, turn off the engine and allow
to cool.
fCheck radiator and air passages in front end of
car for obstructions.
fCheck coolant level.
If necessary, add coolant and have fault reme-
died at an authorized Porsche dealer.
Please see the chapter “COOLANT LEVEL” on
Page 207.
Note
To prevent excessive temperatures, the cooling-
air passages must not be restricted by coverings
(e.g. films, “stone guards”). If the coolant level is too low, the warning light
flashes.
Additionally, a warning is displayed in the on-board
computer.
fSwitch engine off and allow to cool.
fAdd coolant after the engine has cooled to the
touch.
fHave the cause of the fault remedied at an au-
thorized Porsche dealer.
Please see the chapter “COOLANT LEVEL” on
Page 207.
Caution!
Risk of engine damage.
fIf the warning lights come on even though cool-
ant level is correct, do not continue driving.
fHave the fault remedied at the nearest authorized Porsche dealer.
Engine compartment blower fan In addition, this warning light flashes to indicate a
fault in the engine compartment blower fan.
fHave the cause of the fault remedied at an
authorized Porsche dealer.
Cooling System
Page 125 of 310
Instruments, On-Board Computer, Warnings
123
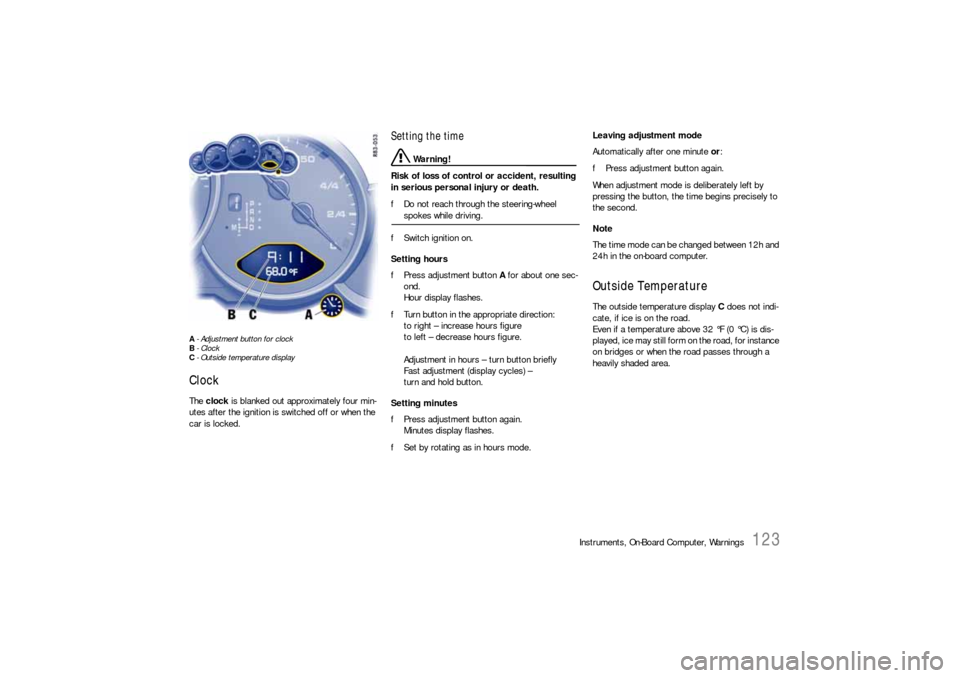
A- Adjustment button for clock
B- Clock
C- Outside temperature displayClock The clock is blanked out approximately four min-
utes after the ignition is switched off or when the
car is locked.
Setting the time
Warning!
Risk of loss of control or accident, resulting
in serious personal injury or death.
fDo not reach through the steering-wheel spokes while driving.
fSwitch ignition on.
Setting hours
fPress adjustment button A for about one sec-
ond.
Hour display flashes.
fTurn button in the appropriate direction:
to right – increase hours figure
to left – decrease hours figure.
Adjustment in hours – turn button briefly
Fast adjustment (display cycles) –
turn and hold button.
Setting minutes
fPress adjustment button again.
Minutes display flashes.
fSet by rotating as in hours mode. Leaving adjustment mode
Automatically after one minute or:
fPress adjustment button again.
When adjustment mode is deliberately left by
pressing the button, the time begins precisely to
the second.
Note
The time mode can be changed between 12h and
24h in the on-board computer.
Outside Temperature The outside temperature display C does not indi-
cate, if ice is on the road.
Even if a temperature above 32 °F (0 °C) is dis-
played, ice may still form on the road, for instance
on bridges or when the road passes through a
heavily shaded area.
Page 128 of 310
126
Instruments, On-Board Computer, Warnings
On-Board Computer (BC)Display fieldThe display field is beneath the tachometer.Readiness for operation– With ignition switched on,
– with engine running.
Operation, controlsIt is not possible to describe all details of the on-
board computer functions in this Owner’s Manual.
However, the examples will quickly familiarize you
with the operational principle and help you to
navigate through the menu structure.
You can restore the factory default settings at any
time by using the “SET” menu.
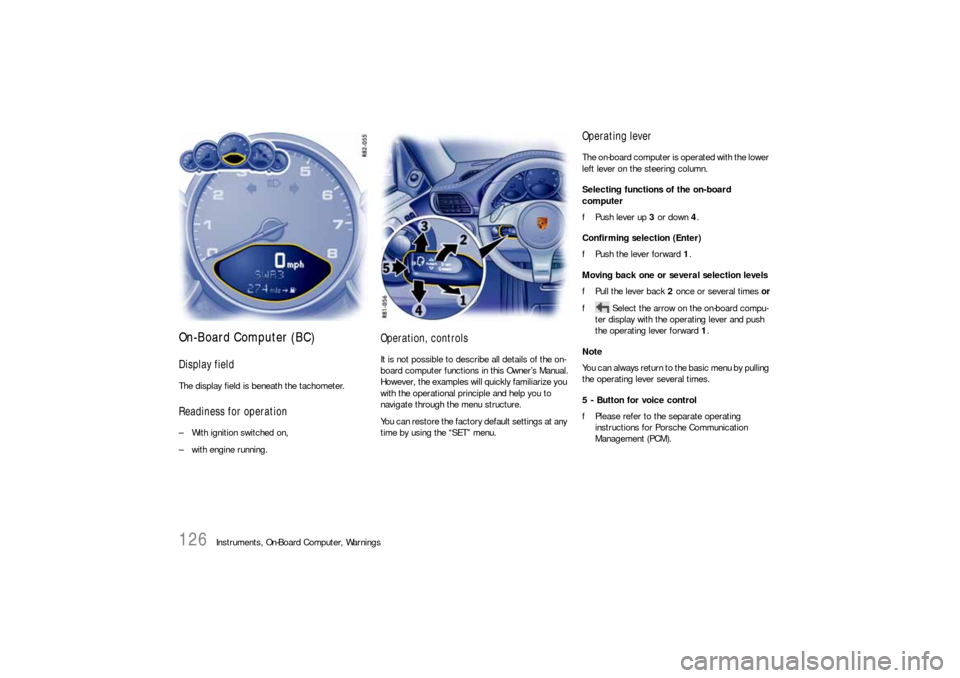
Operating leverThe on-board computer is operated with the lower
left lever on the steering column.
Selecting functions of the on-board
computer
fPush lever up 3 or down 4.
Confirming selection (Enter)
fPush the lever forward 1.
Moving back one or several selection levels
fPull the lever back 2 once or several times or
f Select the arrow on the on-board compu-
ter display with the operating lever and push
the operating lever forward 1.
Note
You can always return to the basic menu by pulling
the operating lever several times.
5 - Button for voice control
fPlease refer to the separate operating
instructions for Porsche Communication
Management (PCM).
Page 138 of 310
136
Instruments, On-Board Computer, Warnings
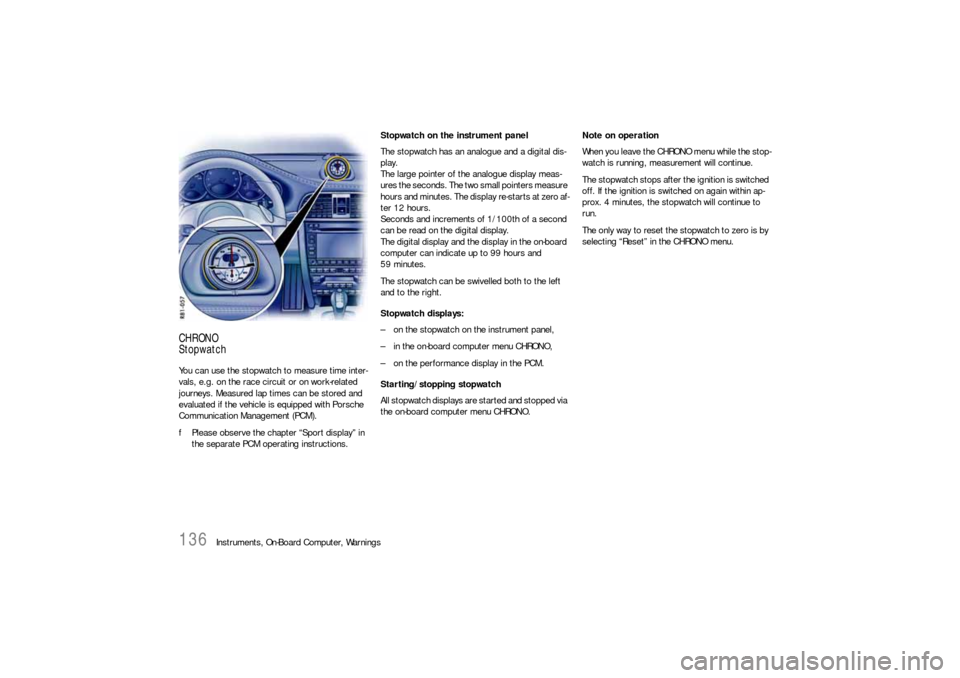
CHRONO
StopwatchYou can use the stopwatch to measure time inter-
vals, e.g. on the race circuit or on work-related
journeys. Measured lap times can be stored and
evaluated if the vehicle is equipped with Porsche
Communication Management (PCM).
fPlease observe the chapter “Sport display” in
the separate PCM operating instructions.Stopwatch on the instrument panel
The stopwatch has an analogue and a digital dis-
play.
The large pointer of the analogue display meas-
ures the seconds. The two small pointers measure
hours and minutes. The display re-starts at zero af-
ter 12 hours.
Seconds and increments of 1/100th of a second
can be read on the digital display.
The digital display and the display in the on-board
computer can indicate up to 99 hours and
59 minutes.
The stopwatch can be swivelled both to the left
and to the right.
Stopwatch displays:
– on the stopwatch on the instrument panel,
– in the on-board computer menu CHRONO,
– on the performance display in the PCM.
Starting/stopping stopwatch
All stopwatch displays are started and stopped via
the on-board computer menu CHRONO.Note on operation
When you leave the CHRONO menu while the stop-
watch is running, measurement will continue.
The stopwatch stops after the ignition is switched
off. If the ignition is switched on again within ap-
prox. 4 minutes, the stopwatch will continue to
run.
The only way to reset the stopwatch to zero is by
selecting “Reset” in the CHRONO menu.
Page 154 of 310

152
Instruments, On-Board Computer, Warnings
No monitoringIn the event of faults the Tire Pressure Monitoring
cannot monitor the tire pressure.
The warning light in the speedometer flashes for
approx. one minute and then remains continuously
illuminated and a corresponding message
appears on the on-board computer.
Monitoring is not active when:
– the Tire Pressure Monitoring is faulty,
– wheel transmitters for the Tire Pressure
Monitoring are missing,
– during the learning phase after the tire settings
have been updated,
– after a wheel change without updating the tire
settings,
– more than four wheel transmitters are
detected,
– there is external interference by other radio
sources, e.g. wireless headphones,
– tire temperatures are too high.
fPlease see the chapter “WARNINGS ON THE
INSTRUMENT PANEL AND THE ON-BOARD
COMPUTER” on Page 158.
Pressure increase as the result of
temperature increaseIn accordance with physical principles, the air
pressure changes as the temperature changes.
The tire pressure increases or decreases by
around 1.5 psi (0.1 bar) for every 18 °F (10 °C)
change in temperature.
The Tire Pressure Monitoring takes this relation-
ship between tire pressure and temperature into
account.Tire pressure specificationsInformation on tire pressure for public roads can
be found in this Owner's Manual in the Technical
Data chapter or on the tire-pressure plate in the
left door aperture.
These values apply to cold tires at 68 °F (20 °C)
ambient temperature.
Page 160 of 310

158
Warnings
Warnings on the instrument panel and the on-board computerIf a warning message appears, always refer to the corresponding chapters in the Owner’s Manual.
Warning messages are issued only if all measurement preconditions are met. Therefore, check all fluid levels regularly –
in particular, always check the engine oil level before refuelling.
Instrument
panelOn-board
computerText display on on-board
computerMeaning/measure
Seat belt Driver and passengers must fasten their seat
belts.
Handbrake Handbrake is still on.
Ignition key
not removed
Replace battery
in ignition keyReplace the remote-control battery.
Ignition lock faulty,
please go to workshopHave the fault remedied at an authorized
Porsche dealer.
Ignition lock faulty,
visit workshop nowHave the fault remedied at an authorized
Porsche dealer.
Relieve steering Relieve the steering l o c k b y m o v i n g t h e s t e e r i n g
wheel to the left or right.
Steering locked The steering wheel lock remains engaged.
Have the fault remedied at an authorized
Porsche dealer.
Lights on Low beam/side marker lamps on
Parking light on Left/right parking light on