low beam PORSCHE 911 2009 5.G Owners Manual
[x] Cancel search | Manufacturer: PORSCHE, Model Year: 2009, Model line: 911, Model: PORSCHE 911 2009 5.GPages: 310, PDF Size: 3.39 MB
Page 82 of 310
80
Operation, SafetyWarning chime
If the ignition key is withdrawn and the door is
opened while the lights (not the parking light or
Welcome Home lighting) are on, a chime warns of
possible battery discharge.
In some countries, differences are possible
due to provisions of law.
Daytime driving lightsThe daytime driving lights are integrated in the
front auxiliary headlights. These lights are
switched on only when the engine is running and
with the light switch in the positions OFF or HOME.
Low beam headlights must be switched on when
driving through tunnels or at dusk, for example.
Operation of the daytime driving lights may vary
depending on country-specific regulations.
Canada only:
In addition to the auxiliary headlights the parking
lights are switched on.
USA only:
The daytime driving lights can be deactivated in
the on-board computer.
fPlease see the chapter “ON-BOARD
COMPUTER (BC)” on Page 126.
Vehicles with the Sport Chrono Package Plus
Further individual light functions (e.g. daytime driv-
ing lights) are available in vehicles with the Sport
Chrono Package Plus.
fPlease observe the chapter “Individual Memo-
ry” in the separate PCM operating instructions.Cornering lightThe dynamic cornering light is activated above
speeds of 6 mph (10 km/h).
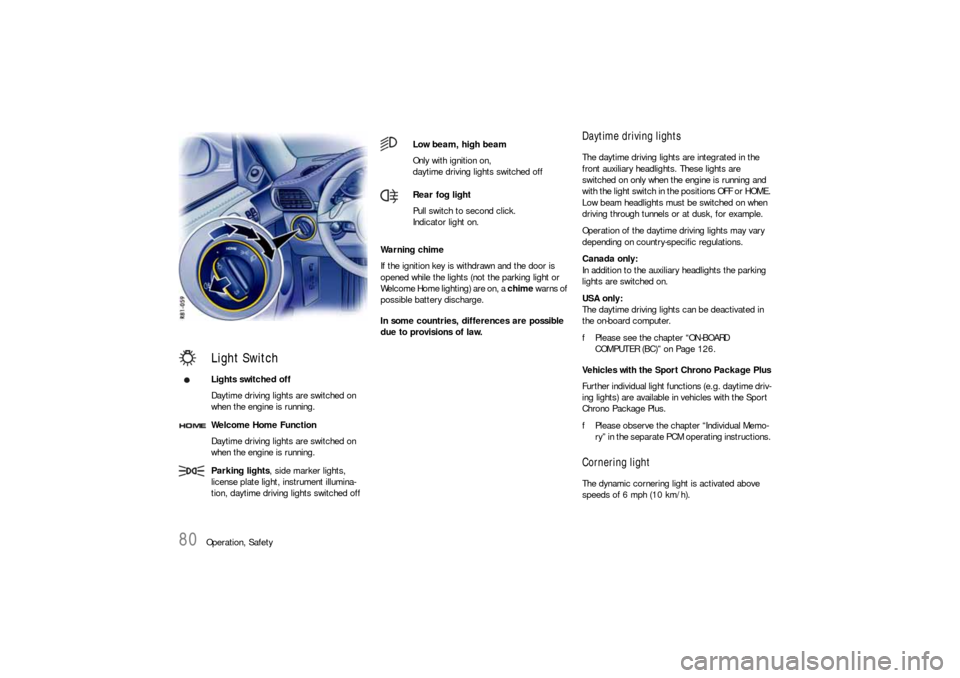
Light SwitchLights switched off
Daytime driving lights are switched on
when the engine is running.
Welcome Home Function
Daytime driving lights are switched on
when the engine is running.
Parking lights, side marker lights,
license plate light, instrument illumina-
tion, daytime driving lights switched off
Low beam, high beam
Only with ignition on,
daytime driving lights switched off
Rear fog light
Pull switch to second click.
Indicator light on.
Page 83 of 310

Operation, Safety
81
Welcome Home LightingSwitching onfMove light switch to the HOME position.
For improved visibility and security when you get
in and out of the car, the daytime driving lights and
the tail lights remain on for a certain period of
time:
–When you get out of the car, the lights are
turned on for approx. 30 seconds after the
door is opened. The off-delay time resumes
when the vehicle is locked.
On vehicles with the Sport Chrono Package
Plus, the PCM can be used to set the off-delay
time. This setting also changes the lighting
period for unlocking the vehicle.
Please observe the chapter “Individual
Memory” in the separate PCM operating
instructions.
– The lights are turned on for approx.
30 seconds when the vehicle is unlocked.
The lights go out if the ignition is switched on
or when leaving the Welcome Home lighting.
Automatic Headlight Beam
Adjustment Vehicles with Bi-Xenon headlights feature
dynamic headlight beam adjustment.
When the ignition is switched on, the level of the
headlight beam automatically changes in accord-
ance with the vehicle load.
The level of the headlight beam is automatically
kept constant during acceleration and braking. Checking operation 1. Switch the low beam on.
2. Insert ignition key and switch ignition on.
The light beam first dips all the way down and
is then adapted to the vehicle load.
If this test item is not met, the headlight beam
adjustment system must be checked by an author-
ized Porsche dealer.
Page 84 of 310
82
Operation, Safety
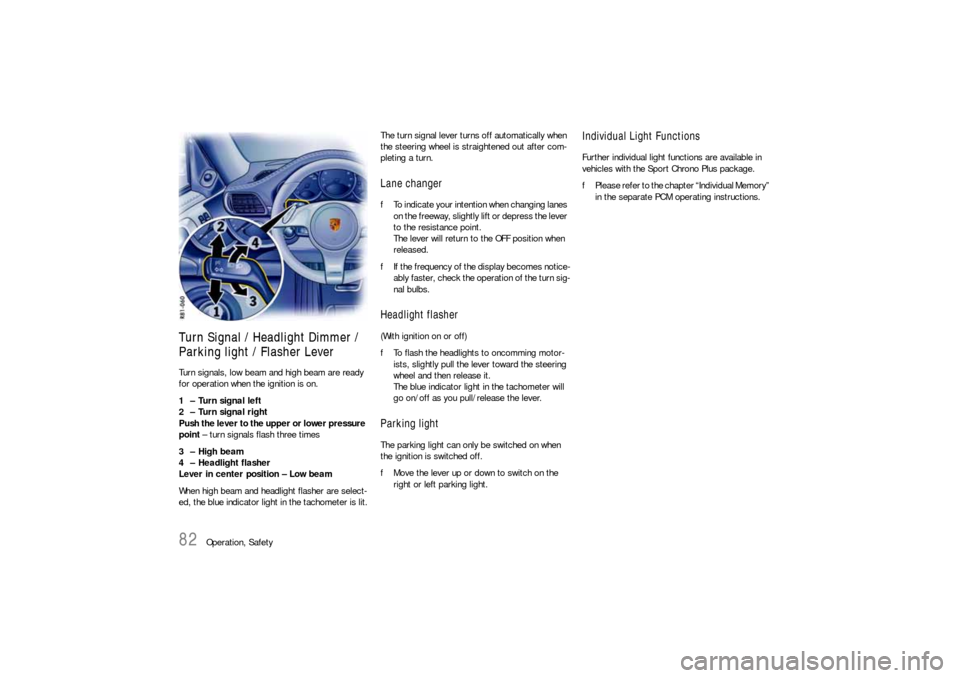
Turn Signal / Headlight Dimmer /
Parking light / Flasher Lever Turn signals, low beam and high beam are ready
for operation when the ignition is on.
1 – Turn signal left
2 – Turn signal right
Push the lever to the upper or lower pressure
point – turn signals flash three times
3 – High beam
4 – Headlight flasher
Lever in center position – Low beam
When high beam and headlight flasher are select-
ed, the blue indicator light in the tachometer is lit.The turn signal lever turns off automatically when
the steering wheel is straightened out after com-
pleting a turn.
Lane changer fTo indicate your intention when changing lanes
on the freeway, slightly lift or depress the lever
to the resistance point.
The lever will return to the OFF position when
released.
fIf the frequency of the display becomes notice-
ably faster, check the operation of the turn sig-
nal bulbs. Headlight flasher (With ignition on or off)
fTo flash the headlights to oncomming motor-
ists, slightly pull the lever toward the steering
wheel and then release it.
The blue indicator light in the tachometer will
go on/off as you pull/release the lever.Parking lightThe parking light can only be switched on when
the ignition is switched off.
fMove the lever up or down to switch on the
right or left parking light.
Individual Light FunctionsFurther individual light functions are available in
vehicles with the Sport Chrono Plus package.
fPlease refer to the chapter “Individual Memory”
in the separate PCM operating instructions.
Page 85 of 310

Operation, Safety
83
Windshield Wiper / Washer Lever
Warning!
Danger of injury when the windshield wipers
operate unintentionally, e.g. in intermittent
or rain sensor operation.
Risk of damage to the windshield and wiper
system.
fAvoid running the wiper blades over a dry wind-
shield to prevent scratching the glass. Spray
washer fluid on the windshield first.
A scratched windshield will reduce visibility.
fAlways loosen wiper blades from frozen glass
before operating wipers to prevent damage to
the wiper motor or blades. fAlways switch off windshield wipers in car
wash to prevent them wiping unintentionally
(intermittent or sensor operation).
fAlways switch off windshield wipers before
cleaning the windshield to avoid unintentional
operation (intermittent or sensor operation).
fDo not operate the headlight washer in car
washes.
fDo not operate headlight washer when it is
frozen.
Front wiper and headlight washer system0 – Windshield wipers off
1 – Rain sensor operation for front
windshield wipers
fMove wiper lever upwards to the first click.
Please see the chapter “RAIN SENSOR” on
Page 85.
2 – Windshield wipers slow
fMove wiper lever upwards to the second click.
3 – Windshield wipers fast
fMove wiper lever upwards to the third click.
4 – Front windshield wiper – one-touch oper-
ation:
fMove wiper lever downwards. The front wind-
shield wipers wipe once.5 – Windshield wipers and washer system:
fPull wiper lever towards the steering wheel.
The washer system sprays and wipes while the
lever is pulled towards the steering wheel.
When the wiper lever is released, a few drying
wipes are executed.
A - Headlight washer:
The washer sprays only while low beam or high
beam is switched on.
fBriefly push button A to operate headlight
washer system.
fIf heavily soiled, repeat wash.
The headlight washer system automatically sprays
once for every ten times the front windshield
washer system is operated.
Note
The windshield washer nozzles are heated
when the ignition is on, as a precaution against
freezing.
Page 121 of 310
Instruments, On-Board Computer, Warnings
119
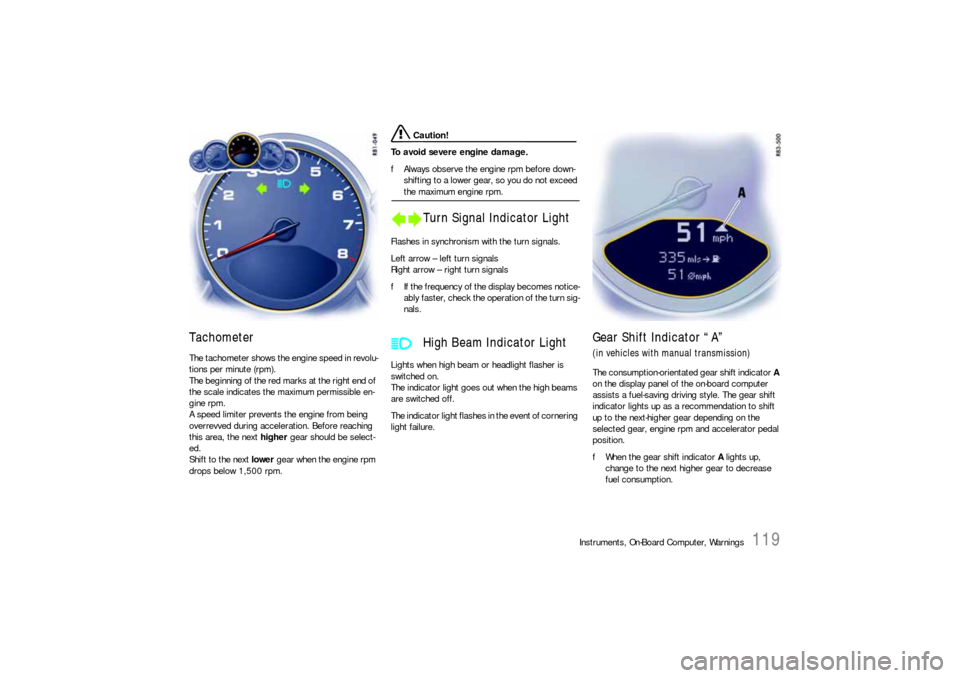
Tachometer The tachometer shows the engine speed in revolu-
tions per minute (rpm).
The beginning of the red marks at the right end of
the scale indicates the maximum permissible en-
gine rpm.
A speed limiter prevents the engine from being
overrevved during acceleration. Before reaching
this area, the next higher gear should be select-
ed.
Shift to the next lower gear when the engine rpm
drops below 1,500 rpm.
Caution!
To avoid severe engine damage.
fAlways observe the engine rpm before down-
shifting to a lower gear, so you do not exceed the maximum engine rpm.
Flashes in synchronism with the turn signals.
Left arrow – left turn signals
Right arrow – right turn signals
fIf the frequency of the display becomes notice-
ably faster, check the operation of the turn sig-
nals.
Lights when high beam or headlight flasher is
switched on.
The indicator light goes out when the high beams
are switched off.
The indicator light flashes in the event of cornering
light failure.
Gear Shift Indicator “A”(in vehicles with manual transmission)The consumption-orientated gear shift indicator A
on the display panel of the on-board computer
assists a fuel-saving driving style. The gear shift
indicator lights up as a recommendation to shift
up to the next-higher gear depending on the
selected gear, engine rpm and accelerator pedal
position.
fWhen the gear shift indicator A lights up,
change to the next higher gear to decrease
fuel consumption.
Turn Signal Indicator Light
High Beam Indicator Light
Page 160 of 310

158
Warnings
Warnings on the instrument panel and the on-board computerIf a warning message appears, always refer to the corresponding chapters in the Owner’s Manual.
Warning messages are issued only if all measurement preconditions are met. Therefore, check all fluid levels regularly –
in particular, always check the engine oil level before refuelling.
Instrument
panelOn-board
computerText display on on-board
computerMeaning/measure
Seat belt Driver and passengers must fasten their seat
belts.
Handbrake Handbrake is still on.
Ignition key
not removed
Replace battery
in ignition keyReplace the remote-control battery.
Ignition lock faulty,
please go to workshopHave the fault remedied at an authorized
Porsche dealer.
Ignition lock faulty,
visit workshop nowHave the fault remedied at an authorized
Porsche dealer.
Relieve steering Relieve the steering l o c k b y m o v i n g t h e s t e e r i n g
wheel to the left or right.
Steering locked The steering wheel lock remains engaged.
Have the fault remedied at an authorized
Porsche dealer.
Lights on Low beam/side marker lamps on
Parking light on Left/right parking light on
Page 161 of 310

Warnings
159
Check left/right dipped beam (low
beam)
also applies to:
direction indicator, high beam, side in-
dicator light, reversing light, side
markerThe reported light is faulty. Check bulb.
Have the fault remedied at an authorized
Porsche dealer.
Daytime
driving lights offDaytime driving lights switch off when the en-
gine is shut off. Switch on lights if necessary.
Headlight beam
adjustment faultyHave the fault remedied at an authorized
Porsche dealer.
Front lid not closed Close luggage compartment lid properly.
Rear lid not closed Close engine compartment lid properly.
Targa flap not closed Close glass rear hatch
Rain sensor faulty Have the fault remedied at an authorized
Porsche dealer.
Steering wheel heating
ONSteering wheel heating was switched on.
Steering wheel heating
OFFSteering wheel heating was switched off.
Launch
control
active
Drive Off Assistant
failureHave the fault remedied at an authorized
Porsche dealer.
Refill washer fluid
Instrument
panelOn-board
computerText display on on-board
computerMeaning/measure
Page 271 of 310

Practical Tips, Emergency Service
269
Bulb chart
Ty p e , r a t i n g
Low beam Philips, D2S 35W
Additional high beam without cornering light H11, 55W
Additional high beam with cornering light H7 LL, 55 W
Turn signal indicator light, side WY5W
License plate light C5W
Lights, Replacing Bulbs
Warning!
Risk of short circuit.
fAlways switch off the relevant consumer when
changing bulbs.
Risk of serious personal injury or death.
The Bi Xenon headlights are under high
voltage when installed.
fBe careful during all work in the area of the Bi
Xenon headlights.
Risk of damage. Bulbs of a higher wattage
can damage the lamp housing.
fOnly the bulbs shown in the chart may be used.
fNew bulbs must be clean and free from oil,
grease and fingerprints. Therefore, never
touch bulbs with your bare hands.
Use a cloth or soft paper while replacing bulbs.
Page 273 of 310
Practical Tips, Emergency Service
271
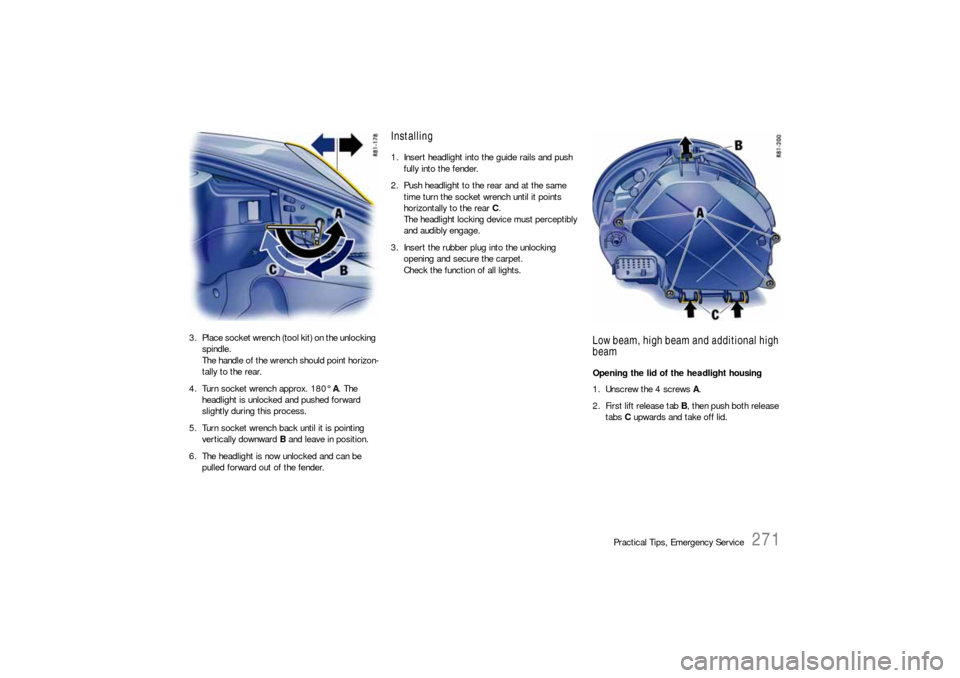
3. Place socket wrench (tool kit) on the unlocking
spindle.
The handle of the wrench should point horizon-
tally to the rear.
4. Turn socket wrench approx. 180° A. The
headlight is unlocked and pushed forward
slightly during this process.
5. Turn socket wrench back until it is pointing
vertically downward B and leave in position.
6. The headlight is now unlocked and can be
pulled forward out of the fender.
Installing1. Insert headlight into the guide rails and push
fully into the fender.
2. Push headlight to the rear and at the same
time turn the socket wrench until it points
horizontally to the rear C.
The headlight locking device must perceptibly
and audibly engage.
3. Insert the rubber plug into the unlocking
opening and secure the carpet.
Check the function of all lights.
Low beam, high beam and additional high
beamOpening the lid of the headlight housing
1. Unscrew the 4 screws A.
2. First lift release tab B, then push both release
tabs C upwards and take off lid.
Page 274 of 310
272
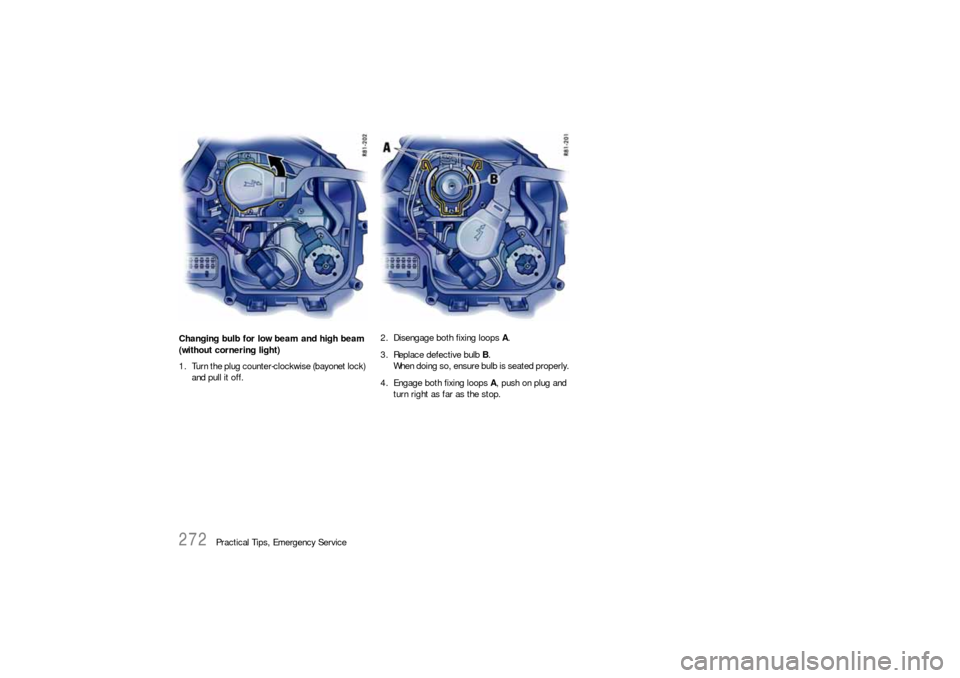
Practical Tips, Emergency Service Changing bulb for low beam and high beam
(without cornering light)
1. Turn the plug counter-clockwise (bayonet lock)
and pull it off.2. Disengage both fixing loops A.
3. Replace defective bulb B.
When doing so, ensure bulb is seated properly.
4. Engage both fixing loops A, push on plug and
turn right as far as the stop.