Garage PORSCHE 911 CARRERA 2006 5.G Owners Manual
[x] Cancel search | Manufacturer: PORSCHE, Model Year: 2006, Model line: 911 CARRERA, Model: PORSCHE 911 CARRERA 2006 5.GPages: 308, PDF Size: 3.69 MB
Page 83 of 308

Controls, Instruments
83
Stopping Engine fTurn key back to position 3.
fDo not stop engine immediately after hard or
extended driving.
Keep engine running at increased idle for
about two minutes to prevent excessive heat
build-up before turning off engine.
fTo avoid battery run-down, always remove the
ignition key from the ignition lock.
fMake sure that when you leave the car, even
briefly, you have withdrawn the ignition key.
fEngage the steering lock by moving the steer-
ing wheel to the left or right.
Turn the steering wheel to the locking position
before you switch off the engine so that you
don’t have to exert yourself when locking or
unlocking the steering.
Warning!
Danger of injury. Hot engine compartment
components can burn skin on contact.
fBefore working on any part in the engine com-
partment, turn the engine off and let it cool down sufficiently.
Engine-compartment blower,
radiator fan The radiator and radiator fans are in the front of
the car.
The engine-compartment blower is mounted on
the engine compartment lid.
Warning!
Risk of injury.
After the engine is switched off, the engine-
compartment temperature is monitored for
approx. 30 minutes.
During this period, and depending on tem-
perature, the engine-compartment blower
may continue to run or start to run.
fCarry out work in these areas only with the en-
gine off, the ignition off, and exercise extreme
caution.
Risk of injury. The radiator fans in the front
end of the car may be operating or
unexpectedly start operating when the
engine is switched on.
fCarry out work in these areas only with the en-gine switched off.
Automatic garage door The ignition system in your Porsche may interfere
with your electronically operated garage door.
fTo check this, drive your Porsche close to the
garage door. Make sure not to interfere with
the operating range of the door.
fRun the engine at different speeds.
If the garage door opens or closes without you op-
erating the garage door unit in your car, contact
the dealer who installed the automatic garage
door to have the frequency and/or coding of the
garage door signal changed or modified.
Page 112 of 308

112
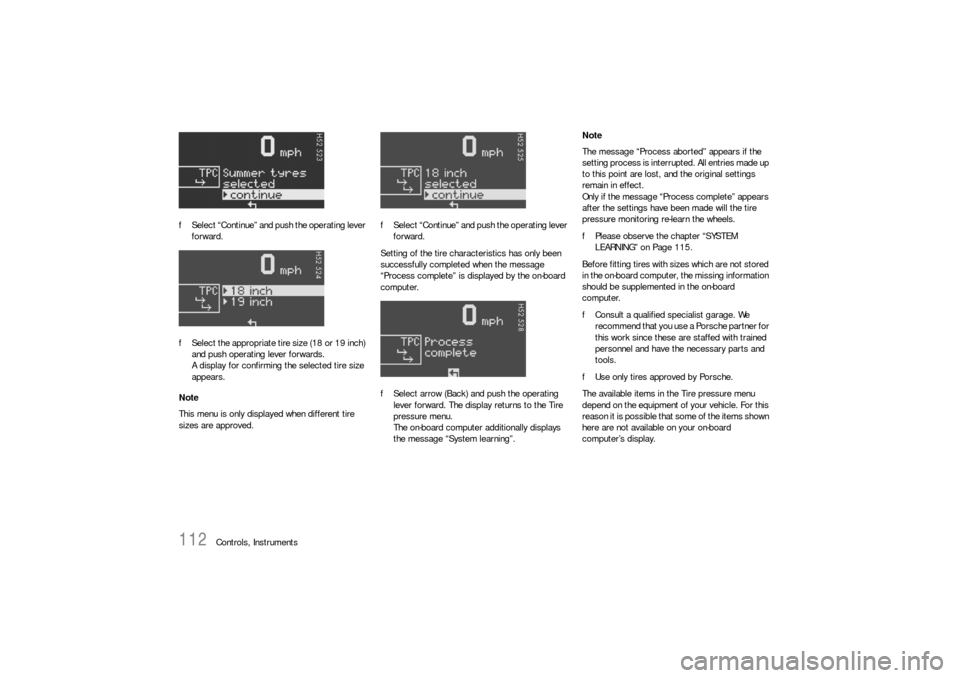
Controls, Instruments fSelect “Continue” and push the operating lever
forward.
fSelect the appropriate tire size (18 or 19 inch)
and push operating lever forwards.
A display for confirming the selected tire size
appears.
Note
This menu is only displayed when different tire
sizes are approved.fSelect “Continue” and push the operating lever
forward.
Setting of the tire characteristics has only been
successfully completed when the message
“Process complete” is displayed by the on-board
computer.
fSelect arrow (Back) and push the operating
lever forward. The display returns to the Tire
pressure menu.
The on-board computer additionally displays
the message “System learning”.Note
The message “Process aborted” appears if the
setting process is interrupted. All entries made up
to this point are lost, and the original settings
remain in effect.
Only if the message “Process complete” appears
after the settings have been made will the tire
pressure monitoring re-learn the wheels.
fPlease observe the chapter “SYSTEM
LEARNING” on Page 115.
Before fitting tires with sizes which are not stored
in the on-board computer, the missing information
should be supplemented in the on-board
computer.
fConsult a qualified specialist garage. We
recommend that you use a Porsche partner for
this work since these are staffed with trained
personnel and have the necessary parts and
tools.
fUse only tires approved by Porsche.
The available items in the Tire pressure menu
depend on the equipment of your vehicle. For this
reason it is possible that some of the items shown
here are not available on your on-board
computer’s display.
Page 155 of 308

Controls, Instruments
155
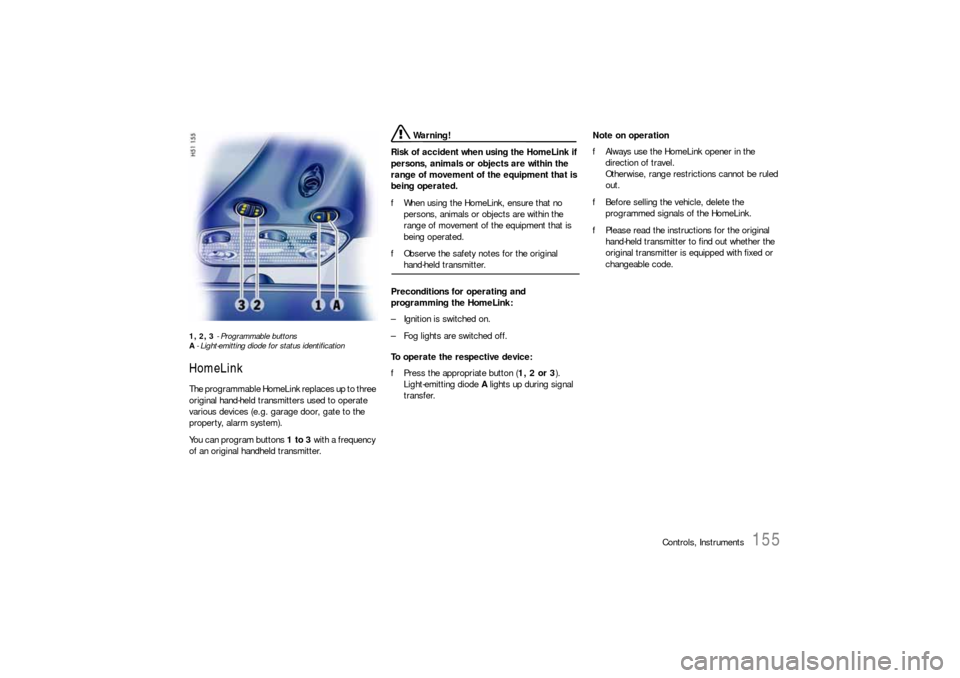
1, 2, 3 - Programmable buttons
A- Light-emitting diode for status identificationHomeLinkThe programmable HomeLink replaces up to three
original hand-held transmitters used to operate
various devices (e.g. garage door, gate to the
property, alarm system).
You can program buttons 1 to 3 with a frequency
of an original handheld transmitter.
Warning!
Risk of accident when using the HomeLink if
persons, animals or objects are within the
range of movement of the equipment that is
being operated.
fWhen using the HomeLink, ensure that no
persons, animals or objects are within the
range of movement of the equipment that is
being operated.
fObserve the safety notes for the original hand-held transmitter.
Preconditions for operating and
programming the HomeLink:
– Ignition is switched on.
– Fog lights are switched off.
To operate the respective device:
fPress the appropriate button (1, 2 or 3).
Light-emitting diode A lights up during signal
transfer.Note on operation
fAlways use the HomeLink opener in the
direction of travel.
Otherwise, range restrictions cannot be ruled
out.
fBefore selling the vehicle, delete the
programmed signals of the HomeLink.
fPlease read the instructions for the original
hand-held transmitter to find out whether the
original transmitter is equipped with fixed or
changeable code.
Page 156 of 308

156
Controls, Instruments
Allocating signals to the buttonsfPlease follow the operating instructions for the
original hand-held transmitter.
Prior to programming the HomeLink for the
first time
The following process deletes the standard codes
set at the factory. Do not repeat the process if you
program further buttons.
fKeep the two outer buttons 1 and 3
depressed for approx. 20 seconds until light-
emitting diode A begins to flash quickly.
All programmed signals of buttons 1 to 3 are
deleted.HomeLink with fixed code system
1. Press the desired button until the light-emitting
diode begins to flash slowly.
You then have approx. 5 minutes to perform
steps 2 and 3.
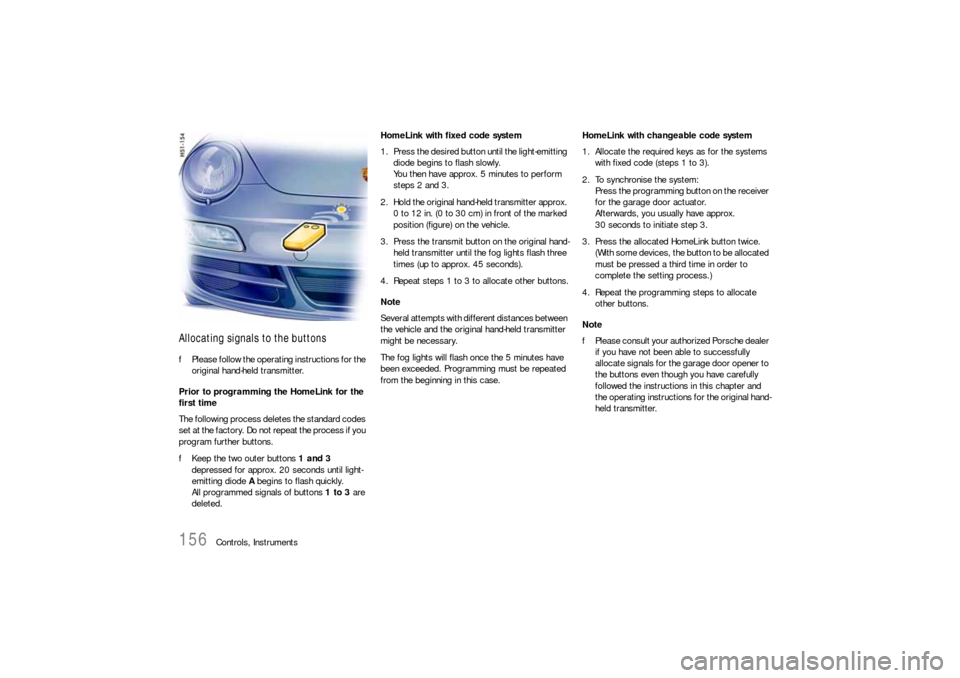
2. Hold the original hand-held transmitter approx.
0 to 12 in. (0 to 30 cm) in front of the marked
position (figure) on the vehicle.
3. Press the transmit button on the original hand-
held transmitter until the fog lights flash three
times (up to approx. 45 seconds).
4. Repeat steps 1 to 3 to allocate other buttons.
Note
Several attempts with different distances between
the vehicle and the original hand-held transmitter
might be necessary.
The fog lights will flash once the 5 minutes have
been exceeded. Programming must be repeated
from the beginning in this case.HomeLink with changeable code system
1. Allocate the required keys as for the systems
with fixed code (steps 1 to 3).
2. To synchronise the system:
Press the programming button on the receiver
for the garage door actuator.
Afterwards, you usually have approx.
30 seconds to initiate step 3.
3. Press the allocated HomeLink button twice.
(With some devices, the button to be allocated
must be pressed a third time in order to
complete the setting process.)
4. Repeat the programming steps to allocate
other buttons.
Note
fPlease consult your authorized Porsche dealer
if you have not been able to successfully
allocate signals for the garage door opener to
the buttons even though you have carefully
followed the instructions in this chapter and
the operating instructions for the original hand-
held transmitter.
Page 176 of 308

176
Mobile Roofs
Convertible Top Brief operating instructions can be found on the
back side of the driver’s sun visor.
fPlease observe the chapter “CAR CARE IN-
STRUCTIONS” on Page 218.
Warning!
When opening or closing the convertible top,
serious personal injury may occur if a per-
son’s body parts are near or in the way of the
convertible top mechanism’s moving parts.
fMake absolutely sure that nobody can be in-
jured by the convertible-top mechanism or the convertible-top compartment lid.
Do not operate convertible top:
– At temperatures below 32°F (0°C).
– When one side of the car is on a curb, a hoist
or a jack.
– When items of luggage or other objects hinder
the convertible top movement.
– With the rollbars extended.fAvoid frequent operation of the convertible top
with the engine off; the vehicle battery would
be unintentionally discharged rapidly.
fDrive only with the convertible top fully open or
closed (end positions).
fWhen opening or closing the convertible top,
ensure there is sufficient clearance above the
convertible top (e.g. in the garage).
fTo prevent damp stains and abrasions, only
open the convertible top in a dry, clean state.
fPark your car in the shade whenever possible,
as the fabric, rubber material and color can be
harmed by long exposure to sunlight.
fThe convertible top may only be actuated dur-
ing driving on even surfaces.
fThe convertible top must not be used with
strong counter wind (over approx. 50 mph/
80 km/h).
Door windows and side windows The side windows are lowered automatically when
the convertible top is opened. The door windows
close automatically if convertible top operation is
not interrupted when the convertible top reaches
its final position.
When the door windows are closed, the rear side
windows can also be closed.
When opening the door windows, the rear win-
dows open automatically.
The side windows are lowered automatically when
the convertible top is closed. All windows close
automatically if convertible top operation is not in-
terrupted when the convertible top reaches its fi-
nal position.
Page 227 of 308

Practical Tips, Emergency Service
227 Practical Tips, Emergency Service
Exercise Extreme Caution
when Working on your Vehicle .................... 228
Tires/Wheels ............................................ 229
Loading Information................................... 242
Lifting the Vehicle with a Lifting Platform
or Garage Lift ........................................... 244
Flat Tire .................................................... 245
Wheel Bolts .............................................. 248
Spacers ................................................... 249
Changing a wheel ...................................... 250
Electrical System ...................................... 254
Battery ..................................................... 258
Emergency Starting with Jumper Cables ..... 264
Lights, Replacing Bulbs.............................. 266
Headlights ................................................ 268
Tail Light .................................................. 276
License Plate Light .................................... 277
Luggage Compartment/
Engine Compartment/Footwell Light ........... 277
Door Guard/Curb Light .............................. 277
Interior Light, Reading Lights...................... 278
Adjusting Headlights .................................. 279
Towing ..................................................... 281
Page 244 of 308

244
Practical Tips, Emergency Service
A-Front jacking pointLifting the Vehicle with a Lifting
Platform or Garage Lift The car must be raised only at the illustrated jack-
ing points.
B-Rear jacking point
Caution!
Serious injury and/or serious damage to the
engine or the vehicle may occur, if you lift
the vehicle improperly.
fNever lift the vehicle at any other place than
the jacking points.
fNever lift the vehicle by the engine, transmis-
sion or axles.
fDo not damage any sensitive components in the vicinity of the jacking points.
Platform lift Before the car is driven on to a lifting platform, it
must be ensured that there is enough space be-
tween the lifting platform and the vehicle. Garage lift A garage lift must be used only at the illustrated
jacking points.
Page 250 of 308

250
Practical Tips, Emergency Service
Changing a wheel
Warning!
Risk of injury. The car may slip off the jack.
fMake sure that no one is in the vehicle when
jacking up and changing a wheel.
fAlways place the car on stable supports if work
has to be carried out under the car.
Risk of damage to the brake discs of the
Porsche Ceramic Composite Brake (PCCB).
fAlways screw in both assembly aids when changing a wheel.
Note
The tools required for changing a wheel (e.g. jack,
wheel bolt wrench, assembly aids) are not sup-
plied with the car.
Your authorized Porsche dealer will be pleased to
advise you.1. Fully apply the handbrake, engage 1st gear or
select position P and withdraw the ignition key.
2. Secure the car against rolling away, e.g. by
means of wedges under the wheels on the op-
posite side.
This is particularly important on slopes.
3. Slightly slacken the wheel bolts of the wheel to
be changed.
4. Raise the car until the wheel lifts off the
ground.
fPlease observe the chapter “LIFTING THE VE-
HICLE WITH A LIFTING PLATFORM OR GARAGE
LIFT” on Page 244.
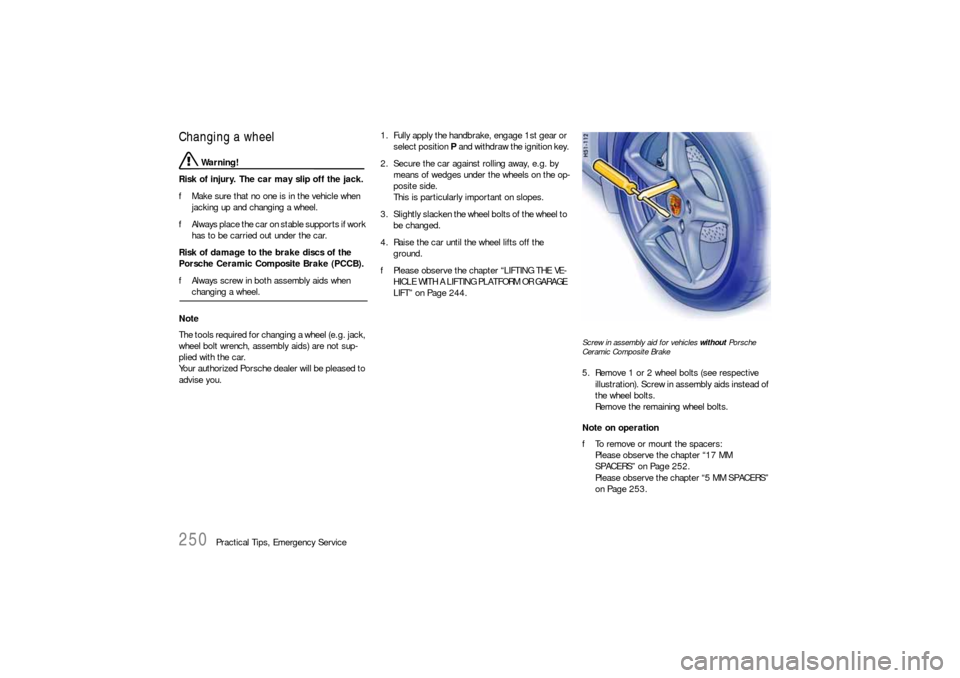
Screw in assembly aid for vehicles without Porsche
Ceramic Composite Brake5. Remove 1 or 2 wheel bolts (see respective
illustration). Screw in assembly aids instead of
the wheel bolts.
Remove the remaining wheel bolts.
Note on operation
fTo remove or mount the spacers:
Please observe the chapter “17 MM
SPACERS” on Page 252.
Please observe the chapter “5 MM SPACERS”
on Page 253.
Page 305 of 308

Index
305
Compact disc
Player and Changer ............................. 160
Storage.............................................. 147
Compartment monitoring............................... 26
Compressor ............................................... 151
Convertible top ........................................... 176
Care .................................................. 220
Coolant ................................................92
, 199
Level.................................................. 199
Temperature gauge.............................. 92
Warning light ........................................ 92
Cooling system .....................................92, 199
Cruise control .............................. 96
, 136
, 137
Cupholder .................................................. 144
DDashboard ................................................... 78
Data bank .................................................. 284
Defrosting windows ...............................33
, 139
Diagnostic socket .................................17, 256
Diagrams ................................................... 299
Dimensions ................................................ 298
Door ............................................................ 21
Guard lights ........................................ 277
Handles................................................ 21
Locks...........................................21, 221
Mirror .................................................. 32
Mirror heating ....................................... 33
Windows ....................... 21
, 28, 176
, 223
Driving hints ................................................. 14
Driving in winter .......................................... 170
Driving performance...........................296, 297
Drop-center rim .......................................... 241
DVD Navigation...................................150, 158DVD navigation ...........................................151
Dynamometer testing....................................61
EElectrical system.........................................254
Emergency flasher ......................................130
Emergency operation
Central locking ......................................23
Lids ...................................................257
Sliding roof .........................................174
Tank flap ............................................208
Emergency service......................................228
Emergency starting
with jumper cables............................. 264
, 265
Emission control system ........... 7
, 97, 211
, 212
Engine
Checking the oil level ...........................118
Exhaust ..................................................9
Number ..............................................285
Oil consumption........................... 16, 201
Oil level ..............................................201
Oil level indicator.................................118
Oil pressure ..........................................96
Oil temperature .....................................88
Oils ........................................... 201, 291
Speeds ............................... 16
, 296
, 297
Starting ................................................82
Stopping ..............................................83
Engine compartment
Blower .......................................... 83, 92
Lid ............................................ 148, 149
Lid warning light ..................................148
Light ..................................................277
Environment ...................................................6
FFilling pressure, tire................................ 5
, 290
Fire extinguisher......................................... 154
Floor mats ................................................. 225
Fluids and fuels .......................................... 291
Fog lights .................................................. 131
Footbrake .................................................... 66
Footwell lights ............................................ 277
Four-wheel drive ..................................... 61, 62
Fresh air intake .......................................... 141
Front lid ..................................................... 149
Fuel................................................. 4
, 94, 208
Containers ..................................... 8, 210
Economy ........................................... 207
Evaporation control ............................ 213
Level gauge ......................................... 94
Level warning light................................ 94
Recommendation ....................... 209, 210
Tank.................................................. 209
Function keys ............................................... 40
Fuses ........................................................ 256
GGarage door opener................................... 155
Garage lift ................................................. 244
Glove compartment .................................... 147
Gong ..................................... 18
, 81, 100
, 131
Ground clearance ........................................... 9