tire sealant PORSCHE 911 CARRERA 2006 5.G Owners Manual
[x] Cancel search | Manufacturer: PORSCHE, Model Year: 2006, Model line: 911 CARRERA, Model: PORSCHE 911 CARRERA 2006 5.GPages: 308, PDF Size: 3.69 MB
Page 109 of 308

Controls, Instruments
109
TPC
Tire pressure monitoringPlease observe the chapter “TIRE PRESSURES” on
Page 232.
The tire pressure monitoring continuously
monitors tire pressure and tire temperature on all
four wheels and warns the driver when the tire
pressure is too low.
The display as well as the settings for the tire
pressure monitoring take place on the on-board
computer.
However, you must still adjust the tire pressure on
the wheel.
fThe driver is responsible for filling the tires
correctly and making the correct settings on
the on-board computer.
The tire pressure monitoring offers the following
functions:
– Display of the actual tire pressure while the
vehicle is in motion
– Display of the deviation from the required
pressure (refilling pressure)
– Display of currently set tire size and type
– Tire pressure warnings in two stages
Safety notes!
Despite the advantages offered by the tire
pressure monitoring, it is still the driver’s
responsibility to update the corresponding
settings in the on-board computer and
maintain the pressure in the tires. Low tire
pressure reduces the road safety of the
vehicle and destroys the tire and wheel.
fWhen a flat tire has been displayed, immedi-
ately stop in a suitable place and check the
tires for damage. If necessary, remedy the
damage with a tire sealant.
fDo not by any means continue to drive with
damaged tires.
fSealing the tire with tire sealant is only an
emergency repair, so you can drive to the next
authorized Porsche dealer. The maximum per-
mitted speed is 50 mph (80 km/h).
fDo not drive with tires whose tire pressure
drops again in a short period of time. In cases
of doubt, have tires checked by an authorized
Porsche dealer.
fDamaged tires must be immediately replaced
by an authorized Porsche dealer.
Tire repairs are not permissible under any
circumstances.fIf the tire pressure monitoring is defective (e.g.
defective wheel transmitter), contact an
authorized Porsche dealer immediately and
have the damage repaired.
The tire pressure will not be monitored by a
defective tire pressure monitoring.
fTires lose air over time without a tire defect
being present. A tire pressure warning will then
appear in the on-board computer display.
Correct the tire pressure at the next oppor-
tunity.
fThe tire pressure monitoring gives a warning
about tire damage due to natural pressure loss
as well as about a gradual loss of pressure due
to foreign objects.
The tire pressure monitoring cannot warn you
about tire damage that occurs suddenly (e.g.
flat tire due to abrupt external effects).
Page 114 of 308
114
Controls, Instruments Tire pressure warnings
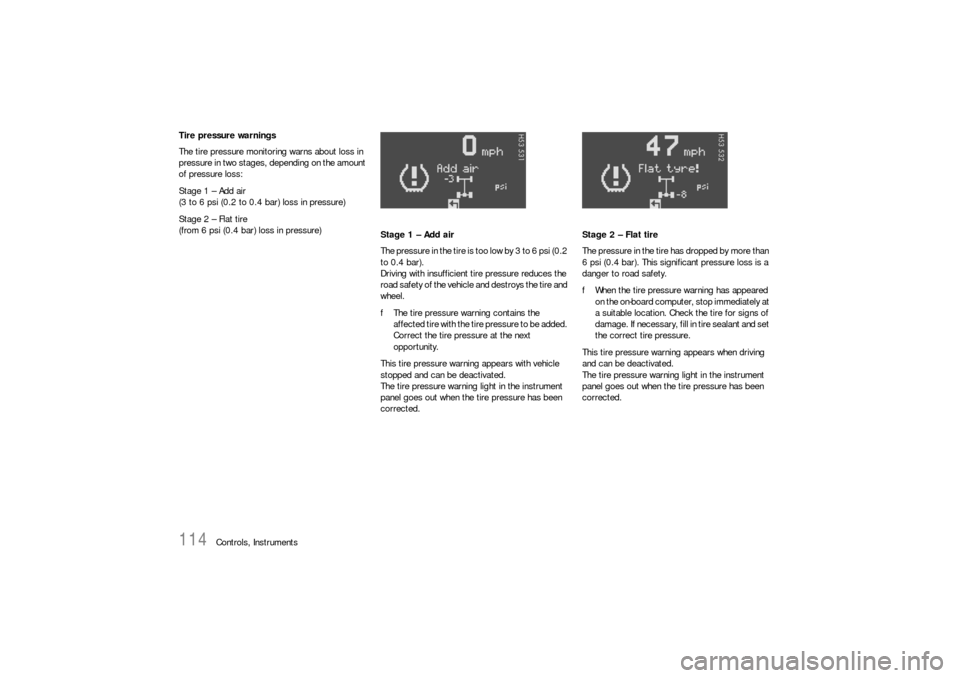
The tire pressure monitoring warns about loss in
pressure in two stages, depending on the amount
of pressure loss:
Stage 1 – Add air
(3 to 6 psi (0.2 to 0.4 bar) loss in pressure)
Stage 2 – Flat tire
(from 6 psi (0.4 bar) loss in pressure)
Stage 1 – Add air
The pressure in the tire is too low by 3 to 6 psi (0.2
to 0.4 bar).
Driving with insufficient tire pressure reduces the
road safety of the vehicle and destroys the tire and
wheel.
fThe tire pressure warning contains the
affected tire with the tire pressure to be added.
Correct the tire pressure at the next
opportunity.
This tire pressure warning appears with vehicle
stopped and can be deactivated.
The tire pressure warning light in the instrument
panel goes out when the tire pressure has been
corrected.Stage 2 – Flat tire
The pressure in the tire has dropped by more than
6 psi (0.4 bar). This significant pressure loss is a
danger to road safety.
fWhen the tire pressure warning has appeared
on the on-board computer, stop immediately at
a suitable location. Check the tire for signs of
damage. If necessary, fill in tire sealant and set
the correct tire pressure.
This tire pressure warning appears when driving
and can be deactivated.
The tire pressure warning light in the instrument
panel goes out when the tire pressure has been
corrected.
Page 150 of 308
150
Controls, Instruments
Luggage Compartment
(911 Carrera, 911 Carrera S)Access covers(on vehicles with DVD navigation or CD changer)
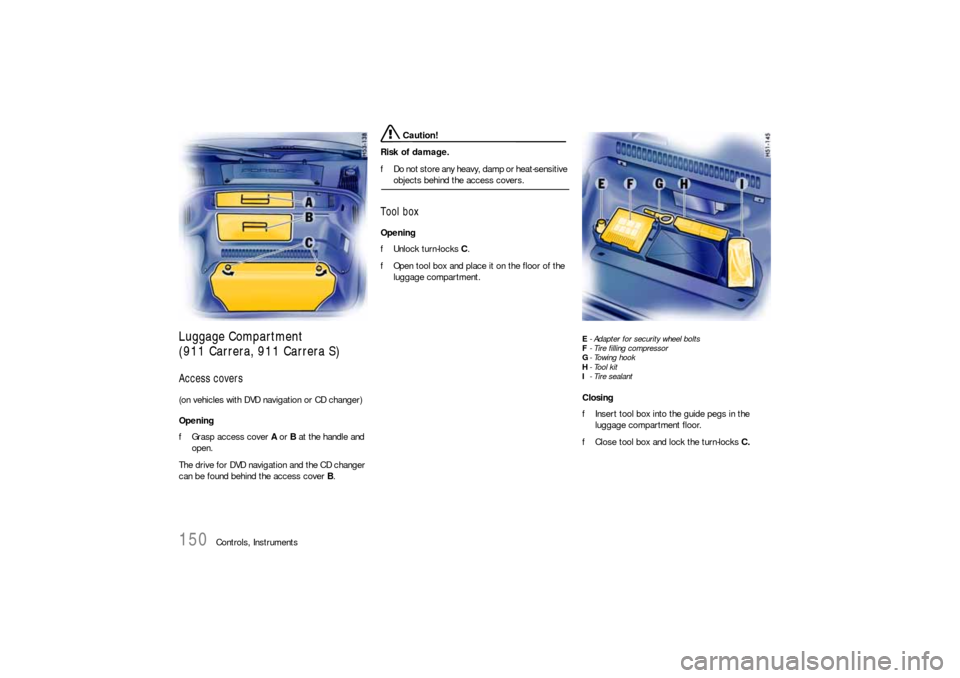
Opening
fGrasp access cover A or B at the handle and
open.
The drive for DVD navigation and the CD changer
can be found behind the access cover B.
Caution!
Risk of damage.
fDo not store any heavy, damp or heat-sensitive objects behind the access covers.
Tool boxOpening
fUnlock turn-locks C.
fOpen tool box and place it on the floor of the
luggage compartment.
E- Adapter for security wheel bolts
F- Tire filling compressor
G-Towing hook
H-Tool kit
I-Tire sealantClosing
fInsert tool box into the guide pegs in the
luggage compartment floor.
fClose tool box and lock the turn-locks C.
Page 151 of 308
Controls, Instruments
151
Luggage Compartment
(911 Carrera 4, 911 Carrera 4S)The position of the components in the luggage
compartment are dependent on the country equip-
ment and can vary from what is shown in this
manual.DVD navigationThe drive for DVD navigation and the audio ampli-
fier are on the rear wall of the luggage compart-
ment.
Caution!
Risk of damage.
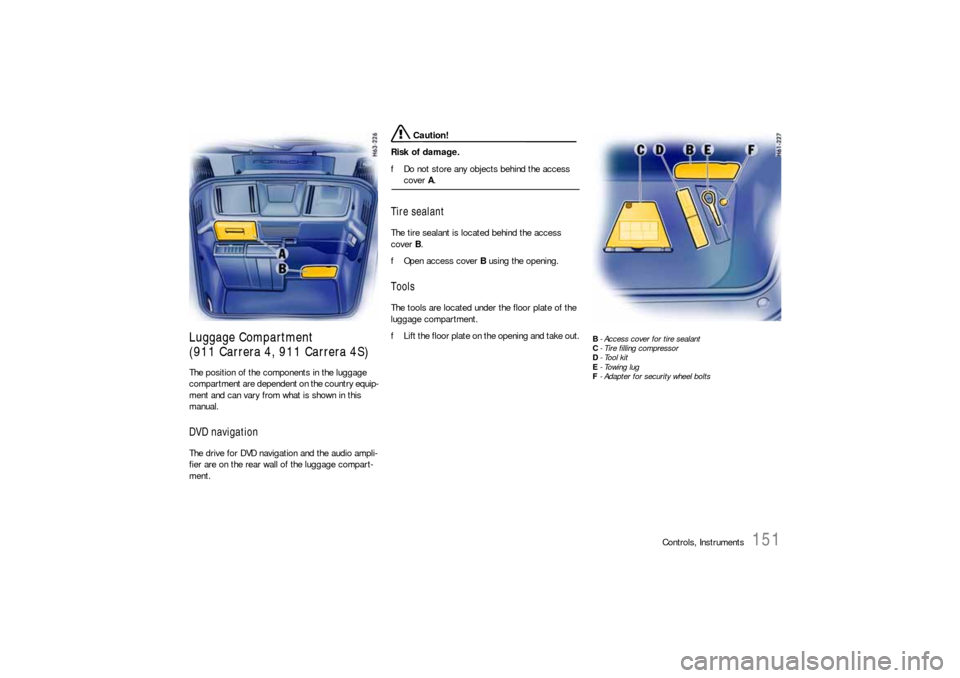
fDo not store any objects behind the access cover A.
Tire sealantThe tire sealant is located behind the access
cover B.
fOpen access cover B using the opening.ToolsThe tools are located under the floor plate of the
luggage compartment.
fLift the floor plate on the opening and take out.
B- Access cover for tire sealant
C- Tire filling compressor
D-Tool kit
E- Towing lug
F- Adapter for security wheel bolts
Page 232 of 308

232
Practical Tips, Emergency Service
Tire pressures
Warning!
Incorrect tire pressure causes increased tire
wear and adversely affects road handling.
fAlways use an accurate tire pressure gauge
when checking inflation pressures.
fDo not exceed the maximum tire pressure list-
ed on the tire sidewall.
Please observe the chapter “TIRE PRESSURE
PLATE” on Page 285.
fCold tire inflation pressure means: all tires
must be cold, ambient temperature maximum
(68°F/20°C)
, when adjusting the inflation pres-
sure.
Avoid sunlight striking the tires before measur-
ing cold pressures, since the pressures would
rise from temperature influence.
fValve caps protect the valve from dust and dirt,
and thus from leakage.
Always screw caps tightly down.
Replace missing caps immediately.
fUse only plastic valve caps.
fDo not use commercially available sealant or
tire inflating bottles. Only use Porsche approved tire sealant.Each tire, including the spare (if provided), should
be checked every 2 weeks when cold (68°F/20°C)
and inflated to the inflation pressure recommend-
ed in this Owner's Manual or on the tire-pressure
plate.
If your vehicle has tires of a different size than the
size indicated in this Owner's Manual or on the tire-
pressure plate, you should determine the proper
tire inflation pressure for those tires.
As an added safety feature, your vehicle has been
equipped with a tire pressure monitoring (TPC)
that illuminates a low tire pressure message when
one or more of your tires is significantly under-in-
flated. Accordingly, when the low tire pressure
message illuminates, you should stop and check
your tires as soon as possible, and inflate them to
the proper pressure. Driving on a significantly un-
der-inflated tire causes the tire to overheat and
can lead to tire failure. Under-inflation also reduc-
es fuel efficiency and tire tread life, and may affect
the vehicle’s handling and stopping ability.
Please note that the TPC is not a substitute for
proper tire maintenance, and it is the driver’s re-
sponsibility to maintain correct tire pressure, even
if under-inflation has not reached the level to trig-
ger illumination of the TPC low tire pressure mes-
sage.
fOn vehicles with tire pressure monitoring:
Please observe the chapter “TPC TIRE
PRESSURE MONITORING” on Page 109.
When tires are warm, the tire pressure is
increased.fNever let air out of hot tires.
This could cause the tire pressure to fall below
the prescribed value.
Insufficient tire filling pressure can cause tires to
overheat and thus be damaged – even invisibly.
Hidden tire damage is not eliminated by subse-
quently correcting the tire pressure.
Overloading
Danger!
Risk of personal injury, loss of control and
damage to vehicle parts.
fDo not overload your vehicle. Be careful about
the roof load.
fIf loading the vehicle also correct the tire pres-
sure. Tire pressure for loaded vehicle can be
found on the tire pressure plate and in the
chapter technical data.
fNever exceed the specified axle load.
Overloading can shorten the service life of the
tires and car, as well as lead to dangerous ve-
hicle reactions and long braking distances.
Damage due to overloading is not covered by the vehicle warranty.
fPlease observe the chapter “LOADING INFOR-
MATION” on Page 242.
fPlease observe the chapter “TIRE PRESSURES
FOR COLD TIRES” on Page 290.
Page 233 of 308
Practical Tips, Emergency Service
233
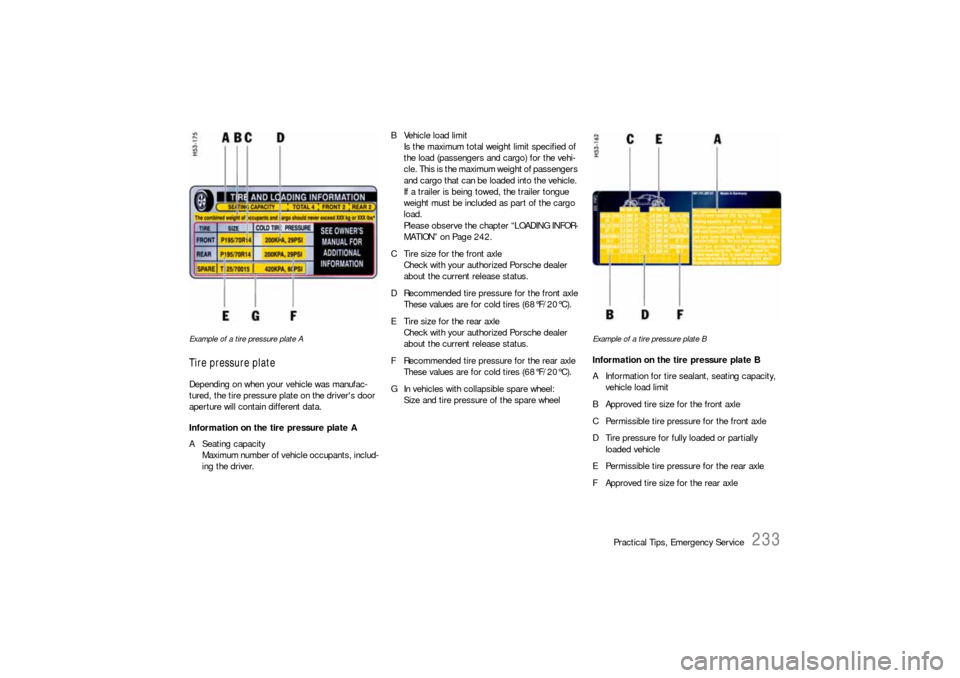
Example of a tire pressure plate ATire pressure plateDepending on when your vehicle was manufac-
tured, the tire pressure plate on the driver's door
aperture will contain different data.
Information on the tire pressure plate A
A Seating capacity
Maximum number of vehicle occupants, includ-
ing the driver.B Vehicle load limit
Is the maximum total weight limit specified of
the load (passengers and cargo) for the vehi-
cle. This is the maximum weight of passengers
and cargo that can be loaded into the vehicle.
If a trailer is being towed, the trailer tongue
weight must be included as part of the cargo
load.
Please observe the chapter “LOADING INFOR-
MATION” on Page 242.
C Tire size for the front axle
Check with your authorized Porsche dealer
about the current release status.
D Recommended tire pressure for the front axle
These values are for cold tires (68°F/20°C).
E Tire size for the rear axle
Check with your authorized Porsche dealer
about the current release status.
F Recommended tire pressure for the rear axle
These values are for cold tires (68°F/20°C).
G In vehicles with collapsible spare wheel:
Size and tire pressure of the spare wheel
Example of a tire pressure plate BInformation on the tire pressure plate B
A Information for tire sealant, seating capacity,
vehicle load limit
B Approved tire size for the front axle
C Permissible tire pressure for the front axle
D Tire pressure for fully loaded or partially
loaded vehicle
E Permissible tire pressure for the rear axle
F Approved tire size for the rear axle
Page 245 of 308

Practical Tips, Emergency Service
245
Flat Tire
Warning!
Failure to follow these instructions may result
in serious personal injuries to you or to by-
standers.
fIf you have a flat tire, move a safe distance off
the road. Turn the emergency flasher on and
use other warning devices to alert other motor-
ists. Set the parking brake.
fDo not park your vehicle where it may contact
dry grass, brush or other flammable materials.
The hot parts of the exaust system could set
such materials on fire, thereby causing both
property damage and severe or fatal physical injury.
A tire sealant and compressor with pressure
tester are located in the luggage compartment.
fPlease observe the safety and operating in-
structions on the special sealant bottle with a
special Porsche part number and on the com-
pressor – these are essential.Important note
Sealing the tire with the tire repair kit is only
an emergency repair. Even with the tire air-
tight, it may be used only for short journeys
in an emergency.
The maximum permitted speed is 50 mph
(80 km/h).
fDo not use commercially available sealant or
tire inflating bottles.
Use only the tire sealant located in the luggage
compartment.
Warning!
Risk of accident.
fHave tires replaced by a specialist workshop
as soon as possible.
fAvoid hard acceleration and high cornering speeds.
f f f
Page 246 of 308
246
Practical Tips, Emergency Service
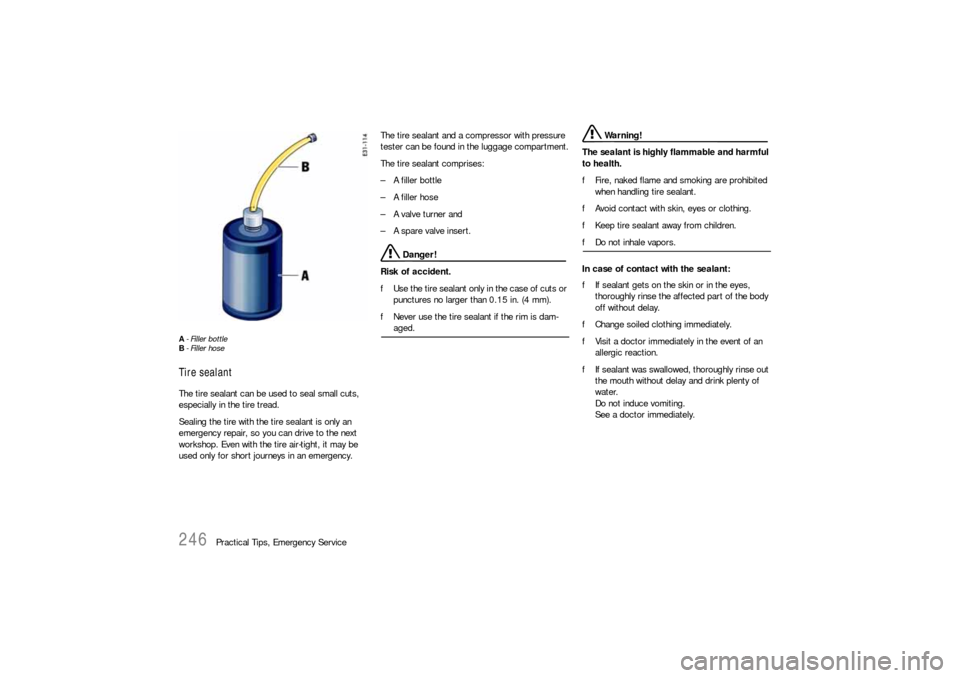
A- Filler bottle
B- Filler hoseTire sealantThe tire sealant can be used to seal small cuts,
especially in the tire tread.
Sealing the tire with the tire sealant is only an
emergency repair, so you can drive to the next
workshop. Even with the tire air-tight, it may be
used only for short journeys in an emergency.The tire sealant and a compressor with pressure
tester can be found in the luggage compartment.
The tire sealant comprises:
– A filler bottle
– A filler hose
– A valve turner and
– A spare valve insert.
Danger!
Risk of accident.
fUse the tire sealant only in the case of cuts or
punctures no larger than 0.15 in. (4 mm).
fNever use the tire sealant if the rim is dam-aged.
Warning!
The sealant is highly flammable and harmful
to health.
fFire, naked flame and smoking are prohibited
when handling tire sealant.
fAvoid contact with skin, eyes or clothing.
fKeep tire sealant away from children.
fDo not inhale vapors.
In case of contact with the sealant:
fIf sealant gets on the skin or in the eyes,
thoroughly rinse the affected part of the body
off without delay.
fChange soiled clothing immediately.
fVisit a doctor immediately in the event of an
allergic reaction.
fIf sealant was swallowed, thoroughly rinse out
the mouth without delay and drink plenty of
water.
Do not induce vomiting.
See a doctor immediately.
Page 247 of 308
Practical Tips, Emergency Service
247
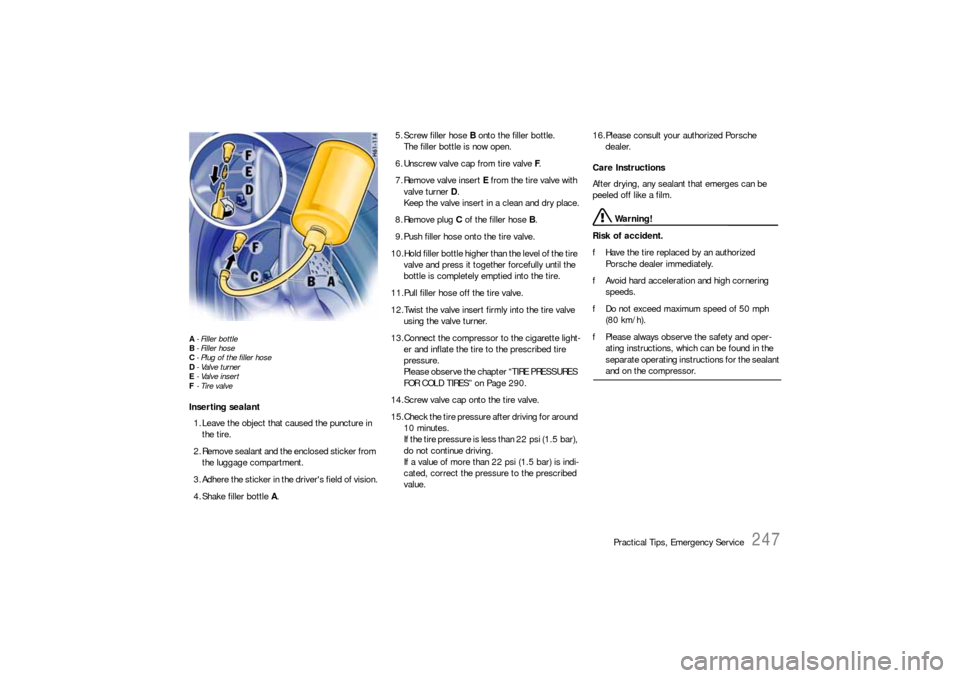
A- Filler bottle
B- Filler hose
C- Plug of the filler hose
D-Valve turner
E-Valve insert
F- Tire valveInserting sealant
1. Leave the object that caused the puncture in
the tire.
2. Remove sealant and the enclosed sticker from
the luggage compartment.
3. Adhere the sticker in the driver's field of vision.
4. Shake filler bottle A.5. Screw filler hose B onto the filler bottle.
The filler bottle is now open.
6. Unscrew valve cap from tire valve F.
7. Remove valve insert E from the tire valve with
valve turner D.
Keep the valve insert in a clean and dry place.
8. Remove plug C of the filler hose B.
9. Push filler hose onto the tire valve.
10.Hold filler bottle higher than the level of the tire
valve and press it together forcefully until the
bottle is completely emptied into the tire.
11.Pull filler hose off the tire valve.
12.Twist the valve insert firmly into the tire valve
using the valve turner.
13.Connect the compressor to the cigarette light-
er and inflate the tire to the prescribed tire
pressure.
Please observe the chapter “TIRE PRESSURES
FOR COLD TIRES” on Page 290.
14.Screw valve cap onto the tire valve.
15.Check the tire pressure after driving for around
10 minutes.
If the tire pressure is less than 22 psi (1.5 bar),
do not continue driving.
If a value of more than 22 psi (1.5 bar) is indi-
cated, correct the pressure to the prescribed
value.16.Please consult your authorized Porsche
dealer.
Care Instructions
After drying, any sealant that emerges can be
peeled off like a film.
Warning!
Risk of accident.
fHave the tire replaced by an authorized
Porsche dealer immediately.
fAvoid hard acceleration and high cornering
speeds.
fDo not exceed maximum speed of 50 mph
(80 km/h).
fPlease always observe the safety and oper-
ating instructions, which can be found in the
separate operating instructions for the sealant and on the compressor.
Page 308 of 308

308
Index
TTachometer .................................................. 91
Tank ......................................... 208
, 209
, 291
Ventilation system ............................... 213
Technical data ............................................ 286
Telephone .................................................. 161
Temperature setting .................................... 138
Temperature, outside indicator....................... 95
Test stand, measurements ............................ 74
Theft protection ............................................ 18
Tightening torque for wheel bolts ................. 252
Tiptronic .................................................... 165
Indicator............................................... 93
Tire pressure monitoring ............................. 109
Tires ................................... 16
, 229
, 288
, 289
Care .................................................. 229
Checking pressure .............................. 251
Inscription .......................................... 240
Loading information............................ 242
Pressure ............................... 5
, 232
, 290
Pressure monitoring............................ 109
Pressure plate .................................... 285
Sealant ......................................245, 246
Sidewall ............................................. 240
Size ................................................... 240
Tool kit....................................................... 151
Tools .................................................150, 151
Towing ...................................... 170
, 281
, 282
Towing lug .................................................. 151
Tow-starting ............................................... 170
Tracks ...............................................288, 289
Transmission ......................................164, 287
Fluid...........................................215, 291
Trunk entrapment ....................................... 152Turn signals ......................................... 91
, 132
Tyre pressure
Compressor ....................................... 151
Ty re s
Sealant............................................... 151
UUndercoating ..................................... 211
, 223
VValves ........................................................ 236
Vanity mirror ................................................. 41
Vehicle
Care .................................................. 218
Data................................................... 284
Identification label ............................... 284
Identification number ........................... 284
Putting into operation .......................... 261
Washing ............................................. 219
Ventilation .................................................. 138
Vents ................................................ 138
, 141
Viscosity, engine oil..................................... 204
WWarning lights and messages....................... 122
Washer
Fluid .......................................... 213
, 291
Lever ................................................. 133
Washing ..................................................... 219
Weights ............................................. 292, 293
Welcome Home Function ............................. 131
Wheel.......................... 16
, 224
, 229
, 288
, 289Bolts ..................................................248
Care...................................................229
Changing ............................................245
Checking pressure ..............................251
Inscription...........................................240
Loading information .............................242
Securing wheel bolts .............................19
Security wheel bolts ............................151
Sidewall ..............................................240
Size ...................................................240
Tire pressure ......................... 5
, 232
, 290
Tire pressure plate..............................285
Tire sealant................................ 245, 246
Windows...................................... 28
, 176
, 223
Washer nozzles ...................................133
Washer system .................. 133
, 213
, 291
Windshield wiper/washer lever .....................133
Windshield wipers .............................. 133, 216
Replacing ...........................................216
Windstop ....................................................185
Winter operation
Battery ...............................................260
Coolant ..............................................199
Engine oil............................................200
Jumper cables ........................... 264, 265
Locks .................................................221
Seals..................................................224
Snow chains .......................................239
Tires ................................. 238
, 288
, 289
Washer fluid ........................................213
Wiper blades .......................................216
Wiper
Blades ................................................216
Rear ...................................................134