steering wheel PORSCHE 911 CARRERA 2010 5.G User Guide
[x] Cancel search | Manufacturer: PORSCHE, Model Year: 2010, Model line: 911 CARRERA, Model: PORSCHE 911 CARRERA 2010 5.GPages: 310, PDF Size: 3.39 MB
Page 41 of 310

Operation, Safety
39
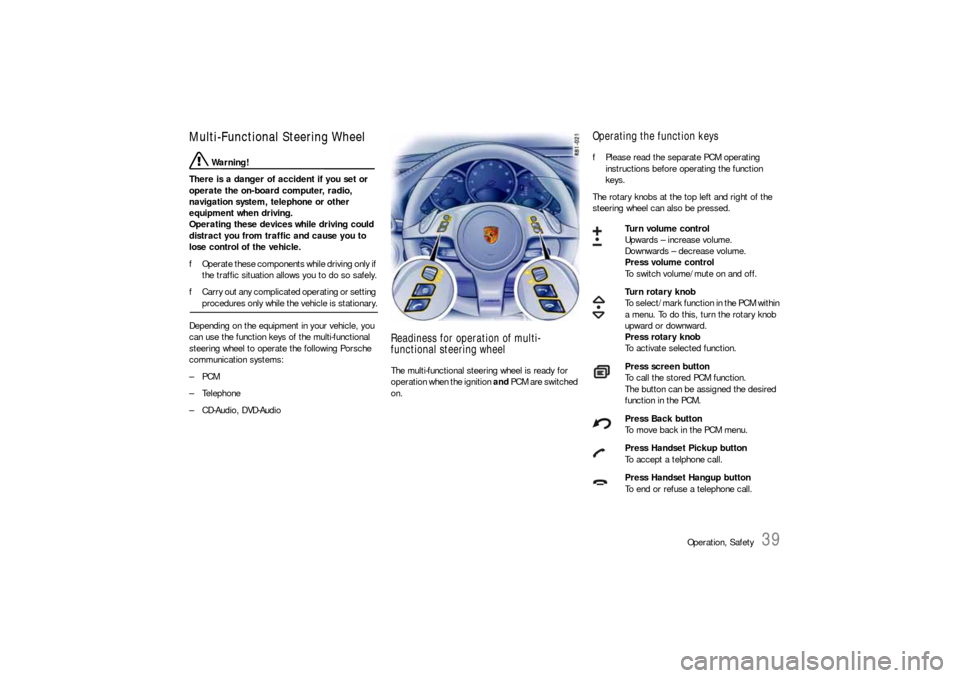
Multi-Functional Steering Wheel
Warning!
There is a danger of accident if you set or
operate the on-board computer, radio,
navigation system, telephone or other
equipment when driving.
Operating these devices while driving could
distract you from traffic and cause you to
lose control of the vehicle.
fOperate these components while driving only if
the traffic situation allows you to do so safely.
fCarry out any complicated operating or setting procedures only while the vehicle is stationary.
Depending on the equipment in your vehicle, you
can use the function keys of the multi-functional
steering wheel to operate the following Porsche
communication systems:
–PCM
– Telephone
– CD-Audio, DVD-Audio
Readiness for operation of multi-
functional steering wheelThe multi-functional steering wheel is ready for
operation when the ignition and PCM are switched
on.
Operating the function keysfPlease read the separate PCM operating
instructions before operating the function
keys.
The rotary knobs at the top left and right of the
steering wheel can also be pressed.
Turn volume control
Upwards – increase volume.
Downwards – decrease volume.
Press volume control
To switch volume/mute on and off.
Turn rotary knob
To select/mark function in the PCM within
a menu. To do this, turn the rotary knob
upward or downward.
Press rotary knob
To activate selected function.
Press screen button
To call the stored PCM function.
The button can be assigned the desired
function in the PCM.
Press Back button
To move back in the PCM menu.
Press Handset Pickup button
To accept a telphone call.
Press Handset Hangup button
To end or refuse a telephone call.
Page 46 of 310

44
Operation, Safety
Airbag SystemsThe airbags in combination with the safety belts
make up a safety system which offers the driver
and the passenger the greatest known protection
from injuries in case of accident.
Your vehicle is equipped with a weight sensing sys-
tem for the front passenger's seat in accordance
with U.S. Federal Motor Vehicle Safety Standard
208.
Even if your vehicle is equipped with airbags, the
safety belts must be worn at all times,
because the front airbag system is only deployed
by frontal collisions with an impact of sufficient se-
verity.
Below the deployment threshold of the airbag sys-
tem, and during types of collisions which do not
cause the actuation of the system, the safety belts
provide the primary protection to the occupants
when correctly worn.
Therefore, all persons within the vehicle
must wear safety belts at all times (in many
states, state law requires the use of safety belts).
fPlease see the chapter “SAFETY BELTS” on
Page 41.
The front airbags are located under the padded
steering wheel panel on the driver’s side and, on
the passenger's side, in the dashboard.
The side airbags for the front seats are installed
on the side in the seat backrests.
The head airbags are installed in the door linings.
Danger!
To provide optimal occupant protection, air-
bags must inflate at very high speed. If you
are not wearing your safety belt or are too
close to the airbag when it is deployed, inflat-
ing airbags can result in serious personal in-
jury or death.
fMake sure there are no people, animals or ob-
jects between the driver or passenger and the
area into which the airbag inflates.
fSit back as far from the dashboard or steering
wheel as is practical, while still maintaining full
vehicle control.
fAlways hold the steering wheel by the outer
rim. Never rest your hands on the airbag panel.
fAlways fasten seat belts because triggering
of the airbag system depends on the force and
angle of impact.
fDo not transport heavy objects on or in front of
the passenger’s seat. These could impair the
function of the airbag, the seat belts, and
weight sensing.
fDo not hang objects (e.g. jackets, coats, coat
hangers) over the backrest.fAlways keep the lid of the door storage com-
partment closed. Objects must not protrude
out of the door storage compartment.
fNo changes may be made to the wiring or
components of the airbag system.
fDo not add any additional coverings or stickers
to the steering wheel or in the area of the pas-
senger’s airbag, side airbags and head air-
bags. Doing so may adversely affect the func-
tioning of the airbag system or cause harm to
the occupants if the airbag system should de-
ploy.
Do not use protective seat covers.
fDo not modify the seat coverings. Do not at-
tach additional cushions, protective coverings,
or pillows to the passenger's seat. Do not affix
things to the passenger's seat or cover it with
other materials. Do not cover the back of the
backrest. Do not make changes to the passen-
ger's seat and to the seat base frame.
fDo not undertake any wiring for electrical ac-
cessory equipment in the vicinity of the airbag
wiring harnesses. Doing so may disable the air-
bag system or cause inadvertent inflation.
fIf the warning light comes on, the airbag sys-
tem should be repaired immediately by your
authorized Porsche dealer.
fAlways keep feet in the footwell while driving.
Do not put feet on the dashboard or the seat
area. Do not lean against the inside of the door
or outside the window while the vehicle is mov-
ing.
Page 47 of 310

Operation, Safety
45
fUsing accessories not approved by Porsche
can cause the weight sensing system to be im-
paired.
fDo not squeeze objects, such as the fire extin-
guisher, or first aid kit under the seat.
fOnly have seats removed and installed by an
authorized Porsche dealer so that weight sens-
ing components will not be damaged.
fGive your passenger all of the information in
this chapter.
Note
Airbag components (e.g. steering wheel, door lin-
ing, seats) may be disassembled only by an autho-
rized Porsche dealer.
When disposing of a used airbag unit, our safety
instructions must be followed. These instructions
can be obtained at any authorized Porsche dealer.
Function of the airbag systemAirbags are a supplemental safety system. Your
primary protection comes from your safety belts.
The front airbags are triggered during a frontal col-
lision of sufficient force and direction.
In the event of a side impact of corresponding
force, the side airbag on the impact side is
triggered.
The inflation process generates the amount of gas
required to fill the airbags at the necessary pres-
sure in fractions of a second.Airbags help to protect the head and upper body,
while simultaneously damping the motion of the
driver and passenger in the impact direction in the
event of a frontal impact or side impact.
In order to help provide protection in severe colli-
sions which can cause death and serious injury,
airbags must inflate extremely rapidly. Such high
speed inflation has a negative but unavoidable
side effect, which is that it can and does cause in-
juries, including facial and arm abrasions, bruising
and broken bones. You can help minimize such in-
juries by always wearing your safety belts.
There are many types of accidents in which
airbags are not expected to deploy. These include
accidents where the airbags whould provide no
benefit, such as a rear impact against your vehi-
cle. Other accidents where the airbags are de-
signed not to deploy are those where the risk of
injury from the airbag deployment could exeed any
protective benefits, such as in low speed acci-
dents or higher speed accidents where the vehicle
decelerates over a longer time. Since airbag de-
ployment does not occur in all accidents, this fur-
ther emphasizes the need for you and your pas-
sengers to always wear safety belts.
Your vehicle is equipped with a crash sensing and
diagnostic module. This module will record the
use of the seat belt restraint system by the driver
and front passenger when the airbags and/or belt
tensioner work.
Advanced AirbagYour vehicle is equipped with a weight sensing sys-
tem for the passenger's seat in accordance with
U.S. Federal Motor Vehicle Safety Standard 208.
Depending on the weight acting on the front pas-
senger's seat, the front passenger's airbag will au-
tomatically be switched on and off.
Depending on the angle and force of impact, the
front passenger's airbag which is activated will be
triggered during a collision.
Precondition for switching the front passenger's
airbag on and off, depending on weight:
– Vehicles equipped with key-operated airbag
deactivation device:
Switch position AUTO.
– Ignition key is inserted.
Improper handling of the weight sensing
system can unintentionally impair switching
the passenger's airbag off and on.
Page 63 of 310

Operation, Safety
61
ABS Brake System
(Antilock Brake System)The ABS system represents a major contribution
to the enhancement of active safety in your vehi-
cle. This system prevents the wheels from locking
in a panic stop on almost all road surfaces.
With the ABS system in your vehicle, the
following areas are enhanced:
Steering, vehicle remains steerable under all
braking forces when ABS is engaged.
Good directional control, no swerving caused
by locking of wheels under braking conditions.
Shorter stopping distance, stopping distances
are usually reduced because controlled braking is
maximized.
Prevention of wheel lock up, no brake- induced
sliding and thus no localized tire wear from emer-
gency braking.
The crucial advantage of the ABS system over a
conventional brake system is in the area of main-
taining directional control and maneuverability of
the car in emergency situations.
Warning!
The increased control that is provided should
not induce you to take greater risks with your
safety. The limits dictated by the laws of
physics cannot be overcome, even with ABS.
The risk of accidents due to inappropriate
speed cannot be reduced, even by the ABS.
The driver bears the responsibility for all
driving maneuvers.
fAdapt your driving style to the prevailing road
and weather conditions.
fObey all traffic laws.
Other vehicles not equipped with the ABS
system may not be able to maintain control,
especially on wet or poor road surfaces and
thus may be more likely to impact you from
behind.
fTo minimize that risk, use your ABS system to
increase your ability to maneuver to avoid dan-
gerous situations and not merely to try to stop in the shortest distance possible.
Operation of the ABS systemA wheel speed sensor is mounted to each of the
four wheels. If wheel lock-up of either of the front
wheels or the rear wheels is sensed during brak-
ing, the brake pressure is adjusted automatically
until the wheel no longer slips.
If braking forces approach the wheel lock-up point
for all wheels (panic braking) the ABS system will
intervene to provide a rapid rythmic braking. The
proper operation of ABS is perceived by the driver
as a pulsating brake pedal in conjunction with au-
dible noise and perhaps some vibration.
fIf you experience these sensations while driv-
ing or a road surface with questionable trac-
tion, reduce vehicle speed appropriate for the
prevailing road conditions.
fIf full braking should be necessary, press the
brake pedal all the way down throughout the
entire braking procedure, regardless of the pul-
sating pedal. Do not ease up on pressure ap-
plied to the pedal.
The functional readiness of all the main electrical
components of the ABS is checked by an
electronic monitoring system both before and
while you drive.
Page 68 of 310

66
Operation, Safety
Porsche Stability Management
(PSM)PSM is an active control system for stabilization of
the vehicle approaching the performance limits of
driving maneuvers.
Warning!
Risk of an accident, resulting in serious per-
sonal injury or death.
The increased control that is provided should
not induce you to take greater risks with your
safety. The limits dictated by the laws of
physics cannot be overcome, even with PSM.
The risk of accidents due to inappropriate
speed cannot be reduced, even by PSM.
The driver bears the responsibility for all
driving maneuvers.
fAdapt your driving style to the prevailing road
and weather conditions.
fObey all traffic laws.
Sensors at the wheels, brakes, steering system
and engine continuously measure:
–Speed
– Direction of travel (steering angle)
– Lateral acceleration
– Rate of turn about the vertical axis
– Longitudinal accelerationPSM uses these values to determine the direction
of travel indicated by the driver.
PSM intervenes and helps to correct the course if
the actual direction of motion deviates from the
chosen course (steering-wheel position):
It brakes individual wheels as needed. In addition,
the engine power may be manipulated in order to
stabilize the vehicle.
The events below inform the driver of PSM control
operations and warn him/her to adapt his/her
driving style to the road conditions:
– The multifunctional information light on the
instrument panel flashes.
– Hydraulic noises can be heard.
– The vehicle decelerates and steering-wheel
forces are altered as the PSM controls the
brakes.
– Reduced engine power.
– The brake pedal pulsates and its position is
changed during braking.
In order to achieve full vehicle deceleration,
foot pressure must be increased after the
brake pedal has begun vibrating.
Examples of PSM control operations– If the front wheels of the vehicle drift on a
bend, the rear wheel on the inside of the bend
is braked and the engine power is reduced if
necessary.
– If the rear of the vehicle swings out on a bend,
the front wheel on the outside of the bend is
braked.Additional braking functions– Pre-filling the brake system:
The brake system is prepared for possible
subsequent emergency braking if the acceler-
ator pedal is released suddenly and quickly.
The brake system is prefilled and the brake
pads are already applied gently to the brake
discs.
– Brake booster:
In the event of an emergency braking operation
where the pedal force is insufficient, a brake
booster provides the braking pressure neces-
sary for maximum deceleration at all 4 wheels.Advantages of PSM– Best possible traction and lane-holding ability
in all driving situations – even on road surfaces
with varying friction.
Page 69 of 310

Operation, Safety
67
– The system compensates for undesired lateral
vehicle reactions when the driver releases the
accelerator pedal or brakes when cornering.
This compensation functions up to the
maximum lateral acceleration.
– PSM actively stabilizes the vehicle as required
during dynamic driving maneuvers (e.g. rapid
steering movements, during lane changes or
on alternating bends).
– Improved braking stability on bends and on
different or varying road surfaces.
– It improves braking function and shortens
stopping distance in the event of emergency
braking.Readiness for operationPSM is switched on automatically every time you
start the engine.
PSM should always be switched on during
“normal” driving.
However, it may be advantageous to switch off
PSM temporarily in exceptional situations, for
example:
– On a loose surface or in deep snow,
– When “rocking” the vehicle free and
– When using snow chains.
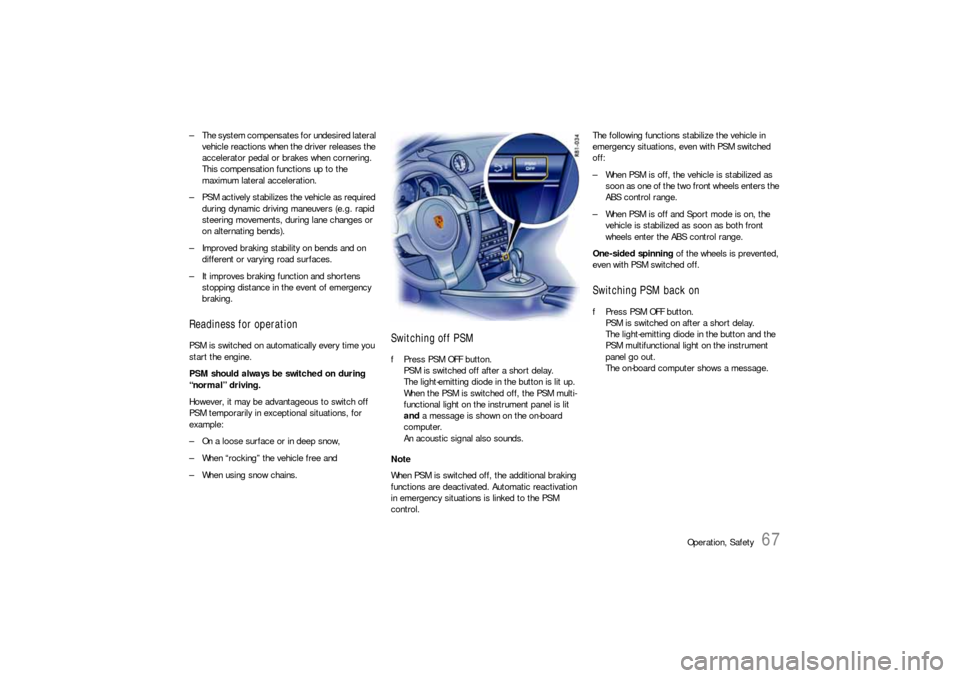
Switching off PSMfPress PSM OFF button.
PSM is switched off after a short delay.
The light-emitting diode in the button is lit up.
When the PSM is switched off, the PSM multi-
functional light on the instrument panel is lit
and a message is shown on the on-board
computer.
An acoustic signal also sounds.
Note
When PSM is switched off, the additional braking
functions are deactivated. Automatic reactivation
in emergency situations is linked to the PSM
control.The following functions stabilize the vehicle in
emergency situations, even with PSM switched
off:
– When PSM is off, the vehicle is stabilized as
soon as one of the two front wheels enters the
ABS control range.
– When PSM is off and Sport mode is on, the
vehicle is stabilized as soon as both front
wheels enter the ABS control range.
One-sided spinning of the wheels is prevented,
even with PSM switched off.
Switching PSM back onfPress PSM OFF button.
PSM is switched on after a short delay.
The light-emitting diode in the button and the
PSM multifunctional light on the instrument
panel go out.
The on-board computer shows a message.
Page 77 of 310

Operation, Safety
75
Switch position 2Start engine
fTurn ignition key to ignition lock position 2.
fPlease see the chapter “STARTING PROCEDU-
RES” on Page 77.Switch position 3Ignition off
fTurn ignition key to ignition lock position 3.
Note on operation
The vehicle battery discharges if the ignition key is
left inserted.
If the vehicle battery is dead, the key can only be
pulled out of the ignition lock if the emergency
operation is performed:
fPlease see the chapter “EMERGENCY OPERA-
TION – PULLING OUT THE IGNITION KEY” on
Page 76.
Locking the steering columnAutomatic locking
The steering column is automatically locked when
the ignition key is withdrawn from the ignition lock.
Warning!
Risk of an accident, resulting in serious per-
sonal injury or death.
The steering wheel will lock and will cause
loss of steering.
fNever remove key from the ignition lock or turn
the key off while the vehicle is moving.
fAlways withdraw the ignition key when leaving the vehicle.Automatic unlocking
The steering column is unlocked when the vehicle
is unlocked with the radio remote control.
Note
fTo avoid discharging the battery, always re-
move the ignition key from the ignition lock.
Please see the chapter “BATTERY” on
Page 261.
Gong If you leave the key in the ignition/steering lock, a
gong will sound when the driver’s door is opened.
This is a reminder to remove the key.
Page 80 of 310

78
Operation, Safety
Stopping Engine fTurn key back to position 3.
fDo not stop engine immediately after hard or
extended driving.
Keep engine running at increased idle for
about two minutes to prevent excessive heat
build-up before turning off engine.
fTo avoid discharging the battery, always re-
move the ignition key from the ignition lock.
fWhen leaving the car, always remove the igni-
tion key and apply the handbrake. Engage 1st
gear or reverse gear on vehicles with manual
transmission or move the selector lever to po-
sition P on vehicles with PDK transmission.
fEngage the steering lock by moving the steer-
ing wheel to the left or right.
Turn the steering wheel to the locking position
before you switch off the engine so that you
don’t have to exert yourself when locking or
unlocking the steering.
Warning!
Danger of injury. Hot engine compartment
components can burn skin on contact.
fBefore working on any part in the engine com-
partment, turn the engine off and let it cool down sufficiently.
Engine-compartment blower,
radiator fan The radiator and radiator fans are in the front of
the car.
The engine-compartment blower is mounted on
the engine compartment lid.
Warning!
Risk of injury.
After the engine is switched off, the engine-
compartment temperature is monitored for
approx. 30 minutes.
During this period, and depending on tem-
perature, the engine-compartment blower
may continue to run or start to run.
fCarry out work in these areas only with the en-
gine off, the ignition off, and exercise extreme
caution.
Risk of injury. The radiator fans in the front
end of the car may be operating or
unexpectedly start operating when the
engine is switched on.
fCarry out work in these areas only with the en-gine switched off.
Automatic garage door The ignition system in your Porsche may interfere
with your electronically operated garage door.
fTo check this, drive your Porsche close to the
garage door. Make sure not to interfere with
the operating range of the door.
fRun the engine at different speeds.
fIf the garage door opens or closes without you
operating the garage door unit in your car,
contact the dealer who installed the automatic
garage door to have the frequency and/or
coding of the garage door signal changed or
modified.
Page 84 of 310

82
Operation, Safety
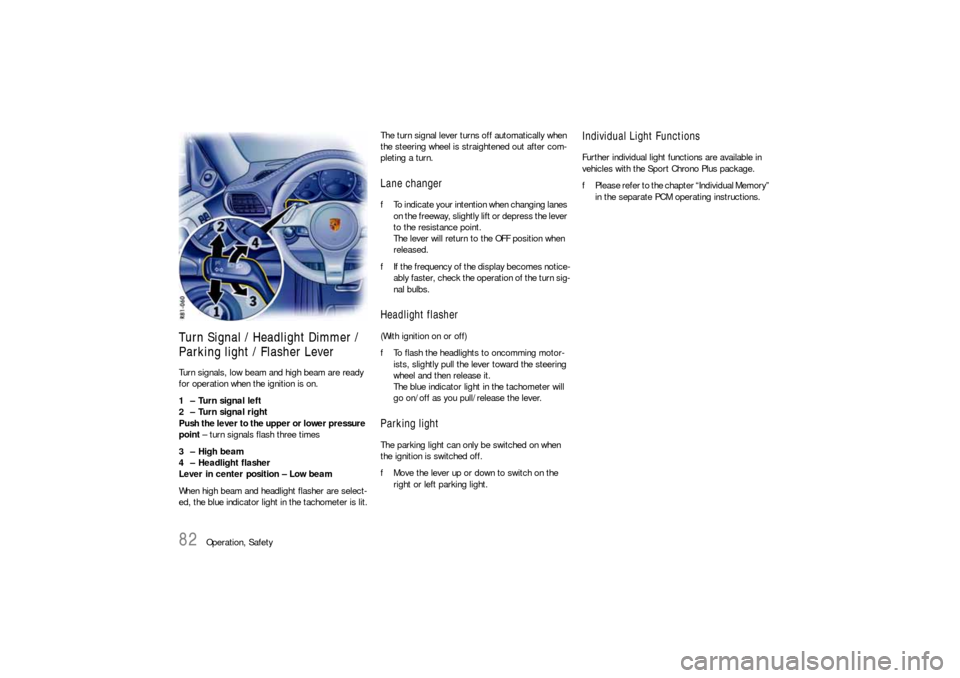
Turn Signal / Headlight Dimmer /
Parking light / Flasher Lever Turn signals, low beam and high beam are ready
for operation when the ignition is on.
1 – Turn signal left
2 – Turn signal right
Push the lever to the upper or lower pressure
point – turn signals flash three times
3 – High beam
4 – Headlight flasher
Lever in center position – Low beam
When high beam and headlight flasher are select-
ed, the blue indicator light in the tachometer is lit.The turn signal lever turns off automatically when
the steering wheel is straightened out after com-
pleting a turn.
Lane changer fTo indicate your intention when changing lanes
on the freeway, slightly lift or depress the lever
to the resistance point.
The lever will return to the OFF position when
released.
fIf the frequency of the display becomes notice-
ably faster, check the operation of the turn sig-
nal bulbs. Headlight flasher (With ignition on or off)
fTo flash the headlights to oncomming motor-
ists, slightly pull the lever toward the steering
wheel and then release it.
The blue indicator light in the tachometer will
go on/off as you pull/release the lever.Parking lightThe parking light can only be switched on when
the ignition is switched off.
fMove the lever up or down to switch on the
right or left parking light.
Individual Light FunctionsFurther individual light functions are available in
vehicles with the Sport Chrono Plus package.
fPlease refer to the chapter “Individual Memory”
in the separate PCM operating instructions.
Page 85 of 310

Operation, Safety
83
Windshield Wiper / Washer Lever
Warning!
Danger of injury when the windshield wipers
operate unintentionally, e.g. in intermittent
or rain sensor operation.
Risk of damage to the windshield and wiper
system.
fAvoid running the wiper blades over a dry wind-
shield to prevent scratching the glass. Spray
washer fluid on the windshield first.
A scratched windshield will reduce visibility.
fAlways loosen wiper blades from frozen glass
before operating wipers to prevent damage to
the wiper motor or blades. fAlways switch off windshield wipers in car
wash to prevent them wiping unintentionally
(intermittent or sensor operation).
fAlways switch off windshield wipers before
cleaning the windshield to avoid unintentional
operation (intermittent or sensor operation).
fDo not operate the headlight washer in car
washes.
fDo not operate headlight washer when it is
frozen.
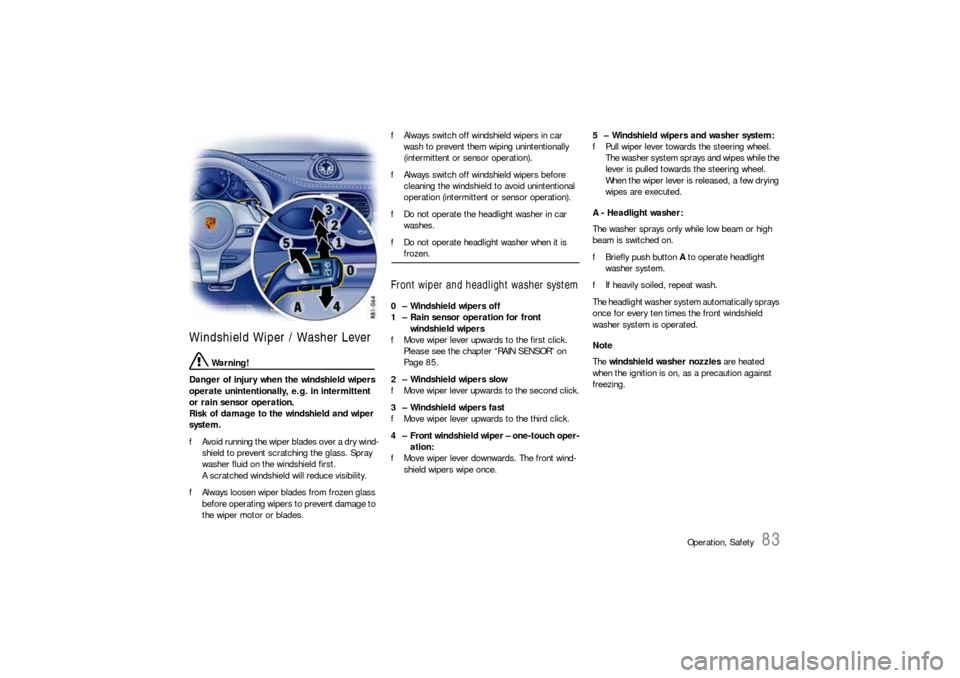
Front wiper and headlight washer system0 – Windshield wipers off
1 – Rain sensor operation for front
windshield wipers
fMove wiper lever upwards to the first click.
Please see the chapter “RAIN SENSOR” on
Page 85.
2 – Windshield wipers slow
fMove wiper lever upwards to the second click.
3 – Windshield wipers fast
fMove wiper lever upwards to the third click.
4 – Front windshield wiper – one-touch oper-
ation:
fMove wiper lever downwards. The front wind-
shield wipers wipe once.5 – Windshield wipers and washer system:
fPull wiper lever towards the steering wheel.
The washer system sprays and wipes while the
lever is pulled towards the steering wheel.
When the wiper lever is released, a few drying
wipes are executed.
A - Headlight washer:
The washer sprays only while low beam or high
beam is switched on.
fBriefly push button A to operate headlight
washer system.
fIf heavily soiled, repeat wash.
The headlight washer system automatically sprays
once for every ten times the front windshield
washer system is operated.
Note
The windshield washer nozzles are heated
when the ignition is on, as a precaution against
freezing.