key PORSCHE 911 CARRERA 2010 5.G Workshop Manual
[x] Cancel search | Manufacturer: PORSCHE, Model Year: 2010, Model line: 911 CARRERA, Model: PORSCHE 911 CARRERA 2010 5.GPages: 310, PDF Size: 3.39 MB
Page 228 of 310

226
Maintenance, Car Care Convertible top
fNever remove snow and ice using a sharp
edged object.
Incorrect care and treatment can damage the con-
vertible top and cause leaks. Any repair work can
be done by your authorized Porsche dealer.
Important note
No folding top is 100% leak proof.
Due to the constant changing of loads and strains
to which a car is subject to when driving on roads,
minor wind noise and seepage at joints between
the top, body and doors on convertible tops can-
not be completely sealed in certain areas. There-
fore small leaks are considered normal for these
models. In addition, your convertible top should
not be washed in a car wash. The top may experi-
ence damage by the brushes or may experience
leaks due to the high pressure water streams di-
rected in areas which would not encounter water
in normal driving conditions. Cleaning
Caution!
Risk of damage due to the cleaning jet of the
high-pressure cleaning equipment or hot wax
treatment.
fDo not clean the convertible top with high-
pressure cleaning equipment.
fDo not use the hot wax treatment.
Do not wash the convertible top each time the car
is washed.
It is usually sufficient to spray or wash it with clean
water.
fBrush dust off the convertible top in the direc-
tion of the weave using a soft brush.
fOnly if there is heavy dirt, wet the convertible
top with lukewarm water and the Porsche
Wash-Shampoo & convertible-top cleaner, us-
ing a sponge or soft brush, and rub gently.
Rinse Wash-Shampoo & convertible-top clean-
er thoroughly off the convertible top with clean
water.
fAfter washing it, treat the convertible-top cover
at least once a year with the special Porsche
convertible-top care product.
Do not allow the convertible-top care product
to come into contact with paint or windows. If
it does, remove immediately. fIf there is leakage in the convertible-top cover
or at its seams or folds, the special Porsche
convertible-top care product can be used.
fPlease note the information on the container.
fRemove bird droppings immediately since the
acid in them will make the rubber swell and the
convertible top will become leaky.
fOpen convertible top only when it is completely
dry, otherwise damp stains and scrub marks
may occur which cannot be removed.
fTry to remove spots from the convertible-top
cover by rubbing carefully with a soft rubber
sponge.
Door lock fTo prevent the door lock from freezing during
the cold season, the lock cylinder should be
covered during a wash.
fShould the lock freeze, use an ordinary de-icer.
In many cases, a well warmed key can help.
Never use excessive force.
Page 236 of 310

234
Practical Tips, Emergency Service
Exercise Extreme Caution when
Working on your Vehicle
Danger!
Ignoring the following instructions may
cause serious personal injury or death.
fThe engine compartment of any motor vehicle
is a potentially hazardous area. If you are not
fully familiar with proper repair procedures, do
not attempt the adjustments described on the
following pages.
This caution also applies to the entire vehicle.
fO n l y w o r k o n y o u r v e h i c l e o u t d o o r s o r i n a w e l l
ventilated area.
fEnsure that there are no open flames in the
area of your vehicle at any time when fuel
fumes might be present. Be especially cau-
tious of such devices such as hot water heat-
ers which ignite a flame intermittently.
fBefore working on any part in the engine com-
partment, turn the engine off and let it cool
down sufficiently. Hot engine compartment
components can burn skin on contact.
fBe alert and cautious around engine at all
times while the engine is running.
If work has to be performed with the engine
running, always set the parking brake, and
make sure the shift lever is in neutral position
or the PDK selector lever in position P or N.fIn particular, be very careful to ensure that
items of clothing (ties, shirt, sleeves etc.), jew-
elry, long hair, hand or fingers cannot get
caught in the engine-compartment blower, fan,
belts or other moving parts.
The radiator and radiator fans are in the front
of the car.
The engine-compartment blower is mounted
on the engine-compartment lid.
The engine-compartment blower can start or
continue running as a function of temperature,
even with the engine switched off.
Carry out work in these areas only with the en-
gine off, the ignition switched off, and exercise
extreme caution.
fYour Porsche is equipped with an electronic ig-
nition system. When the ignition is on, high volt-
age is present in all wires connected with the
ignition system; therefore, exercise extreme
caution when working on any part of the engine
while the ignition is on or the engine is running.
fAlways support your car with safety stands if it
is necessary to work under the car.
Jacks are not suitable for this kind of work.
fWhen working under the car without safety
stands but with the wheels on the ground,
make sure the car is on level ground, the
wheels are blocked, and that the engine
cannot be started.
Remove the ignition key.fDo not smoke or allow an open flame around
the battery or fuel.
Keep a fire extinguisher in close reach.
fIncomplete or improper servicing may cause
problems in the operation of the car. If in doubt
about any servicing, have it done by your au-
thorized Porsche dealer.
Improper maintenance during the warranty pe-
riod may affect your Porsche warranty cover-
age.
fSupplies of fluids, e.g. engine oil, brake fluid or
coolant, are hazardous to your health.
Keep these fluids out of children’s reach and
dispose of them in accordance with the appro-
priate regulations.
fSome countries require additional tools and
special spare parts to be carried.
Please make enquiries before driving abroad.
Page 250 of 310
248
Practical Tips, Emergency Service
Wheel Bolts
Danger!
Risk of wheel bolt breakage and wheel sepa-
ration, resulting in serious personal injury or
death.
fFollow all instructions concerning wheel bolts. fAlways clean the wheel bolts before fitting.
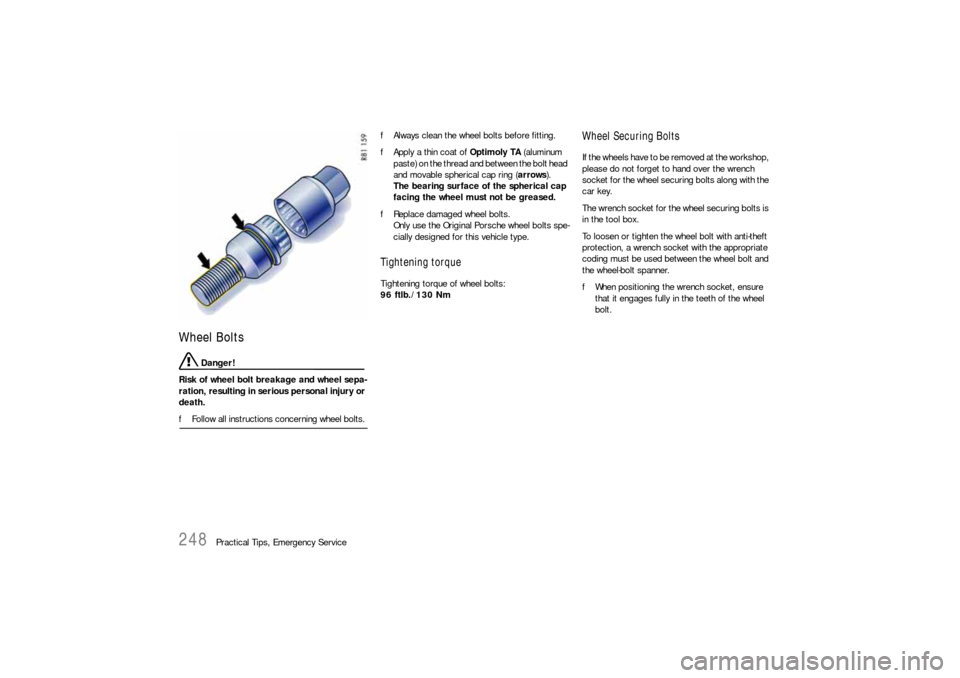
fApply a thin coat of Optimoly TA (aluminum
paste) on the thread and between the bolt head
and movable spherical cap ring (arrows).
The bearing surface of the spherical cap
facing the wheel must not be greased.
fReplace damaged wheel bolts.
Only use the Original Porsche wheel bolts spe-
cially designed for this vehicle type.
Tightening torque Tightening torque of wheel bolts:
96 ftlb./130 Nm
Wheel Securing Bolts If the wheels have to be removed at the workshop,
please do not forget to hand over the wrench
socket for the wheel securing bolts along with the
car key.
The wrench socket for the wheel securing bolts is
in the tool box.
To loosen or tighten the wheel bolt with anti-theft
protection, a wrench socket with the appropriate
coding must be used between the wheel bolt and
the wheel-bolt spanner.
fWhen positioning the wrench socket, ensure
that it engages fully in the teeth of the wheel
bolt.
Page 251 of 310

Practical Tips, Emergency Service
249
Changing a wheel
Warning!
Risk of serious personal injury or death. The
car may slip off the jack.
fMake sure that no one is in the vehicle when
jacking up and changing a wheel.
fAlways place the car on stable supports if work
has to be carried out under the car.
Risk of damage to the brake discs of the
Porsche Ceramic Composite Brake (PCCB).
fAlways screw in both assembly aids when changing a wheel.
Note
The tools required for changing a wheel (e.g. jack,
wheel bolt wrench, assembly aids) are not sup-
plied with the car.
Your authorized Porsche dealer will be pleased to
advise you.1. Apply the handbrake fully and engage 1st gear
or PDK selector-lever position P and remove
the ignition key.
2. Switch on the hazard warning lights if neces-
sary.
3. Secure the car against rolling away, e.g. by
means of wedges under the wheels on the op-
posite side.
This is particularly important on slopes.
4. Slightly slacken the wheel bolts of the wheel to
be changed.
5. Lift the car only at the specified jacking points.
6. Raise the car until the wheel lifts off the
ground.
Please see the chapter “LIFTING THE VEHICLE
WITH A LIFTING PLATFORM OR GARAGE LIFT”
on Page 254.
7. Remove 1 or 2 wheel bolts (see respective
illustration).
8. Screw in assembly aids instead of the wheel
bolts.
Screw in assembly aid for vehicles without Porsche
Ceramic Composite Brake9. Remove the remaining wheel bolts.
Note on operation
fTo remove or mount the spacers:
Please see the chapter “SPACERS 911
CARRERA, 911 CARRERA S” on Page 255.
Page 259 of 310
Practical Tips, Emergency Service
257
Electrical System In order to avoid damage and faults in electrical or
electronic systems, electrical accessories should
be installed at your authorized Porsche dealer.
fOnly use accessories authorized by Porsche.
Warning!
Risk of short circuit and fire, resulting in
serious personal injury or death.
Replacing fuses or relays with the engine
running or the ignition on could cause elec-
trical shock.
fDisconnect the negative terminal on the
battery during all work on the electrical
system.
Please see the chapter “BATTERY” on Page 261.
RelaysDefective relays should be changed only by an
authorized workshop.
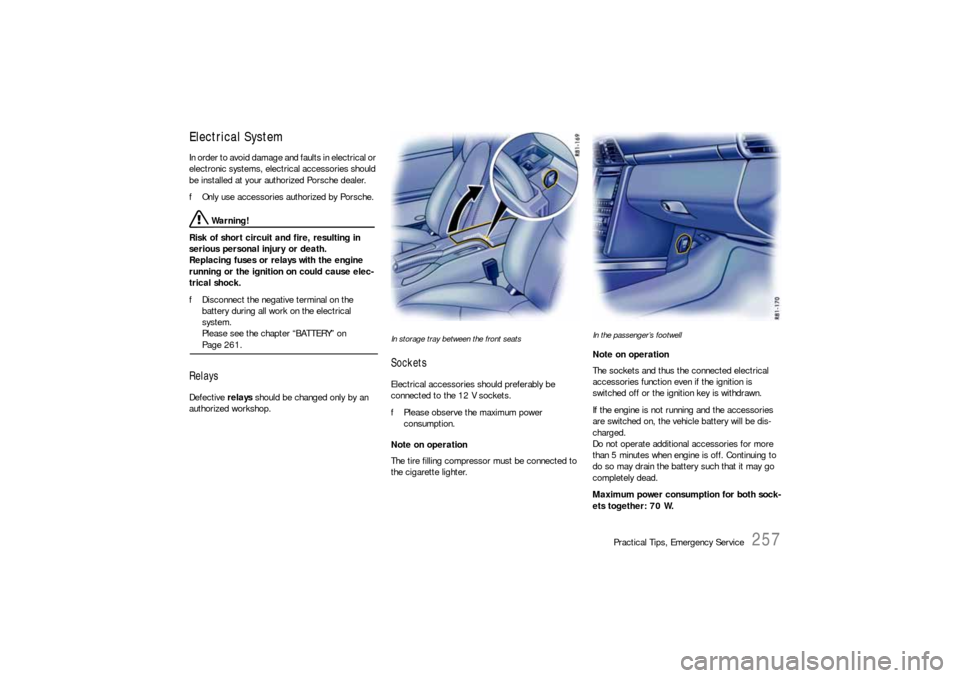
In storage tray between the front seatsSocketsElectrical accessories should preferably be
connected to the 12 V sockets.
fPlease observe the maximum power
consumption.
Note on operation
The tire filling compressor must be connected to
the cigarette lighter.
In the passenger’s footwellNote on operation
The sockets and thus the connected electrical
accessories function even if the ignition is
switched off or the ignition key is withdrawn.
If the engine is not running and the accessories
are switched on, the vehicle battery will be dis-
charged.
Do not operate additional accessories for more
than 5 minutes when engine is off. Continuing to
do so may drain the battery such that it may go
completely dead.
Maximum power consumption for both sock-
ets together: 70 W.
Page 260 of 310

258
Practical Tips, Emergency Service
Alarm system, central lockingThe status of the central locking and alarm system
is not changed by disconnecting the battery.
When the battery is disconnected, the alarm
system ceases to function.Central locking overload protectionIf the central locking system is operated more
than ten times within a minute, further operation is
blocked for 30 seconds.
Load switch-off after 2 hours or 7 daysIf the ignition key is removed, loads which are
switched on or are in standby mode (such as the
luggage compartment light, interior light) are
automatically switched off after approx. 2hours.
The Radio/PCM is automatically switched off after
approx. 10 minutes.
If the vehicle is not started or unlocked with the
remote control within 7days, the remote control
standby function is switched off (to save the
vehicle battery).
1. In this case, unlock the driver’s door with the
key at the door lock.
Leave the door closed in order to prevent the
alarm system from being triggered.
2. Press button 1 on the remote control.
The remote control is now activated again.
Page 262 of 310
260
Practical Tips, Emergency Service
Emergency unlocking of the luggage
compartment lidIf the battery is discharged, the luggage compart-
ment lid can be opened only with the aid of a donor
battery.
Note
The engine cannot be started with this method.
fPlease see the chapter “EMERGENCY
STARTING WITH JUMPER CABLES” on
Page 267.
Unlocking lid
1. Use the key to unlock the vehicle at the door
lock.
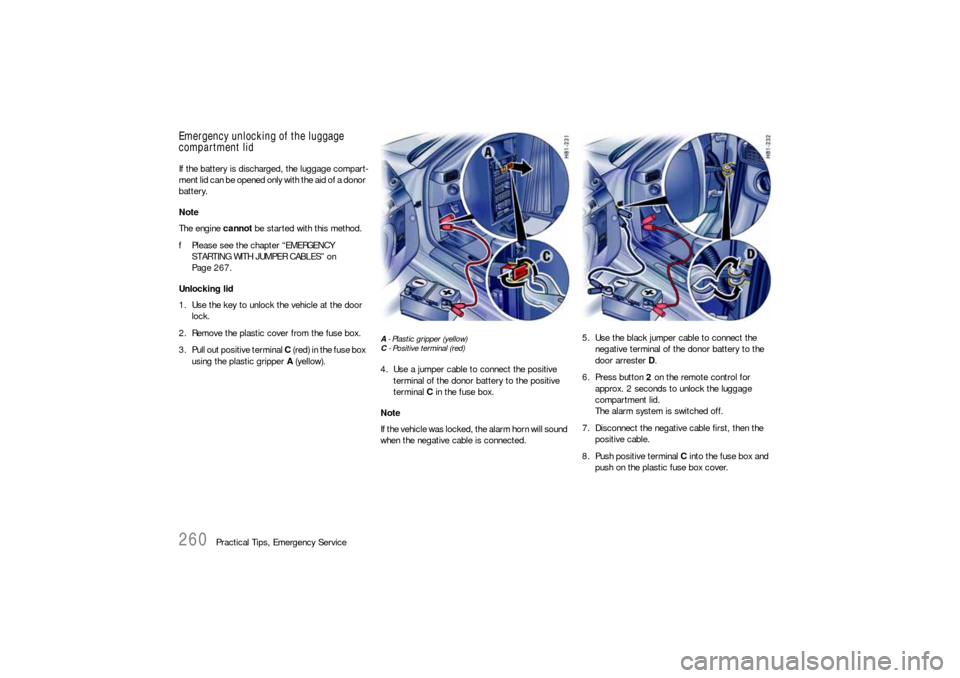
2. Remove the plastic cover from the fuse box.
3. Pull out positive terminal C (red) in the fuse box
using the plastic gripper A (yellow).
A - Plastic gripper (yellow)
C - Positive terminal (red)4. Use a jumper cable to connect the positive
terminal of the donor battery to the positive
terminal C in the fuse box.
Note
If the vehicle was locked, the alarm horn will sound
when the negative cable is connected.
5. Use the black jumper cable to connect the
negative terminal of the donor battery to the
door arrester D.
6. Press button 2 on the remote control for
approx. 2 seconds to unlock the luggage
compartment lid.
The alarm system is switched off.
7. Disconnect the negative cable first, then the
positive cable.
8. Push positive terminal C into the fuse box and
push on the plastic fuse box cover.
Page 263 of 310

Practical Tips, Emergency Service
261
Battery The battery is located in the luggage compart-
ment under a black plastic cover.
fPlease see the chapter “EMERGENCY OPERA-
TION – PULLING OUT THE IGNITION KEY” on
Page 76.
fPlease see the chapter “EMERGENCY UNLO-
CKING OF THE LUGGAGE COMPARTMENT LID”
on Page 260.
Warning!
Risk of short circuit, fire and damage to al-
ternerator and electronic control units, re-
sulting in serious personal injury or death.
fObserve all warning notes on the battery.
fDisconnect the negative terminal on the bat-
tery during all work on the electrical system.
fDo not lay tools or other metal objects on the
battery as they could cause a short circuit
across the battery terminal.
Hydrogen gas generated by the battery
could cause an explosion, resulting in
serious personal injury or death.
fDo not expose the battery to an open flame,
electrical spark or a lit cigarette.
fDo not wipe battery with a dry cloth.
Risk of serious personal injury or death and
damage to the fabric, metal or paint. fWear eye protection.
fDo not allow battery acid to come in contact
with your skin, eyes, fabric or painted
surfaces.
fIf you get electrolyte, which is an acid, in your
eyes or on your skin, immediately rinse with
cold water for several minutes and call a doc-
tor.
fSpilled electrolyte must be rinsed off at once
with a solution of baking soda and water to
neutralize the acid.
Battery posts, terminals and related acces-
sories contain lead and lead compounds,
chemicals known to the State of California to
cause cancer and reproductive harm.
fAlways protect your skin by washing thorough-
ly with soap and water.
Risk of explosion as a result of static charge,
resulting in serious personal injury or death.
fDo not wipe the battery with a dry cloth.
fEliminate potential electrostatic charge by
touching the vehicle before touching the bat-
tery.
Charge state A well-charged battery prevents starting problems
and has a longer service life.
Traffic density, requirements regarding noise, ex-
haust gas and fuel consumption reduce the engine
speed and, hence, the alternator output.
However, the large number of electrical loads has
markedly increased the demand for electrical
power.
In order to avoid discharging the battery
unintentionally:
fSwitch off unnecessary electrical loads in city
traffic, on short trips or in a line or traffic.
fAlways remove the ignition key from the igni-
tion switch when leaving the car.
fAvoid frequent operation of the convertible top
and operation of the Porsche Communication
Management system when the engine is not
running.
fIn the cold season in particular or if the vehicle
is used primarily for short journeys, it may be
necessary to recharge the battery from time to
time.
Page 268 of 310
266
Practical Tips, Emergency Service
Replacing the remote-control
battery The battery should be changed when the range of
the radio remote control becomes smaller or
when the light-emitting diode no longer flashes
when the remote control is operated.
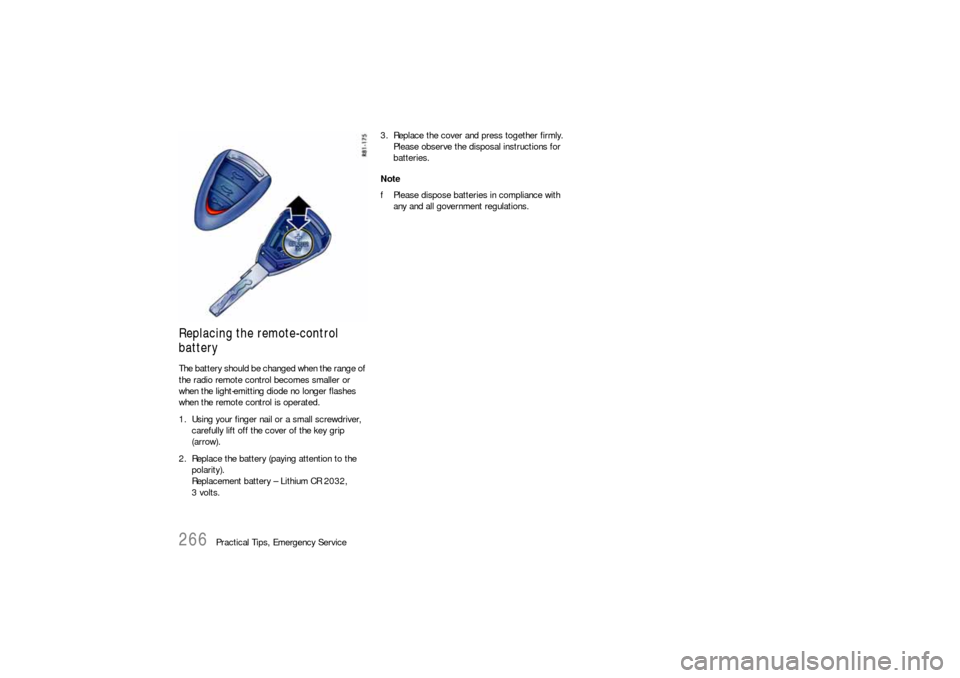
1. Using your finger nail or a small screwdriver,
carefully lift off the cover of the key grip
(arrow).
2. Replace the battery (paying attention to the
polarity).
Replacement battery – Lithium CR 2032,
3volts.3. Replace the cover and press together firmly.
Please observe the disposal instructions for
batteries.
Note
fPlease dispose batteries in compliance with
any and all government regulations.
Page 304 of 310
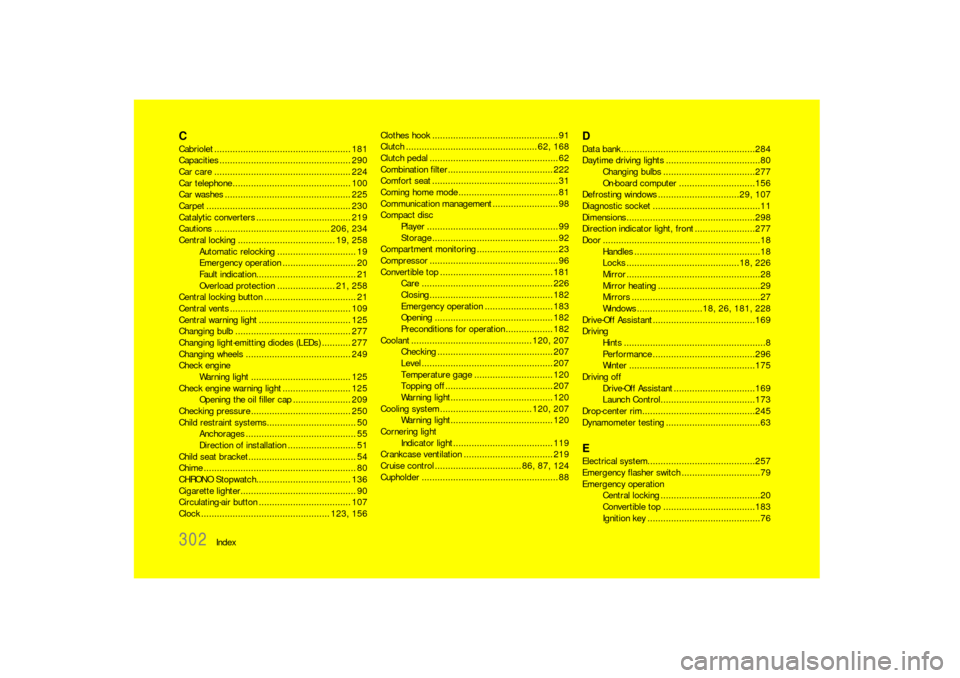
302
Index
CCabriolet .................................................... 181
Capacities .................................................. 290
Car care .................................................... 224
Car telephone ............................................. 100
Car washes ................................................ 225
Carpet ....................................................... 230
Catalytic converters .................................... 219
Cautions ............................................ 206, 234
Central locking ..................................... 19, 258
Automatic relocking.............................. 19
Emergency operation ............................ 20
Fault indication...................................... 21
Overload protection...................... 21, 258
Central locking button................................... 21
Central vents .............................................. 109
Central warning light................................... 125
Changing bulb ............................................ 277
Changing light-emitting diodes (LEDs) ........... 277
Changing wheels ........................................ 249
Check engine
Warning light ...................................... 125
Check engine warning light .......................... 125
Opening the oil filler cap ...................... 209
Checking pressure ...................................... 250
Child restraint systems.................................. 50
Anchorages .......................................... 55
Direction of installation .......................... 51
Child seat bracket......................................... 54
Chime .......................................................... 80
CHRONO Stopwatch.................................... 136
Cigarette lighter............................................ 90
Circulating-air button................................... 107
Clock ................................................. 123, 156Clothes hook ................................................ 91
Clutch .................................................. 62, 168
Clutch pedal ................................................. 62
Combination filter........................................ 222
Comfort seat ................................................ 31
Coming home mode ...................................... 81
Communication management ......................... 98
Compact disc
Player .................................................. 99
Storage ................................................ 92
Compartment monitoring ............................... 23
Compressor ................................................. 96
Convertible top ........................................... 181
Care .................................................. 226
Closing............................................... 182
Emergency operation .......................... 183
Opening ............................................. 182
Preconditions for operation .................. 182
Coolant .............................................. 120, 207
Checking ............................................ 207
Level .................................................. 207
Temperature gage .............................. 120
Topping off ......................................... 207
Warning light....................................... 120
Cooling system ................................... 120, 207
Warning light....................................... 120
Cornering light
Indicator light ...................................... 119
Crankcase ventilation.................................. 219
Cruise control ................................. 86, 87, 124
Cupholder .................................................... 88
DData bank ...................................................284
Daytime driving lights....................................80
Changing bulbs ...................................277
On-board computer .............................156
Defrosting windows ...............................29, 107
Diagnostic socket .........................................11
Dimensions.................................................298
Direction indicator light, front .......................277
Door ............................................................18
Handles ................................................18
Locks ...........................................18, 226
Mirror ...................................................28
Mirror heating .......................................29
Mirrors .................................................27
Windows .........................18, 26, 181, 228
Drive-Off Assistant .......................................169
Driving
Hints ......................................................8
Performance .......................................296
Winter ................................................175
Driving off
Drive-Off Assistant ...............................169
Launch Control....................................173
Drop-center rim...........................................245
Dynamometer testing ....................................63EElectrical system.........................................257
Emergency flasher switch ..............................79
Emergency operation
Central locking ......................................20
Convertible top ...................................183
Ignition key ...........................................76