headlights PORSCHE 911 GT3 2004 5.G User Guide
[x] Cancel search | Manufacturer: PORSCHE, Model Year: 2004, Model line: 911 GT3, Model: PORSCHE 911 GT3 2004 5.GPages: 195, PDF Size: 16.94 MB
Page 158 of 195
j!\
Warning!
Hydrogen gasgenerated bythe battery
could cause anexplosion, resultinginsevere
personal injuries.
c> Charge battery inawell ventilated area.
c> Never charge afrozen battery. Itmay explode
because ofgas trapped inthe ice. Allow afro-
zen battery tothaw outfirst.
c> Ifyou getelectrolyte, whichisan acid, inyour
eyes oron your skin, immediately rinsewith
cold water forseveral minutes andcalladoc-
tor.
Slow
battery charging
1. Pay attention toallwarnings andfollow instruc-
tions thatcome withyour battery charger.
2. When charging, ensureadequate ventilation.
3. Remove battery.
Please observe thechapter "REMOVING THE
BATTERY" onPage 158.
4. Allvent caps should beopen.
The fluid level should meettheindicator mark
in each cell.
5. Ensure thatcharger isswitched off-danger of
short circuit!
6. Connect chargercables.
Charger cablesmustbeconnected
POSITIVE
(+1
toPOSITIVE
(+)
and
NEGATIVE (-)toNEGATIVE
(-I.
7. Switch oncharger.
Normally, abattery shouldbecharged atno
more than10percent ofits rated capacity.
Rated capacity ofthe battery inyour vehicle is
listed onthe battery housing.
8. After charging, turnoffcharger anddiscon-
nect charger cables.
9. Tighten thevent caps andreinstall battery
Please observe thechapter "INSTALLING THE
BATTERY" onPage 158. Winter
operation
During thewinter months, batterycapacity tends
to decrease astemperatures drop.
Additionally, morepower isconsumed whilestart-
ing, andtheheadlights, heater,rearwindow de-
fogger, etc.,areused more frequently.
c> let your Porsche dealertestthebattery's
capacity beforewintersetsin.
Replacing battery
The service lifeofthe battery issubject tonormal
wear; itdepends graetlyoncare, climatic condi-
tions, anddriving conditions (distances, loads).
c> Only useanoriginal Porsche battery,withthe
correct partnumber, asareplacement.
c> Please observe thedisposal instructions for
batteries.
c>c>c>
Practical Tips,Emergency Service
Page 163 of 195
Lights, Replacing Bulbs
A
Warning!
Risk ofshort circuit.
c>
Always switchoffthe relevant consumer when
changing bulbs.
Risk ofinjury. Theheadlights areunder high
voltage wheninstalled.
c>
Becareful duringallwork inthe area ofthe
headlights.
Risk ofdamage. Bulbsofahigher wattage
can damage thelamp housing.
c>
Only thebulbs shown inthe chart maybeused.
c>
New bulbs mustbeclean andfree from
grease.
Therefore, nevertouch bulbswith
your barehands.
Use acloth orsoft paper whilereplacing bulbs.
c>
For reasons oftraffic safety, werecommend
that youalways carryspare bulbssothat you
can have acorrectly illuminated caratall
times. In certain countries, thecarrying ofspare
bulbs ismandatory.
Practical Tips,Emergency Service
A
Caution!
Risk ofdamage toheadlights duetoexces-
sive temperatures andabrasion.
c>
Attach nocoverings (e.g.films, "stone
guards") inthe area ofthe headlights.
c>
Use soapy wateronlytoclean lightlenses and
plastic headlight lenses.
In no case maychemical cleanersorother vol-
atile cleaning fluidsbeused.
c>
Toprevent scratches, donot rubwith adry or
merely moistcloth,tissue orinsect sponges.
Page 164 of 195
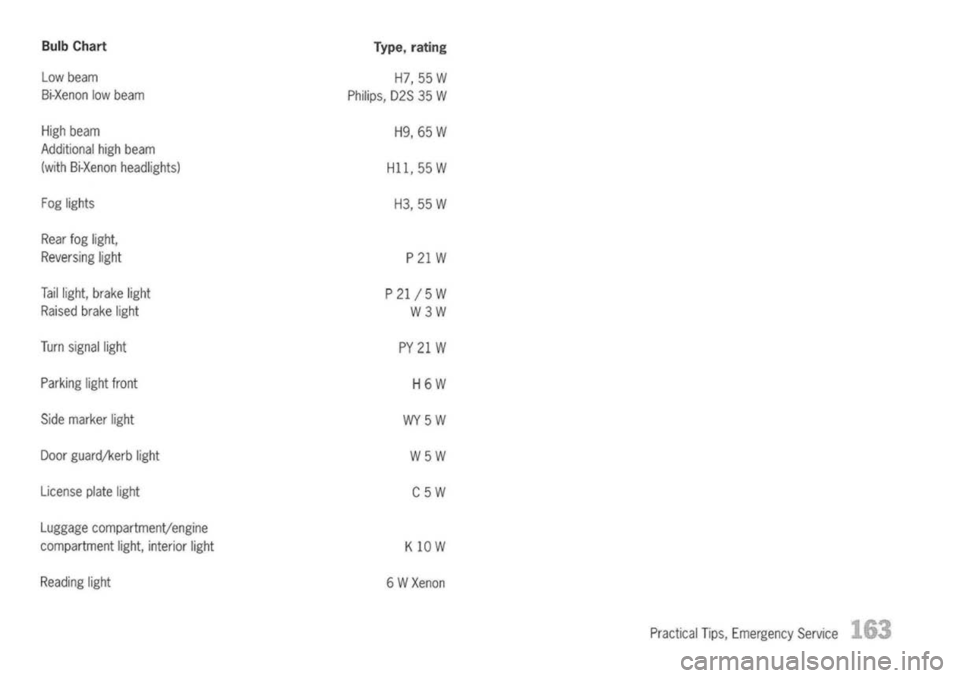
BulbChart
Type.
rating
Low beam
H7,55W
Bi-Xenon lowbeam
Philips,D2S35W
High beam
H9,65W
Additional highbeam
(with Bi-Xenon headlights)
Hll,55W
Fog lights
H3,55W
Rear foglight,
Reversing light
P21 W
Taillight, brakelight
P21 /5 W
Raised brakelight
W3W
Turn signal light
PY21W
Parking lightfront
H6W
Side marker light
WY5W
Door guardjkerb light
W5W
License platelight
C5W
Luggage compartmenVengine
compartment light,interior light
K10 W
Reading light
6W Xenon
PracticalTips,Emergency Service
Page 165 of 195
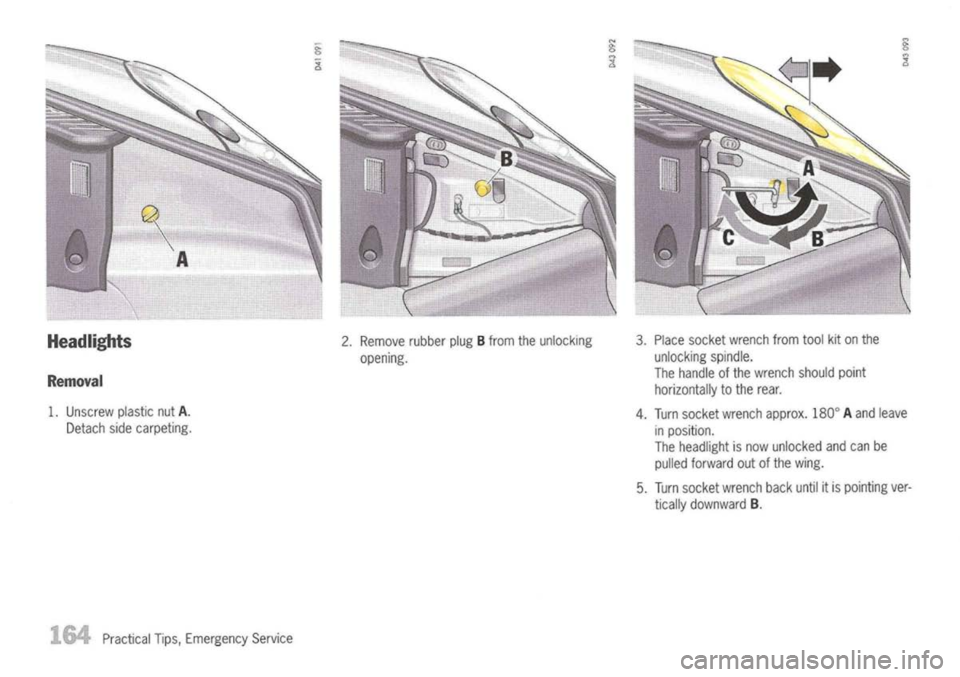
Headlights
Removal
1. Unscrew plasticnut
A.
Detach sidecarpeting.
Practical Tips,Emergency Service 2.
Remove rubberplugBfrom theunlocking
opening. 3.
Place socket wrench fromtoolkitonthe
unlocking spindle.
The handle ofthe wrench shouldpoint
horizontally tothe rear.
4. Turn socket wrench approx. 180
0
Aand leave
in position.
The headlight isnow unlocked andcanbe
pulled forward outofthe wing.
5. Turn socket wrench backuntilitis pointing ver-
tically downward
B.
Page 176 of 195
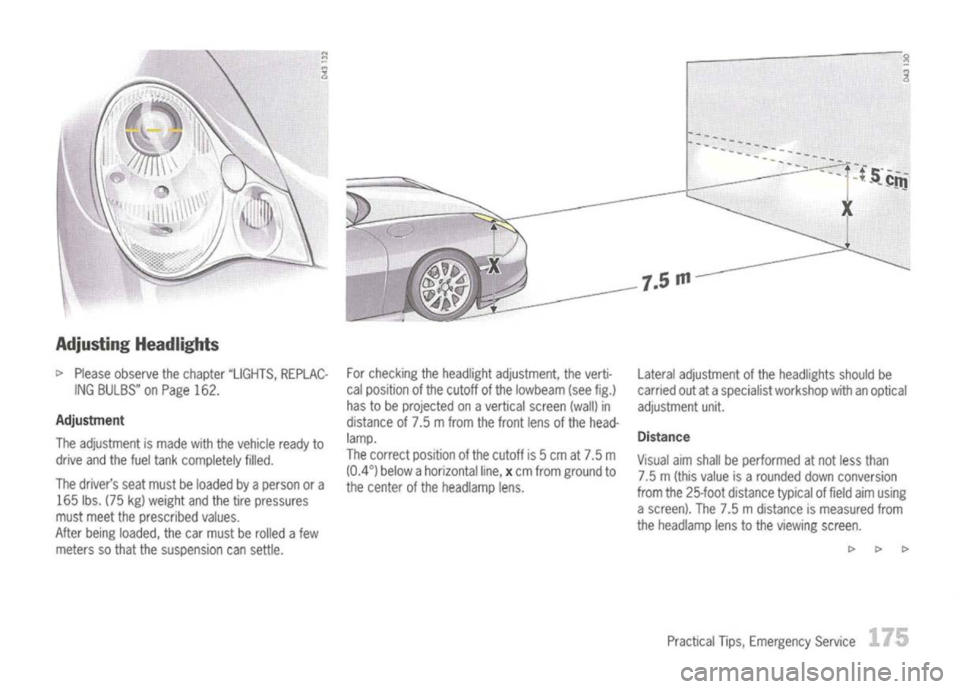
Adjusting Headlights
c>
Please observe thechapter "LIGHTS, REPLAC-
ING BULBS" onPage 162.
Adjustment
The adjustment ismade withthevehicle readyto
drive andthefuel tank completely filled.
The driver's seatmust beloaded byaperson ora
165 Ibs.(75kg)weight andthetire pressures
must meet theprescribed values.
After being loaded, thecarmust berolled afew
meters sothat thesuspension cansettle. For
checking theheadlight adjustment, theverti-
cal position ofthe cutoff ofthe lowbeam (seefig.)
has tobe projected onavertical screen(wall)in
distance of7.5 mfrom thefront lensofthe head-
lamp.
The correct position ofthe cutoff is5cm at7.5 m
(0.4°) below ahorizontal line,xcm from ground to
the center ofthe headlamp lens. Lateral
adjustment ofthe headlights shouldbe
carried outataspecialist workshop withanoptical
adjustment unit.
Distance
Visual aimshall beperformed atnot less than
7.5 m(this value isarounded downconversion
from the25-foot distance typicaloffield aimusing
a screen). The7.5mdistance ismeasured from
the headlamp lenstothe viewing screen.
c> c>c>
Practical Tips,Emergency Service
175
Page 192 of 195
Temperaturgauge 54,56
Warning light 54,56
Cruise contro!. 58,86,87
Curb light 172
D
Dashboard 48
Defrosting windows 29,90, 91
Diagnostic socket 17,153
Diagrams 187
Dimensions 186
Door 21
Guard 172
Handles 21
Locks 21,132
Windows 21,26,27,133
Door mirror 28
Heating 29
Driving hints 14
Driving performance 182
E
Electrical system 152
Emergency flasher 81
Emergency operation
Central locking 23
Lids 154
Tank flap 121
Emergency service 140
Emergency startingwithjumper cables160,161
Emission controlsystem 7,66, 124, 125
Engine Checking oillevel 71,115 Dipstick
116
Exhaust 10
Number 180
Oil consumption 16,114
Oillevel 116
Oil level gauge 71
Oil pressure gauge 54,56,65
Oil pressure warninglight.. 54,56,65
Oils 114,185
Speeds 16,182
Starting 52
Stopping 53
Engine compartment
Blower 53,62
Lid 98,99
Lid warning light.. 54,56,98
Light 172
F
Fog lights 82,169, 171
F ootbrake 41
Footweillights 47
Fresh airintake 93
Front hood 99
Fuel 4,63, 121
Containers 10
Economy 120
Evaporation control 126
Level gauge 54,56,63
Level warning light 63
Recommendation 122,123
Tank 122
Warning light... 54,56
Fuses 153
G
Garage lift 148
Gearshifting 109
Glove compartment. 96
Gong 18,51, 69, 79
Ground clearance 9,186
H
Headlights 82,83,164
Adjusting 175,176
Cleaning system 84,126, 185
Heated rearwindow 29
Heating 88
High beam
Indicator light... 54,56,61
Lever 82
Hoods 98,99
Horn 17,22, 23
I
Identification number 100,180
Ignition lock 50
Immobilizer 19
Indicator lights 54
Infrared passenger compartment monitoring..24
Instrument panel 48
Instruments 54
Lights 59,82
Interior light 46,173
Interior mirror 28
Intermittent operationswitch 84
Index