brake PORSCHE 911 GT3 2004 5.G Owner's Guide
[x] Cancel search | Manufacturer: PORSCHE, Model Year: 2004, Model line: 911 GT3, Model: PORSCHE 911 GT3 2004 5.GPages: 195, PDF Size: 16.94 MB
Page 142 of 195
lires/Wheels
The original equipment tiresandwheel rimson
your Porsche complywithallapplicable Federal
Motor Vehicle SafetyStandards.
For your safety remember thefollowing:
- Wheel rimsandwheel boltsarematched tofit
your Porsche.
- Ifyou intend touse other thanoriginal equip-
ment wheels, besure thatthey conform to
Porsche specifications foryour model.
Only tires withthesame makeandwith the
same specification code(e.g.
"NO", "Nl"..
J
can bemounted.
- The useofwheel rimsandwheel boltsthatdo
not meet specifications ofthe original factory
installed equipment willaffect thesafe opera-
tion ofyour vehicle.
- Before youplan onexchanging wheels,or
snow tiresalready mounted onthe wheel rims,
consult yourauthorized Porschedealer.Your
dealer hasthetechnical information necessary
to advise youwhich wheel rimsandwheel bolts
are compatible withtheoriginal factoryinstal-
lations.
A
Warning!
Risk ofloss ofcontrol andserious personal
injury.
I>
Ifwhile driving, yourvehicle experiences asud-
den vibration orride disturbance, and/oryou
suspect thatpossible damagetoyour tires or
vehicle hasoccurred, youshould immediately
reduce yourspeed without excessive useof
the brakes.
I>
Stop thevehicle assoon aspossible, andin-
spect thetires.
If you cannot determine thecause forthe dis-
turbance, haveyourvehicle towedtothe near-
est Porsche ortire dealer tohave yourvehicle
or tire(s) inspected.
I>
Continuing tooperate thevehicle without cor·
rection couldresult inaloss ofcontrol and
serious personal injury.
PracticalTips,Emergency Service
141
Page 145 of 195
Tirewear
The original equipment tiresonyour Porsche have
built-in tirewear indicators. Theyaremolded into
the bottom ofthe tread grooves andwillappear as
approximately 1/2in(12 mm) bands whenthetire
tread depth isdown to1/16 ofan in(1.6 mm).
When theindicators appearintwo ormore adja-
cent grooves, itis time toreplace thetires. We
recommend, however,thatyoudonot letthe tires
wear down tothis extent.
Worn tirescannot griptheroad surface properly
and areeven lesseffective onwet roads.
In the United States, statelawsmaygovern the
minimum treaddepth permissible. Followallsuch
laws.
PracticalTips,Emergency Service
/!\
Warning!
Driving onworn tirescanresult inloss of
control ofthe vehicle andcould cause severe
personal injuries.
0>
Donot drive withworn tiresortires showing
cuts orbruises asthey mayleadtosudden
deflation andloss ofcontrol whichcouldcause
severe personal injury.
0>
Specialized highperformance tiresonhigh
performance sportscarsexhibit morewear
than those onafamily sedan, oreven ahigh
performance sedan.
Therefore, itis important tocheck yourtire
pressure andcondition atleast every two
weeks.
If you notice thattires arewearing unevenly, con-
sult your Porsche dealer.
Uneven wearmaynotalways bedue toimproper
wheel alignment. Itcan bethe result ofindividual
driving habitssuchascornering athigh speeds. If
the tire pressure isnot checked andadjusted
regularly, abnormal tirewear canalso occur.
Tire
care
0>
Avoid damaging tiresandwheel rims.
0>
Ifyou must driveoveracurb orother obstacle,
drive slowly andatan obtuse angle.
0>
Check tiresforuneven wearanddamage
before driving off.
0>
Remove imbedded material.
0>
Replace wornordamaged tiresimmediately.
0>
Keep oil,fuel, brake fluid,etc.away fromtires.
0>
Replace missingvalvestemcaps.
0>
Keep tiresinflated correctly.
Page 148 of 195
Beforemounting snowtires, consult with
your Porsche dealer.Hehas thetechnical
information necessarytoadvise youon
wheel andtirecompatibility.
Snow tiresshould havethesame loadcapacity as
original equipment tiresandshould bemounted
on allfour wheels.
Snow tireswithstuds should berun atmoderate
speeds whennewinorder togive thestuds time
to settle.
/i\
Warning!
Tires withbadly worntreads andstuds are
very dangerous andcould cause accidents
resulting insevere personal injuries.
I>
Make surethey arereplaced immediately.
Do not drive avehicle equipped withsnow tiresat
prolonged highspeed.
Snow tiresdonot have thesame degree oftrac-
tion ondry, wet orsnowfree roadsasanormal
tire. Furthermore, snowtireswear rapidly underthese
conditions.
Snow tiresdonot fulfill their purpose ifthe tread
depth isless than 5/32 in.(4mm).
Comply withallstate andlocal laws
governing snowtireand tread depth
requirements.
Snow
chains
/i\
Caution!
Risk ofdamage tobody, axleorbrake com-
ponents.
I>
Fitsnow chains onlytothe rear wheels, and
only withthetire/rim combination listedinthe
Technical Data.
To ensure adequate clearance betweenchain
and body, Porsche recommends onlytheuse
of fine-link chainssuchasthose approved by
Porsche.
I>
Follow instructions issuedbythe supplier of
the chains.
Different statesandcountries havevarying statu-
tory requirements regardingmaximum speed.
Check withlocal authorities forpossible restric-
tions.
I>
Remove chainsassoon asthe roads arefree
of ice and snow.
Tire
designations
Due tonew speed andload ratings forradial tires,
new designations havecome intoforce forsnow
tires foryour Porsche.
The designation tobe used forZRtires ise.g.,
255/40 ZR17(Z
=
code letterforradial tiresfor
speeds above150mph (240 kmjhl.
Practical Tips,Emergency Service
Page 150 of 195
Flat
lire
j!\ Warning!
Failure tofollow theseinstructions mayre-
sult inserious personal injuriestoyou orto
bystanders.
~ Ifyou have aflat tire, move asafe distance off
the road. Turntheemergency flasheronand
use other warning devicestoalert other motor-
ists. Settheparking brake.
~ Donot park your vehicle whereitmay contact
dry grass, brushorother flammable materials.
The hotparts ofthe exaust system couldset
such materials onfire, thereby causing both
property damageandsevere orfatal physical
injury.
~ Set upawarning triangleatasuitable
distance.
A tire repair kit,compressor andpressure tester
are located undertheluggage compartment floor.
~ Please observe thesafety andoperating in-
structions onthe special sealant bottlewitha
special Porsche partnumber andonthe com-
pressor -these areessential.
Important
note
Sealing thetire with thetire repair kitisonly
an emergency repair.Evenwiththetire air-
tight, itmay beused onlyforshort journeys
in an emergency.
The maximum permittedspeedis50 mph
(80 kmjh).
~ Donot use commercially availablesealantor
tire inflating bottles.
j!\Warning! Risk ofaccident.
~ Have tiresreplaced byaspecialist workshop
as soon aspossible.
~ Avoid hardacceleration andhigh cornering
speeds.
PracticalTips,Emergency Service
Page 151 of 195

WheelBolts
/!\
Warning!
Risk ofwheel boltbreakage andwheel sepa-
ration, resulting insevere personal injuryor
death.
D>
Follow allinstructions concerningwheelbolts.
D>
Always cleanthewheel boltsbefore fitting.
D>
Apply athin coat of
Optimoly TA
(aluminium
pastel onthe thread andbetween thebolt head
and movable spherical capring
(arrows).
The bearing surfaceofthe spherical cap
facing thewheel mustnotbegreased.
Practical Tips,Emergency Service
D>
Replace damaged wheelbolts.
Only usetheOriginal Porsche wheelbolts
specially designed forthis vehicle type.
Tightening torque
Tightening torqueofwheel bolts:
130 Nmj96 ftlb.
Wheel Securing Bolts
The wrench socketforthe wheel securing boltsis
in the tool pocket.
To loosen ortighten thewheel boltwith anti-theft
protection, awrench socketwiththeappropriate
coding mustbeused between thewheel boltand
the wheel-bolt spanner.
D>
When positioning thewrench socket, ensure
that itengages fullyinthe teeth ofthe wheel
bolt.
If the wheels havetobe removed atthe workshop,
please donot forget tohand overthewrench
socket forthe wheel securing boltsalong withthe
car key.
Changing
awheel
A
Warning!
Risk ofinjury. Thecarmay slipoffthe jack.
D>
Make surethatnoone isinthe vehicle when
jacking upand changing awheel.
D>
Always placethecar onstable supports ifwork
has tobe carried outunder thecar.
Risk ofdamage tothe brake discsofthe
Porsche Ceramic Composite Brake(PCCB).
D>
Always screwinboth assembly aidswhen
changing awheel.
1. Fully apply thehand brake, engage 1st gear
and withdraw theignition key.
2. Secure thecaragainst rollingaway,e.g.by
means ofwedges underthewheels onthe op-
posite side.
This isparticularly importantonslopes.
Page 152 of 195
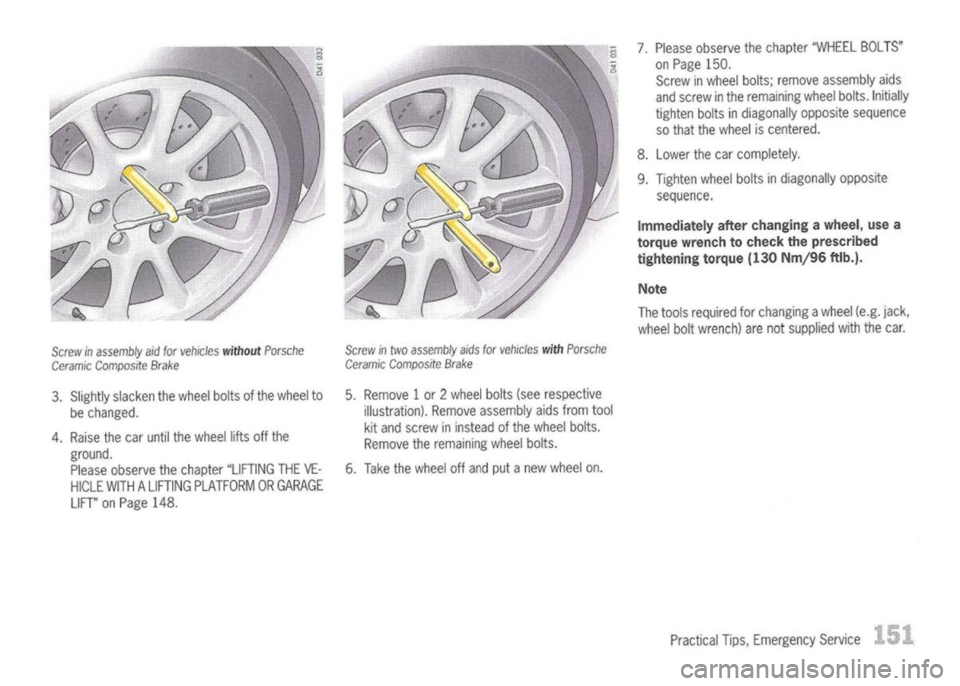
Screwinassembly aid
for
vehicles
without
Porsche
Ceramic
Composite Brake
3. Slightly slacken thewheel boltsofthe wheel to
be changed.
4. Raise thecar until thewheel liftsoffthe
ground. Please observe thechapter "LIFTING THEVE-
HICLE WITHALIFTING PLATFORM ORGARAGE
LIFT" onPage 148.
Screw
in
two
assembly aids
for
vehicles
with
Porsche
Ceramic Composite Brake
5. Remove 1or 2wheel bolts(seerespective
illustration). Removeassembly aidsfrom tool
kit and screw ininstead ofthe wheel bolts.
Remove theremaining wheelbolts.
6. Take thewheel offand putanew wheelan. 7.
Please observe thechapter "WHEEL BOLTS"
on Page 150.
Screw inwheel bolts;remove assembly aids
and screw inthe remaining wheelbolts.Initially
tighten boltsindiagonally oppositesequence
so that thewheel iscentered.
8. Lower thecar completely.
9. Tighten wheelboltsindiagonally opposite
sequence.
Immediately afterchanging awheel, usea
torque wrench tocheck theprescribed
tightening torque(130Nm/96 ftlb.).
Note
The tools required forchanging awheel (e.g.jack,
wheel boltwrench) arenotsupplied withthecar.
Practical Tips,Emergency Service
1
Page 162 of 195
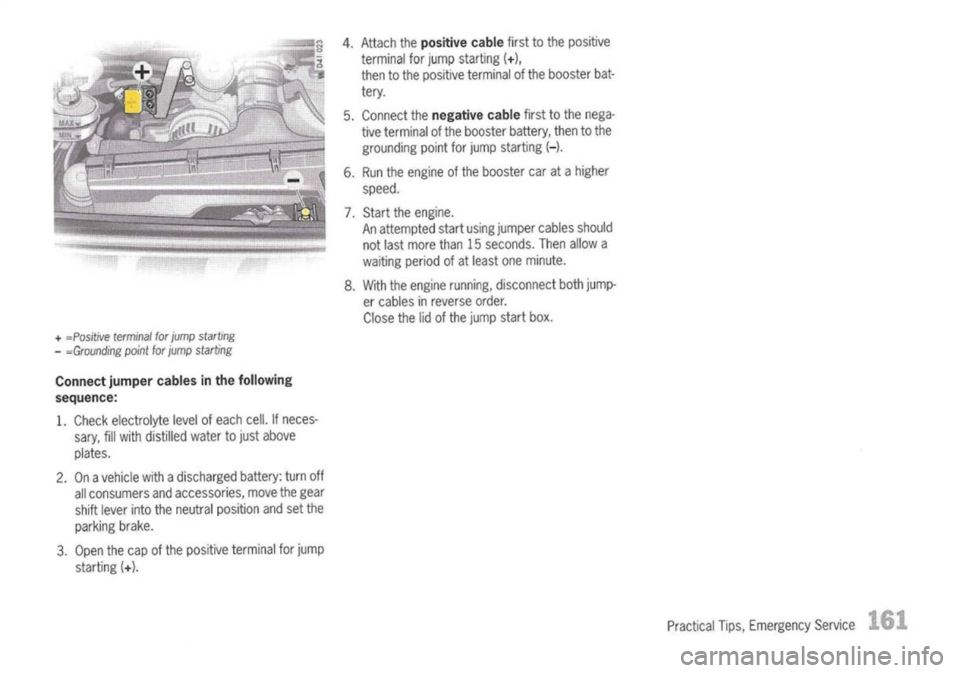
+
=Positive terminal
for
jump starting
- =Grounding point
for
jump starting
Connect jumpercablesinthe following
sequence:
1. Check electrolyte levelofeach cell.Ifneces-
sary, fillwith distilled watertojust above
plates.
2. Onavehicle withadischarged battery:turnoff
all consumers andaccessories, movethegear
shift lever intotheneutral position andsetthe
parking brake.
3. Open thecap ofthe positive terminal forjump
starting
(+).
4.
Attach the
positive cable
firsttothe positive
terminal forjump starting (+),
then tothe positive terminal ofthe booster bat-
tery.
5. Connect the
negative cable
firsttothe nega-
tive terminal ofthe booster battery,thentothe
grounding pointforjump starting (-).
6. Run theengine ofthe booster caratahigher
speed.
7. Start theengine.
An attempted startusing jumper cablesshould
not last more than15seconds. Thenallowa
waiting periodofatleast oneminute.
8. With theengine running, disconnect bothjump-
er cables inreverse order.
Close thelidofthe jump startbox.
PracticalTips,Emergency Service
Page 164 of 195
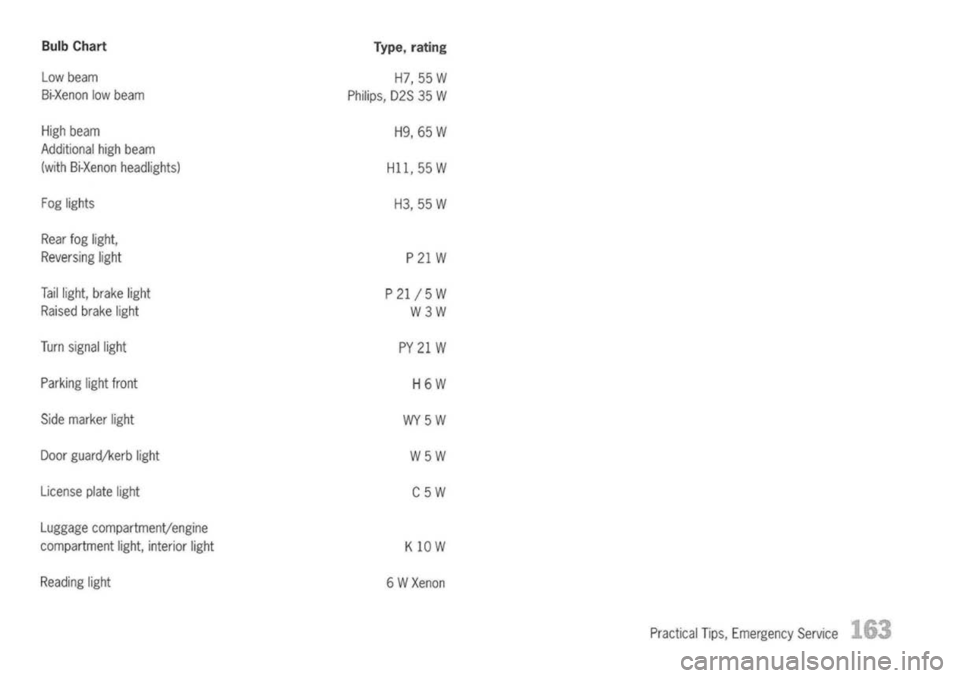
BulbChart
Type.
rating
Low beam
H7,55W
Bi-Xenon lowbeam
Philips,D2S35W
High beam
H9,65W
Additional highbeam
(with Bi-Xenon headlights)
Hll,55W
Fog lights
H3,55W
Rear foglight,
Reversing light
P21 W
Taillight, brakelight
P21 /5 W
Raised brakelight
W3W
Turn signal light
PY21W
Parking lightfront
H6W
Side marker light
WY5W
Door guardjkerb light
W5W
License platelight
C5W
Luggage compartmenVengine
compartment light,interior light
K10 W
Reading light
6W Xenon
PracticalTips,Emergency Service
Page 172 of 195
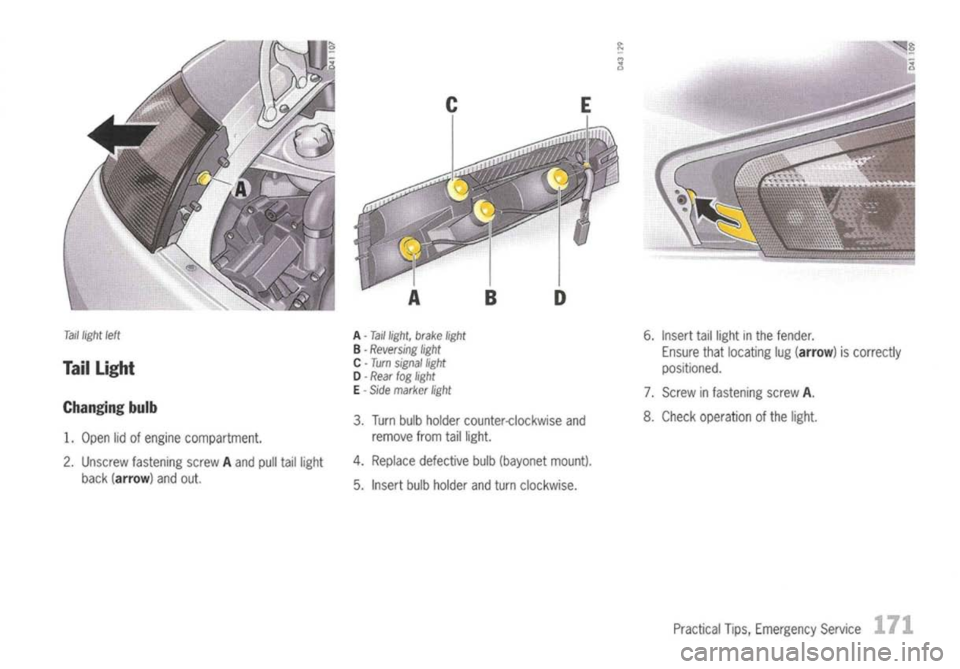
Tail
light
left
Taillight
Changing bulb
1. Open lidofengine compartment.
2. Unscrew fastening screwAand pulltaillight
back (arrow) andout.
A
-Taillight, brakelight
B -
Reversing light
C -Turn signal light
o -Rear
foglight
E -
Side marker light
3. Turn bulbholder counter-clockwise and
remove fromtaillight.
4. Replace defective bulb(bayonet mount).
5. Insert bulbholder andturn clockwise. 6.
Insert taillight inthe fender.
Ensure thatlocating lug(arrow) iscorrectly
positioned.
7. Screw infastening screwA.
8. Check operation ofthe light.
Practical Tips,Emergency Service
171
Page 175 of 195
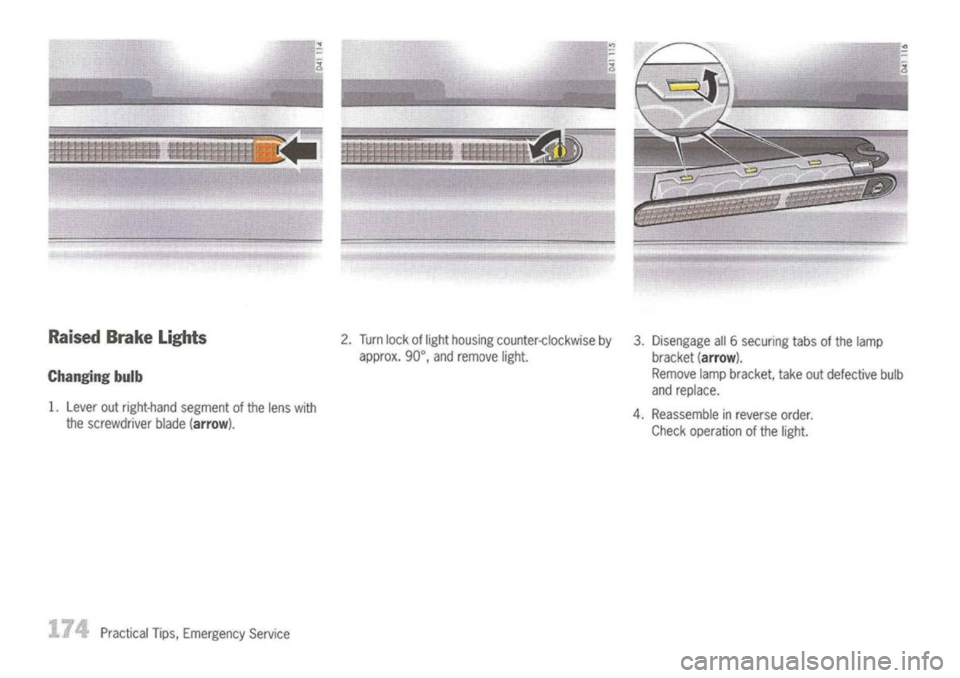
Raised BrakeLights
Changing bulb
1. Lever outright-hand segmentofthe lens with
the screwdriver blade
(arrow).
Practical Tips,Emergency Service 2.
Turn lockoflight housing counter-clockwise by
approx. 90°,andremove light. 3.
Disengage all6securing tabsofthe lamp
bracket
(arrow).
Remove lampbracket, takeoutdefective bulb
and replace.
4. Reassemble inreverse order.
Check operation ofthe light.