warning PORSCHE 911 GT3 2010 5.G Owners Manual
[x] Cancel search | Manufacturer: PORSCHE, Model Year: 2010, Model line: 911 GT3, Model: PORSCHE 911 GT3 2010 5.GPages: 251, PDF Size: 14.33 MB
Page 200 of 251
Practical Tips, Emergency Service
199
Caution!
Risk of damage due to scratches.
fBe careful when removing the wheel-hub cap.
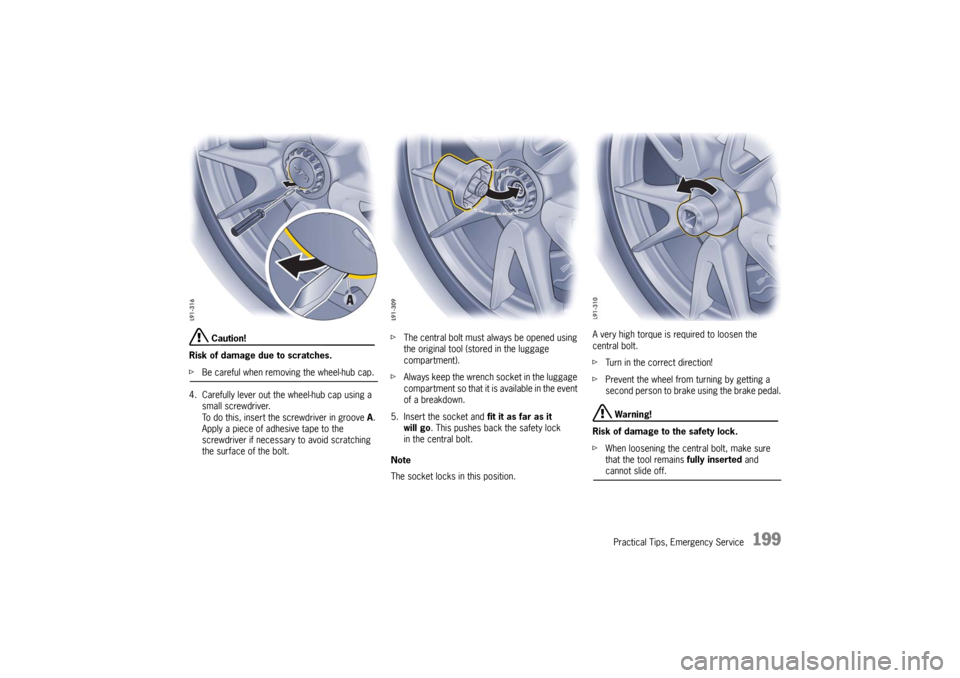
4. Carefully lever out the wheel-hub cap using a
small screwdriver.
To do this, insert the screwdriver in groove A.
Apply a piece of adhesive tape to the
screwdriver if necessary to avoid scratching
the surface of the bolt.fThe central bolt must always be opened using
the original tool (stored in the luggage
compartment).
fAlways keep the wrench socket in the luggage
compartment so that it is available in the event
of a breakdown.
5. Insert the socket and fit it as far as it
will go. This pushes back the safety lock
in the central bolt.
Note
The socket locks in this position.A very high torque is required to loosen the
central bolt.
fTurn in the correct direction!
fPrevent the wheel from turning by getting a
second person to brake using the brake pedal.
Warning!
Risk of damage to the safety lock.
fWhen loosening the central bolt, make sure
that the tool remains fully inserted and cannot slide off.
10_GT3_21.book Seite 199 Donnerstag, 4. Juni 2009 12:48 12
Page 201 of 251
200
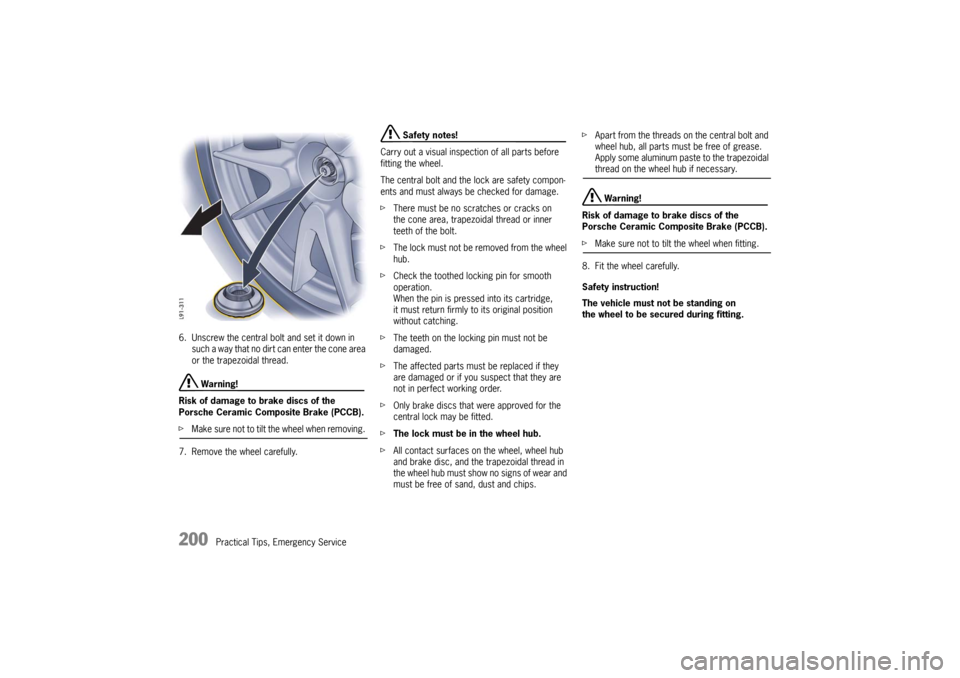
Practical Tips, Emergency Service 6. Unscrew the central bolt and set it down in
such a way that no dirt can enter the cone area
or the trapezoidal thread.
Warning!
Risk of damage to brake discs of the
Porsche Ceramic Composite Brake (PCCB).
fMake sure not to tilt the wheel when removing.
7. Remove the wheel carefully.
Safety notes!
Carry out a visual inspection of all parts before
fitting the wheel.
The central bolt and the lock are safety compon-
ents and must always be checked for damage.
fThere must be no scratches or cracks on
the cone area, trapezoidal thread or inner
teeth of the bolt.
fThe lock must not be removed from the wheel
hub.
fCheck the toothed locking pin for smooth
operation.
When the pin is pressed into its cartridge,
it must return firmly to its original position
without catching.
fThe teeth on the locking pin must not be
damaged.
fThe affected parts must be replaced if they
are damaged or if you suspect that they are
not in perfect working order.
fOnly brake discs that were approved for the
central lock may be fitted.
fThe lock must be in the wheel hub.
fAll contact surfaces on the wheel, wheel hub
and brake disc, and the trapezoidal thread in
the wheel hub must show no signs of wear and
must be free of sand, dust and chips. fApart from the threads on the central bolt and
wheel hub, all parts must be free of grease.
Apply some aluminum paste to the trapezoidal
thread on the wheel hub if necessary. Warning!
Risk of damage to brake discs of the
Porsche Ceramic Composite Brake (PCCB).
fMake sure not to tilt the wheel when fitting.
8. Fit the wheel carefully.
Safety instruction!
The vehicle must not be standing on
the wheel to be secured during fitting.
10_GT3_21.book Seite 200 Donnerstag, 4. Juni 2009 12:48 12
Page 202 of 251
Practical Tips, Emergency Service
201
9. Insert the central bolt into the socket (until it
engages), fit the central bolt at right angles to
the wheel hub and screw it on without tilting.
10.Tighten the central bolt once to at least
370 ftlb. (500 Nm) using a suitable torque
wrench and then loosen again slightly (by
approx. 1/4 turn).
11.Tighten the central bolt to 370 ftlb.
(500 Nm).
Prevent the wheel from turning by getting
a second person to press the brake pedal.
If you do not have a suitable torque wrench
in a breakdown situation, the emergency
procedure for securing the central bolt must
be performed.
Please see the chapter “EMERGENCY PROCE-
DURE FOR SECURING CENTRAL BOLT” on
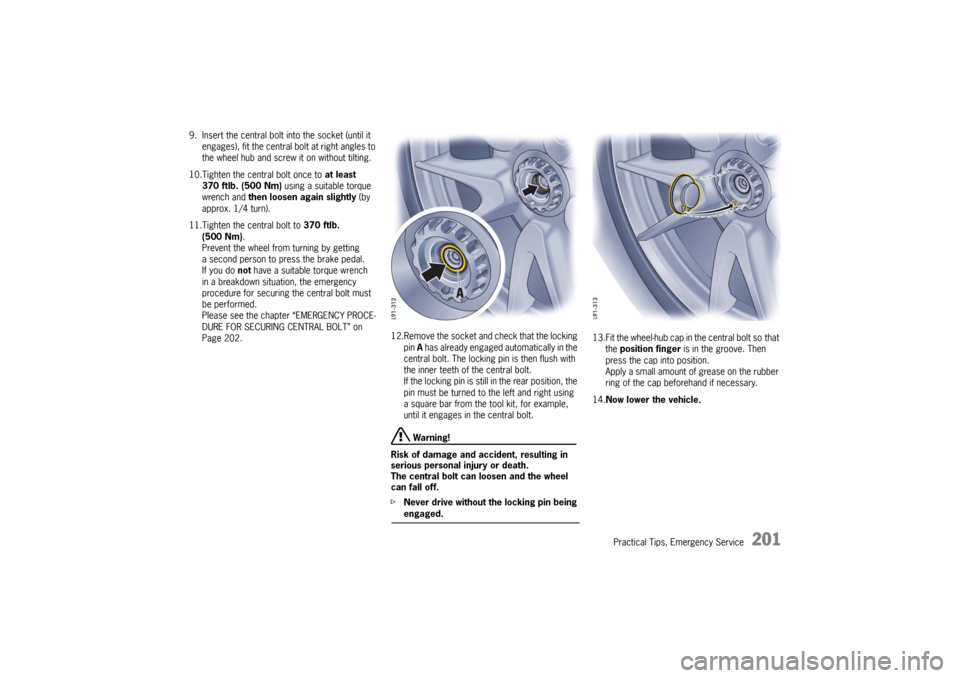
Page 202.12.Remove the socket and check that the locking
pin A has already engaged automatically in the
central bolt. The locking pin is then flush with
the inner teeth of the central bolt.
If the locking pin is still in the rear position, the
pin must be turned to the left and right using
a square bar from the tool kit, for example,
until it engages in the central bolt.
Warning!
Risk of damage and accident, resulting in
serious personal injury or death.
The central bolt can loosen and the wheel
can fall off.
fNever drive without the locking pin being engaged. 13.Fit the wheel-hub cap in the central bolt so that
the position finger is in the groove. Then
press the cap into position.
Apply a small amount of grease on the rubber
ring of the cap beforehand if necessary.
14.Now lower the vehicle.
10_GT3_21.book Seite 201 Donnerstag, 4. Juni 2009 12:48 12
Page 204 of 251

Practical Tips, Emergency Service
203
Checking Tire Pressure with a
Pressure Gauge1. Remove the valve stem cap from the tire.
2. Press the pressure gauge onto the valve stem.
Note on operation
fDo not press too hard or force the valve stem
sideways, or air will escape.
If the sound of air escaping from the tire is
heard, reposition the pressure gauge.
3. Read the tire pressure on the gauge stem and
compare it to the permissble tire pressure.
This information can be found on the tire
pressure plate or in the chapter Technical
Data.
Please see the chapter “TIRE PRESSURES FOR
COLD TIRES 68 °F/20 °C” on Page 237.
4. Remove the pressure gauge.
fPlease see the chapter “TPM TIRE PRESSURE
MONITORING” on Page 134.
Flat Tire
Warning!
Failure to follow these instructions may result
in serious personal injury to you or to bystan-
ders.
fIf you have a flat tire, move a safe distance off
the road. Turn the emergency flasher on and
use other warning devices to alert other
motorists. Set the parking brake.
fDo not park your vehicle where it may contact
dry grass, brush or other flammable materials.
The hot parts of the exhaust system could set
such materials on fire, thereby causing both
property damage and serious personal injury or death.
A tire sealant and compressor with pressure
tester are located in the luggage compartment.
fPlease see the safety and operating instruc-
tions on the special sealant bottle with a
special Porsche part number and on the
compressor – these are essential.Important note
Sealing the tire with the tire repair kit is only
an emergency repair. Even with the tire air-
t i g h t , i t m a y b e u s e d o nly for short trips in an
emergency.
The maximum permitted speed is 50 mph
(80 km/h).
fDo not use commercially available sealant or
tire inflating bottles.
Use only the tire sealant located in the luggage
compartment.
Warning!
Risk of accident, resulting in serious
personal injury or death.
fHave tires replaced by a specialist workshop
as soon as possible.
fAvoid hard acceleration and high cornering speeds.
10_GT3_21.book Seite 203 Donnerstag, 4. Juni 2009 12:48 12
Page 205 of 251
204
Practical Tips, Emergency Service
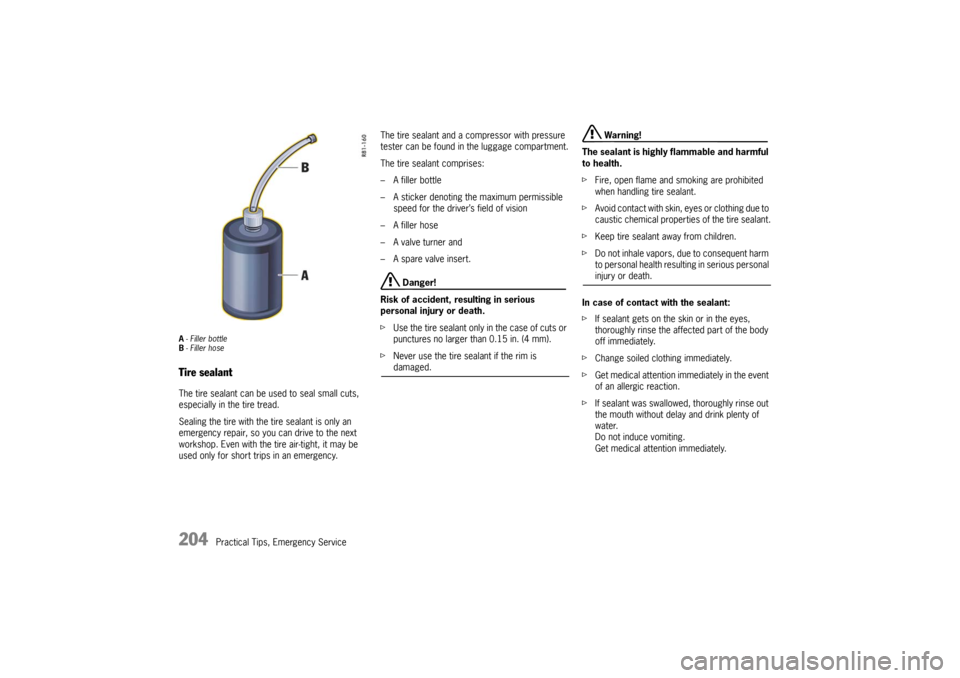
A- Filler bottle
B- Filler hoseTire sealantThe tire sealant can be used to seal small cuts,
especially in the tire tread.
Sealing the tire with the tire sealant is only an
emergency repair, so you can drive to the next
workshop. Even with the tire air-tight, it may be
used only for short trips in an emergency.The tire sealant and a compressor with pressure
tester can be found in the luggage compartment.
The tire sealant comprises:
– A filler bottle
– A sticker denoting the maximum permissible
speed for the driver’s field of vision
– A filler hose
– A valve turner and
– A spare valve insert.
Danger!
Risk of accident, resulting in serious
personal injury or death.
fUse the tire sealant only in the case of cuts or
punctures no larger than 0.15 in. (4 mm).
fNever use the tire sealant if the rim is damaged.
Warning!
The sealant is highly flammable and harmful
to health.
fFire, open flame and smoking are prohibited
when handling tire sealant.
fAvoid contact with skin, eyes or clothing due to
caustic chemical properties of the tire sealant.
fKeep tire sealant away from children.
fDo not inhale vapors, due to consequent harm
to personal health resulting in serious personal injury or death.
In case of contact with the sealant:
fIf sealant gets on the skin or in the eyes,
thoroughly rinse the affected part of the body
off immediately.
fChange soiled clothing immediately.
fGet medical attention immediately in the event
of an allergic reaction.
fIf sealant was swallowed, thoroughly rinse out
the mouth without delay and drink plenty of
water.
Do not induce vomiting.
Get medical attention immediately.
10_GT3_21.book Seite 204 Donnerstag, 4. Juni 2009 12:48 12
Page 206 of 251
Practical Tips, Emergency Service
205
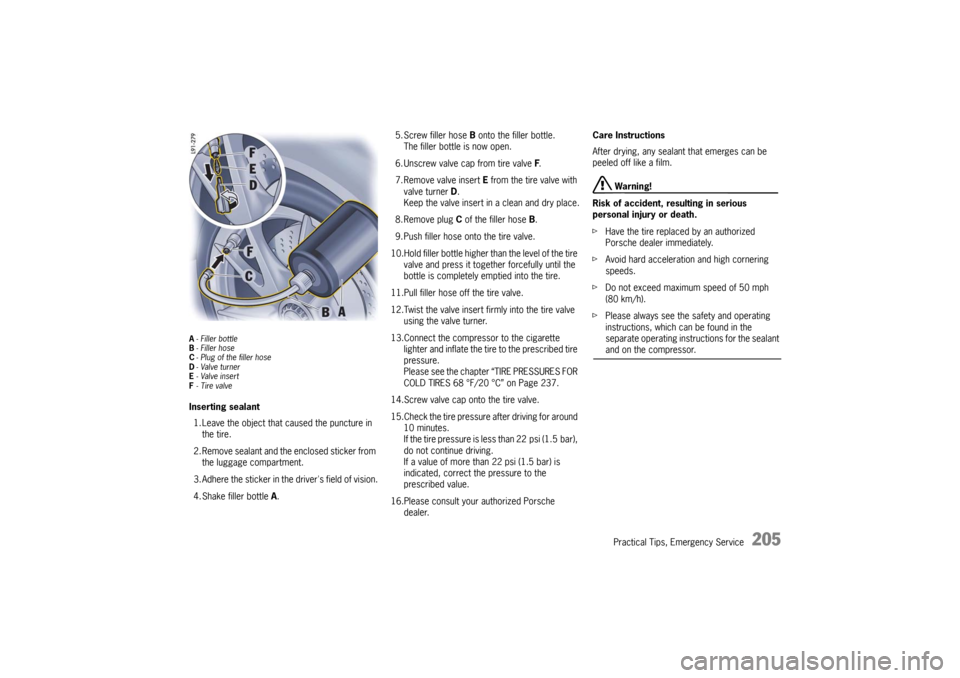
A- Filler bottle
B- Filler hose
C- Plug of the filler hose
D-Valve turner
E-Valve insert
F- Tire valveInserting sealant
1. Leave the object that caused the puncture in
the tire.
2. Remove sealant and the enclosed sticker from
the luggage compartment.
3. Adhere the sticker in the driver's field of vision.
4. Shake filler bottle A.5. Screw filler hose B onto the filler bottle.
The filler bottle is now open.
6. Unscrew valve cap from tire valve F.
7. Remove valve insert E from the tire valve with
valve turner D.
Keep the valve insert in a clean and dry place.
8. Remove plug C of the filler hose B.
9. Push filler hose onto the tire valve.
10.Hold filler bottle higher than the level of the tire
valve and press it together forcefully until the
bottle is completely emptied into the tire.
11.Pull filler hose off the tire valve.
12.Twist the valve insert firmly into the tire valve
using the valve turner.
13.Connect the compressor to the cigarette
lighter and inflate the tire to the prescribed tire
pressure.
Please see the chapter “TIRE PRESSURES FOR
COLD TIRES 68 °F/20 °C” on Page 237.
14.Screw valve cap onto the tire valve.
15.Check the tire pressure after driving for around
10 minutes.
If the tire pressure is less than 22 psi (1.5 bar),
do not continue driving.
If a value of more than 22 psi (1.5 bar) is
indicated, correct the pressure to the
prescribed value.
16.Please consult your authorized Porsche
dealer.Care Instructions
After drying, any sealant that emerges can be
peeled off like a film.
Warning!
Risk of accident, resulting in serious
personal injury or death.
fHave the tire replaced by an authorized
Porsche dealer immediately.
fAvoid hard acceleration and high cornering
speeds.
fDo not exceed maximum speed of 50 mph
(80 km/h).
fPlease always see the safety and operating
instructions, which can be found in the
separate operating instructions for the sealant and on the compressor.
10_GT3_21.book Seite 205 Donnerstag, 4. Juni 2009 12:48 12
Page 208 of 251
Practical Tips, Emergency Service
207
Electrical System In order to avoid damage and faults in electrical or
electronic systems, electrical accessories should
be installed at your authorized Porsche dealer.
fOnly use accessories authorized by Porsche.
Warning!
Risk of short circuit and fire, resulting in
serious personal injury or death.
Replacing fuses or relays with the engine
running or the ignition on could cause
electrical shock.
fDisconnect the negative terminal on the
battery during all work on the electrical
system.
Please see the chapter “BATTERY” on Page 211.
RelaysDefective relays should be changed only by an
authorized workshop.
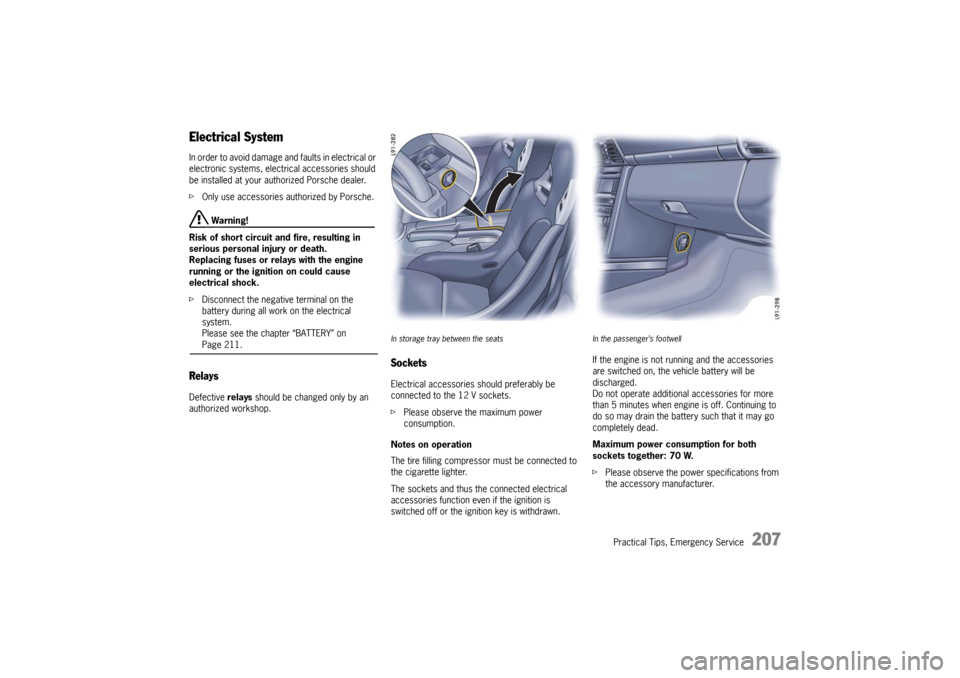
In storage tray between the seatsSocketsElectrical accessories should preferably be
connected to the 12 V sockets.
fPlease observe the maximum power
consumption.
Notes on operation
The tire filling compressor must be connected to
the cigarette lighter.
The sockets and thus the connected electrical
accessories function even if the ignition is
switched off or the ignition key is withdrawn.
In the passenger’s footwellIf the engine is not running and the accessories
are switched on, the vehicle battery will be
discharged.
Do not operate additional accessories for more
than 5 minutes when engine is off. Continuing to
do so may drain the battery such that it may go
completely dead.
Maximum power consumption for both
sockets together: 70 W.
fPlease observe the power specifications from
the accessory manufacturer.
10_GT3_21.book Seite 207 Donnerstag, 4. Juni 2009 12:48 12
Page 212 of 251

Practical Tips, Emergency Service
211
Battery fPlease see the chapter “EMERGENCY OPERA-
TION – PULLING OUT THE IGNITION KEY” on
Page 69.
fPlease see the chapter “EMERGENCY
UNLOCKING OF THE LUGGAGE COMPART-
MENT LID” on Page 210.
Warning!
Risk of short circuit and fire, resulting in
serious personal injury or death.
fObserve all warning notes on the battery.
fDisconnect the negative terminal on the
battery during all work on the electrical
system.
fDo not lay tools or other metal objects on the
battery as they could cause a short circuit
across the battery terminal.
Hydrogen gas generated by the battery
could cause an explosion, resulting in
serious personal injury or death.
fDo not expose the battery to an open flame,
electrical spark or a lit cigarette.
fDo not wipe battery with a dry cloth.
Risk of serious personal injury or death and
damage to the fabric, metal or paint.
fWear eye protection. fDo not allow battery acid to come in contact
with your skin, eyes, fabric or painted
surfaces.
fIf you get electrolyte, which is an acid, in your
eyes or on your skin, immediately rinse with
cold water for several minutes and call a
doctor.
fSpilled electrolyte must be rinsed off at once
with a solution of baking soda and water to
neutralize the acid.
Battery posts, terminals and related acces-
sories contain lead and lead compounds,
chemicals known to the State of California to
cause cancer and reproductive harm.
fAlways protect your skin by washing
thoroughly with soap and water.
Risk of explosion as a result of static charge,
resulting in serious personal injury or death.
fDo not wipe the battery with a dry cloth.
fEliminate potential electrostatic charge by
touching the vehicle before touching the
battery.
Charge state A well charged battery will not only prevent
starting problems but will also last longer.
In order to avoid discharging the battery
unintentionally:
fSwitch off unnecessary electrical loads in city
traffic, on short trips or in a line or traffic.
fAlways remove the ignition key from the
ignition switch when leaving the car.
fAvoid frequent operation of the convertible top
and operation of the Porsche Communication
Management system when the engine is not
running.
In the cold season in particular or if the vehicle is
used primarily for short trips, it may be necessary
to recharge the battery from time to time.
Porsche recommends the use of a charger, partic-
ularly during extended immobilization periods.
Please see your authorized Porsche dealer
for relevant information.
10_GT3_21.book Seite 211 Donnerstag, 4. Juni 2009 12:48 12
Page 213 of 251

212
Practical Tips, Emergency Service
Battery care fEnsure that battery is securely mounted.
fKeep terminals and connections clean and
properly tightened.
Corrosion can be prevented by coating the
terminals and connections with petroleum jelly
or silicone spray.
fEnsure that vent caps are securely tightened to
prevent spillage.
Checking the electrolyte fluid level
Generally, the electrolyte level must be checked
more often in summer than in the winter, and more
often when driving long distances.
fWhen adding water, use only clean containers.
In no case may alcohol (e.g. window cleaner
residues) be permitted to enter the battery.
fUnscrew and open the filler vent caps of each
cell.
With the car on a level surface, the fluid level
should meet the indicator mark in each cell.
fIf necessary, top up with distilled water.
Do not use acid.
Only fill up to the mark, otherwise the electro-
lyte will overflow when the battery is being
charged and cause damage. Battery charging
Automotive batteries loose their efficiency when
not in use.
The charge available in your battery can be
measured with a battery hydrometer.
We recommend that the battery voltage be tested
by your authorized Porsche dealer who has the
appropriate equipment.
If the car is not driven for prolonged periods, the
battery must be charged at least every 6 weeks.
A discharged battery allows rapid formation of
sulfates, leading to premature deterioration of the
plates.
Warning!
Hydrogen gas generated by the battery
could cause an explosion, resulting in
serious personal injury or death.
fCharge battery in a well ventilated area.
fNever charge a frozen battery. It may explode
because of gas trapped in the ice. Allow a
frozen battery to thaw out first.
fIf you get electrolyte, which is an acid, in your
eyes or on your skin, immediately rinse with
cold water for several minutes and call a doctor. Slow battery charging
1. Pay attention to all warnings and follow instruc-
tions that come with your battery charger.
2. When charging, ensure adequate ventilation.
3. Remove battery.
Please see the chapter “REMOVING THE
BATTERY” on Page 214.
4. All vent caps should be open.
The fluid level should meet the indicator mark
in each cell.
5. Ensure that charger is switched off – danger of
short circuit!
6. Connect charger cables.
Charger cables must be connected
POSITIVE (+) to POSITIVE (+) and
NEGATIVE (–) to NEGATIVE (–).
7. Switch on charger.
Normally, a battery should be charged at no
more than 10 percent of its rated capacity.
Rated capacity of the battery in your vehicle is
listed on the battery housing.
8. After charging, turn off charger and disconnect
charger cables.
9. Tighten the vent caps and reinstall battery.
Please see the chapter “INSTALLING THE
BATTERY” on Page 215.
10_GT3_21.book Seite 212 Donnerstag, 4. Juni 2009 12:48 12
Page 214 of 251

Practical Tips, Emergency Service
213
Winter operation The capacity and ability of the battery to store
power decreases at low outside temperatures.
Additionally, more power is consumed while
starting, and the headlights, heater, rear window
defogger, etc., are used more frequently.
fLet your Porsche dealer test the battery’s
capacity before winter sets in.
The battery will discharge more quickly if your
vehicle is not driven on a daily basis over a
distance of several miles. The more often you
drive your vehicle, and the longer the distance
driven on each trip, the more opportunity the
vehicle’s charging system will have to recharge the
batteries.
Replacing battery The service life of the battery is subject to normal
wear; it depends greatly on care, climatic condi-
tions, and driving conditions (distances, loads).
fOnly use an original Porsche battery, with the
correct part number, as a replacement.
fPlease observe the disposal instructions for
batteries.
Putting vehicle into operationAfter the battery is connected or after an comple-
tely discharged battery is charged, the multi-
functional PSM light lights up on the instrument
panel and a message appears on the on-board
computer to indicate a fault.
This fault can be remedied with a few simple
steps:
1. Start the engine.
2. With the vehicle stationary, perform a few
steering movements to the left and right and
then drive a short distance in a straight line
until the multifunctinal PSM light goes out and
the message on the on-board computer
disappears.
3. If the warnings do not disappear, then:
Drive carefully to the nearest authorized
Porsche dealer.
Have the fault remedied.
4. After the warnings disappear:
Stop the vehicle in a suitable place.
fPerform adaptation of the power windows:
Please see the chapter “STORING END
POSITION OF THE WINDOWS” on Page 29.
10_GT3_21.book Seite 213 Donnerstag, 4. Juni 2009 12:48 12