load capacity PORSCHE 911 GT3 2010 5.G Owners Manual
[x] Cancel search | Manufacturer: PORSCHE, Model Year: 2010, Model line: 911 GT3, Model: PORSCHE 911 GT3 2010 5.GPages: 251, PDF Size: 14.33 MB
Page 187 of 251

186
Practical Tips, Emergency Service fPlease see the chapter “TIRE PRESSURES FOR
COLD TIRES 68 °F/20 °C” on Page 237.
Each tire, should be checked every 2 weeks when
cold (68 °F/20 °C) and inflated to the inflation
pressure recommended in this Owner's Manual or
on the tire-pressure plate.
If your vehicle has tires of a different size than the
size indicated in this Owner's Manual or on the tire-
pressure plate, you should determine the proper
tire inflation pressure for those tires.
As an added safety feature, your vehicle has been
equipped with a tire pressure monitoring (TPM)
that illuminates a low tire pressure message when
one or more of your tires is significantly under-
inflated. Accordingly, when the low tire pressure
message illuminates, you should stop and check
your tires as soon as possible, and inflate them to
the proper pressure. Driving on a significantly
under-inflated tire causes the tire to overheat and
can lead to tire failure. Under-inflation also
reduces fuel efficiency and tire tread life, and may
affect the vehicle’s handling and stopping ability.
Please note that the TPM is not a substitute for
proper tire maintenance, and it is the driver’s
responsibility to maintain correct tire pressure,
even if under-inflation has not reached the level to
trigger illumination of the TPM low tire pressure
message.
fPlease see the chapter “TPM TIRE PRESSURE
MONITORING” on Page 134.
When tires are warm, the tire pressure is
increased.fNever let air out of hot tires.
This could cause the tire pressure to fall below
the prescribed value.
Insufficient tire filling pressure can cause tires to
overheat and thus be damaged – even invisibly.
Hidden tire damage is not eliminated by subse-
quently correcting the tire pressure.
Overloading
Danger!
Risk of damage to vehicle parts, loss of
control and serious personal injury or death.
fDo not overload your vehicle.
fIf loading the vehicle also correct the tire
pressure. Tire pressure for loaded vehicle can
be found on the tire pressure plate and in the
chapter technical data.
fNever exceed the specified axle load.
Overloading can shorten the service life of the
tires and car, as well as lead to dangerous
vehicle reactions and long braking distances.
Damage due to overloading is not covered by the vehicle warranty.
fPlease see the chapter “LOADING INFORMA-
TION” on Page 195.
fPlease see the chapter “TIRE PRESSURES FOR
COLD TIRES 68 °F/20 °C” on Page 237.
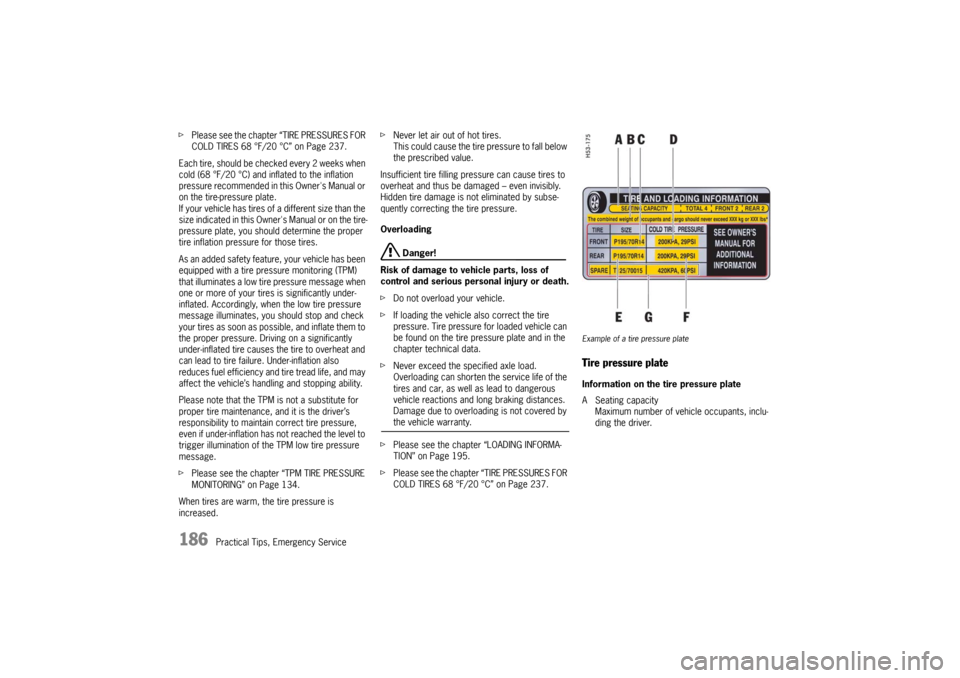
Example of a tire pressure plateTire pressure plateInformation on the tire pressure plate
A Seating capacity
Maximum number of vehicle occupants, inclu-
ding the driver.
10_GT3_21.book Seite 186 Donnerstag, 4. Juni 2009 12:48 12
Page 192 of 251

Practical Tips, Emergency Service
191
Removing and storing tires fAfter changing, adjust tire pressure and torque
wheel bolts diagonally to 370 ftlb (500 Nm).
Tires must always remain on the same side of
the vehicle.
When wheels are removed, the direction of
rotation and position of each wheel should be
marked.
Example
FR (front right), FL, RR and RL.
Wheels must always be fitted in accordance with
their marking.
The perception that tire durability and perfor-
mance are immune to the effects of storage and
age is unfounded.
Chemical additives, which make the rubber
elastic, lose their effectiveness in the course of
time and the rubber becomes brittle and cracks.
Therefore, the tires should be inspected from
time to time. Note
Under no circumstances should tires older than
6 years be used on your Porsche.
The age of the tire can be obtained from the “DOT”
code number. If, for example, the last four
numbers read 1209, then the tire was produced in
the 12th week of 2009.
fStore tires in a cool and dry place.
Snow tires For a better grip on snow and ice, use radial M+S
tires with studs.
Check with your local Motor Vehicle Bureau for
possible restrictions.
Danger!
Risk of loss of control and damage to the
vehicle as well as serious personal injury or
death.
The standard tires profile and rubber mixture
are optimized for wet and dry driving condi-
tions, and may not prove favorable for snow
conditions.
fTherefore install M+S tires before driving in such conditions. Before mounting snow tires, consult with
your Porsche dealer. He has the technical
information necessary to advise you on
wheel and tire compatibility.
Snow tires should have the same load capacity as
original equipment tires and should be mounted on
all four wheels.
Snow tires with studs should be run at moderate
speeds when new in order to give the studs time
to settle.
Danger!
Tires with badly worn treads and studs are
very dangerous and could cause accidents
resulting in serious personal injuries or
death.
fMake sure they are replaced immediately.
fDo not drive a vehicle equipped with snow tires
at prolonged high speed.
Snow tires do not have the same degree of
traction on dry, wet or snowfree roads as a
normal tire.
Furthermore, snow tires wear rapidly under
these conditions.
Comply with all state and local laws
governing snow tire and tread depth require-
ments.
10_GT3_21.book Seite 191 Donnerstag, 4. Juni 2009 12:48 12
Page 194 of 251

Practical Tips, Emergency Service
193
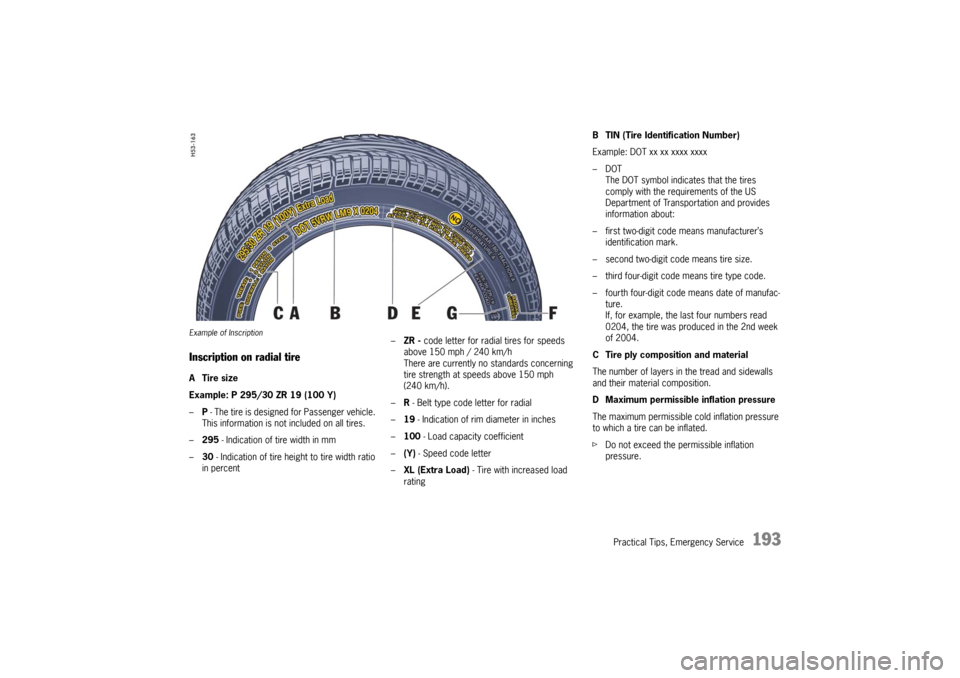
Example of InscriptionInscription on radial tireATire size
Example: P 295/30 ZR 19 (100 Y)
–P - The tire is designed for Passenger vehicle.
This information is not included on all tires.
–295 - Indication of tire width in mm
–30 - Indication of tire height to tire width ratio
in percent–ZR - code letter for radial tires for speeds
above 150 mph / 240 km/h
There are currently no standards concerning
tire strength at speeds above 150 mph
(240 km/h).
–R - Belt type code letter for radial
–19 - Indication of rim diameter in inches
–100 - Load capacity coefficient
–(Y) - Speed code letter
–XL (Extra Load) - Tire with increased load
rating
B TIN (Tire Identification Number)
Example: DOT xx xx xxxx xxxx
–DOT
The DOT symbol indicates that the tires
comply with the requirements of the US
Department of Transportation and provides
information about:
– first two-digit code means manufacturer’s
identification mark.
– second two-digit code means tire size.
– third four-digit code means tire type code.
– fourth four-digit code means date of manufac-
ture.
If, for example, the last four numbers read
0204, the tire was produced in the 2nd week
of 2004.
C Tire ply composition and material
The number of layers in the tread and sidewalls
and their material composition.
D Maximum permissible inflation pressure
The maximum permissible cold inflation pressure
to which a tire can be inflated.
fDo not exceed the permissible inflation
pressure.
10_GT3_21.book Seite 193 Donnerstag, 4. Juni 2009 12:48 12
Page 196 of 251

Practical Tips, Emergency Service
195
Loading InformationDefinitionsThe Curb weight - actual weight of your vehicle -
vehicle weight including standard and optional
equipment, fluids and emergency tools. This
weight does not include passengers and cargo.
The Gross Vehicle Weight is sum of the curb
weight and the weight of passengers and cargo
combined.
The Gross Vehicle Weight Rating is the
maximum total weight of vehicle, passengers,
luggage and optional equipment.
The Gross Axle Weight Rating is the maximum
load limit for the front or the rear axle. This infor-
mation is located on the safety compliance sticker
located in the driver’s side door jamb.
For determining the compatibility of the tire and
vehicle load capabilities:
fPlease see the chapter “TECHNICAL DATA” on
Page 236.
The load capacity coefficient (e.g. “102”) is a
minimum requirement.The Gross Combined Weight Rating is the
maximum total weight rating of vehicle, passen-
gers and cargo.
The Vehicle Capacity Weight - Load Limit - is
the maximum total weight limit specified of the
load (passengers and cargo) for the vehicle. This
is the maximum weight of passengers and cargo
that can be loaded into the vehicle. This informa-
tion can be found on the tire pressure plate.
The maximum loaded vehicle weight is the
sum of curb weight, accessory weight, vehicle
capacity weight and production options weight.
The load rating is the maximum load that a tire
is rated to carry for a given inflation pressure.
The maximum load rating is the load rating for
a tire at the maximum permissble inflation
pressure.
The cargo capacity is the permissible weight of
cargo, the substracted weight of passengers from
the load limit.
fNever exceed the permissible limits.
Danger!
Risk of loss of control, damage to the vehicle
and serious personal injury or death.
fNever exceed the specified axle loads.
Overloading can shorten the service life of the
tires and car, as well as lead to dangerous
vehicle reactions and long braking distances.
Damage due to overloading is not covered by the vehicle warranty.
10_GT3_21.book Seite 195 Donnerstag, 4. Juni 2009 12:48 12
Page 197 of 251

196
Practical Tips, Emergency Service
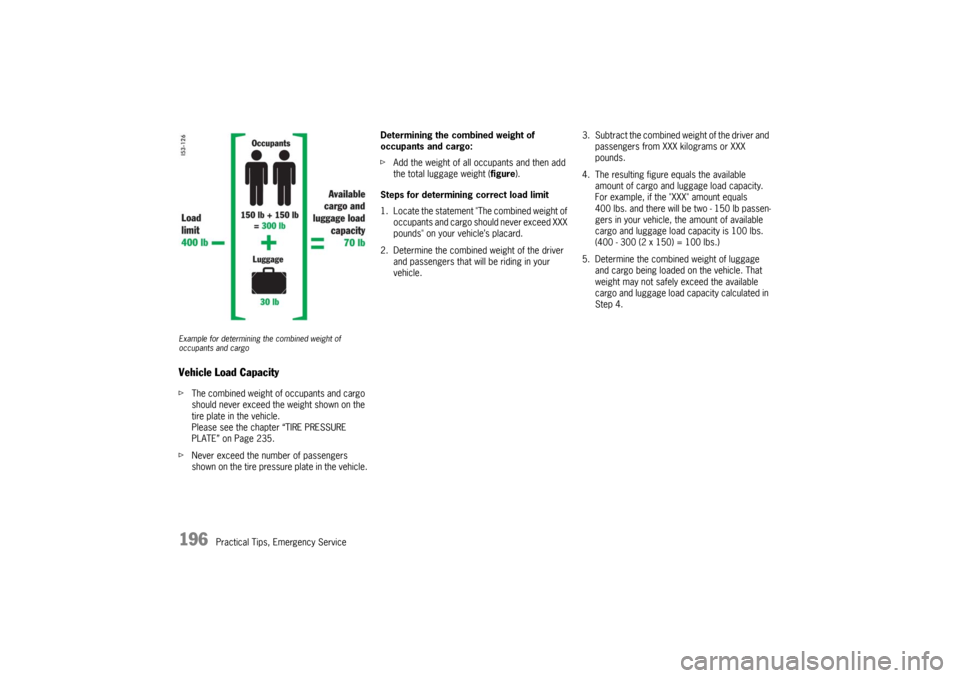
Example for determining the combined weight of
occupants and cargoVehicle Load CapacityfThe combined weight of occupants and cargo
should never exceed the weight shown on the
tire plate in the vehicle.
Please see the chapter “TIRE PRESSURE
PLATE” on Page 235.
fNever exceed the number of passengers
shown on the tire pressure plate in the vehicle.Determining the combined weight of
occupants and cargo:
fAdd the weight of all occupants and then add
the total luggage weight (figure).
Steps for determining correct load limit
1. Locate the statement "The combined weight of
occupants and cargo should never exceed XXX
pounds" on your vehicle’s placard.
2. Determine the combined weight of the driver
and passengers that will be riding in your
vehicle. 3. Subtract the combined weight of the driver and
passengers from XXX kilograms or XXX
pounds.
4. The resulting figure equals the available
amount of cargo and luggage load capacity.
For example, if the "XXX" amount equals
400 lbs. and there will be two - 150 lb passen-
gers in your vehicle, the amount of available
cargo and luggage load capacity is 100 lbs.
(400 - 300 (2 x 150) = 100 lbs.)
5. Determine the combined weight of luggage
and cargo being loaded on the vehicle. That
weight may not safely exceed the available
cargo and luggage load capacity calculated in
Step 4.10_GT3_21.book Seite 196 Donnerstag, 4. Juni 2009 12:48 12
Page 214 of 251

Practical Tips, Emergency Service
213
Winter operation The capacity and ability of the battery to store
power decreases at low outside temperatures.
Additionally, more power is consumed while
starting, and the headlights, heater, rear window
defogger, etc., are used more frequently.
fLet your Porsche dealer test the battery’s
capacity before winter sets in.
The battery will discharge more quickly if your
vehicle is not driven on a daily basis over a
distance of several miles. The more often you
drive your vehicle, and the longer the distance
driven on each trip, the more opportunity the
vehicle’s charging system will have to recharge the
batteries.
Replacing battery The service life of the battery is subject to normal
wear; it depends greatly on care, climatic condi-
tions, and driving conditions (distances, loads).
fOnly use an original Porsche battery, with the
correct part number, as a replacement.
fPlease observe the disposal instructions for
batteries.
Putting vehicle into operationAfter the battery is connected or after an comple-
tely discharged battery is charged, the multi-
functional PSM light lights up on the instrument
panel and a message appears on the on-board
computer to indicate a fault.
This fault can be remedied with a few simple
steps:
1. Start the engine.
2. With the vehicle stationary, perform a few
steering movements to the left and right and
then drive a short distance in a straight line
until the multifunctinal PSM light goes out and
the message on the on-board computer
disappears.
3. If the warnings do not disappear, then:
Drive carefully to the nearest authorized
Porsche dealer.
Have the fault remedied.
4. After the warnings disappear:
Stop the vehicle in a suitable place.
fPerform adaptation of the power windows:
Please see the chapter “STORING END
POSITION OF THE WINDOWS” on Page 29.
10_GT3_21.book Seite 213 Donnerstag, 4. Juni 2009 12:48 12
Page 239 of 251

238
Technical Data
Tires, Rims, Tracks
Tire Rim Rim offset Track
Summer tiresfront 235/35 ZR 19 (87Y) 8.5 J x 19 H2 53 mm 58.9 in./1497 mm
911 GT3 rear 305/30 ZR 19 (102Y) XL 12 J x 19 H2 63 mm 60.0 in./1524 mm
Snow tiresfront 235/35 R 19 87V M+S 8.5 J x 19 H2 53 mm
911 GT3 rear 295/30 R 19 100V XL M+S* 11 J x 19 H2 67 mm
The load capacity coefficient (e.g. “87”) and maximum speed code letter (e.g. “Y”) are minimum requirements.
Snow chainsCan be mounted only on the rear wheels; maximum speed 30 mph (50 km/h).
Use only Porsche authorized fine-link cross-type or edge chains.
Snow chain clearance can be guaranteed only on the tire + rim combination marked*.
Tire and rim sizesExtensive tests are performed before specific tires and wheels are approved by Porsche. Your Porsche dealer has informa-
tion about approved tires and wheels and is happy to assist you.
If aftermarket tires and/or wheels are installed which are not approved by Porsche, the vehicle’s driveability, stability while
in motion and handling characteristics might be impaired. Since Porsche has no data on such combinations, Porsche cannot
stand behind the safety or durability of these aftermarket combinations.
Danger!
Installation of sizes not authorized by
Porsche may have a dangerous effect on
the driving stability and could result in
severe personal injury or death.
fBefore mounting new tires, check with your Porsche dealer about the current release status.
10_GT3_21.book Seite 238 Donnerstag, 4. Juni 2009 12:48 12
Page 250 of 251

Index
249
Towing lug ................................................... 87
TPM Tire pressure monitoring ...................... 134
Tracks ....................................................... 238
Traction Control (TC)..................................... 61
Transmission .............................................. 237
Drive-Off Assistant............................... 155
Fluid........................................... 172, 239
Manual transmission............................ 155
Porsche Doppelkupplung (PDK) ............ 155
Trip Odometer ............................................ 109
Trunk entrapment ......................................... 88
Turn signal
Indicator light...................................... 111
Turn signals ......................................... 75, 111
Turn signals, front....................................... 227UUndercoating...................................... 168, 178
Upshift indicator ................................. 111, 155
USB interface ............................................... 93
VValves ........................................................189
Vanity mirror.................................................37
Vehicle
Care...................................................174
Engine number....................................235
Identification .......................................234
Identification label ...............................234
Identification number ...........................234
Lifting.................................................206
Load capacity .....................................196
Putting into operation ..........................213
Safety compliance sticker ....................234
Washing .............................................175
Vehicle identification number ........................234
Ventilation ....................................................98
Vents ...................................................98, 101
Viscosity, engine oil.....................................160
Voice control, button ...................................117
Voice control, PCM .....................................117
WWarning lights and messages ...................... 148
Washer
Fluid .......................................... 170, 239
Fluid warning light............................... 170
Lever................................................... 76
Washing .................................................... 175
Weights ..................................................... 240
Welcome Home Function .............................. 74
Wheel .......................................... 13, 184, 238
Alignment .......................................... 190
Balancing........................................... 190
Care .................................................. 184
Central bolts ...................................... 197
Changing ................................... 198, 203
Checking pressure............................. 203
Inscription .......................................... 193
Loading information ............................ 195
Security wheel bolts ............................. 87
Sidewall ............................................. 193
Size .................................................. 193
Tire pressure ............................. 185, 237
Tire pressure plate ............................. 235
Tire sealant ................................ 203, 204
Wheels
Care .................................................. 178
Central bolts ...................................... 197
Tightening torque ............................... 197
TPM sensors...................................... 190
10_GT3_21.book Seite 249 Donnerstag, 4. Juni 2009 12:48 12