technical data PORSCHE 911 GT3 2010 5.G Owners Manual
[x] Cancel search | Manufacturer: PORSCHE, Model Year: 2010, Model line: 911 GT3, Model: PORSCHE 911 GT3 2010 5.GPages: 251, PDF Size: 14.33 MB
Page 11 of 251
10
Table of Contents Exercise Extreme Caution when Working
on your Vehicle ........................................... 157
Coolant Level ............................................. 158
Engine Oil................................................... 159
Engine Oil Level .......................................... 160
Brake Fluid Level ........................................ 162
Fuel Economy ............................................. 164
Operating your Porsche in other Countries .... 164
Fuel ........................................................... 165
Fuel Recommendations............................... 166
Portable Fuel Containers ............................. 167
Fuel Evaporation Control ............................. 167
Emission Control System............................. 168
How Emission Control Works ....................... 169
Washer Fluid............................................... 170
Power Steering ........................................... 171
Air Filter ..................................................... 172
Combination Filter ....................................... 172
Manual Transmission Oil .............................. 172
Wiper Blades .............................................. 173
Car Care Instructions.................................. 174
Exercise Extreme Caution when Working
on your Vehicle ........................................... 183
Tires/Wheels .............................................. 184
Loading Information .................................... 195
Wheels with Central Locking ........................ 197
Central Bolts .............................................. 197
Changing a Wheel ....................................... 198
Checking Tire Pressure with a
Pressure Gauge .......................................... 203
Flat Tire ..................................................... 203
Lifting the Vehicle with a Lifting Platform or
Garage Lift ................................................. 206
Electrical System ........................................ 207
Battery....................................................... 211Replacing the remote-control battery ............216
Emergency Starting with Jumper Cables .......217
Bulb chart ..................................................219
Lights, Replacing Bulbs ...............................219
Headlights ..................................................220
License Plate Light ......................................227
Front Side Lights, Front Turn Signal Lights,
Daytime Running Lights, Tail Lights and
Additional Brake Light..................................227
Adjusting Headlights ....................................228
Towing .......................................................230
Vehicle Identification....................................234
Technical Data ............................................236
Engine Diagram at full Power .......................242
10_GT3_21.book Seite 10 Donnerstag, 4. Juni 2009 12:48 12
Page 14 of 251

Before driving off...
13
Break in hints for the first
2,000 miles/3,000 kilometers The following tips will be helpful in obtaining
optimum performance from your new Porsche.
Despite the most modern, high-precision manufac-
turing methods, the moving parts must still wear
in with each other. This wearing-in occurs mainly in
the first 2,000 miles/3,000 kilometers.Therefore: fPreferably take longer trips.
fAvoid frequent cold starts with short-distance
driving whenever possible.
fAvoid full throttle starts and abrupt stops.
fDo not exceed maximum engine speed of
4,200 rpm (revolutions per minute).
fDo not run a cold engine at high rpm either in
Neutral or in gear.
fDo not let the engine labor, especially when
driving uphill. Shift to the next lower gear in
time (use the most favorable rpm range).
fNever lug the engine in high gear at low
speeds. This rule applies at all times, not just
during the break-in period.fDo not participate in motor racing events,
sports driving schools, etc. during the first
2,000 miles/3,000 kilometers.
There may be a slight stiffness in the steering,
gear-shifting or other controls during the break-in
period which will gradually disappear.
Break in brake pads and brake discsNew brake pads and discs have to be “broken in”,
and therefore only attain optimal friction when the
car has covered several hundred miles or km.
The slightly reduced braking ability must be
compensated for by pressing the brake pedal
harder. This also applies whenever the brake pads
and brake discs are replaced.
A significant amount of brake noise may be heard
during the break-in period.New tires New tires do not have maximum traction. They
tend to be slippery.
fBreak in new tires by driving at moderate
speeds during the first 60 to 120 miles/100 to
200 km. Longer braking distances must be
anticipated.
Engine oil and fuel consumption During the break-in period oil and fuel consump-
tion may be higher than normal.
fPlease see the chapter “TECHNICAL DATA” on
Page 236.
As always, the rate of oil consumption depends on
the quality and viscosity of oil, the speed at which
the engine is operated, the climate and road
conditions, as well as the amount of dilution and
oxidation of the lubricant.
fMake a habit of checking engine oil with every
refueling, add if necessary.
10_GT3_21.book Seite 13 Donnerstag, 4. Juni 2009 12:48 12
Page 143 of 251
142
Instruments, On-Board Computer
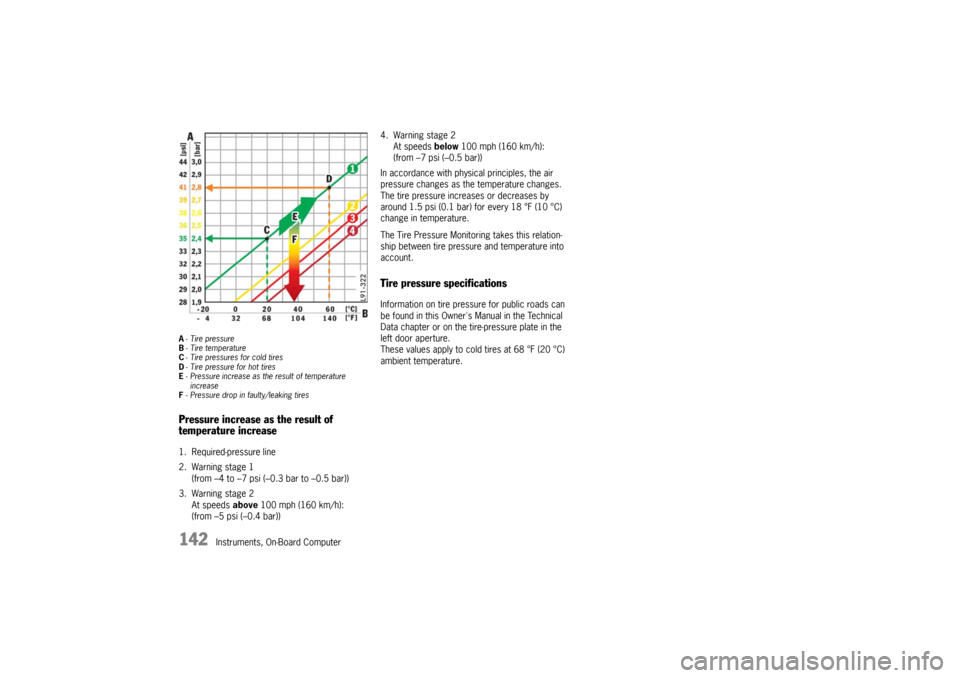
A-Tire pressure
B-Tire temperature
C-Tire pressures for cold tires
D-Tire pressure for hot tires
E-Pressure increase as the result of temperature
increase
F-Pressure drop in faulty/leaking tiresPressure increase as the result of
temperature increase1. Required-pressure line
2. Warning stage 1
(from –4 to –7 psi (–0.3 bar to –0.5 bar))
3. Warning stage 2
At speeds above 100 mph (160 km/h):
(from –5 psi (–0.4 bar))4. Warning stage 2
At speeds below 100 mph (160 km/h):
(from –7 psi (–0.5 bar))
In accordance with physical principles, the air
pressure changes as the temperature changes.
The tire pressure increases or decreases by
around 1.5 psi (0.1 bar) for every 18 °F (10 °C)
change in temperature.
The Tire Pressure Monitoring takes this relation-
ship between tire pressure and temperature into
account.
Tire pressure specificationsInformation on tire pressure for public roads can
be found in this Owner's Manual in the Technical
Data chapter or on the tire-pressure plate in the
left door aperture.
These values apply to cold tires at 68 °F (20 °C)
ambient temperature.
10_GT3_21.book Seite 142 Donnerstag, 4. Juni 2009 12:48 12
Page 187 of 251
186
Practical Tips, Emergency Service fPlease see the chapter “TIRE PRESSURES FOR
COLD TIRES 68 °F/20 °C” on Page 237.
Each tire, should be checked every 2 weeks when
cold (68 °F/20 °C) and inflated to the inflation
pressure recommended in this Owner's Manual or
on the tire-pressure plate.
If your vehicle has tires of a different size than the
size indicated in this Owner's Manual or on the tire-
pressure plate, you should determine the proper
tire inflation pressure for those tires.
As an added safety feature, your vehicle has been
equipped with a tire pressure monitoring (TPM)
that illuminates a low tire pressure message when
one or more of your tires is significantly under-
inflated. Accordingly, when the low tire pressure
message illuminates, you should stop and check
your tires as soon as possible, and inflate them to
the proper pressure. Driving on a significantly
under-inflated tire causes the tire to overheat and
can lead to tire failure. Under-inflation also
reduces fuel efficiency and tire tread life, and may
affect the vehicle’s handling and stopping ability.
Please note that the TPM is not a substitute for
proper tire maintenance, and it is the driver’s
responsibility to maintain correct tire pressure,
even if under-inflation has not reached the level to
trigger illumination of the TPM low tire pressure
message.
fPlease see the chapter “TPM TIRE PRESSURE
MONITORING” on Page 134.
When tires are warm, the tire pressure is
increased.fNever let air out of hot tires.
This could cause the tire pressure to fall below
the prescribed value.
Insufficient tire filling pressure can cause tires to
overheat and thus be damaged – even invisibly.
Hidden tire damage is not eliminated by subse-
quently correcting the tire pressure.
Overloading
Danger!
Risk of damage to vehicle parts, loss of
control and serious personal injury or death.
fDo not overload your vehicle.
fIf loading the vehicle also correct the tire
pressure. Tire pressure for loaded vehicle can
be found on the tire pressure plate and in the
chapter technical data.
fNever exceed the specified axle load.
Overloading can shorten the service life of the
tires and car, as well as lead to dangerous
vehicle reactions and long braking distances.
Damage due to overloading is not covered by the vehicle warranty.
fPlease see the chapter “LOADING INFORMA-
TION” on Page 195.
fPlease see the chapter “TIRE PRESSURES FOR
COLD TIRES 68 °F/20 °C” on Page 237.
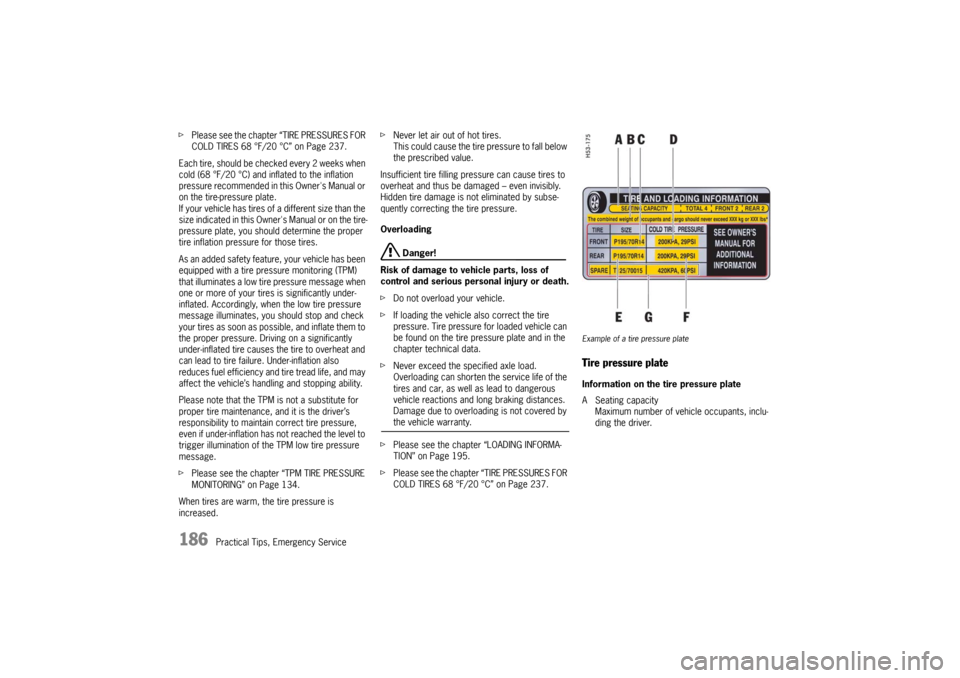
Example of a tire pressure plateTire pressure plateInformation on the tire pressure plate
A Seating capacity
Maximum number of vehicle occupants, inclu-
ding the driver.
10_GT3_21.book Seite 186 Donnerstag, 4. Juni 2009 12:48 12
Page 193 of 251

192
Practical Tips, Emergency Service
Danger!
Risk of accident and serious personal injury
or death due to excessive speed.
fAlways check the maximum speed rating on
the tire sidewall on any tire on the vehicle.
fNever exceed the maximum speed rating of the tires.
fFit winter tires to both axles well before the
cold season begins.
Your authorized Porsche dealer will be pleased
to advise you.
Maintenance note
We recommend fitting snow tires on the vehicle at
temperatures below 45 °F (7 °C) since the driving
performance of summer tires is reduced at low
temperatures. Summer tires may be permanently
damaged at extremely low temperatures.
Winter tires lose their traction capability when their
tread depth falls below 5/32 in. (4 mm).
Snow chains
Caution!
Risk of damage to body, axle or brake
components.
fFit snow chains only to the rear wheels, and
only with the tire/rim combination listed in the
Technical Data.
To ensure adequate clearance between chain
and body, Porsche recommends only the use
of fine-link chains such as those approved by
Porsche.
fFollow instructions issued by the supplier of the chains.
In order to mount snow chains the vehicle must be
jacked up at the rear.
Different states and countries have varying statu-
tory requirements regarding maximum speed.
Check with local authorities for possible restric-
tions.
fRemove chains as soon as the roads are free
of ice and snow.
Tire designations Due to new speed and load ratings for radial tires,
new designations have come into force for snow
tires for your Porsche.
The designation to be used for ZR tires is e.g.,
265/40 ZR 18 (Z = code letter for radial tires for
speeds above 150 mph / 240 km/h).
10_GT3_21.book Seite 192 Donnerstag, 4. Juni 2009 12:48 12
Page 196 of 251

Practical Tips, Emergency Service
195
Loading InformationDefinitionsThe Curb weight - actual weight of your vehicle -
vehicle weight including standard and optional
equipment, fluids and emergency tools. This
weight does not include passengers and cargo.
The Gross Vehicle Weight is sum of the curb
weight and the weight of passengers and cargo
combined.
The Gross Vehicle Weight Rating is the
maximum total weight of vehicle, passengers,
luggage and optional equipment.
The Gross Axle Weight Rating is the maximum
load limit for the front or the rear axle. This infor-
mation is located on the safety compliance sticker
located in the driver’s side door jamb.
For determining the compatibility of the tire and
vehicle load capabilities:
fPlease see the chapter “TECHNICAL DATA” on
Page 236.
The load capacity coefficient (e.g. “102”) is a
minimum requirement.The Gross Combined Weight Rating is the
maximum total weight rating of vehicle, passen-
gers and cargo.
The Vehicle Capacity Weight - Load Limit - is
the maximum total weight limit specified of the
load (passengers and cargo) for the vehicle. This
is the maximum weight of passengers and cargo
that can be loaded into the vehicle. This informa-
tion can be found on the tire pressure plate.
The maximum loaded vehicle weight is the
sum of curb weight, accessory weight, vehicle
capacity weight and production options weight.
The load rating is the maximum load that a tire
is rated to carry for a given inflation pressure.
The maximum load rating is the load rating for
a tire at the maximum permissble inflation
pressure.
The cargo capacity is the permissible weight of
cargo, the substracted weight of passengers from
the load limit.
fNever exceed the permissible limits.
Danger!
Risk of loss of control, damage to the vehicle
and serious personal injury or death.
fNever exceed the specified axle loads.
Overloading can shorten the service life of the
tires and car, as well as lead to dangerous
vehicle reactions and long braking distances.
Damage due to overloading is not covered by the vehicle warranty.
10_GT3_21.book Seite 195 Donnerstag, 4. Juni 2009 12:48 12
Page 204 of 251

Practical Tips, Emergency Service
203
Checking Tire Pressure with a
Pressure Gauge1. Remove the valve stem cap from the tire.
2. Press the pressure gauge onto the valve stem.
Note on operation
fDo not press too hard or force the valve stem
sideways, or air will escape.
If the sound of air escaping from the tire is
heard, reposition the pressure gauge.
3. Read the tire pressure on the gauge stem and
compare it to the permissble tire pressure.
This information can be found on the tire
pressure plate or in the chapter Technical
Data.
Please see the chapter “TIRE PRESSURES FOR
COLD TIRES 68 °F/20 °C” on Page 237.
4. Remove the pressure gauge.
fPlease see the chapter “TPM TIRE PRESSURE
MONITORING” on Page 134.
Flat Tire
Warning!
Failure to follow these instructions may result
in serious personal injury to you or to bystan-
ders.
fIf you have a flat tire, move a safe distance off
the road. Turn the emergency flasher on and
use other warning devices to alert other
motorists. Set the parking brake.
fDo not park your vehicle where it may contact
dry grass, brush or other flammable materials.
The hot parts of the exhaust system could set
such materials on fire, thereby causing both
property damage and serious personal injury or death.
A tire sealant and compressor with pressure
tester are located in the luggage compartment.
fPlease see the safety and operating instruc-
tions on the special sealant bottle with a
special Porsche part number and on the
compressor – these are essential.Important note
Sealing the tire with the tire repair kit is only
an emergency repair. Even with the tire air-
t i g h t , i t m a y b e u s e d o nly for short trips in an
emergency.
The maximum permitted speed is 50 mph
(80 km/h).
fDo not use commercially available sealant or
tire inflating bottles.
Use only the tire sealant located in the luggage
compartment.
Warning!
Risk of accident, resulting in serious
personal injury or death.
fHave tires replaced by a specialist workshop
as soon as possible.
fAvoid hard acceleration and high cornering speeds.
10_GT3_21.book Seite 203 Donnerstag, 4. Juni 2009 12:48 12
Page 234 of 251
Vehicle Identification, Technical Data
233 Vehicle Identification, Technical Data
Vehicle Identification................................... 234
Technical Data ........................................... 236
Engine Diagram at full Power ...................... 242
10_GT3_21.book Seite 233 Donnerstag, 4. Juni 2009 12:48 12
Page 235 of 251
234
Vehicle Identification, Technical Data
Vehicle IdentificationWhen ordering spare parts or making inquiries,
please always quote the vehicle identification
number. Vehicle data bankThe vehicle data bank is attached to the inside of
the “Maintenance” booklet.
It contains all important data about your vehicle.
Note
This data bank cannot be re-ordered if it is lost or
damaged.
This label contains the following information:
1. Vehicle Identification No.
2. Type/Type description
3. Engine code/Transmission code
4. Paint No./Interior
5. Optional equipment
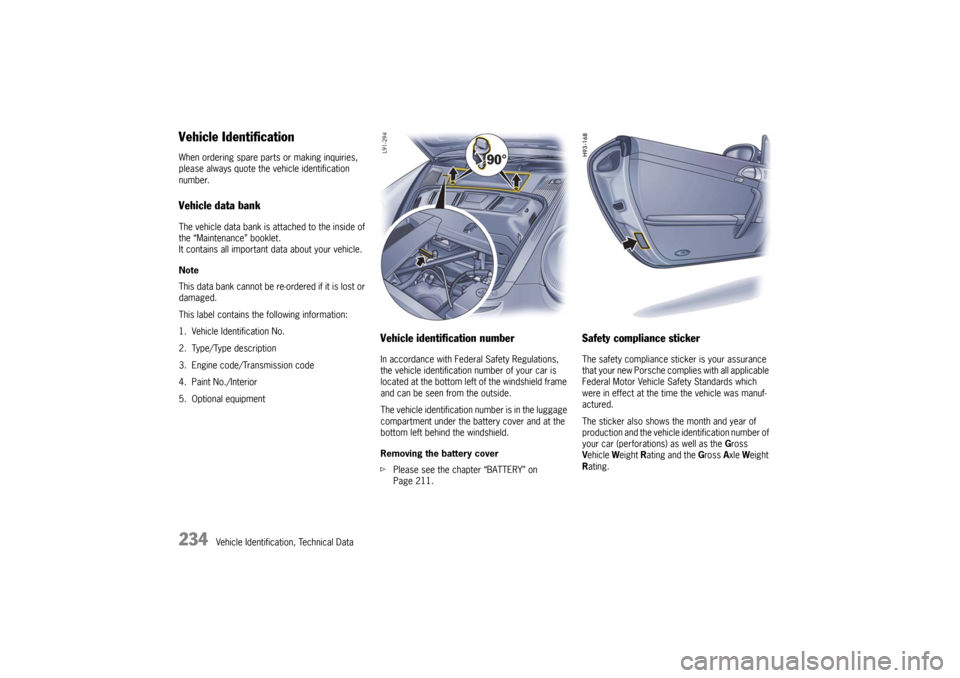
Vehicle identification number In accordance with Federal Safety Regulations,
the vehicle identification number of your car is
located at the bottom left of the windshield frame
and can be seen from the outside.
The vehicle identification number is in the luggage
compartment under the battery cover and at the
bottom left behind the windshield.
Removing the battery cover
fPlease see the chapter “BATTERY” on
Page 211.
Safety compliance stickerThe safety compliance sticker is your assurance
that your new Porsche complies with all applicable
Federal Motor Vehicle Safety Standards which
were in effect at the time the vehicle was manuf-
actured.
The sticker also shows the month and year of
production and the vehicle identification number of
your car (perforations) as well as the Gross
Vehicle Weight Rating and the Gross Axle Weight
Rating.
10_GT3_21.book Seite 234 Donnerstag, 4. Juni 2009 12:48 12
Page 236 of 251
Vehicle Identification, Technical Data
235
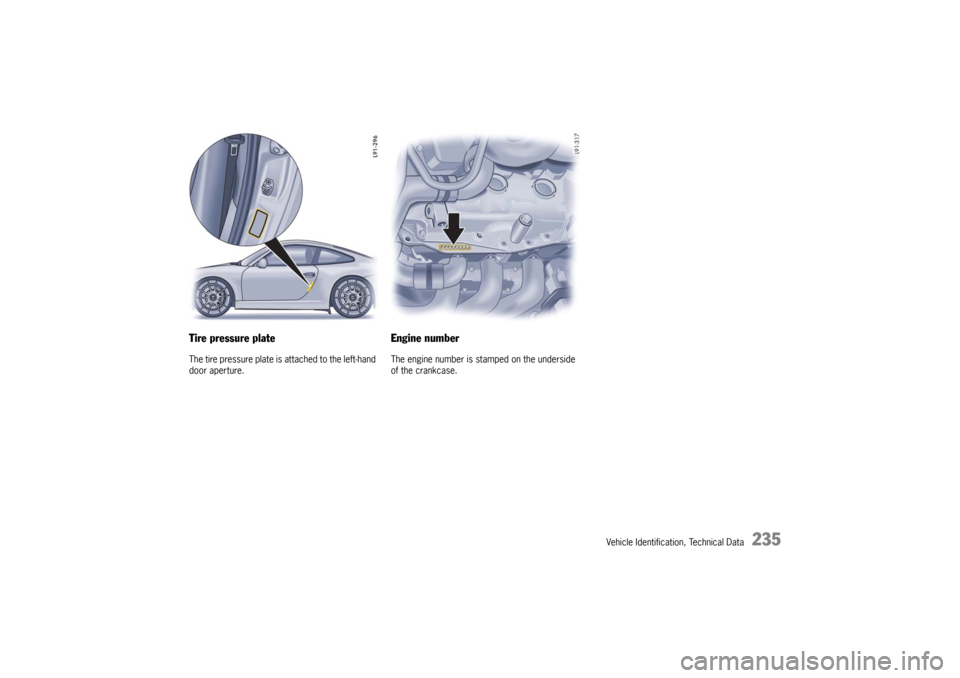
Tire pressure plateThe tire pressure plate is attached to the left-hand
door aperture.
Engine number The engine number is stamped on the underside
of the crankcase.
10_GT3_21.book Seite 235 Donnerstag, 4. Juni 2009 12:48 12