height PORSCHE 911 TURBO 2014 6.G Owners Manual
[x] Cancel search | Manufacturer: PORSCHE, Model Year: 2014, Model line: 911 TURBO, Model: PORSCHE 911 TURBO 2014 6.GPages: 300, PDF Size: 10.61 MB
Page 34 of 300
32 Seats, Mirrors and Steering Wheel
Seat Adjustment and Head
Restraints
Safety belts only offer protection when the backrest is upright and the belts are properly positioned on the body.Improperly positioned safety belts or safety belts worn by passengers in an excessively reclined position can cause serious personal injury or death in an accident.fDo not operate the car with the driver or passenger backrests excessively reclined.fPlease see the chapter “SEAT POSITION” on page 32.
The seat may move further than desired if you adjust it when driving. You could lose control of the vehicle.fDo not adjust seats while the vehicle is in mo-tion.The backrest locks must be engaged at all times while the vehicle is in motion.
If persons or animals are in the movement range of the seat during seat adjustment, parts of the body could get trapped or crushed.fAdjust the seat so that no-one is put a risk.fDo not activate the comfort memory button if there is any risk of the seat crushing the occupant.fCancel automatic adjustment by pressing any of the seat adjustment buttons.
fDo not leave children in the vehicle unattended, since they may depress the setting buttons and crush themselves or another occupant.
Risk of damage to windshield, sun visor, etc. when the seat is adjusted or folded back or forward.fAdjust the seat so that the seat backrest is not in contact with any other object.
The driver and front passenger seats provide integrated head restraints in the backrests. The head restraints are not adjustable. The rear seats do not provide head restraints.
All occupants, including the driver, should not operate a vehicle or sit in a vehicle’s seat until the headrests and backrests are placed in their proper positions so that the risk of neck injuries is minimized in the event of a crash.fAdjust the backrest's inclination such that the headrest is in an upright position.fDriver and passengers should be seated upright and in the center of their seats.
Front Seats
Seat position
A ergonomically correct sitting position is important for safe and fatigue-free driving. We recommend the following procedure for adjusting the driver’s seat to suit individual requirements: 1. Adjust the seat height to give yourself enough headroom and a good overview of the vehicle.2. Adjust the seat in fore-and-aft direction so that your leg is not fully straight and your entire foot is on the pedal when pressing the pedals fully.3. Grip the top half of the steering wheel. Set the backrest angle and the steering wheel position so that your arms are almost outstretched. However, your shoulders must still rest on the backrest.4. Adjust the seat fore-and-aft setting if necessary.
Adjusting the seat
The seat may move further than desired if you attempt to adjust it when driving. You may lose control of the vehicle.fDo not adjust the seat when driving.
If persons or animals are within the range of movement of the seat, they could become trapped or crushed when you adjust the seat.fAdjust the seat so that no-one is put at risk.
Improper Safety Belt Use
Seat Adjustment While Driving
Seat Adjustment
DANGERh
WARNINGh
CAUTIONh
Failure to Adjust Head and Backrests
NOTICE
WARNINGh
Seat Adjustment While Driving
Seat Adjustment
WARNINGh
CAUTIONh
14_991_Turbo_21.book Seite 32 Mittwoch, 9. April 2014 2:19 14
Page 35 of 300
Seats, Mirrors and Steering Wheel 33
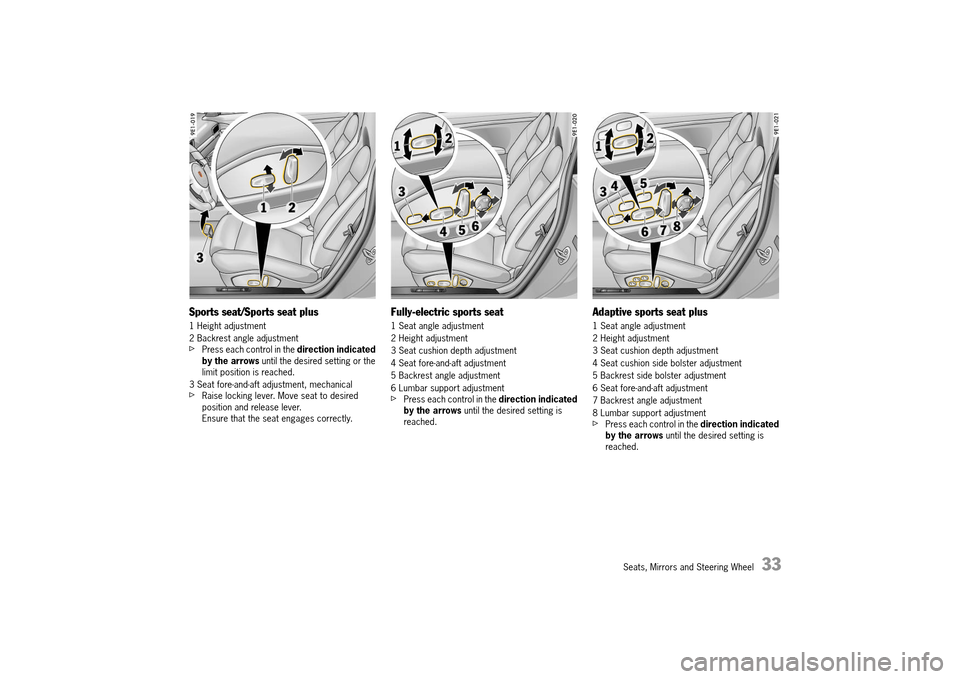
Sports seat/Sports seat plus
1 Height adjustment
2 Backrest angle adjustmentfPress each control in the direction indicated by the arrows until the desired setting or the limit position is reached.
3 Seat fore-and-aft adjustment, mechanicalfRaise locking lever. Move seat to desired position and release lever.Ensure that the seat engages correctly.
Fully-electric sports seat
1 Seat angle adjustment
2 Height adjustment
3 Seat cushion depth adjustment
4 Seat fore-and-aft adjustment
5 Backrest angle adjustment
6 Lumbar support adjustmentfPress each control in the direction indicated by the arrows until the desired setting is reached.
Adaptive sports seat plus
1 Seat angle adjustment
2 Height adjustment
3 Seat cushion depth adjustment
4 Seat cushion side bolster adjustment
5 Backrest side bolster adjustment
6 Seat fore-and-aft adjustment
7 Backrest angle adjustment
8 Lumbar support adjustmentfPress each control in the direction indicated by the arrows until the desired setting is reached.
14_991_Turbo_21.book Seite 33 Mittwoch, 9. April 2014 2:19 14
Page 121 of 300
Instrument Panel and Multi-Function Display 119
Available display contents: –“ Veh. voltage” –“ Oil pressure” –“ Oil temperature” –“ Boost pressure” –“ Coolant temp.” – Coolant temperature –“ Fuel Range” –“ Dst: Arrival” – Arrival time at destination –“ Int.: Arrival” – Arrival time at intermediate destination –“ Dst: Trip time” – Driving time to destination –“ Int.: Trip time” – Driving time to intermediate destination–“ Compass” –“ GPS height” –“ Time” –“ Date”. –“ Station/Track” – Current radio station/ music track–“ Phone info” – Network strength/network name–“ Blank line” – Line remains empty
Information
One item of information cannot be assigned to several areas or one area and the “Upper line”.
Adapting upper status area
You can assign various items of information to the upper status area A in the multi-function display.
Available display contents: –“ Station name” –“ Fuel Range” –“ Compass” –“ Blank line” No information is displayed in the upper status area A.
Displaying PCM information on the multi-function display
You can configure the multi-function display to temporarily display different items of information relating to Porsche Communication Management (PCM).
Available PCM information: –“ Map info” Navigation map appears automatically when navigation information is available.–“ Phone info” Information on incoming and outgoing calls is displayed.–“ Voice control” Help text appears when the voice control button is pressed.–“ Arrow info” Navigation arrow appears automatically when navigation information is available.–“ Speed limit” Speed limits marked on the map in the navigation system are displayed.
1. Main menu “Vehicle” > “ Settings” > “ Display”
2.“Vehicle menu” and confirm.
3. Select “1:” or “ 2:” or “ 3:” or “ 4:” and confirm.
4. Select the desired display contents and confirm.
1. Main menu “Vehicle” > “ Settings” > “ Display”
2.“Upper line” and confirm.
3. Select the desired display contents and confirm.
1. Main menu “Vehicle” > “ Settings” > “ Display”
2.Select “PCM display” and confirm.
3. Select the PCM information in the main menu.
4. Confirm your selection.
Information is displayed.
Information is not displayed.
14_991_Turbo_21.book Seite 119 Mittwoch, 9. April 2014 2:19 14
Page 202 of 300
200 Storage, Luggage Compartment and Roof Transport System
Roof Transport System
A roof transport system can be fitted on the vehicle for transporting various sports and hobby equipment.
Various objects can be transported safely and securely using the roof transport system and additional attachments, e.g. ski rack, bicycle rack, surfboard rack, roof box or snowboard holder.fOnly use roof transport systems that have been tested and approved by Porsche. It is not possible to fit commercially available roof rack systems.
fInstall individual load-carrying devices, such as ski rack or roof box as centrally as possible with respect to the supports.fDo not exceed the permissible roof load, permissible gross weight and permissible axle loads.Details of these weights and loads can be found under “Technical data” in this Owner’s Manual:Please see the chapter “WEIGHTS” on page 288.fDistribute load evenly, with heavy items as low as possible. Items of luggage must not project beyond the side of the load area.fFix and secure every item to the basic carrier with a rope or lashing strap (do not use elastic rubber tensioners).fBefore every trip, and at regular intervals during long trips, check that the Roof Transport System and load are secure. Re-tighten if necessary and secure further by locking. Tighten all fastening screws again.
When the Roof Transport System is loaded, the maximum speeds depends on the nature, size and weight of the load being carried.fDriving, braking and steering behavior change due to the higher center of gravity and the greater wind resistance. You should adapt your driving style accordingly.Nevertheless, Porsche recommends that you do not exceed the posted speed limit.fNever drive faster than 80 mph (130 km/h) when the Roof Transport System is fitted and loaded.fWith the basic carrier fitted and no load, do not exceed a maximum speed of 110 mph (180 km/h).
Washing the vehicle in a car wash or failure to observe the overall vehicle height or the maximum permitted gross weight can damage the vehicle or roof transport system.fRemove the complete roof transport system before washing the vehicle in a car wash.fCheck the overall vehicle height with the roof transport system fitted before driving into multi-storey car parks, garages, underground garages and tunnels.fDo not exceed the permissible roof load, permissible gross weight and permissible axle loads.Details of these weights and loads can be found under “Technical data” in this Owner’s Manual:Please see the chapter “WEIGHTS” on page 288.
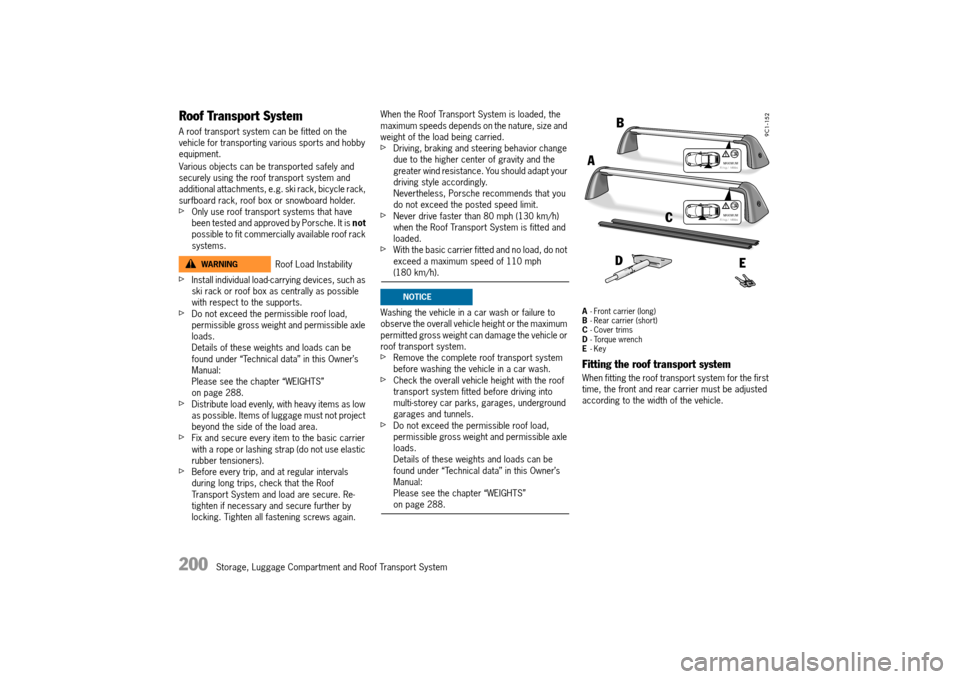
A - Front carrier (long) B - Rear carrier (short) C - Cover trims D - Torque wrench E - Key
Fitting the roof transport system
When fitting the roof transport system for the first time, the front and rear carrier must be adjusted according to the width of the vehicle.
Roof Load InstabilityWARNINGh
NOTICE
14_991_Turbo_21.book Seite 200 Mittwoch, 9. April 2014 2:19 14
Page 222 of 300
220 Maintenance and Car Care
If the vehicle is not secured, or incorrectly secured, during repair work, it could move unexpectedly or fall from the car jack or car lift.fBe alert and cautious around the engine at all times while it is running. If you have to work on the engine while it is running, always apply the electric parking brake and put the PDK selector lever in position P or N.fAlways support your car with safety stands if it is necessary to work under the car. The jack supplied with the car is not adequate for this purpose.Switch off level control of air suspension and height adjustment.Please see the chapter “RAISING THE VEHICLE WITH A LIFTING PLATFORM, TROLLEY JACK OR STANDARD JACK” on page 254.fJack up the vehicle only at the specified jacking points on the underside of the vehicle.fNever start the engine when the vehicle is jacked or lifted up. Vibration from the engine could cause the vehicle to fall.fWhen working under the car without safety stands but with the wheels on the ground, make sure the car is on level ground, the wheels are blocked, and that the engine cannot be started.Withdraw ignition keys (switch ignition off in vehicles that have Porsche Entry & Drive).
Information
fIncomplete or improper servicing may cause problems in the operation of the car. If in doubt about any servicing, have it done by your authorized Porsche dealer.Improper maintenance during the warranty period may affect your Porsche warranty coverage.fSome countries require additional tools and special spare parts to be carried in your vehicle. Please make enquiries before driving abroad.
Technical Modifications
fModifications may be carried out on your vehicle only if approved by Porsche.This ensures that your Porsche will remain reliable and safe to drive, and that it will not be damaged as a result of the modifications.Your authorized Porsche dealer will be pleased to advise you.
Information
fOnly use genuine Porsche spare parts for your vehicle or spare parts of similar quality which have been manufactured according to the specifications and production requirements of Porsche. These parts are available from your authorized Porsche dealer. Safety-related accessories should only be used if they are from the Porsche Tequipment range or are tested and approved by Porsche. Your authorized Porsche dealer will be pleased to advise you and answer any questions you may have.However, the use of other parts or accessories may adversely affect the safety of your vehicle, and Porsche can take no responsibility for any loss or damage caused by their use.Even if the supplier of other accessories or parts is a recognized supplier, the safety of your vehicle may still be affected if such items are installed.Due to the large variety of products offered in the accessory market, it is not possible for Porsche to inspect and approve every one.fIn addition, please note that the use of replacement parts that are not genuine Porsche parts or approved parts, or the use of accessories not approved by Porsche may also detrimentally affect your vehicle warranty.fCheck your vehicle regularly for signs of damage. Damaged or missing aerodynamic components, such as spoilers or underbody panels, impair vehicle handling and must therefore be replaced immediately.
Failure to Secure VehicleWARNINGh
14_991_Turbo_21.book Seite 220 Mittwoch, 9. April 2014 2:19 14
Page 235 of 300

Maintenance and Car Care 233
Cleaning in car washes
Optional add-on parts or parts that project beyond the contours of the vehicle may be damaged by design features of car washes.
The following parts are particularly at risk: – Convertible top (hot wax treatment must not be used, as the wax attacks the convertible top material),– Windshield wipers and rear wiper (always switch them off – wiper stalk in position 0 – to prevent them wiping unintentionally in intermittent or sensor operation).– Exterior mirrors (always fold in).– External antenna (always unscrew).– Roof transport system (always remove completely).– Spoilers.– Wheels (the wider the rim and the lower the tire height, the greater the risk of damage).– High-gloss or silk-gloss wheels (to prevent these from getting scratched, do not clean with the wheel-cleaning brushes of the car wash). fPlease consult the operator before using automatic car washes.fAll parts not reached by a car wash, such as door and lid seams or door sills, must be washed and polished by hand.
Information
Automatic car washes spray water at odd angles and high pressures, which are not seen in normal driving. Therefore, water can sometimes find its way into the passengers compartment during or shortly after the car wash.
Convertible top
The service life and appearance of the convertible top depend largely on expert care and operation.
Incorrect care and operation can damage the convertible top or cause it to leak.
Never remove snow and ice with sharp-edged objects.
Cleaning the convertible top
Risk of damage to the convertible top due to the cleaning jet of the high-pressure cleaning equipment or hot wax treatment. fDo not clean the convertible top with high-pressure cleaning equipment. fDo not use hot wax treatment.
Do not wash the convertible top every time you wash the vehicle.
Normally, rinsing the convertible top with clean water is sufficient.fBrush dust off the convertible top in the direction of the weave using a soft brush. fOnly in the case of heavy soiling, wet the convertible top with lukewarm water and a wash-shampoo & convertible-top cleaner and rub gently using a sponge or soft brush.Rinse off wash-shampoo & convertible-top cleaner thoroughly from the convertible top with clean water.We recommend Porsche wash-shampoo.fAfter washing, treat the convertible top at least once a year with a convertible-top care product.Do not allow the convertible-top care product to come into contact with paint or glass. If it does, remove immediately.
fIn the case of leakage in the convertible-top covering or at its seams and folds, use a convertible-top care product.fPlease observe the information on the containers.We recommend Porsche convertible-top care product.fRemove bird excrement immediately. The acid this contains makes the rubber swell and the convertible top will leak.fOpen the convertible top only when completely dry, otherwise damp stains and abrasion marks may occur which cannot be removed.fAttempt to remove spots from the convertible-top covering by rubbing carefully with a soft rubber sponge.
NOTICE
14_991_Turbo_21.book Seite 233 Mittwoch, 9. April 2014 2:19 14
Page 243 of 300
Minor Repairs 241
If the vehicle is not secured, or incorrectly secured, during repair work, it could move unexpectedly or fall from the car jack or car lift.fBe alert and cautious around the engine at all times while it is running. If you have to work on the engine while it is running, always apply the electric parking brake and put the PDK selector lever in position P or N.fAlways support your car with safety stands if it is necessary to work under the car. The jack supplied with the car is not adequate for this purpose.Switch off level control of air suspension and height adjustment.Please see the chapter “RAISING THE VEHICLE WITH A LIFTING PLATFORM, TROLLEY JACK OR STANDARD JACK” on page 254.fJack up the vehicle only at the specified jacking points on the underside of the vehicle.fNever start the engine when the vehicle is jacked or lifted up. Vibration from the engine could cause the vehicle to fall.fWhen working under the car without safety stands but with the wheels on the ground, make sure the car is on level ground, the wheels are blocked, and that the engine cannot be started.Withdraw ignition keys (switch ignition off in vehicles that have Porsche Entry & Drive).
Information
fIncomplete or improper servicing may cause problems in the operation of the car. If in doubt about any servicing, have it done by your authorized Porsche dealer.Improper maintenance during the warranty period may affect your Porsche warranty coverage.fSome countries require additional tools and special spare parts to be carried in your vehicle. Please make enquiries before driving abroad.
T
The engine-compartment blowers are mounted under the engine compartment lid.After the engine is switched off, the engine compartment temperature is monitored for approx. 30 minutes.During this period, and depending on temperature, the engine-compartment blowers may continue to run or start to run.fCarry out work in this area only with the engine off and exercise extreme caution.
The radiators and radiator fans are in the front of the vehicle.The radiator fans in the front of the vehicle may be operating or unexpectedly start operating when the engine is switched on.fCarry out work in these areas only with the engine switched off.fTake great care to ensure that parts of the body, items of clothing or jewelery cannot be drawn in by the radiator fan, engine-compartment blower, drive belt or other moving parts.
Measurements on test stands
Performance test
Performance tests on roller-type test stands are not approved by Porsche.
Brake tests
Brake tests must be performed only on roller-type test stands.
The following limit values must not be exceeded on roller-type test stands: – Test speed 4.7 mph (7.5 km/h)– Test duration 20 seconds
Testing the electric parking brake
Electric parking brake tests on the brake test stand must only be performed with the ignition switched on and the Porsche Doppelkupplung selector lever in position N. The vehicle switches automatically to brake test stand mode, in which the electric parking brake can be tested.The message “ Electric parking brake in service mode ” appears on the multi-function display in the instrument panel.
Balancing wheels on the vehicle
During finish balancing of the wheels, the entire vehicle must be lifted and the wheels must be free to turn.
Information
The tools required for changing a wheel (e.g. jack, wheel bolt wrench, assembly aids) are not supplied as standard with the vehicle. Your authorized Porsche dealer will be pleased to advise you.
Failure to Secure VehicleWARNINGh
Radiator Fans, Engine Compartment Blowers
WARNINGh
14_991_Turbo_21.book Seite 241 Mittwoch, 9. April 2014 2:19 14
Page 254 of 300
252 Minor Repairs
Fitting snow chains
fBefore fitting chains, remove accumulated ice and snow from the wheel well.fVehicles with snow chains must not be driven faster than 30 mph (50 km/h).
Different states and countries have varying statutory requirements regarding maximum speed.fCheck with local authorities for possible restrictions.fRemove chains as soon as the roads are free of ice and snow.
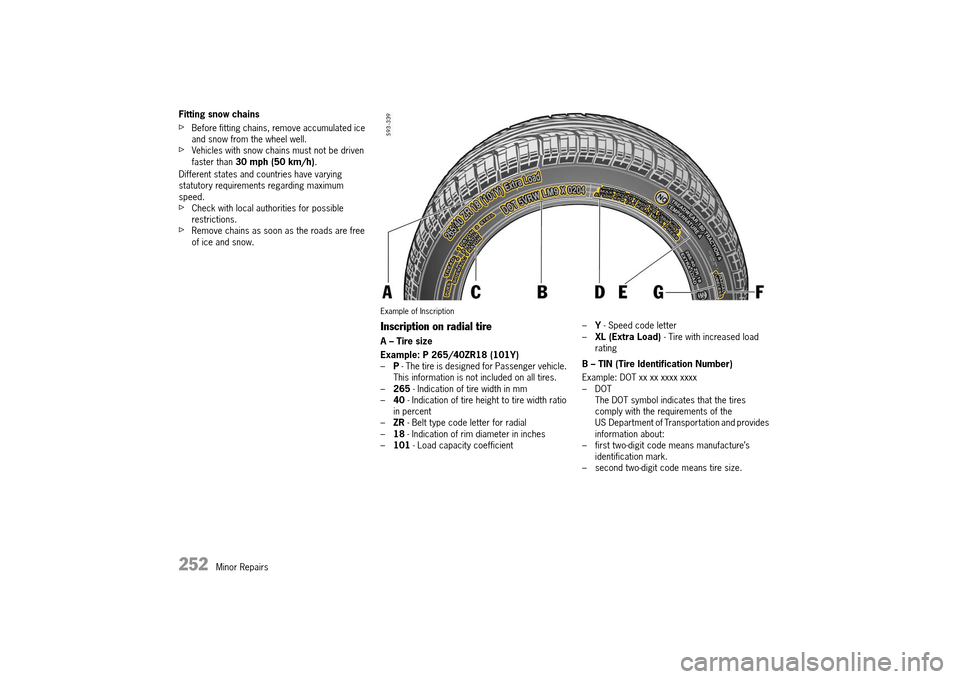
Example of Inscription
Inscription on radial tire
A – Tire size
Example: P 265/40ZR18 (101Y) – P - The tire is designed for Passenger vehicle. This information is not included on all tires.– 265 - Indication of tire width in mm – 40 - Indication of tire height to tire width ratio in percent– ZR - Belt type code letter for radial – 18 - Indication of rim diameter in inches – 101 - Load capacity coefficient
– Y - Speed code letter – XL (Extra Load) - Tire with increased load rating
B – TIN (Tire Identification Number)
Example: DOT xx xx xxxx xxxx – DOTThe DOT symbol indicates that the tires comply with the requirements of the US Department of Transportation and provides information about:– first two-digit code means manufacture’s identification mark.– second two-digit code means tire size.
14_991_Turbo_21.book Seite 252 Mittwoch, 9. April 2014 2:19 14
Page 280 of 300
278 Minor Repairs
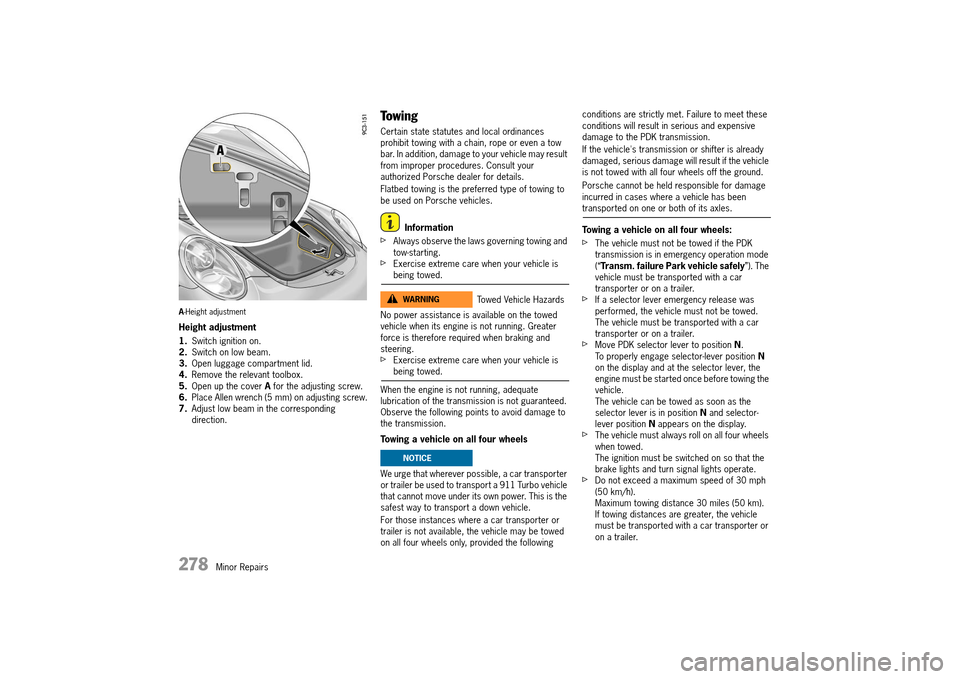
A-Height adjustment
Height adjustment
1. Switch ignition on. 2. Switch on low beam. 3. Open luggage compartment lid. 4. Remove the relevant toolbox. 5. Open up the cover A for the adjusting screw. 6. Place Allen wrench (5 mm) on adjusting screw. 7. Adjust low beam in the corresponding direction.
Towing
Certain state statutes and local ordinances prohibit towing with a chain, rope or even a tow bar. In addition, damage to your vehicle may result from improper procedures. Consult your authorized Porsche dealer for details.
Flatbed towing is the preferred type of towing to be used on Porsche vehicles.
Information
fAlways observe the laws governing towing and tow-starting.fExercise extreme care when your vehicle is being towed.
No power assistance is available on the towed vehicle when its engine is not running. Greater force is therefore required when braking and steering.fExercise extreme care when your vehicle is being towed.
When the engine is not running, adequate lubrication of the transmission is not guaranteed. Observe the following points to avoid damage to the transmission.
Towing a vehicle on all four wheels
We urge that wherever possible, a car transporter or trailer be used to transport a 911 Turbo vehicle that cannot move under its own power. This is the safest way to transport a down vehicle.
For those instances where a car transporter or trailer is not available, the vehicle may be towed on all four wheels only, provided the following
conditions are strictly met. Failure to meet these conditions will result in serious and expensive damage to the PDK transmission.
If the vehicle's transmission or shifter is already damaged, serious damage will result if the vehicle is not towed with all four wheels off the ground.
Porsche cannot be held responsible for damage incurred in cases where a vehicle has been transported on one or both of its axles.
Towing a vehicle on all four wheels:
fThe vehicle must not be towed if the PDK transmission is in emergency operation mode (“ Transm. failure Park vehicle safely”). The vehicle must be transported with a car transporter or on a trailer.fIf a selector lever emergency release was performed, the vehicle must not be towed. The vehicle must be transported with a car transporter or on a trailer.fMove PDK selector lever to position N. To properly engage selector-lever position N on the display and at the selector lever, the engine must be started once before towing the vehicle. The vehicle can be towed as soon as the selector lever is in position N and selector- lever position N appears on the display.fThe vehicle must always roll on all four wheels when towed.The ignition must be switched on so that the brake lights and turn signal lights operate.fDo not exceed a maximum speed of 30 mph (50 km/h).Maximum towing distance 30 miles (50 km).If towing distances are greater, the vehicle must be transported with a car transporter or on a trailer.
Towed Vehicle HazardsWARNINGh
NOTICE
14_991_Turbo_21.book Seite 278 Mittwoch, 9. April 2014 2:19 14
Page 290 of 300
288 Tire Pressure and Technical Data
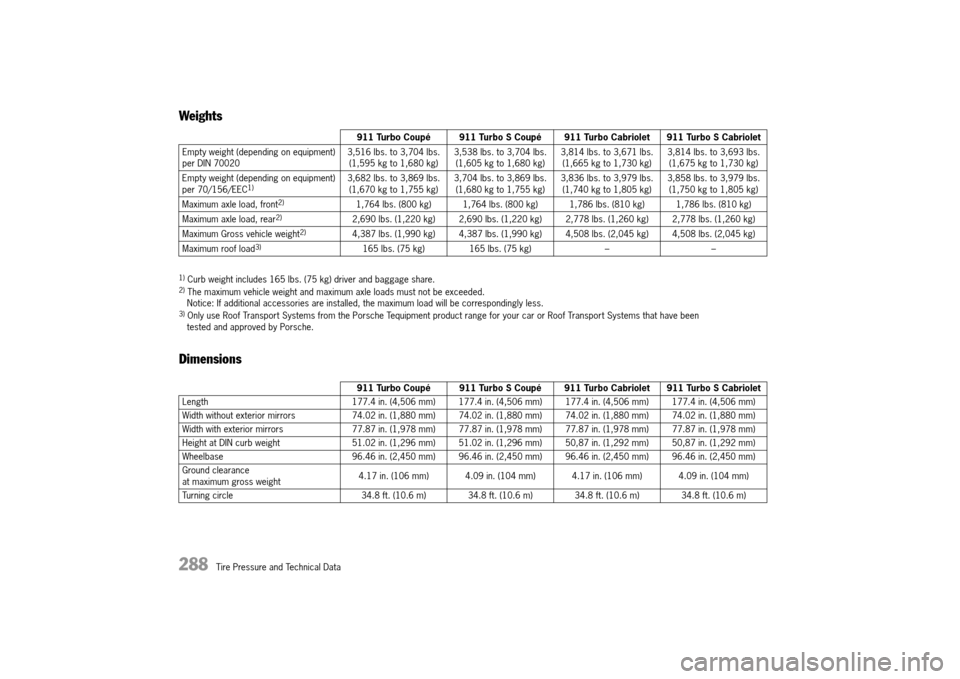
Weights
1) Curb weight includes 165 lbs. (75 kg) driver and baggage share.2) The maximum vehicle weight and maximum axle loads must not be exceeded.Notice: If additional accessories are installed, the maximum load will be correspondingly less.3) Only use Roof Transport Systems from the Porsche Tequipment product range for your car or Roof Transport Systems that have been tested and approved by Porsche.
Dimensions
911 Turbo Coupé 911 Turbo S Coupé 911 Turbo Cabriolet 911 Turbo S Cabriolet
Empty weight (depending on equipment) per DIN 700203,516 lbs. to 3,704 lbs.(1,595 kg to 1,680 kg)3,538 lbs. to 3,704 lbs.(1,605 kg to 1,680 kg)3,814 lbs. to 3,671 lbs.(1,665 kg to 1,730 kg)3,814 lbs. to 3,693 lbs.(1,675 kg to 1,730 kg)
Empty weight (depending on equipment)per 70/156/EEC1)3,682 lbs. to 3,869 lbs.(1,670 kg to 1,755 kg)3,704 lbs. to 3,869 lbs.(1,680 kg to 1,755 kg)3,836 lbs. to 3,979 lbs.(1,740 kg to 1,805 kg)3,858 lbs. to 3,979 lbs.(1,750 kg to 1,805 kg)
Maximum axle load, front2)1,764 lbs. (800 kg) 1,764 lbs. (800 kg) 1,786 lbs. (810 kg) 1,786 lbs. (810 kg)
Maximum axle load, rear2)2,690 lbs. (1,220 kg) 2,690 lbs. (1,220 kg) 2,778 lbs. (1,260 kg) 2,778 lbs. (1,260 kg)
Maximum Gross vehicle weight2)4,387 lbs. (1,990 kg) 4,387 lbs. (1,990 kg) 4,508 lbs. (2,045 kg) 4,508 lbs. (2,045 kg)
Maximum roof load3)165 lbs. (75 kg) 165 lbs. (75 kg)––
911 Turbo Coupé 911 Turbo S Coupé 911 Turbo Cabriolet 911 Turbo S Cabriolet
Length 177.4 in. (4,506 mm) 177.4 in. (4,506 mm) 177.4 in. (4,506 mm) 177.4 in. (4,506 mm)
Width without exterior mirrors 74.02 in. (1,880 mm) 74.02 in. (1,880 mm) 74.02 in. (1,880 mm) 74.02 in. (1,880 mm)
Width with exterior mirrors 77.87 in. (1,978 mm) 77.87 in. (1,978 mm) 77.87 in. (1,978 mm) 77.87 in. (1,978 mm)
Height at DIN curb weight 51.02 in. (1,296 mm) 51.02 in. (1,296 mm) 50,87 in. (1,292 mm) 50,87 in. (1,292 mm)
Wheelbase 96.46 in. (2,450 mm) 96.46 in. (2,450 mm) 96.46 in. (2,450 mm) 96.46 in. (2,450 mm)
Ground clearance at maximum gross weight4.17 in. (106 mm) 4.09 in. (104 mm) 4.17 in. (106 mm) 4.09 in. (104 mm)
Turning circle 34.8 ft. (10.6 m) 34.8 ft. (10.6 m) 34.8 ft. (10.6 m) 34.8 ft. (10.6 m)
Reifendruck_TechnischeDaten.fm Seite 288 Mittwoch, 9. April 2014 3:12 15