fuel PORSCHE 944 1987 1.G User Guide
[x] Cancel search | Manufacturer: PORSCHE, Model Year: 1987, Model line: 944, Model: PORSCHE 944 1987 1.GPages: 66, PDF Size: 3.3 MB
Page 27 of 66
WARNING
Never carry additional fuel in portable containers in your car. Such containers,
full or partially empty, may leak, cause an
explosion, or result in fire in case of a
collision.
Porsche does not recommend the use of
fuel additives.
Do not use any fuel with octane ratings
lower than 91 RON or 87 CLC or AKI,
944S/944 Turbo 95 RON or 90 CLC or AKI.
Gasolines containing alcohol
Gasoline containing alcohol is available at gas
stations in some areas. The gas pump may not
be labeled to identify that alcohol is present in
the gasoline. If it is labeled, it may not identify
what amount and type(s) of alcohol
are used. We recommend you DO NOT use
fuels where the alcohol content cannot be
identified.
Gasolines containing methanol
DO NOT
use fuels containing methanol (methyl alcohol, wood alcohol). The use of fuel
containing this type of alcohol can result in
vehicle drivability and performance problems
and may damage critical parts of your vehicle's
fuel and emission control systems.
Gasolines containing ethanol
A mixture of unleaded gasoline and ethanol (ethyl alcohol, grain alcohol) is sold in some
areas. This mixture is sometimes called
"Gasohol".
You may use gasohol in your
Porsche, provided it contains no more than
10% ethanol, and the octane requirements for
your vehicle are met. However, we strongly
recommend to switch back to gasoline without
ethanol, if you experience any of the following
problems with your vehicle:
Deterioration of drivability and performance.
Substantially reduced fuel economy. Vapor lock and non-start problems, especially
at high altitude or at high temperatures.
Engine malfunction or stalling.
Continued use of gasohol under these
conditions may cause costly damage to the fuel system and the emission control system of your vehicle.
51
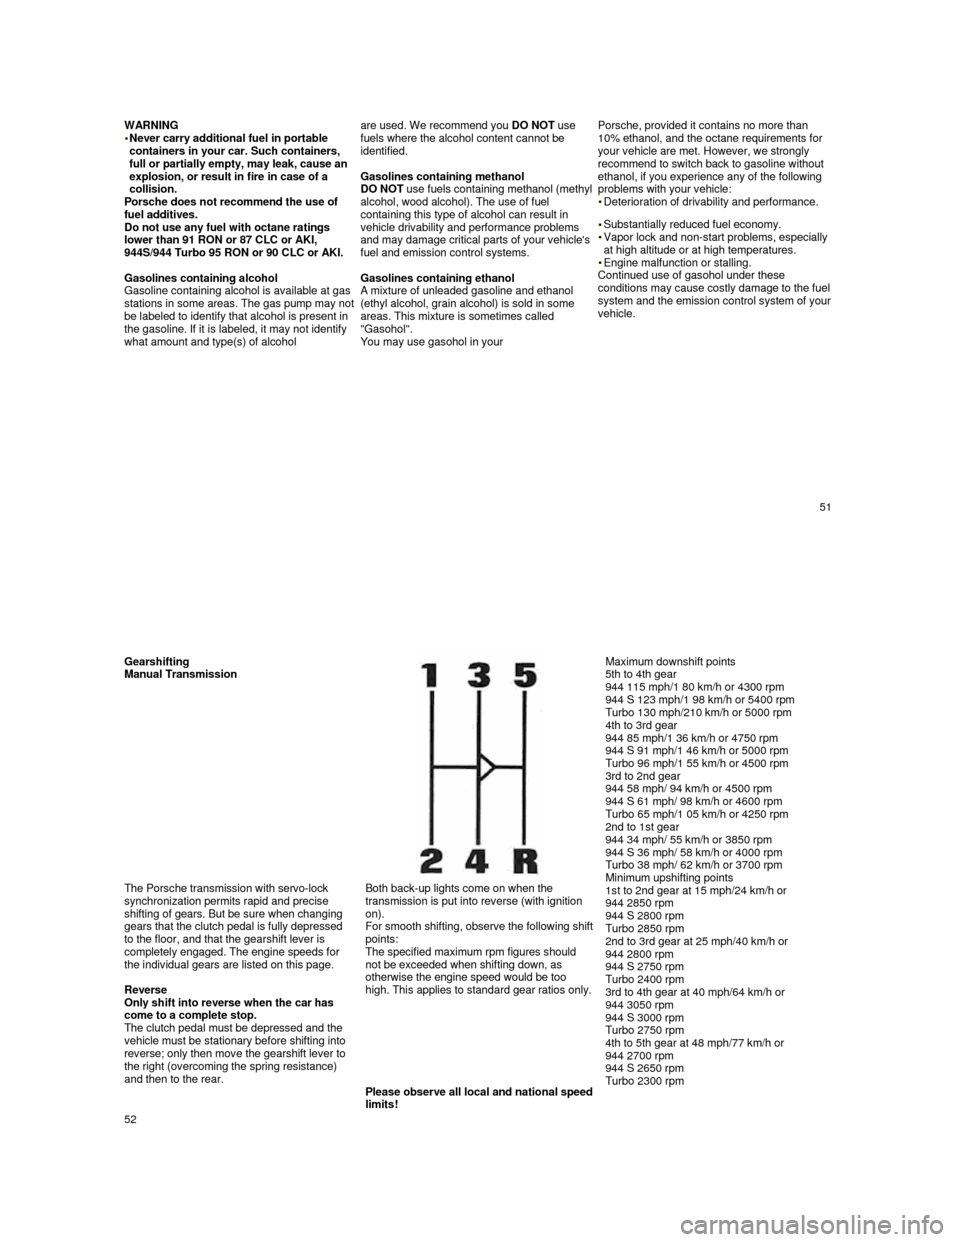
Gearshifting Manual Transmission
Maximum downshift points
5th to 4th gear
944 115 mph/1 80 km/h or 4300 rpm
944 S 123 mph/1 98 km/h or 5400 rpm
Turbo 130 mph/210 km/h or 5000 rpm
4th to 3rd gear
944 85 mph/1 36 km/h or 4750 rpm
944 S 91 mph/1 46 km/h or 5000 rpm
Turbo 96 mph/1 55 km/h or 4500 rpm
3rd to 2nd gear
944 58 mph/ 94 km/h or 4500 rpm
944 S 61 mph/ 98 km/h or 4600 rpm
Turbo 65 mph/1 05 km/h or 4250 rpm
2nd to 1st gear
944 34 mph/ 55 km/h or 3850 rpm
944 S 36 mph/ 58 km/h or 4000 rpm
Turbo 38 mph/ 62 km/h or 3700 rpm
Minimum upshifting points
1st to 2nd gear at 15 mph/24 km/h or
944 2850 rpm
944 S 2800 rpm
Turbo 2850 rpm
2nd to 3rd gear at 25 mph/40 km/h or
944 2800 rpm
944 S 2750 rpm
Turbo 2400 rpm
3rd to 4th gear at 40 mph/64 km/h or
944 3050 rpm
944 S 3000 rpm
Turbo 2750 rpm
4th to 5th gear at 48 mph/77 km/h or
944 2700 rpm
944 S 2650 rpm
Turbo 2300 rpm
The Porsche transmission with servo-lock
synchronization permits rapid and precise
shifting of gears. But be sure when changing
gears that the clutch pedal is fully depressed
to the floor, and that the gearshift lever is
completely engaged. The engine speeds for
the individual gears are listed on this page.
Reverse
Only shift into reverse when the car has
come to a complete stop.
The clutch pedal must be depressed and the
vehicle must be stationary before shifting into
reverse; only then move the gearshift lever to
the right (overcoming the spring resistance)
and then to the rear. Both back-up lights come on when the
transmission is put into reverse (with ignition
on).
For smooth shifting, observe the following shift points:
The specified maximum rpm figures should
not be exceeded when shifting down, as
otherwise the engine speed would be too
high. This applies to standard gear ratios only.
Please observe all local and national speed limits!
52
Page 29 of 66
Neutral
Shift to this position for standing with brakes
applied.
Never use Neutral for coasting downhill.
You may lose control over the car because of reduced braking and cause serious damage to the transmission when a driving range has to be selected. CAUTION: While driving with the automatic speed control set (at speeds above 25 mph or 40 km/h), do not bring shift lever into
the Neutral position as excessive engine
rpm and severe engine damage may result.
Maneuvering
When alternating between forward (D) and
reverse (R) (for instance, while maneuvering
the car into a tight parking space), only shift
into Reverse or Drive
when the car has come to a full stop and the engine is running at idle
speed.
Stuck in snow, mud or sand
When alternating between Drive and
Reverse in an effort to free the vehicle,
depress the accelerator pedal lightly while the
transmission is in gear, and release the
accelerator pedal while shifting. Do not race
the engine and avoid spinning the wheels.
Do not repeat "rocking" back and forth
with wheels spinning at high engine speed
and heavy throttle, as serious damage may be caused to the automatic transmission
and other critical parts.
If you cannot free the vehicle after a few
"rocking" attempts, call for help or a tow truck.
Accelerator Pedal
For good fuel economy we recommend
smooth and even acceleration. Very fast, racy
driving, alternating between full throttle and
hard braking, raises the fuel consumption
considerably. Also, tires and brake linings
wear faster. It is more economical to drive smoothly and at a fairly constant speed.
Accelerator "Kickdown"
When depressing the accelerator pedal you
will find resistance near the full throttle position. By applying greater pressure the
pedal can be pushed beyond this point to the
kick-down position. The transmission will now
shift automatically into the next lower gear to
give you maximum acceleration, and only shift up again after the engine has reached
maximum speed in that particular gear.
WARNING
Be careful when using the kickdown on
slippery roads. Rapid acceleration may
cause skidding.
Please observe the following when applying
the accelerator kickdown:
With the selector lever in D, you can apply the kickdown to make the transmission shift down into second gear when driving below 88 mph
or 140 km/h and down to first gear when
driving below 47 mph or 75 km/h.
With the selector lever in "2", you can apply
the kickdown to make the transmission shift
down into first gear when driving below 47
mph or 75 km/h.
As soon as you release the pedal from the kickdown position the next higher gear is
automatically engaged.
Please observe all local and national speed limits.
55
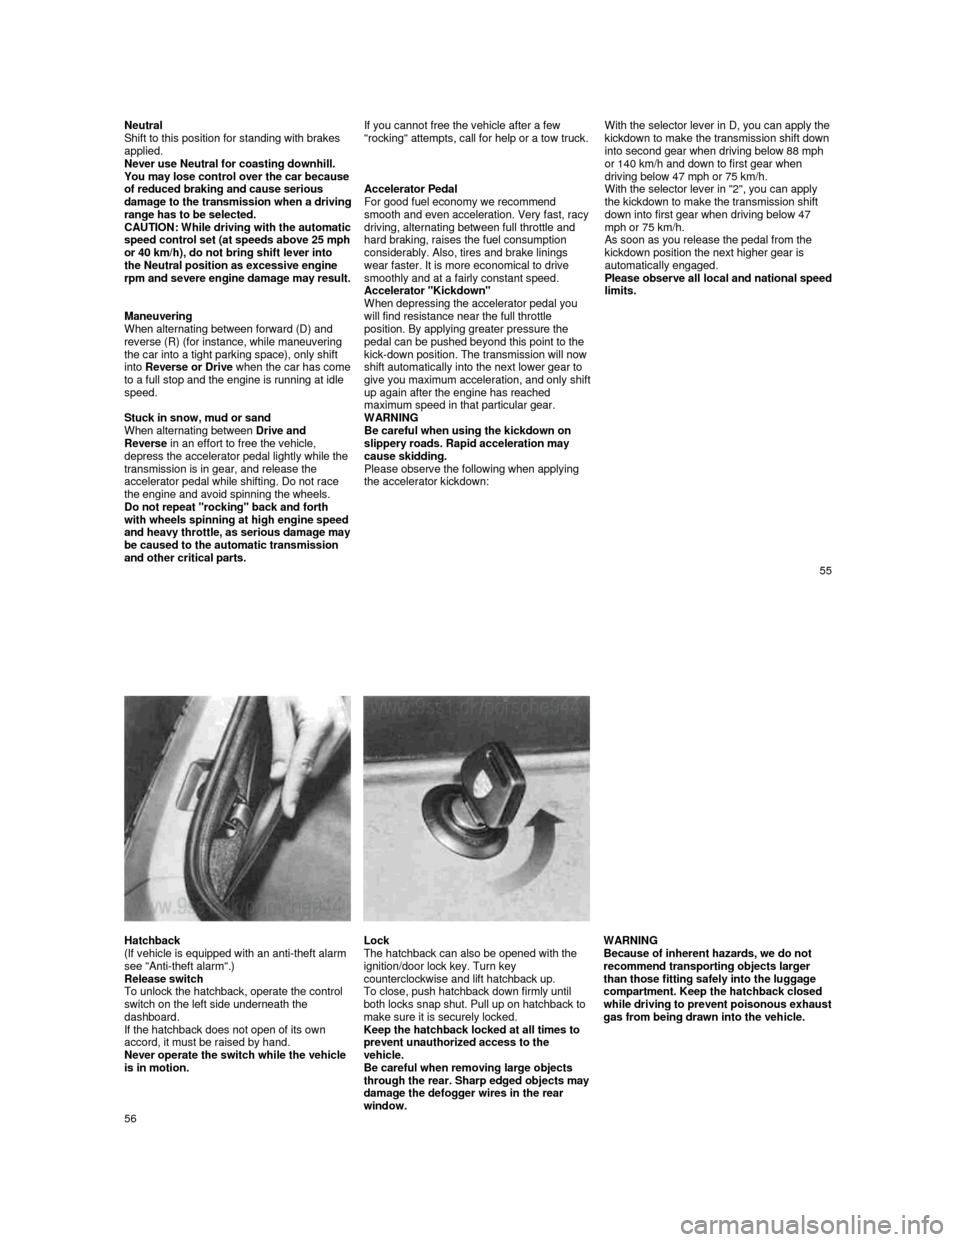
Hatchback
(If vehicle is equipped with an anti-theft alarm
see "Anti-theft alarm".)
Release switch
To unlock the hatchback, operate the control
switch on the left side underneath the
dashboard.
If the hatchback does not open of its own
accord, it must be raised by hand.
Never operate the switch while the vehicle
is in motion. Lock
The hatchback can also be opened with the
ignition/door lock key. Turn key
counterclockwise and lift hatchback up.
To close, push hatchback down firmly until
both locks snap shut. Pull up on hatchback to
make sure it is securely locked.
Keep the hatchback locked at all times to
prevent unauthorized access to the
vehicle.
Be careful when removing large objects
through th
e rear. Sharp edged objects may damage the defogger wires in the rear
window.
WARNING
Because of inherent hazards, we do not
recommend transporting objects larger
than those fitting safely into the luggage
compartment. Keep the hatchback closed
while dr
iving to prevent poisonous exhaust gas from being drawn into the vehicle.
56
Page 36 of 66
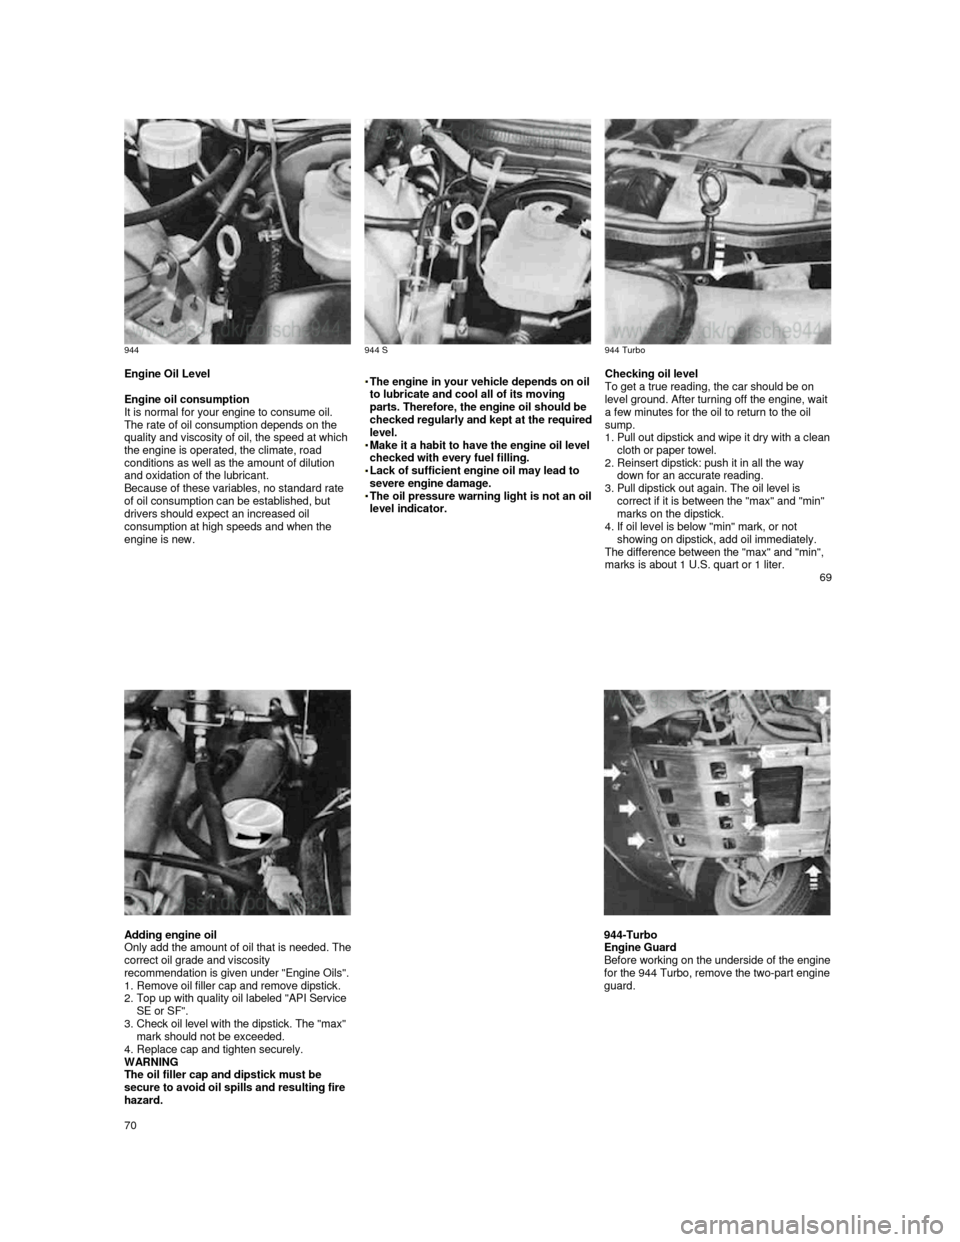
944
944 S
944 Turbo Engine Oil Level
Engine oil consumption
It is normal for your engine to consume oil.
The rate of oil consumption depends on the
quality and viscosity of oil, the speed at which
the engine is operated, the climate, road
conditions as well as the amount of dilution
and oxidation of the lubricant.
Because of these variables, no standard rate
of oil consumption can be established, but
drivers should expect an increased oil
consumption at high speeds and when the
engine is new.
The engine in your vehicle depends on oil to lubricate and cool all of its moving
parts. Therefore, the engine oil should be
checked regularly and kept at the required level.
Make it a habit to have the engine oil level checked with every fuel filling. Lack of sufficient engine oil may lead to severe engine damage. The oil pressure warning light is not an oil level indicator.
Checking oil level
To get a true reading, the car should be on
level ground. After turning off the engine, wait
a few minutes for the oil to return to the oil
sump.
1. Pull out dipstick and wip
e it dry with a clean cloth or paper towel.
2. Reinsert dipstick: push it in all the way
down for an accurate reading.
3.
Pull dipstick out again. The oil level is
correct if it is between the "max" and "min"
marks on the dipstick.
4.
If oil level is below "min" mark, or not
showing on dipstick, add oil immediately.
The difference between the "max" and "min",
marks is about 1 U.S. quart or 1 liter. 69
Adding engine oil Only add the amount of oil that is needed. The correct oil grade and viscosity
recommendation is given under "Engine Oils". 1. Remove oil filler cap and remove dipstick.
2. Top up with quality oil labeled "API Service
SE or SF".
3.
Check oil level with the dipstick. The "max"
mark should not be exceeded.
4.
Replace cap and tighten securely.
WARNING
The oil filler cap and dipstick must be
secure to avoid oil spills and resulting fire
hazard.
944-Turbo
Engine Guard
Before working on the underside of the engine for the 944 Turbo, remove the two-part engine guard.
70
Page 43 of 66
may not always be due to improper wheel
alignment. It can be the result of individual
driving habits such as cornering at high
speeds. If the tire pressure is not checked and adjusted regularly, abnormal tire wear can
also occur.
Tire care
WARNING
Avoid damaging tires and wheel rims. If you must drive over a curb or other obstacle,
drive slowly and at an obtuse angle.
Frequently check tires for uneven wear and
damage.
Remove imbedded material. Replace worn or damaged tires immediately. Replace missing valve dust caps. Keep oil, fuel, brake fluid, etc. away from
tires.
Keep tires inflated correctly.
Tire replacement
In the interest of maximum safety and best
all-around car handling, always buy
replacement tires that have the same
specifications with regard to tire size,
design, load carrying capacity, tread
pattern, tread depth etc. This also applies
to Porsche recommended alternate
replacement tires. If you do not use a
Porsche recommended replacement tire,
make sure that you purchase your new
tires from a reputable
tire specially dealer and that the dealer complies with all manufacturers warnings
for those tires.
In case of tire damage where it is uncertain
whether there is a break in the ply with all its consequences or, tire damage caused by
thermal or mechanical overloading due to a
loss of pressure or any other prior damage,
we recommend that the tire be replaced for safety reasons.
If one faulty tire on an axle is replaced it
should be noted that the difference in tread
depth on one axle must not be more than
30%.
Tire specifications are imprinted on the
sidewall of the tires. If in doubt, check with
your Porsche dealer.
When replacing tubeless tires, always install
new valve stems. When replacing tires
requiring an inner tube, always install new
tubes.
New tires do not possess maximum
traction. They tend to be slippery. Break
new tires in by driving at moderate speed
for the first 60-120 miles or 100-200
kilometers.
Wheel balancing
A wheel should always be balanced after a tire repair. Even with regular use a wheel can
get out of balance, and should therefore be
balanced from time to time. Unbalanced
wheels may affect car handling and tire life.
When balancing light alloy wheels, use only
adhesive balancing weights supplied through
the Porsche parts service.
Wheels
If you intend to use other than original
equipment wheels, be sure that they conform
to Porsche specifications for your model.
Check with your Porsche dealer regarding the
correct wheel specifications for type and
model year.
Removing and storing tires
The driving direction should be clearly marked on all tires before removing them for storage,
to make sure they are mounted and run in the
same direction as before. Store tires in a cool
and dry place. Tires without rims upright!
Avoid contact with oil, grease or gasoline. When remounting, put tires with the most
tread depth at the front.
Snow tires
For a better grip on snow and ice use radial M + S tires or snow tires with studs. Check with
your local Motor Vehicle Bureau for possible
restrictions.
Radial ply M+S tires should be inflated with
the same cold tire inflation pressures required
for the regular radial ply tires. However, do not exceed the maximum tire inflation pressure
listed on the tire sidewall.
Snow tires should have the same load
capacity as original equipment tires and
should be mounted on all four wheels. Snow
tires with studs should be run at moderate
speeds when new in order to give the studs
time to settle.
83
WARNING
Tires with badly worn treads and studs are
very dangerous. Make sure they are replaced
immediately.
Do not drive a vehicle equipped with snow
tires at prolonged high speed. Snow tires do
not have the same degree of traction on dry,
wet or snow free roads as a normal tire. Furthermore, snow tires wear rapidly under
these conditions.
Snow tires do not fulfill their purpose if the
tread depth is less than 5/32 in. / 4 mm.
Comply with all state and local laws
governing snow tire and tread depth
requirements.
Snow chains Should snow chains be necessary, they
must be mounted on the drive wheels
only.
Check with local authorities for possible
restrictions.
Use only Porsche-approved snow chains with
fine pitch links, so that enough
space remains between the chains and the inside of the wheel arches.
Drive wheels must rotate freely with chains
mounted to prevent damage to body, axle or
brake components. Follow instructions issued
by the supplier of the chains. Remove chains
as soon as roads are free of ice and snow.
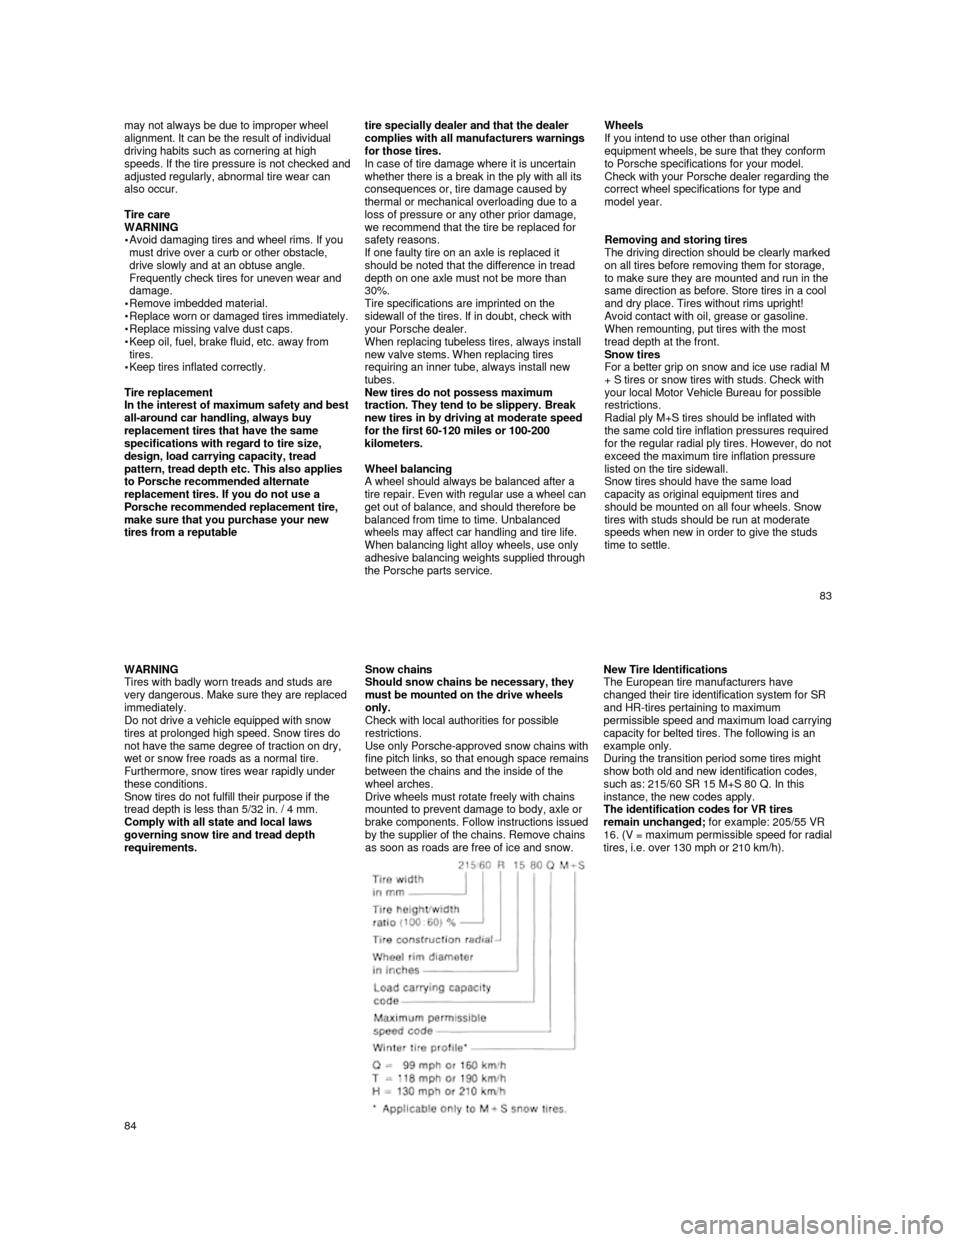
New Tire Identifications
The European tire manufacturers have
changed their tire identification system for SR
and HR-tires pertaining to maximum
permissible speed and maximum load carrying capacity for belted tires. The following is an
example only.
During the transition period some tires might
show both old and new identification codes,
such as: 215/60 SR 15 M+S 80 Q. In this
instance, the new codes apply.
The identification codes for VR tires
remain unchanged; for example: 205/55 VR
16. (V = maximum permissible speed for radial tires, i.e. over 130 mph or 210 km/h).
84
Page 45 of 66
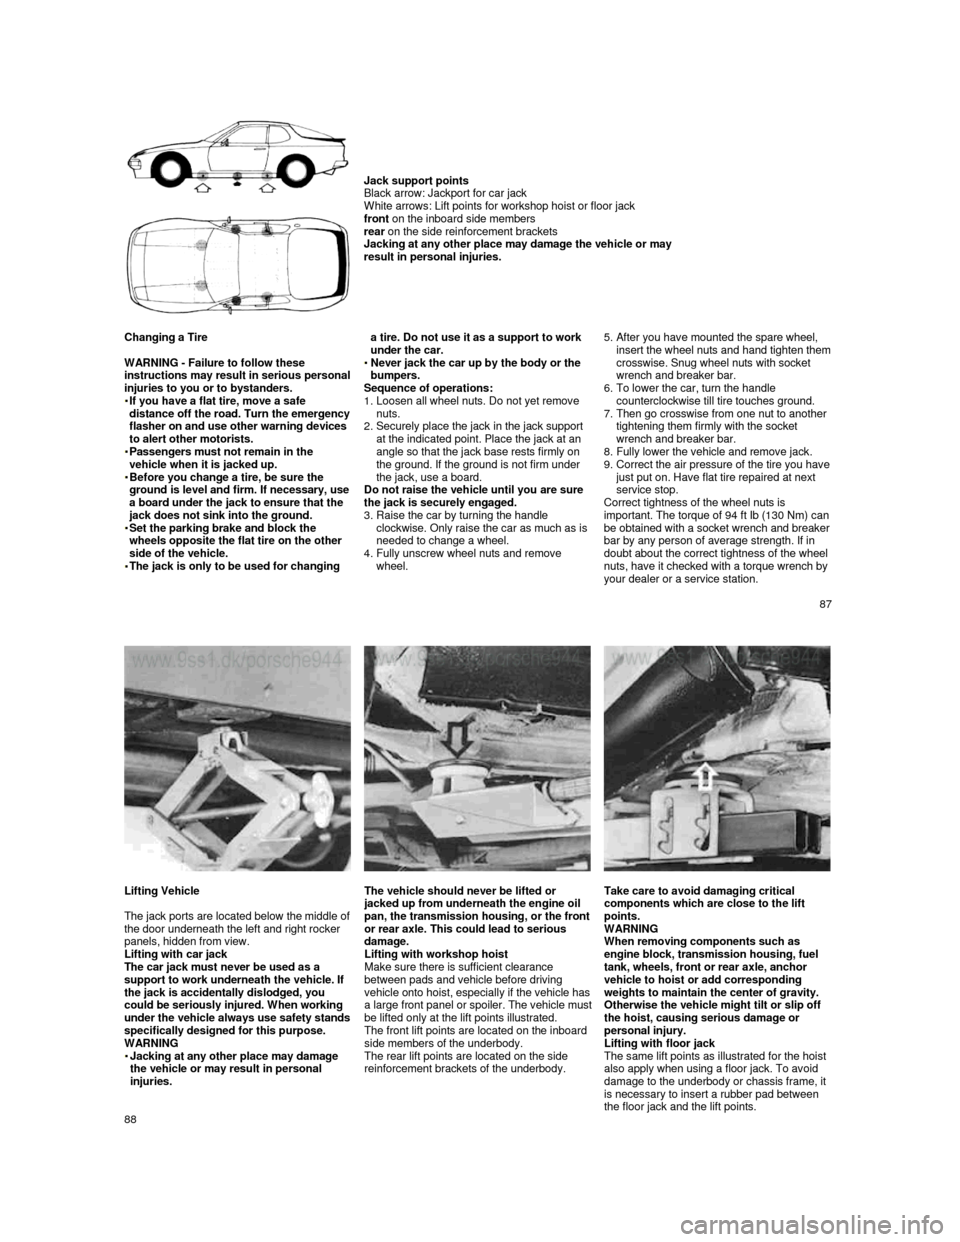
Jack support points
Black arrow: Jackport for car jack
White arrows: Lift points for workshop hoist or flo or jack
front on the inboard side members
rear on the side reinforcement brackets
Jacking at any other place may damage the vehicle o r may
result in personal injuries.
Changing a Tire
WARNING - Failure to follow these
instructions may result in serious personal injuries to you or to bystanders.
If you have a flat tire, move a safe distance off the road. Turn the emergency flasher on and use other warning devices
to alert other motorists.
Passengers must not remain in the vehicle when it is jacked up. Before you change a tire, be sure the ground is level and firm. If necessary, use a board under the jack to ensure that the jack does not sink into the ground. Set the parking brake and block the wheels opposite the flat tire on the other
side of the vehicle.
The jack is only to be used for changing
a tire. Do not use it as a support to work
under the car.
Never jack the car up by the body or the bumpers.
Sequence of operations:
1.
Loosen all wheel nuts. Do not yet remove
nuts.
2.
Securely place the jack in the jack support
at the indicated point. Place the jack at an
angle so that the jack base rests firmly on
the ground. If the ground is not firm under
the jack, use a board.
Do not raise the vehicle until you are sure
the jack is securely engaged.
3.
Raise the car by turning the handle
clockwise. Only raise the car as much as is
needed to change a wheel.
4.
Fully unscrew wheel nuts and remove wheel.
5. After you have mounted the spare wheel, insert the wheel nuts and hand tighten them crosswise. Snug wheel nuts with socket wrench and breaker bar.
6. To lower the car, turn the handle
counterclockwise till tire touches ground.
7.
Then go crosswise from one nut to another
tightening them firmly with the socket
wrench and breaker bar.
8. Fully lower the vehicle and remove jack.
9. Correct the air pressure of the tire you have just put on. Have flat tire repaired at next service stop.
Correct tightness of the wheel nuts is
important. The torque of 94 ft Ib (130 Nm) can
be obtained with a socket wrenc
h and breaker bar by any person of average strength. If in
doubt about the correct tightness of the wheel
nuts, have it checked with a torque wrench by
your dealer or a service station.
87
Lifting Vehicle
The jack ports are located below the middle of the door underneath the left and right rocker
panels, hidden from view.
Lifting with car jack
The car jack must never be used as a
support to work underneath the vehicle. If
the jack is accidentally dislodged, you
could be seriously injured. When working
under the vehicle always use safety stands specifically designed for this purpose.
WARNING
Jacking at any other place may damage the vehicle or may result in personal injuries.
The vehicle should never be lifted or jacked up from underneath the engine oil pan, the transmission housing, or the front or rear axle. This could lead to serious
damage.
Lifting with workshop hoist
Make sure there is sufficient clearance
between pads and vehicle before driving
vehicle onto hoist, especially if the vehicle
has a large front panel or spoiler. The vehicle must be lifted only at the lift points illustrated.
The front lift points are located on the inboard
side members of the underbody.
The rear lift points are located on the side
reinforcement brackets of the underbody.
Take care to avoid damaging critical
components which are close to the lift
points.
WARNING
When removing components such as
engine block, transmission housing, fuel
tank, wheels, front or rear axle, anchor
vehicle to hoist or add corresponding
weights to maintain the center of gravity.
Otherwise the vehicle might tilt or slip off
the hoist, causing serious damage or
personal injury.
Lifting with floor jack
The same lift points as illustrated for the hoist
also apply when using a floor jack. To avoid
damage to the underbody or chassis frame, it
is necessary to insert a rubber pad between
the floor jack and the lift points.
88
Page 49 of 66
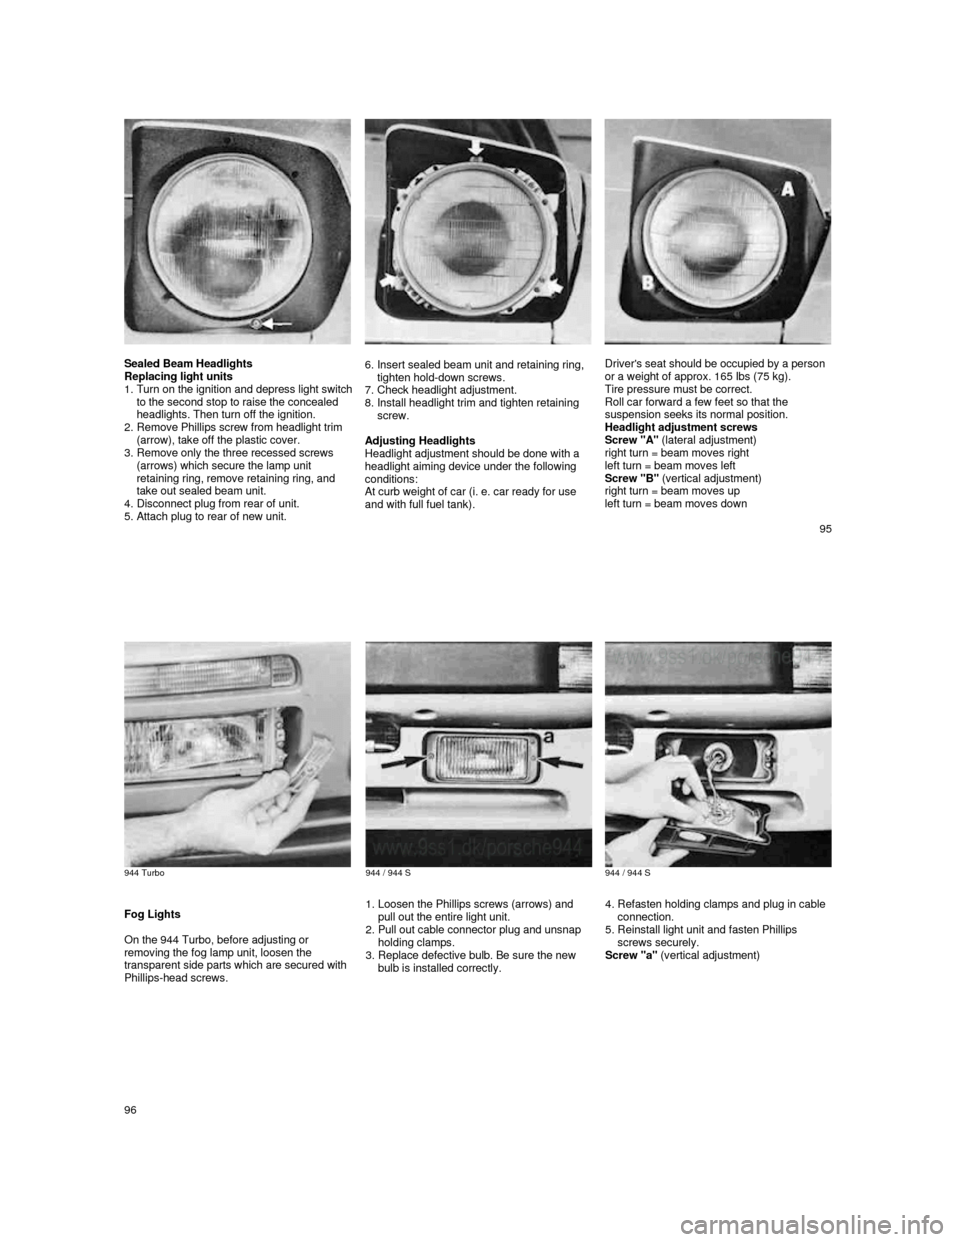
Sealed Beam Headlights
Replacing light units
1.
Turn on the ignition and depress light switch to the second stop to raise the concealed
headlights. Then turn off the ignition.
2.
Remove Phillips screw from headlight trim
(arrow), take off the plastic cover.
3.
Remove only the three recessed screws
(arrows) which secure the lamp unit
retaining ring, remove retaining ring, and
take out sealed beam unit.
4.
Disconnect plug from rear of unit.
5. Attach plug to rear of new unit.
6. Insert sealed beam unit and retaining ring,
tighten hold-down screws.
7.
Check headlight adjustment.
8. Install headlight trim and tighten retaining
screw.
Adjusting Headlights
Headlight adjustment should be done with a
headlight aiming device under the following
conditions:
At curb weight of car (i. e. car ready for use
and with full fuel tank).
Driver's seat should be occupied by a person
or a weight of approx. 165 Ibs (75 kg).
Tire pressure must be correct.
Roll car forward a few feet so that the
suspension seeks its normal position.
Headlight adjustment screws
Screw "A" (lateral adjustment)
right turn = beam moves right
left turn = beam moves left
Screw "B" (vertical adjustment)
right turn = beam moves up
left turn = beam moves down
95
944 Turbo
944 / 944 S
944 / 944 S
Fog Lights
On the 944 Turbo, before adjusting or
removing the fog lamp unit, loosen the
transparent side parts which are secured with
Phillips-head screws.
1. Loosen the Phillips screws (arrows) and
pull out the entire light unit.
2.
Pull out cable connector plug and unsnap
holding clamps.
3.
Replace defective bulb. Be sure the new
bulb is installed correctly.
4. Refasten holding clamps and plug in cable
connection.
5.
Reinstall light unit and fasten Phillips
screws securely.
Screw "a" (vertical adjustment)
96
Page 52 of 66
How Emission Control Works
When an automobile engine is running, it uses energy generated through the combustion of a mixture of air and fuel. Depending on whether
a car is driven fast or slowly or whether the
engine is cold or hot, some of the fuel
(hydrocarbons) may not be burned completely but be discharged into the engine crankcase
or exhaust system. Additional hydrocarbons
may enter the atmosphere through
evaporation of fuel from the fuel tank. These
hydrocarbons (HC), when released into the
air, contribute to undesirable pollution.
In addition, carbon monoxide (CO) and oxides of nitrogen (NOx) contribute to engine
emissions. They, too, are formed during the
combustion process and discharged into the
exhaust system.
To reduce these pollutants, your Porsche is
equipped with a precisely calibrated fuel
injection system to assure a finely balanced
air/fuel mixture under all operating conditions.
Oxygen Sensor
The oxygen sensor, installed in the exhaust
pipe continuously senses the oxygen content
of the exhaust and signals the information to
an electronic control unit. The control unit
corrects the air/fuel ratio, so that the engine
always receives an accurately metered air fuel mixture. .
Crankcase Ventilation
Through Crankcase Ventilation undesirable
emissions from the engine crankcase are not
permitted to reach the outside atmosphere.
These emissions are recirculated from the
crankcase to the air intake system. From here
the emissions mix with the intake air and are
later burned in the engine.
Catalytic converter
The catalytic converter is an efficient
"cleanup" device built into the exhaust system
of the vehicle. The catalytic converter burns
the undesirable pollutants in the exhaust gas
before it is released into the atmosphere.
The exclusive use of unleaded fuel is critically important for the life of the
catalytic converter. Therefore, only
unleaded gasoline without additives must
be used.
The catalytic converter will be damaged by
push or tow starting your vehicle
misfiring of the engine turning off the ignition while the vehicle is moving or
by other unusual operating conditions.
Do not continue to operate your vehicle
under these conditions, as otherwise fuel
can reach the catalytic converter. This
could result in overheating of the
converter.
Federal law prohibits use of leaded
gasoline in this car.
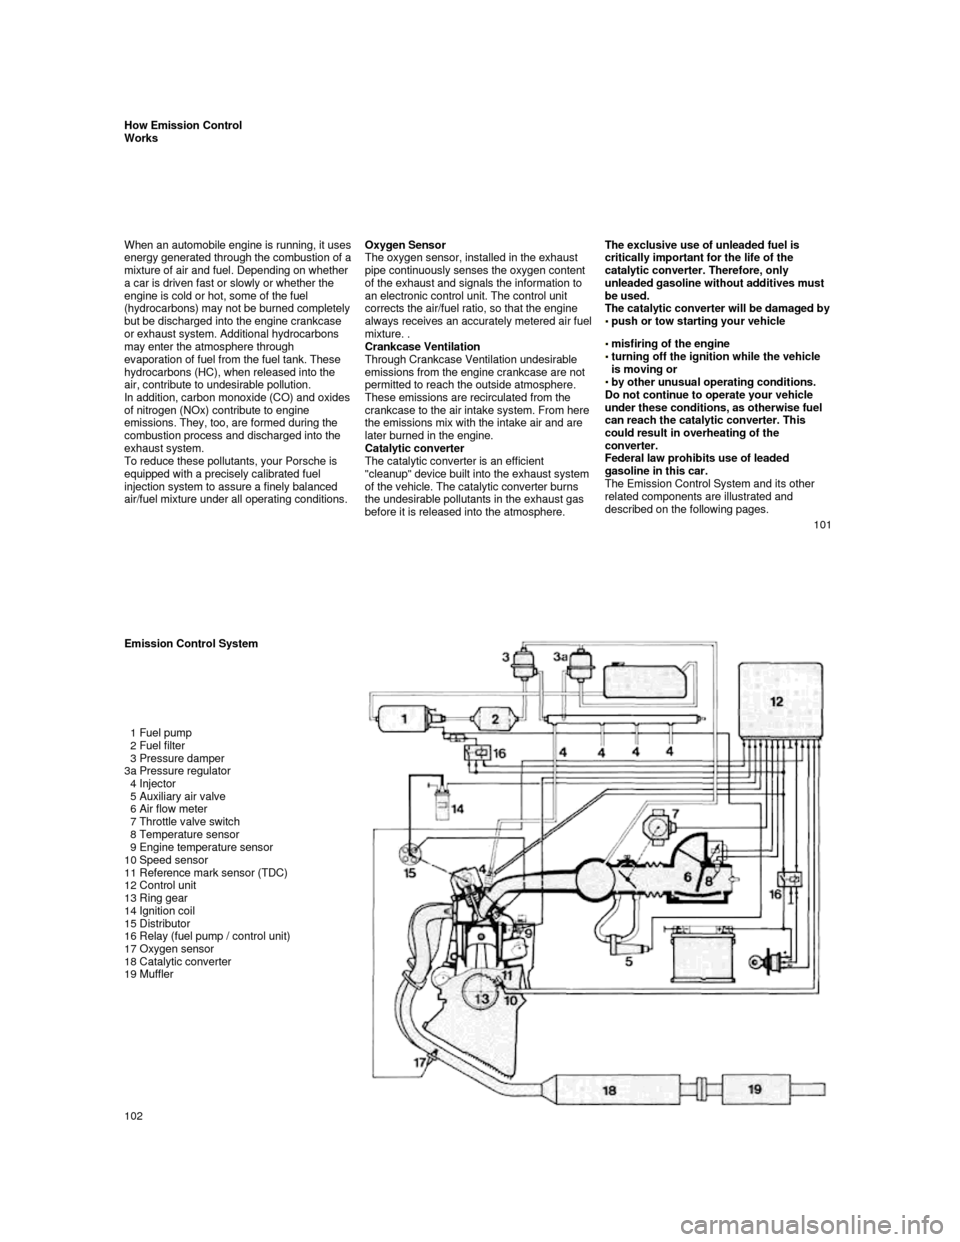
The Emission Control System and its other
related components are illustrated and
described on the following pages.
101
Emission Control System
1 Fuel pump
2 Fuel filter
3 Pressure damper
3a Pressure regulator
4 Injector
5 Auxiliary air valve
6 Air flow meter
7 Throttle valve switch
8 Temperature sensor
9 Engine temperature sensor
10 Speed sensor
11 Reference mark sensor (TDC)
12 Control unit
13 Ring gear
14 Ignition coil
15 Distributor
16 Relay (fuel pump / control unit)
17 Oxygen sensor
18 Catalytic converter
19 Muffler
102
Page 53 of 66

Fuel Evaporation Control
Fuel Tank Venting
The expansion chamber and the roll over valve prevent fuel from escaping to the outside at
extreme high outside temperatures and when
the car is driven or parked at an incline or in
any other nonlevel position. The safety valve
works as a restrictor in the tank vent line between the expansion chamber and the
canister.
Vapor Control System and Storage
When the fuel tank is filled, vapors are
collected in the expansion chamber and filler
tube by a vent l
ine leading the vapors via a roll over valve to the activated carbon canister where they are stored as long as the engine does not run. During engine operation, the
vapors are stored in the activated carbon
canister as long as the control valve I
(ON/OFF valve) is in the OFF-position.
The control valve I stops purging of the
canister during all other operating conditions of the engine if the coolant temperature of the
engine is below a defined temperature.
Purge System
Fuel vapors from the carbon canister will be
mixed with fresh air taken from the ambient
1 Control valve II
2 Temperature switch
3 Air flow meter
4 Throttle valve 5 Intake manifold
6 Engine
7 Injection valve
8 Control valve I
(ON/OFF) 9 Expansion chamber
10 Charcoal canister
11 Roll over valve
12 Pressure regulator
13 Pressure damper 14 Fuel filter
15 Fuel pump
16 Fuel tank
of the carbon canister or fuel vapors from the
fuel tank. The vapors will be directed via a
control valve I and control valve II to the air
intake system housing. The control valve I has the following functions:
To stop purging of the canister during idle (the rich vapor flow from the canister would
influence the mixture characteristic).
To allow purging of the canister during all
other operating conditions of the engine.
The control valve II controls the vapor flow to
the engine.
103
http://www.9ss1.dk/porsche944
104
Page 54 of 66
Technical Data
105
Engine 944 Number of cylinders
4
Bore 3.94 in. / 100 mm
Stroke 3.11 in. / 78.9 mm
Displacement 151 cu. in. / 2479 cm
3
Compression ratio 9.7:1
SAE net-power 147 hp/ 110 kW at 5800 rpm
SAE net-torque 140 ft lb / 190 Nm at 3000 rpm
Output per liter 59,3 SAE net-hp / 44,4 SAE net-kW
Max. permissible rpm 6500
Fuel octane rating Unleaded fuel only 91 RON (87 CLC or AKI ((R+M)/2) rating on fuel pump s in U.S.A.)
Spark plugs Bosch WR 7 DC or
Champion RN 9 YC
Electrode gap 0.028 + 0.004 in. / 0.7 + 0.1 mm
Battery capacity 12 volts, 63 Ah
Alternator output 1610W/115A
Firing order 1-3-4-2
Ignition timing Self-adjusting DME (Digital-Motor-E lectronic)
Ignition Transistorized ignition system with breake r less distributor
Belt for alternator Polyrib K6 1000 Lw
Belt for servo pump 9.5 x 950 LA
Valve clearance Hydraulic valve clearance compensat ion
106
Page 55 of 66
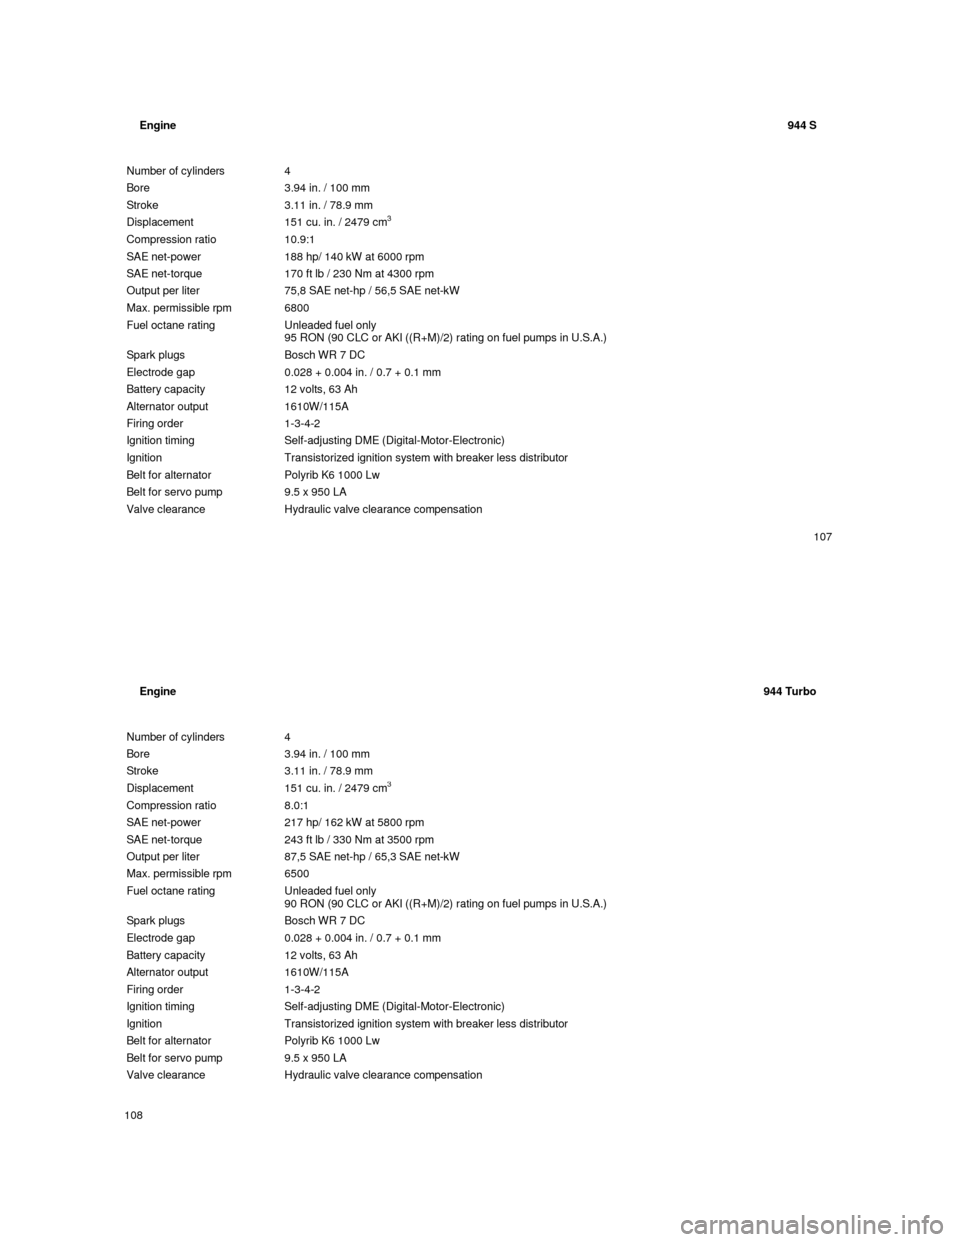
Engine 944 S Number of cylinders
4
Bore 3.94 in. / 100 mm
Stroke 3.11 in. / 78.9 mm
Displacement 151 cu. in. / 2479 cm
3
Compression ratio 10.9:1
SAE net-power 188 hp/ 140 kW at 6000 rpm
SAE net-torque 170 ft lb / 230 Nm at 4300 rpm
Output per liter 75,8 SAE net-hp / 56,5 SAE net-kW
Max. permissible rpm 6800
Fuel octane rating Unleaded fuel only 95 RON (90 CLC or AKI ((R+M)/2) rating on fuel pump s in U.S.A.)
Spark plugs Bosch WR 7 DC
Electrode gap 0.028 + 0.004 in. / 0.7 + 0.1 mm
Battery capacity 12 volts, 63 Ah
Alternator output 1610W/115A
Firing order 1-3-4-2
Ignition timing Self-adjusting DME (Digital-Motor-E lectronic)
Ignition Transistorized ignition system with breake r less distributor
Belt for alternator Polyrib K6 1000 Lw
Belt for servo pump 9.5 x 950 LA
Valve clearance Hydraulic valve clearance compensat ion
107
Engine 944 Turbo
Number of cylinders
4
Bore 3.94 in. / 100 mm
Stroke 3.11 in. / 78.9 mm
Displacement 151 cu. in. / 2479 cm
3
Compression ratio 8.0:1
SAE net-power 217 hp/ 162 kW at 5800 rpm
SAE net-torque 243 ft lb / 330 Nm at 3500 rpm
Output per liter 87,5 SAE net-hp / 65,3 SAE net-kW
Max. permissible rpm 6500
Fuel octane rating Unleaded fuel only 90 RON (90 CLC or AKI ((R+M)/2) rating on fuel pump s in U.S.A.)
Spark plugs Bosch WR 7 DC
Electrode gap 0.028 + 0.004 in. / 0.7 + 0.1 mm
Battery capacity 12 volts, 63 Ah
Alternator output 1610W/115A
Firing order 1-3-4-2
Ignition timing Self-adjusting DME (Digital-Motor-E lectronic)
Ignition Transistorized ignition system with breake r less distributor
Belt for alternator Polyrib K6 1000 Lw
Belt for servo pump 9.5 x 950 LA
Valve clearance Hydraulic valve clearance compensat ion
108