seats PORSCHE 944 1987 1.G Owners Manual
[x] Cancel search | Manufacturer: PORSCHE, Model Year: 1987, Model line: 944, Model: PORSCHE 944 1987 1.GPages: 66, PDF Size: 3.3 MB
Page 3 of 66

INDEX
A
ABS Acceleration diagram Accelerator pedal Air Bag System Air - cleaner
- conditioner
- filter
Alternator warning light Antifreeze Antilock, Brake system Anti-theft alarm Ashtray Automatic- garage door
- speed control
- transmission
- transmission fluid B
Battery
Boost pressure gauge
Brake - booster
- fluid
- fluid warning light
- pads
- parking
- pedal
- system
- warning light
Break-in hints
Bulb replacing
Buzzer 28,39
118-129
55
20, 21, 38, 3980, 8144-4680,81 39
74,75,11028, 39
11
42, 98
25
29
53-55
78,110,128
90-9234
27
39,79,11039
27,37,47,79,80 26
26, 27
26,27,11537
47
93-98
10,18,24,30
C/D
CASIS
Capacities
Car care instructions
Casis
Catalytic Converter
Cautions
Central locking
Central warning light
Cigarette lighter
Cleaning
Clock
Clutch pedal
Collapsible spare tire
Control warning light system
Coolant Temperature Gauge
Cooling system
Corrosion prevention
Dashboard
Defogging/defrosting
Dimensions
Doors
Driving hints
E/F
Electrical system
Emergency- flasher
- starting
Emission Control System
Engine - cooling
- exhaust
- hood
- number
- oil checking & changing
- oil
-speed, max 35
110
61-66
35
50,10267
13
37
41
61-66 40
27
85
36-39 36
74-77
65-66
24
44-46 114
12,138-9, 48, 49
89-92
41
92
100-103 74-77
48
586
69-72
69,110,111,128
34,47,52,106-
108
Fan control switch knob
Fan, radiator
Filling capacities
Fog lights
Fuel - economy
- evaporation control
- gauge
- recommendation
- tank
Fuses and relays
G/H
Gas Station Information
Gasohol
Gasoline
Gear ratio diagram
Gearshift lever
Glove compartment
Hatchback
Headlights
Headlight- dimmer
- flasher
- switch
- washing system
Heater/ventilation controls
Hood - front
- rear
Horn
I/J
Ignition/steering lock
Instrument illumination
Instruments
Interior ligh 44
36, 74 110
30, 96, 97
49
103 37
50, 51
50,110
89,126
126-129 51
50,51
122-125 52-55
42
56
30,95,99 30
30
30
31,32,81,11044-4658
56,57
21,24
24
30
33-40
43, 98
4
Jack
- supports
K/L
Keys
Kickdown
Lane changer
Leather
License plate light
Light switch
Lights - ashtray
- fog
- interior
- license plate
- parking
- turn signal
Locks - doors, wheels
Loudspeakers
Lubricants
Luggage compartment
M/O
Manual transmission
- oil
Mirrors
Oil- change
- consumption
- filter changing
- pressure gauge
- pressure warning light
Octane rating
Oxygen Sensor
P/R
Paint code number 68
87, 88, 129
10-11,86 55
30
65
98
30
98
30, 96, 97
43, 9898
30, 37, 93, 94
30,93,94
10-13, 86 89
110,111 57
52,122-125 77,11022,43
71,72
47, 69
71, 72 38
38
50, 51,106-108 101,102
7
Parking- brake
- lights
Performance
Power assisted steering
Power train
Power windows
Prop-up roof
Radiator fan
Rear - hood
- view mirrors
- window defogger
- wiper
Recirculation Switch
Refrigerant
Relays
Rims
Roof racks
Roof, removable S
Safe driving hints
Safetybelts
Safety belt warning light
Safety compliance sticker
Seat heating System
Seats
Sekuriflex windshield
Shift indicator
Shift points
Side marker lights
Ski racks
Snow- chains
- tires
Spare tire, collapsible
Spark plugs
Specifications, engine
26, 3730,37,93,94116731091259, 6036, 7456,572241424446,11089,12664,112,11357,11459, 60
8-9
17-21,6518,3771514-1631, 63, 643552-559457,11483, 84,112,113
83,84, 111,113
85106-108106-109
Speedometer
Starting procedures
Sun visors
T/U
Tachometer
Technical data
Tirepressure
Tires
Tool kit
Trip odometer
Transmission oil
Trunk
Turn signal lights
Undercoating
Unleaded fuel
V/W
Vehicle identification
Ventilation
Voltmeter
Warning/indicator lights
Washer reservoir
Washing
Water temperature gauge
Weatherstrips
Weights
Wheel alignment
Wheel nuts, lockable
Wheels
Wheel changing
Windows
Windshield- washer reservoir
- wiper/washer lever 3324, 2543
34, 35105-12582,112,113,12947,82-87,112,113683377, 78,11056,5730, 37, 93, 9465, 66,10050, 51,106-108,110
6-744-463835-4081,11061-6636641141158647,64,82-87,11285-8812,63,6481,11031
5
Page 8 of 66

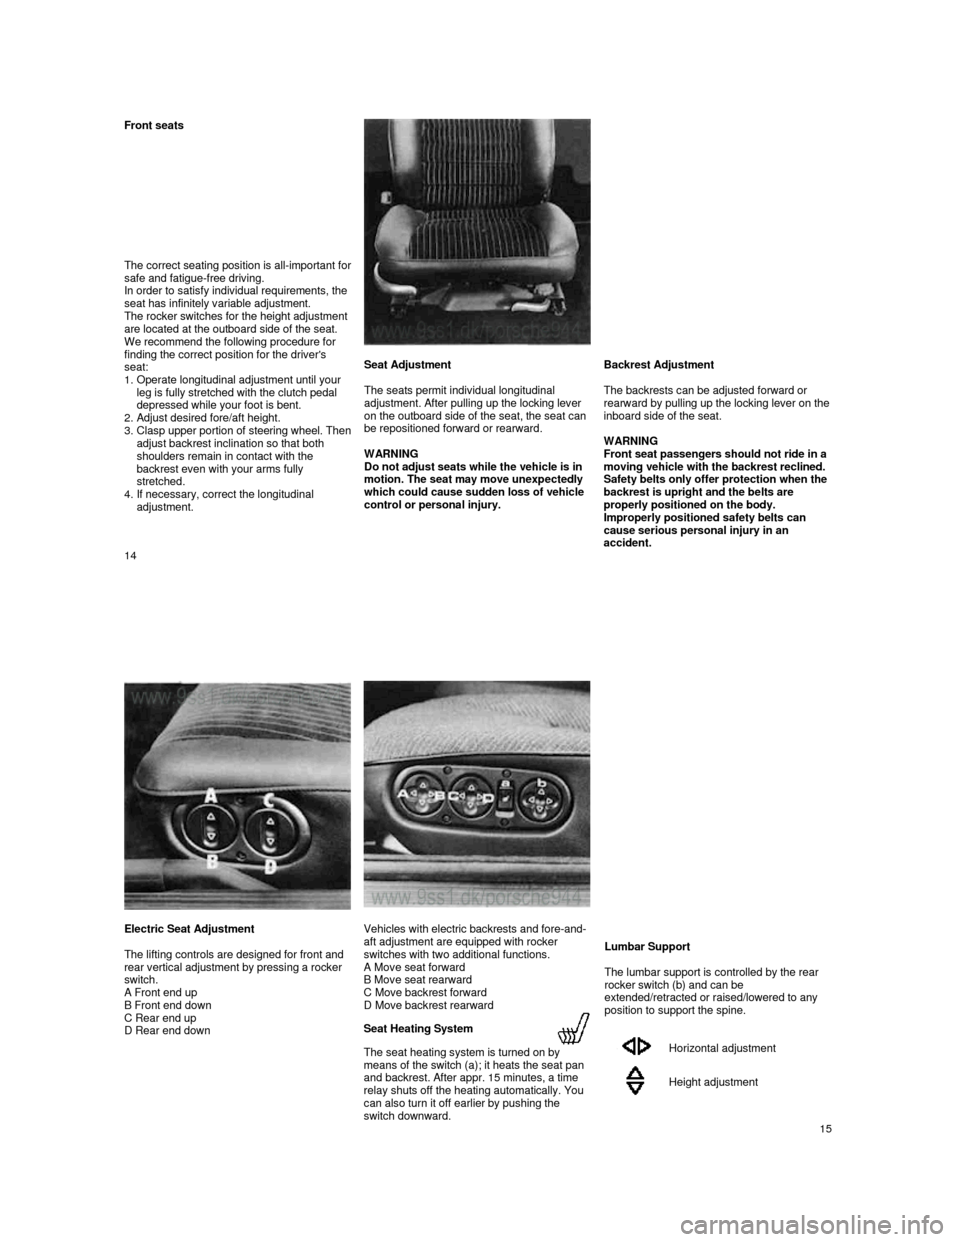
Front seats
The correct seating position is all-
important for safe and fatigue-free driving.
In order to satisfy individual requirements, the
seat has infinitely variable adjustment.
The rocker switches for the height adjustment
are located at the outboard side of the seat.
We recommend the following procedure for
finding the correct position for the driver's
seat:
1. Operate longitudinal adjustment until your leg is fully stretched with the clutch pedal
depressed while your foot is bent.
2.
Adjust desired fore/aft height.
3. Clasp upper portion of steering wheel. Then adjust backrest inclination so that both
shoulders remain in contact with the
backrest even with your arms fully
stretched.
4.
If necessary, correct the longitudinal
adjustment.
Seat Adjustment
The seats permit individual longitudinal
adjustment. After pulling up the locking lever
on the outboard side of the seat, the seat can
be repositioned forward or rearward.
WARNING
Do not adjust seats while the vehicle is in
motion. The seat may move unexpectedly
which could cause sudden loss of vehicle
control or personal injury. Backrest Adjustment
The backrests can be adjusted forward or
rea
rward by pulling up the locking lever on the inboard side of the seat.
WARNING
Front seat passengers should not ride in a
moving vehicle with the backrest reclined.
Safety belts only offer protection when the
backrest is upright and the belts are
properly positioned on the body.
Improperly positioned safety belts can
cause serious personal injury in an
accident.
14
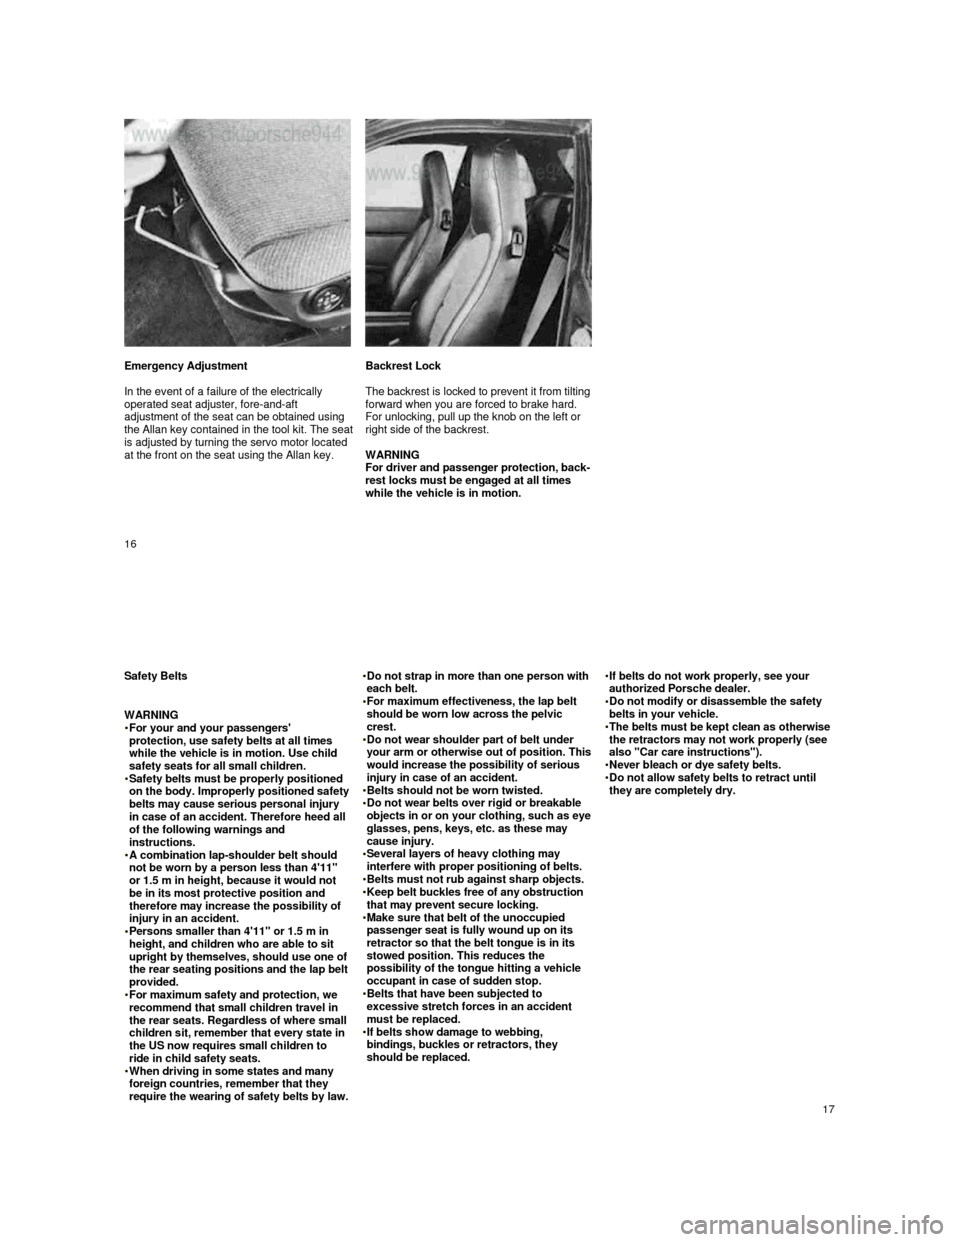
Electric Seat Adjustment
The lifting controls are designed for front and
rear vertical adjustment by pressing a rocker
switch.
A Front end up
B Front end down
C Rear end up
D Rear end down
Vehicles with electric backrests and fore-and-
aft adjustment are equipped with rocker
switches with two additional functions.
A Move seat forward
B Move seat rearward
C Move backrest forward
D Move backrest rearward
Seat Heating System
The seat heating system is turned on by
means of the switch (a); it heats the seat pan
and backrest. After appr. 15 minutes, a time
relay shuts off the heating automatically. You
can also turn it off earlier by pushing the
switch downward.
Lumbar Support
The lumbar support is controlled by the rear
rocker switch (b) and can be
extended/retracted or raised/lowered to any
position to support the spine.
Horizontal adjustment
Height adjustment
15
Page 9 of 66

Emergency Adjustment
In the event of a failure of the electrically
operated seat adjuster, fore-and-aft
adjustment of the seat can be obtained using
the Allan key contained in the tool kit. The seat is adjusted by turning the servo motor located
at the front on the seat using the Allan key.
Backrest Lock
The backrest is locked to prevent it from tilting forward when you are forced to brake hard.
For unlocking, pull up the knob on the left or
right side of the backrest.
WARNING
For driver and passenger protection, back-
rest locks must be engaged at all times
while the vehicle is in motion.
16
Safety Belts
WARNING
For your and your passengers' protection, use safety belts at all times
while the vehicle is in motion. Use child
safety seats for all small children. Safety belts must be properly positioned on the body. Improperly positioned safety belts may cause serious personal injury
in case of an accident. Therefore heed all
of the following warnings and
instructions.
A combination lap-shoulder belt should not be worn by a person less than 4'11"
or 1.5 m in height, because it would not
be in its most protective position and
therefore may increase the possibility of
injury in an accident.
Persons smaller than 4'11" or 1.5 m in height, and children who are able to sit
upright by themselves, should use one of the rear seating positions and the lap belt provided. For maximum safety and protection, we recommend that small children travel in
the rear seats. Regardless of where small
children sit, remember that every state in
the US now requires small children to
ride in child safety seats. When driving in some states and many foreign countries, remember that they
require the wearing of safety belts by law.
Do not strap in more than one person with each belt. For maximum effectiveness, the lap belt should be worn low across the pelvic
crest.
Do not wear shoulder part of belt under your arm or otherwise out of position. This would increase the possibility of serious
injury in case of an accident.
Belts should not be worn twisted. Do not wear belts over rigid or breakable objects in or on your clothing, such as eye glasses, pens, keys, etc. as these may
cause injury.
Several layers of heavy clothing may interfere with proper positioning of belts. Belts must not rub against sharp objects. Keep belt buckles free of any obstruction that may prevent secure locking. Make sure that belt of the unoccupied passenger seat is fully wound up on its
retractor so that the belt tongue is in its
stowed position. This reduces the
possibility of the tongue hitting a vehicle
occupant in case of sudden stop.
Belts that have been subjected to excessive stretch forces in an accident
must be replaced.
If belts show damage to webbing, bindings, buckles or retractors, they
should be replaced.
If belts do not work properly, see your authorized Porsche dealer. Do not modify or disassemble the safety belts in your vehicle. The belts must be kept clean as otherwise the retractors may not work properly (see
also "Car care instructions").
Never bleach or dye safety belts. Do not allow safety belts to retract until they are completely dry.
17
Page 10 of 66

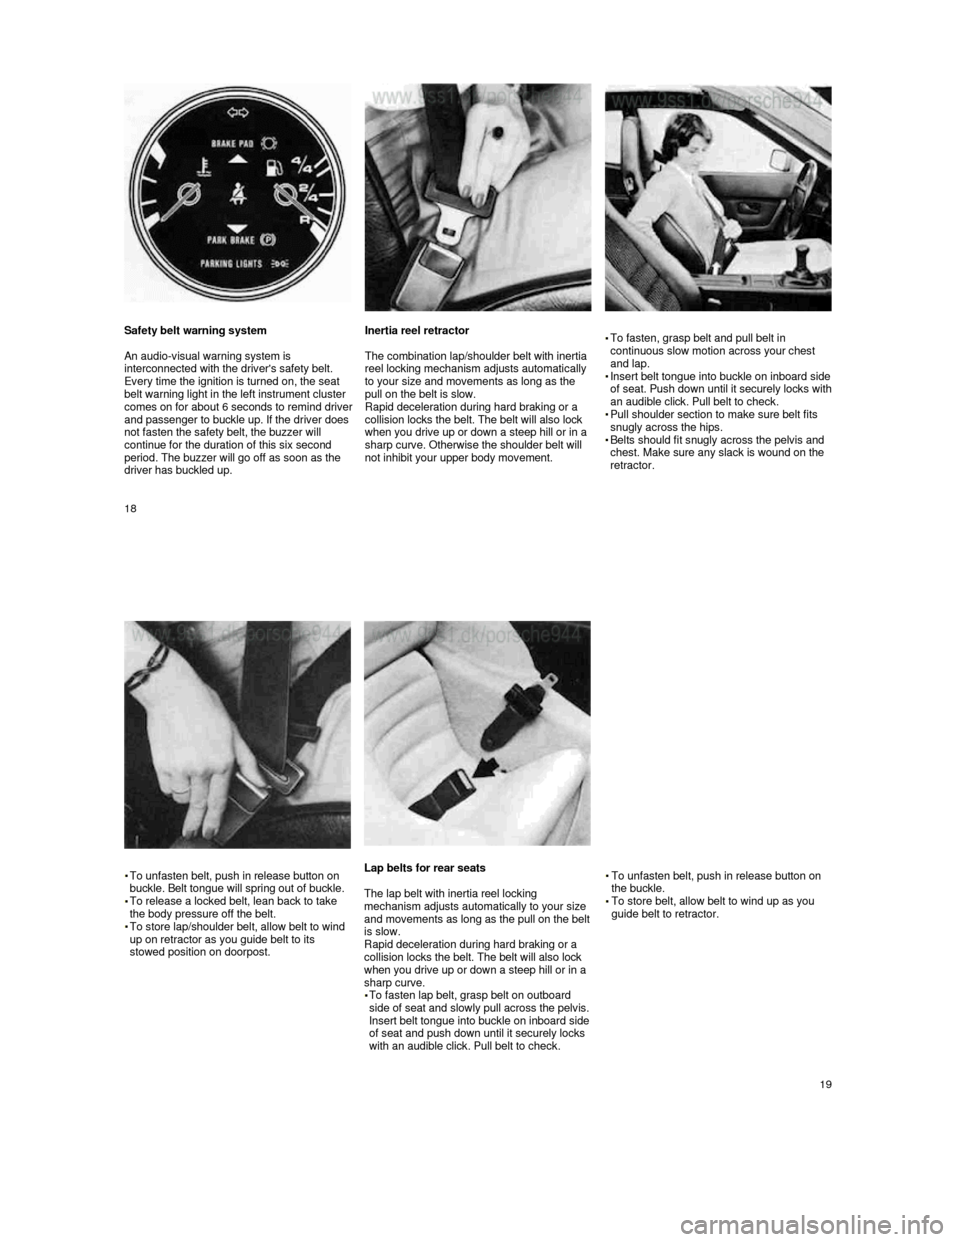
Safety belt warning system
An audio-visual warning system is
interconnected with the driver's safety belt.
Every time the ignition is turned on, the seat
belt warning light in the left instrument cluster
comes on for about 6 seconds to remind driver and passenger to buckle up. If the driver does
not fasten the safety belt, the buzzer will
continue for the duration of this six second
period. The buzzer will go off as soon as the
driver has buckled up.
Inertia reel retractor
The combination lap/shoulder belt with inertia
reel locking mechanism adjusts automatically
to your size and movements as long as the
pull on the belt is slow.
Rapid deceleration during hard braking or a
collision locks the belt. The belt will also lock
when you drive up or down a steep hill or in a sharp curve. Otherwise the shoulder belt will
not inhibit your upper body movement.
To fasten, grasp belt and pull belt in
continuous slow motion across your chest
and lap.
Insert belt tongue into buckle on inboard side of seat. Push down until it securely locks with an audible click. Pull belt to check. Pull shoulder section to make sure belt fits
snugly across the hips.
Belts should fit snugly across the pelvis and
chest. Make sure any slack is wound on the
retractor.
18
To unfasten belt, push in release button on
buckle. Belt tongue will spring out of buckle.
To release a locked belt, lean back to take
the body pressure off the belt.
To store lap/shoulder belt, allow belt to wind
up on retractor as you guide belt to its
stowed position on doorpost.
Lap belts for rear seats
The lap belt with inertia reel locking
mechanism adjusts automatically to your size
and movements as long as the pull on the belt is slow.
Rapid deceleration during hard braking or a
collision locks the belt. The belt will also lock
when you drive up or down a steep hill or in a
sharp curve.
To fasten lap belt, grasp belt on outboard
side of seat and slowly pull across the pelvis.
Insert belt tongue into buckle on inboard side
of seat and push down until it securely locks
with an audible click. Pull belt to check.
To unfasten belt, push in release button on
the buckle.
To store belt, allow belt to wind up as you
guide belt to retractor.
19
Page 34 of 66

Interior Glass
Use the same cleaning agents as for the
exterior and polish dry with a soft cloth or
paper towel.
Fabric
Use a vacuum cleaner or a soft bristle brush
to remove dust and loose dirt from carpeting,
upholstery, headliner and other trim. Dirt
stains can usually be removed with lukewarm
soap water or an all purpose cleaner solution,
or a dry foam cleaner. For greasy, oily and
other stubborn stains, use a spot remover. Do
not pour the liquid on the fabric. Dampen a
clean cloth and rub carefully, starting at the
edge and working inward.
Safety belts
Keep belts clean. Very dirty belts may not
retract properly. Do not remove belts from the
vehicle to be cleaned. Do not use chemical
cleaning agents, bleach or dyes. They
contain corrosive properties which will
weaken the webbing. Do not allow inertia
reel safety belts to retract before they are
completely dry.
For cleaning, use a mild soap water solution.
Let belts dry out thoroughly and away from
direct sun light.
Plastic, vinyl and leatherette
Use a clean, damp cloth or sponge to keep
this trim free from dust. For other spoilage,
use a lukewarm all purpose cleaning solution
or a mild saddle soap for vinyl and leather
trim. Remove water spots and soap traces
with a clean, damp cloth or sponge. Use a clean, soft cloth to rub dry.
Grease, tar or oil stains can be removed with
a clean cloth or sponge soaked with all
purpose cleaner or with a solvent type vinyl or
leather cleaning agent.
Occasionally apply a colorless vinyl or leather
preservative to retain the material's luster and
pliability.
Leather and leather trim
To keep leather seats and trim beautiful and
soft, they should be cleaned and cared for
regularly. Clean leather with a soft, white
woolen cloth and a mild soapwater solution. Do not use chemical or abrasive cleaning
agents. Do not let moisture seep through
perforated surfaces to safeguard against
corrosion and cracking from underneath. After cleaning, apply a leather preservative re-
commended by Porsche to all dry surfaces with a clean and soft woolen cloth. Let your
Porsche dealer advise you on the use of the
leather preservation product.
Corrosion protection
The engine compartment, as well as all
engine, transmission, front and rear axle
assembly surfaces have been treated with a
wax based coating at the factory for protection against corrosion.
WARNING
Do not apply additional undercoating or
rustproofing on or near the exhaust
manifold, exhaust pipes, catalytic
converter or heat shields. During driving,
the substance used for undercoating could overheat and cause a fire.
Engine Compartment
If it becomes necessary to steam clean or
otherwise wash the engine compartment, the
wax based protective coating is usually lost. It is therefore important to reapply this
protective coating to all engine compart-
65
ment panels, flanges, cavities, seams and
engine assembly surfaces.
When washing the engine compartment,
only use commercially available grease
cutting solvents made especially for this
purpose. Carefully fol
low directions printed on the container by the manufacturer.
Chassis
The lower body shell of your Porsche is
thoroughly protected against corrosion.
However, it is recommended to have the
underbody inspected twice a year. Any
detected damage to the undercoating, due to
road hazards, should be repaired promptly. Oil based protective sprays must not be applied. Only tar or wax based anti corrosion protectors are compatible with the factory applied undercoating. Before application, road dirt and oily substances must be removed.
Whenever the lower body shell, axle,
transmission or engine assemblies are
repaired, the lost anti-corrosion coating of
the affected surfaces should be renewed.
Let your Porsche dealer advise and assist you.
66