wipers PORSCHE 944 1987 1.G Owners Manual
[x] Cancel search | Manufacturer: PORSCHE, Model Year: 1987, Model line: 944, Model: PORSCHE 944 1987 1.GPages: 66, PDF Size: 3.3 MB
Page 5 of 66

Dear Porsche Owner Before going on a trip...
A lot has gone into the manufacture of your Porsche, including advanced engineering
techniques, rigid quality control and
demanding inspections. These engineering
and safety features will be enhanced by
you... the safe driver...
who knows his car and all controls who maintains his vehicle properly who uses his driving skills wisely, and who always drives within his own capabilities and
his level of familiarity with his vehicle.
You will find helpful hints in this manual on
how to perform most of the checks listed on
these pages. If in doubt, have these checks
performed by your Porsche dealer.
First things first
Turn the engine off before you attempt any
checks or repairs of the vehicle.
Be sure tires are inflated correctly. Check for
damage and tire wear.
See that wheel bolts are properly tightened
and not loose or missing.
Check engine oil level, add if necessary.
Make it a habit to have engine oil checked
with every fuel filling. Check coolant level to assure sufficient
engine cooling.
Be sure you have a well charged battery. Check brake fluid level. If too low, have
brake system checked.
Replenish windshield washer fluid. Check if engine hood is latched safely. Replace worn or cracked wiper blades. See that all windows are clear and
unobstructed.
Keep air intake slots and area between engine hood and windshield free of snow and ice, so that the heater and the windshield wipers work properly.
Check whether all light lenses are clean.
Be sure all lights are working and headlights
are aimed correctly.
Check under vehicle for leaks. Be sure all luggage is stowed securely.
Emergency equipment 3
It is good practice to carry emergency
equipment in your vehicle. Some of the things
you should have are: window scraper, snow
brush, container or bag of sand or salt,
emergency light, small shovel, first-
aid kit, etc.
8
In the driver's seat... On the road...
Check operation of horn.
Position seat for easy reach of controls. Adjust inside and outside rear view mirrors. Attach your safety belts. Check operation of foot and parking brakes. Check all warning and indicator lights when
starting the engine.
NEVER leave car idling unattended. Lock doors from inside, especially with
children in the car.
To prevent inadvertent opening of doors
from inside or outside, drive with locked
doors.
Never drive after you have consumed
alcohol.
Always have your safety belt attached. Always drive defensively. Expect the unexpected. Use signals to indicate turns and lane
changes.
Turn on headlights at dusk. Always keep a safe distance from the vehicle in front of you, depending on traffic, road and weather conditions. Reduce speed at night and during inclement weather.
Driving in wet weather requires caution and
reduced speeds, particularly on roads with
standing water, as the handling characteristics of the vehicle may be impaired due to tire
aquaplaning.
Also, when crossing stretches of deeper water there is a danger that too high of a speed can
cause water to enter the engine combustion
chambers through the intake air system
and/or water may strike the cooling fan
causing cooling system damage. In order to
avoid possible en- gine or cooling system damage when driving
through deep water, the vehicle should be
driven at a walking speed in first gear.
Observe speed limits and obey road signs.
When tired, get well off the road, stop and
take a rest. Turn the engine off. Do not sit in
the vehicle with engine idling. See
WARNINGS on "Engine Exhaust".
When parked, always set the parking brake.
Move the selector lever to "P" (Automatic
transmission) or move the gearshift lever to
reverse or first gear (Manual transmission).
On hills also turn the wheels toward the curb.
When emergency repairs become necessary, move the vehicle well off the road. Turn on
emergency flasher and use other warning
devices to alert other motorists. Do not park
or operate the vehicle in areas where the hot
exhaust system may come in contact with dry grass, brush, fuel spill or other flammable
material.
Make it a habit to have the engine oil
checked with every fuel filling.
9
Page 16 of 66

Lane changer
To indicate your intention when changing
lanes on the highway, slightly push the turn
signal switch lever up or down to the point of
resistance. The lever will return to the OFF
position when released.
Headlight dimmer
With the light switch at stage 2, high beam is
switched on by pressing the lever towards the
instrument panel, and low beam is switched
on by pulling the lever towards the steering
wheel. When high beams are on, the blue indicator light between the tachometer and the right instrument cluster will light up.
You can flash signal other motorists by
repeatedly pulling and releasing the lever just
up to the point of resistance.
Light Switch
Parking light - 1st position
Headlights -2nd position (with ignition key in
switch position "1").
Tail lights, side marker lights, license plate
and instrument lights are on in both switch
positions.
The retractable headlights open when turning
the switch to the second position.
When you open the door while the lights are
on, the buzzer will sound. It is your reminder
to switch off the lights.
Instrument illumination
The instrument illumination goes on when the
vehicle lights are turned on. Turn the
knob to the left of the light switch for infinitely
variable brightness control.
Turn Signal/Headlight
Dimmer Switch Lever
(ignition on)
Lever up - right turn signal
Lever down - left turn signal
The turn signal lever turns off automatically
when the steering wheel is straightened out after completing a turn.
If a turn signal fails, the indicator light flashes
about twice as fast. The light bulb may have
to be replaced.
Headlight flasher
During daylight, you can flash signal with your
foglights (in lieu of horn) by repeatedly pulling
and releasing the lever just up to the point of
resistance.
Fog lights
- with ignition on
Turn on the fog lights by depressing the rocker switch on the dashboard. A green light in the
switch glows when the fog lights are turned
on.
Parking lights - with ignition off . ... Lever up -
right side parking lights on Lever down - left
side parking lights on
30
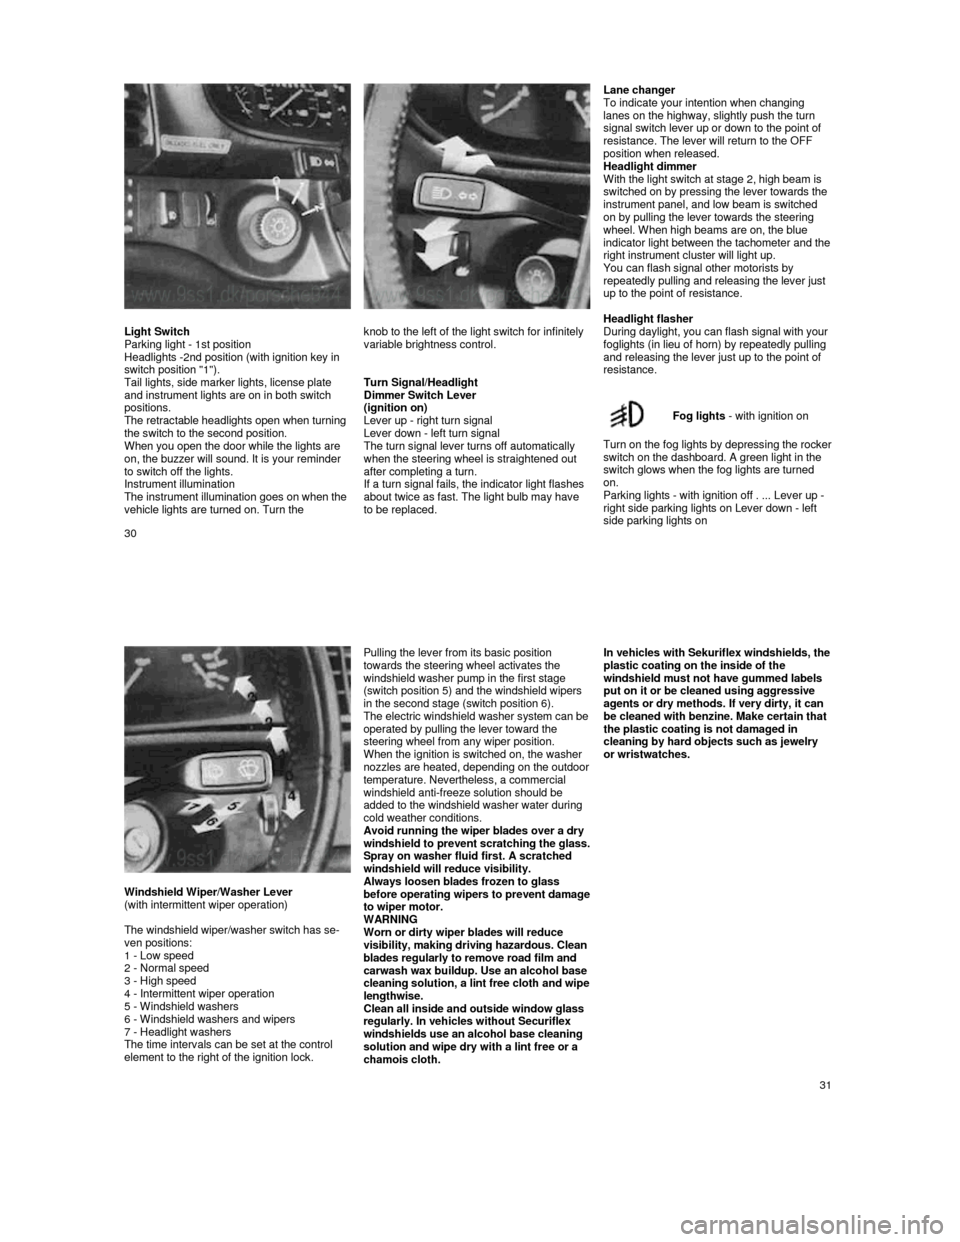
Windshield Wiper/Washer Lever
(with intermittent wiper operation)
The windshield wiper/washer switch has se-
ven positions:
1 - Low speed
2 - Normal speed
3 - High speed
4 - Intermittent wiper operation
5 - Windshield washers
6 - Windshield washers and wipers
7 - Headlight washers
The time intervals can be set at the control
element to the right of the ignition lock.
Pulling the lever from its basic position
towards the steering wheel activates the
windshield washer pump in the first stage
(switch position 5) and the windshield wipers
in the second stage (switch position 6).
The electric windshield washer system can be operated by pulling the lever toward the
steering wheel from any wiper position.
When the ignition is switched on, the washer
nozzles are heated, depending on the outdoor temperature. Nevertheless, a commercial windshield anti-freeze solution should be
added to the windshield washer water during
cold weather conditions.
Avoid running the wiper blades over a dry
windshield to p
revent scratching the glass. Spray on washer fluid first. A scratched
windshield will reduce visibility.
Always loosen blades frozen to glass
before operating wipers to prevent damage to wiper motor.
WARNING
Worn or dirty wiper blades will reduce
visibility, making driving hazardous. Clean
blades regularly to remove road film and
carwash wax buildup. Use an alcohol base
cleaning solution, a lint free cloth and wipe lengthwise.
Clean all inside and outside window glass
regularly. In vehicles without Securiflex
windshields use an alcohol base cleaning
solution and wipe dry with a lint free or a
chamois cloth.
In vehicles with Sekuriflex windshields, the plastic coating on the inside of the
windshield must not have gummed labels
put on it or be cleaned using aggressive
agents or dry methods. If very dirty, it can
be cleaned with benzine. Make certain that
the plastic coating is not damaged in
cleaning by hard objects such as jewelry
or wristwatches.
31
Page 30 of 66

Luggage Compartment
Luggage and other belongings should be
protected from the sun and "inquisitive eyes"
by pulling the rolled-up luggage cover from
behind the rear seat back and hooking it into
the eyelets on the rear cross wall. When
unhooked, the cover rolls itself up
automatically.
To prevent luggage and other objects from
sliding around while the car is in motion, you
can secure them with spider straps available
through your dealer or other supply firms. The
eyelets for this purpose can be found behind
the rear seat back and on the luggage
compartment floor. Luggage space
To provide for additional luggage space, press the knob on the left or right side to release the rear seat back. Then tilt forward.
Luggage compartment light
The light is located on the left side of the
luggage compartment. The light can be
switched on or off, regardless of ignition or
vehicle light switch positions.
Roofracks
The installation of commercially available
roofracks is not compatible with the roof
design of your Porsche.
When installing the Genuine Porsche Roof-
rack available up till now, the maximum
permissible weight load of 75 Ibs or 35 kg
must not be exceeded.
The "New Genuine Porsche Roofload
Transport System" provides for maximum
permissible weight loads of up to 165 Ibs or
75kg.
Your Porsche dealer will be glad to advise you about which type of roofrack can best serve
your individual needs and load carrying
requirements.
WARNING
Make sure that the load is carefully
mounted. Secure it additionally by locking
the roof transport system.
57
Engine Hood
To unlatch the engine hood, pull the release
lever on the left underneath the instrument
panel. Opening the hood
Lift hood slightly and pull up on handle (arrow) to disengage safety catch. Then lift up the
hood.
Make sure the windshield wipers are not tilted
forward.
The engine compartment light on the hood will come on when the vehicle lights are turned
on.
Closing the hood
Lower the hood and press it down on the hood latch until you hear an audible click.
WARNING
Should you notice at any time while driving that the hood is not secured properly,
please stop at once and close it.
58