Reverse PORSCHE BOXSTER 2005 2.G User Guide
[x] Cancel search | Manufacturer: PORSCHE, Model Year: 2005, Model line: BOXSTER, Model: PORSCHE BOXSTER 2005 2.GPages: 276, PDF Size: 4.05 MB
Page 152 of 276

152
Shifting Gear
Slip monitoring When the speeds of rotation of the front and rear
axles differ by more than the maximum permissib-
le value, integrated slip monitoring shifts up to the
next gear.
This increases driving stability on a slippery sur-
face.
Note
fSlip monitoring is also deactivated when
Porsche Stability Management (PSM) is swit-
ched off. Stopping fFor a brief stop, e.g. at a traffic light, leave the
selector lever in drive position and hold the ve-
hicle with the brake pedal.
fFor a longer stop with the engine running,
select position N (neutral).
fDo not hold the car on a slope using the
accelerator. Use the brake pedal or the hand-
brake instead.
fBefore leaving the vehicle, always apply the
handbrake and move the selector lever to
position P.
Parking fGo easy on the accelerator.
fWhen parking or maneuvring in a small space,
control the speed by careful use of the footbra-
ke. Driving in winter In wintery road conditions it is advisable to take
steep inclines in manual mode. This prevents the
occurrence of gear changes that could cause
wheelspin. Tow-starting, towing fPlease observe the chapter “TOWING” on Page
254.
Emergency program
Warning!
Reverse gear lock monitoring is disabled in
the emergency running program.
Damage to the vehicle may result as well as
loss of control, if the vehicle is moving for-
w a r d f a s t e n o u g h t o c a u s e r e a r w h e e l l o c k u p .
fDo not shift into R while the vehicle is moving forward.
A transmission fault is indicated by the following
symptoms:
–The 4th-gear display flashes.
– The warning “Tiptronic emergency run”
appears in the on-board computer.
– The transmission no longer shifts.
Regardless of selector lever position, 4th is
the only forward gear still available.
fAdapt your driving style to the changed hand-
ling.
fTo remedy the fault, please consult an authori-
zed Porsche dealer.
Page 198 of 276

198
Maintenance, Car Care
Light alloy wheels fPlease observe the chapter “WASHING” on
Page 192.
Warning!
Danger of accident if cleaning agents (e.g.
wheel cleaning agents) come into contact
with the brake discs. The resulting film on the
brake discs can impair braking perfor-
mance.
fMake sure that no cleaning agent comes into
contact with the brake discs.
fIf cleaning agent has come into contact with
the brake discs, thoroughly clean the brake
discs with a strong jet of water.
fPaying attention to any road users behind you,
dry the brake discs by applying the brakes at short intervals.
Pitting may occur if metallic particles which cause
contact corrosion (e.g. brass or copper in brake
dust) are allowed to remain on the aluminum for
too long.
fIf possible, wash the wheels with a sponge or
wash brush about every two weeks. In areas
where salt is spread on winter roads or there is
a lot of airborne industrial dust, it is best to
clean the wheels weekly.
The Porsche Light Alloy Wheel Cleaner
(ph-value 9.5) can be used for this purpo-
se.If the ph-value of the detergent is incor-
rect, the protective coating on the wheels
will be destroyed.
Polishes which dissolve oxides, such as
those frequently used for other metals, or
abrasive tools or agents are unsuitable
because they break down the oxide film of
the protective coating and will cause dis-
coloration of the wheel.
fEvery three months, after cleaning, coat the
wheels with a car wax or non-corrosive grease
(vaseline).
Using a clean cloth thoroughly rub the grease
into the surface.
Leather Characteristics and special features
The natural surface markings of leather, e.g. cre-
ases, healed scars, insect sting marks, structural
differences and slight variations in shade and
grain add to the attractiveness of the natural lea-
ther product.
A special mention must be made here of natural le-
ather.
For natural leather, carefully selected hides of the
highest quality are used. It is not covered comple-
tely with dye on production.
“Nature’s signature” is therefore easily recogniz-
able.
This fine material is distinguished by an outstan-
ding seating comfort, special suppleness and a ty-
pical patina. Leather care and treatment
fClean all types of leather regularly to remove
fine dust using a soft, damp, white woollen
cloth or a commercially available microfibre
cloth.
fRemove heavy contamination with Porsche le-
ather cleaner.
Please always follow the instructions for use gi-
ven on the containers.
Caustic cleaners and hard cleaning objects
must not be used.
Perforated leather must under no circum-
stances get wet on its reverse side.
Once cleaned, leather (particularly the heavily
stressed leather seats) must be treated only with
Porsche leather care liquid.
Page 230 of 276

230
Practical Tips, Emergency Service
Charge stateA well-charged battery prevents starting problems
and has a longer useful life.
Traffic density, speed limits, requirements
regarding noise, exhaust gas and fuel consump-
tion reduce the engine speed and, hence, the
generator output.
However, the large number of electrical loads has
markedly increased the demand for electrical
power.
In order to avoid unintended battery
discharge
fSwitch off unnecessary electrical loads in city
traffic, on short trips and in queues.
fAlways withdraw the ignition key when leaving
the vehicle.
fAvoid frequent operation of the convertible top
and operation of the Porsche Communication
Management system when the engine is not
running.
Battery carefKeep battery surface clean and dry.
fEnsure that cell plugs and terminal clamps are
firmly secured.
Checking acid level
The acid level should be more frequently checked
by a qualified specialist workshop during the
summer months and in predominantly warm
countries.
Charging the battery
Your Porsche partner will be pleased to advise you
about a suitable charger.
1. Always observe the instructions of the charger
manufacturer.
Depending on the type of charger, the battery
may have to be disconnected. Extremely
important: disconnect the negative cable first,
and then the positive cable – danger of short
circuit!
Reconnection must be carried out in reverse
order.
2. Before charging, cold batteries must be
warmed up indoors.
3. Frozen batteries must not be charged. They
must be replaced with a new battery.
4. When charging, ensure adequate ventilation. 5. Connect charger to the battery.
Only plug into the mains and switch the
charger on when it has been correctly
connected up.
Warning!
Hydrogen gas generated by the battery
could cause an explosion, resulting in severe
personal injuries.
fCharge battery in a well ventilated area.
fNever charge a frozen battery. It may explode
because of gas trapped in the ice. Allow a fro-
zen battery to thaw out first.
fIf you get electrolyte, which is an acid, in your
eyes or on your skin, immediately rinse with
cold water for several minutes and call a doc-tor.
Page 237 of 276

Practical Tips, Emergency Service
237
3. Run the engine of the donor car at a higher
speed.
4. Start the engine.
An attempted start using jump leads should
not last more than 15 seconds. Then allow a
waiting period of at least one minute.
5.Note
Before disconnecting the jump leads, electrical
loads such as the heated rear window and the
heating fan blower should be switched on (the
vehicle’s lights must not be switched on). This
reduces voltage peaks which may occur when
disconnecting the jump leads.
With the engine running, remove both jump
leads in reverse order.
Page 243 of 276

Practical Tips, Emergency Service
243
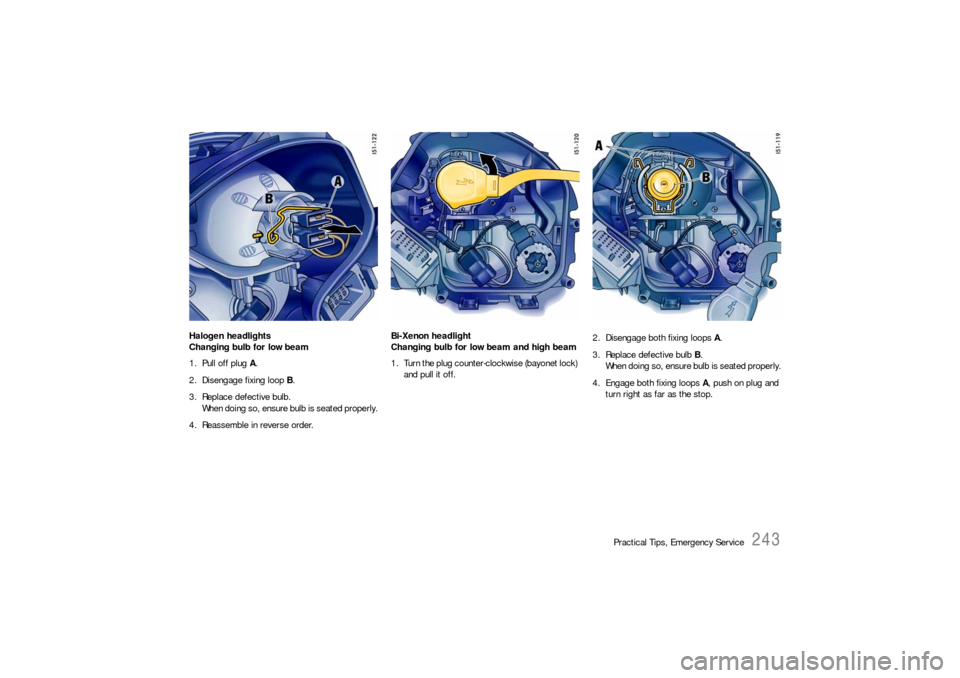
Halogen headlights
Changing bulb for low beam
1. Pull off plug A.
2. Disengage fixing loop B.
3. Replace defective bulb.
When doing so, ensure bulb is seated properly.
4. Reassemble in reverse order.Bi-Xenon headlight
Changing bulb for low beam and high beam
1. Turn the plug counter-clockwise (bayonet lock)
and pull it off.2. Disengage both fixing loops A.
3. Replace defective bulb B.
When doing so, ensure bulb is seated properly.
4. Engage both fixing loops A, push on plug and
turn right as far as the stop.
Page 244 of 276

244
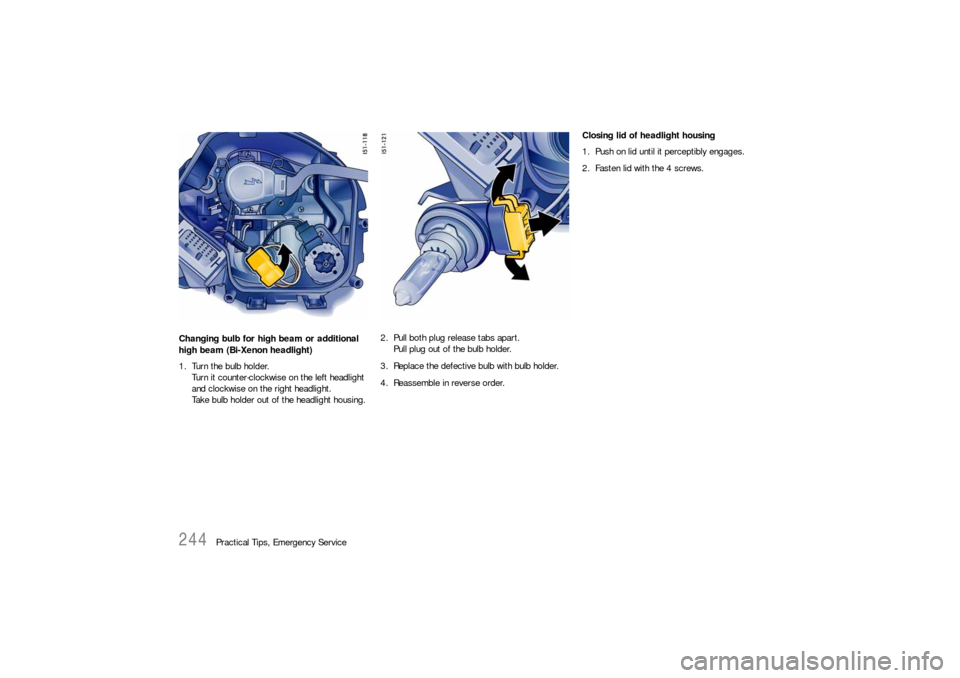
Practical Tips, Emergency Service Changing bulb for high beam or additional
high beam (Bi-Xenon headlight)
1. Turn the bulb holder.
Turn it counter-clockwise on the left headlight
and clockwise on the right headlight.
Take bulb holder out of the headlight housing.2. Pull both plug release tabs apart.
Pull plug out of the bulb holder.
3. Replace the defective bulb with bulb holder.
4. Reassemble in reverse order.Closing lid of headlight housing
1. Push on lid until it perceptibly engages.
2. Fasten lid with the 4 screws.
Page 249 of 276

Practical Tips, Emergency Service
249
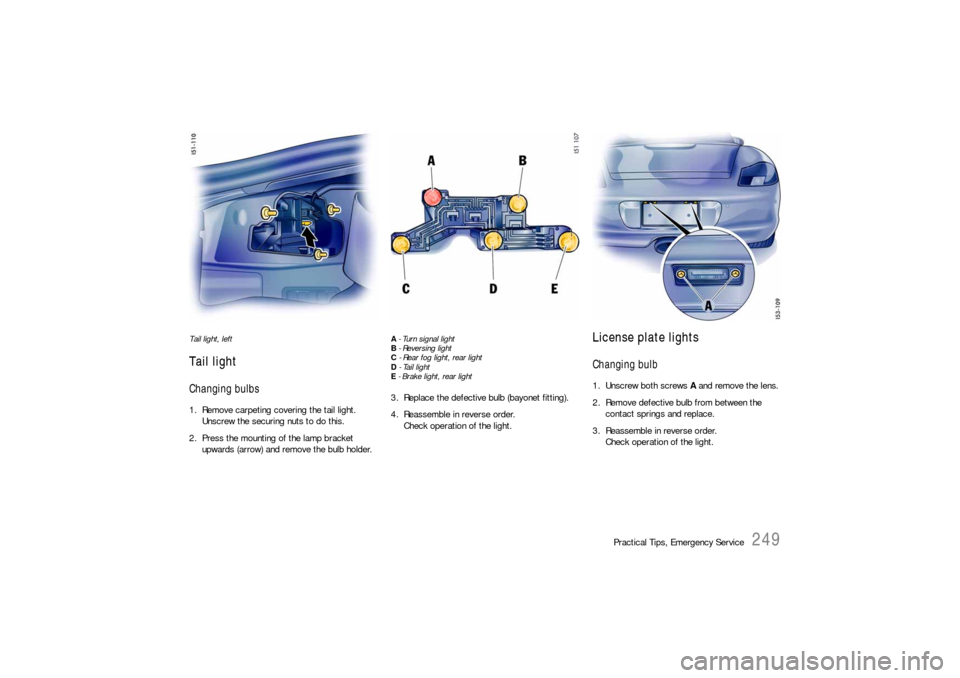
Tail light, leftTail lightChanging bulbs1. Remove carpeting covering the tail light.
Unscrew the securing nuts to do this.
2. Press the mounting of the lamp bracket
upwards (arrow) and remove the bulb holder.
A - Turn signal light
B - Reversing light
C - Rear fog light, rear light
D - Tail light
E - Brake light, rear light3. Replace the defective bulb (bayonet fitting).
4. Reassemble in reverse order.
Check operation of the light.
License plate lightsChanging bulb 1. Unscrew both screws A and remove the lens.
2. Remove defective bulb from between the
contact springs and replace.
3. Reassemble in reverse order.
Check operation of the light.
Page 251 of 276

Practical Tips, Emergency Service
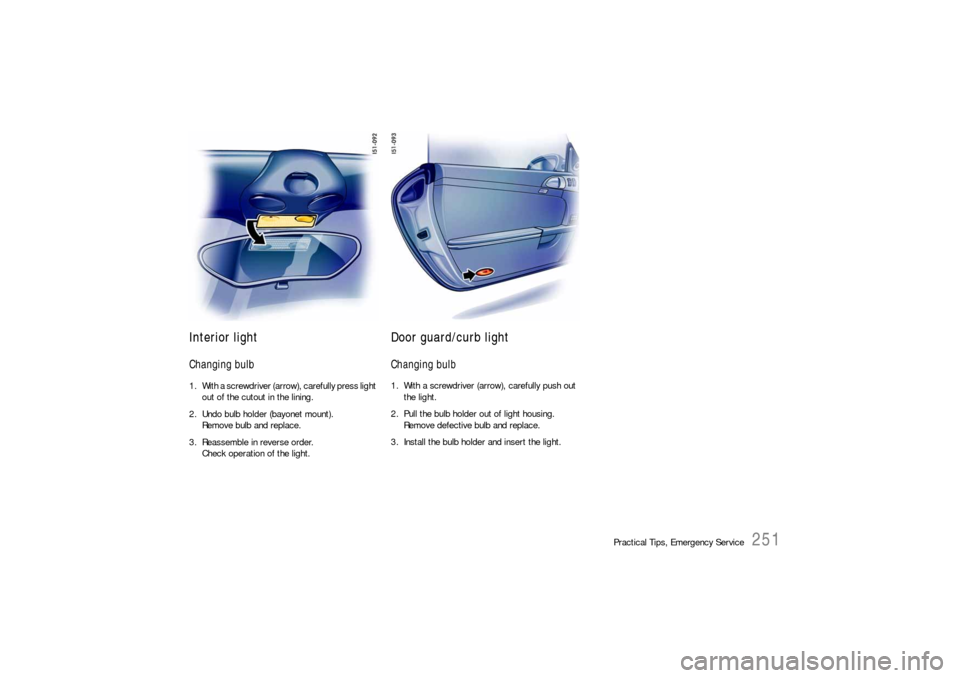
251
Interior lightChanging bulb 1. With a screwdriver (arrow), carefully press light
out of the cutout in the lining.
2. Undo bulb holder (bayonet mount).
Remove bulb and replace.
3. Reassemble in reverse order.
Check operation of the light.
Door guard/curb lightChanging bulb 1. With a screwdriver (arrow), carefully push out
the light.
2. Pull the bulb holder out of light housing.
Remove defective bulb and replace.
3. Install the bulb holder and insert the light.
Page 261 of 276

Vehicle Identification, Technical Data
261
Transmission Boxster
Boxster S Gear ratios5-speed
manual transmission6-speed
manual transmissionTiptronic S
1st gear 3.50 : 1 3.67 : 1 3.66 : 1
2nd gear 2.12 : 1 2.05 : 1 2.00 : 1
3rd gear 1.43 : 1 1.41 : 1 1.41 : 1
4th gear 1.09 : 1 1.13 : 1 1.00 : 1
5th gear 0.84 : 1 0.97 : 1 0.74 : 1
6th gear0.82 : 1
Reverse 3.44 : 1 3.33 : 1 4.10 : 1
Final drive ratio 3.75 : 1 3.875 : 1 4.379 : 1
Gear ratios6-speed
manual transmissionTiptronic S
1st gear 3.67 : 1 3.66 : 1
2nd gear 2.05 : 1 2.00 : 1
3rd gear 1.41 : 1 1.41 : 1
4th gear 1.13 : 1 1.00 : 1
5th gear 0.97 : 1 0.74 : 1
6th gear 0.82 : 1
Reverse 3.33 : 1 4.10 : 1
Final drive ratio 3.875 : 1 3.908 : 1