headlight PORSCHE BOXSTER 2005 2.G User Guide
[x] Cancel search | Manufacturer: PORSCHE, Model Year: 2005, Model line: BOXSTER, Model: PORSCHE BOXSTER 2005 2.GPages: 276, PDF Size: 4.05 MB
Page 197 of 276

Maintenance, Car Care
197
Warning!
Danger of fire and serious personal injuries.
fDo not apply additional undercoating or rust-
proofing on or near the exhaust manifold, ex-
haust pipes, catalytic converters or heat
shields. During driving the substance used for undercoating could overheat and ignite.
fBefore applying fresh underseal, carefully re-
move deposits or dirt and grease. Once it has
dried, the new undercoating compound forms
a tough protective coating which provides effi-
cient rust-proofing of the floor panels and com-
ponents.
fAlways apply a fresh coating of suitable preser-
vative to unprotected areas after cleaning the
underside of the body, the transmission, the
engine or carrying out repairs to under-body,
engine or transmission components.
Effective rust-proofing is particularly important du-
ring the cold weather season. If your car is driven
frequently in areas where salt has been spread on
the roads, the whole engine compartment should
be cleaned thoroughly after the winter to prevent
salt from causing any lasting damage. A full under-
body wash should also be performed at the same
time.
Door, roof, lid and window seals fWash dirt (e.g. abrasion, dust, road salts) from
all seals regularly using warm soapy water. Do
not use any chemical cleaning agents or sol-
vents.
When there is a frost hazard, the outer door seals
and the front and rear lid seals can be protected
against freezing into place by a suitable care pro-
duct.
In order to prevent damage to the anti-fric-
tion coating, the inner door seals, the con-
vertible top seals and hardtop seals must not
be treated with care products.
Headlights, lights, interior and exterior
plastic parts fUse only clean water and a little dishwashing
detergent to clean light lenses, plastic head-
light lenses, plastic parts and surfaces.
Do not clean when dry.
Use a soft sponge or a soft, lint-free cloth.
Gently wipe the surface without applying too
much pressure.
The Porsche inside window cleaner is also sui-
table for cleaning plastic surfaces. Follow the
cleaning instructions on the container.
Never use other chemical cleaners or
solvents.
fRinse cleaned surfaces with clear water.
Page 200 of 276

200
Maintenance, Car Care
Storing your Porsche If you intend to store your Porsche for a prolonged
period, please consult your authorized Porsche
dealer. The staff will be glad to advise you on the
most suitable and necessary methods.
fClean your vehicle thoroughly inside and out-
side.
Clean the engine compartment.
The under carriage and chassis components
should be free of dirt and salt deposits.
fFill up the fuel tank.
fChange the oil and oil filter, and run the engine
for several minutes.
fIncrease the tire pressure to 58 psi (4 bar).
It is not recommended to lift the vehicle, due to
the possibility of corrosion on shock absorber
piston shafts.
The vehicle should be moved slightly, approxi-
mately every four weeks, to prevent flat spot
on the tires. Climate control
The air conditioning system should be in good wor-
king condition and fully charged.
Windshield/Headlight washer
fCheck and correct antifreeze/cleaning solution
level as necessary.
Electrical system
fRemove the battery from the vehicle and store
it in a cool dry place, not on a cement floor.
When the battery is disconnected, the
alarm system is deactivated.
fRecharge the battery every 3 months. If the
battery remains in the vehicle with the cables
connected, it is necessary to check, remove
and recharge the battery every 2-3 weeks.
Do not fast charge the battery.
fPlease observe the chapter “BULB CHART” on
Page 239. Vehicle interior
The interior must be dry, especially in the area of
the floor carpets. The use of drying agents (Silica-
Gel) is recommended in vehicles with leather inte-
rior and in areas with high humidity. The recom-
mended amount is 3 fabric bags of 1.1 lbs. (500
grams) each placed on the floor carpets.
Windows, doors, lids and top must be closed. The
air vents should be opened.
Page 201 of 276

Practical Tips, Emergency Service
201 Practical Tips, Emergency Service
Exercise Extreme Caution
when Working on your Vehicle .................... 202
Tires/Wheels ............................................ 203
Loading Information................................... 216
Lifting the Vehicle
with a Lifting Platform or Garage Lift........... 218
Flat Tire .................................................... 219
Wheel Bolts .............................................. 222
Electrical System ..................................... 226
Battery ..................................................... 229
Jump lead starting..................................... 236
Replacing bulbs......................................... 238
Headlights ................................................. 241
Turn signal light ........................................ 245
Side marker light ....................................... 248
Tail light ................................................... 249
Additional brake light................................. 250
Luggage compartment/footwell lights......... 250
Interior light .............................................. 251
Adjusting Headlights .................................. 252
Towing ..................................................... 254
Page 238 of 276

238
Practical Tips, Emergency Service
Replacing bulbs
Warning!
Risk of short circuit.
fAlways switch off the relevant load when
changing bulbs.
Risk of injury. The Bi-Xenon headlights are
under high voltage when installed.
fExercise extreme caution when working in the
area of the Bi-Xenon headlights.
Risk of damage. Bulbs of a higher wattage
can damage the lamp housing.
fOnly use the bulbs specified in the bulb chart.
fBulbs must be clean and free from grease.
fNever touch bulbs with your bare hands. Use a
cloth or soft paper when replacing bulbs.
fAlways carry spare bulbs with you.
In certain countries, the carrying of spare
bulbs is mandatory.
Caution!
Risk of damage to headlights due to exces-
sive temperatures and abrasion.
fAttach no coverings (e.g. films, “stone
guards”) in the area of the headlights.
fUse soapy water only to clean light lenses and
plastic headlight lenses.
In no case may chemical cleaners or other vol-
atile cleaning fluids be used.
fTo prevent scratches, do not rub with a dry or merely moist cloth, tissue or insect sponges.
Page 239 of 276

Practical Tips, Emergency Service
239
Bulb chart
Ty p e , r a t i n g
Halogen low beam H7, 55 W
Low beam with Bi-Xenon headligh Philips, D2S 35W
Halogen high beam H 9, 65W
Additional high beam with Bi-Xenon headlight H 11, 55W
Fog light H8, 35W
Tail light, rear fog light, brake light, tail light P21, 4W
Tail light, reflector P21, 5W
Reversing light P21W
Turn signal light, front and rear LL PY21W (long-life)
Door guard,/curb light/footwell light/
luggage compartment lihgtW5W
Parking light W5W Blue-Vision
License plate light C5W
Side marker Light W3W
Page 240 of 276

240
Practical Tips, Emergency Service
Warning!
Risk of short circuit.
fAlways switch off the relevant load when
changing bulbs.
Risk of injury. The Bi-Xenon headlights are
under high voltage when installed.
fExercise extreme caution when working in the
area of the Bi-Xenon headlights.
Risk of damage. Bulbs of a higher wattage
can damage the lamp housing.
fOnly use the bulbs specified in the bulb chart.
fBulbs must be clean and free from grease.
fNever touch bulbs with your bare hands. Use a
cloth or soft paper when replacing bulbs.
fAlways carry spare bulbs with you.
In certain countries, the carrying of spare
bulbs is mandatory.
Caution!
Risk of damage to headlights due to exces-
sive temperatures and abrasion.
fAttach no coverings (e.g. films, “stone
guards”) in the area of the headlights.
fUse soapy water only to clean light lenses and
plastic headlight lenses.
In no case may chemical cleaners or other vol-
atile cleaning fluids be used.
fTo prevent scratches, do not rub with a dry or merely moist cloth, tissue or insect sponges.
Page 241 of 276

Practical Tips, Emergency Service
241
Headlights
Caution!
Risk of damage to headlights due to abrasion
and excessive temperatures.
fDo not affix any coverings (e.g. “stone guards” or films) in the area of the headlights.
Note
The headlights can mist up depending on the
temperature and humidity.
fTo ensure optimum ventilation, do not cover
the gap between headlight and body
(e.g. “stone guards” or films).
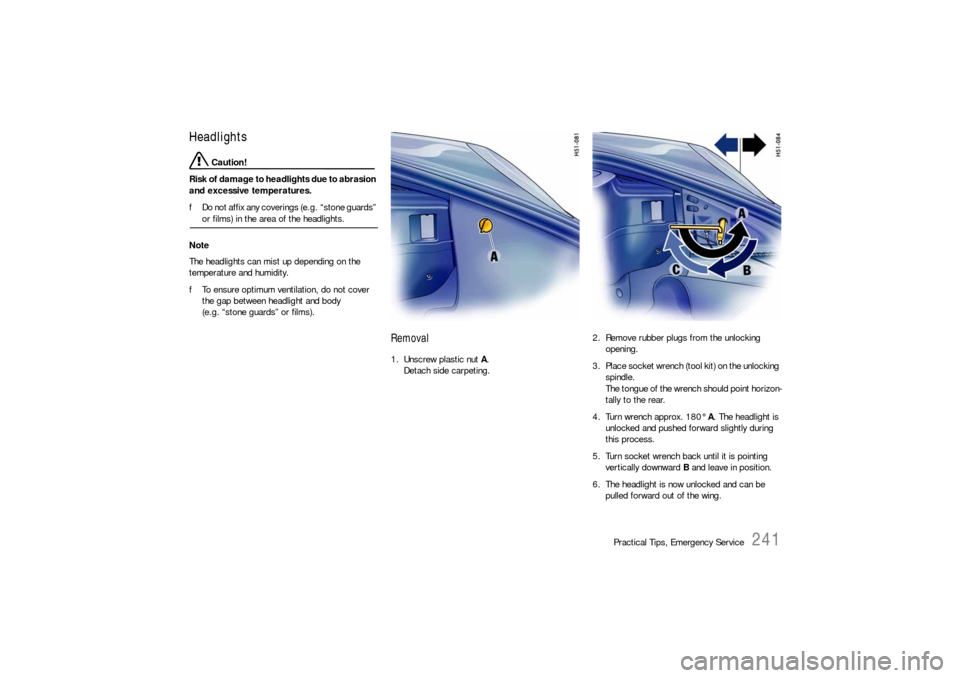
Removal1. Unscrew plastic nut A.
Detach side carpeting.2. Remove rubber plugs from the unlocking
opening.
3. Place socket wrench (tool kit) on the unlocking
spindle.
The tongue of the wrench should point horizon-
tally to the rear.
4. Turn wrench approx. 180° A. The headlight is
unlocked and pushed forward slightly during
this process.
5. Turn socket wrench back until it is pointing
vertically downward B and leave in position.
6. The headlight is now unlocked and can be
pulled forward out of the wing.
Page 242 of 276

242
Practical Tips, Emergency Service
Installing1. Insert the headlight into the guide rails and
push it fully into the wing.
2. Push headlight to the rear and at the same
time the turn socket wrench until it points
horizontally to the rear C.
The headlight locking device must perceptibly
and audibly engage.
3. Insert rubber plug into the unlocking opening
and secure the carpeting.
Check the function of all lights.
Low beam, high beam and additional high
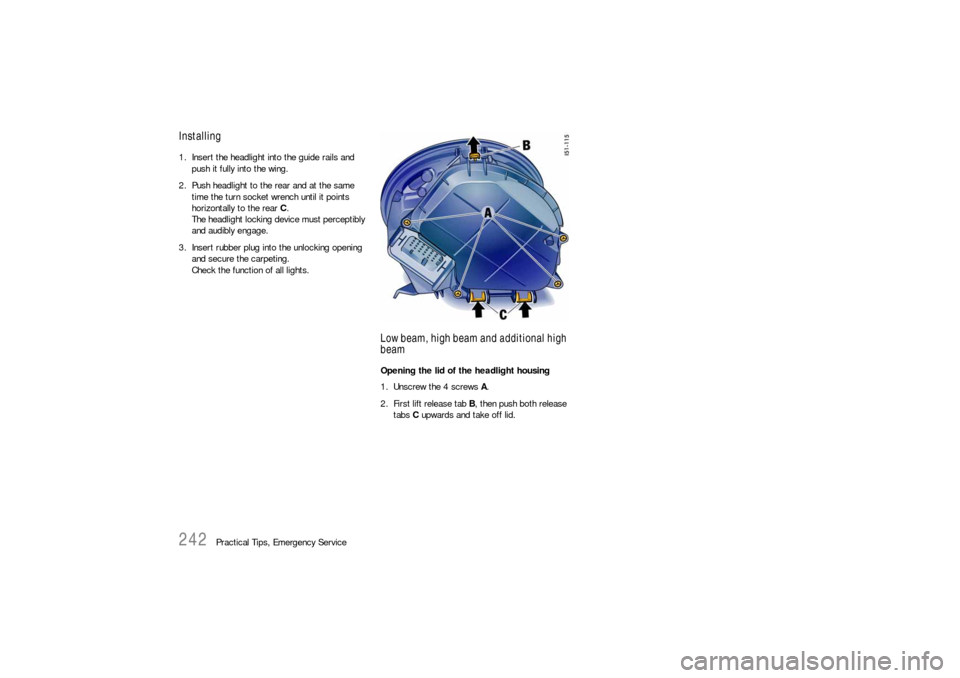
beamOpening the lid of the headlight housing
1. Unscrew the 4 screws A.
2. First lift release tab B, then push both release
tabs C upwards and take off lid.
Page 243 of 276

Practical Tips, Emergency Service
243
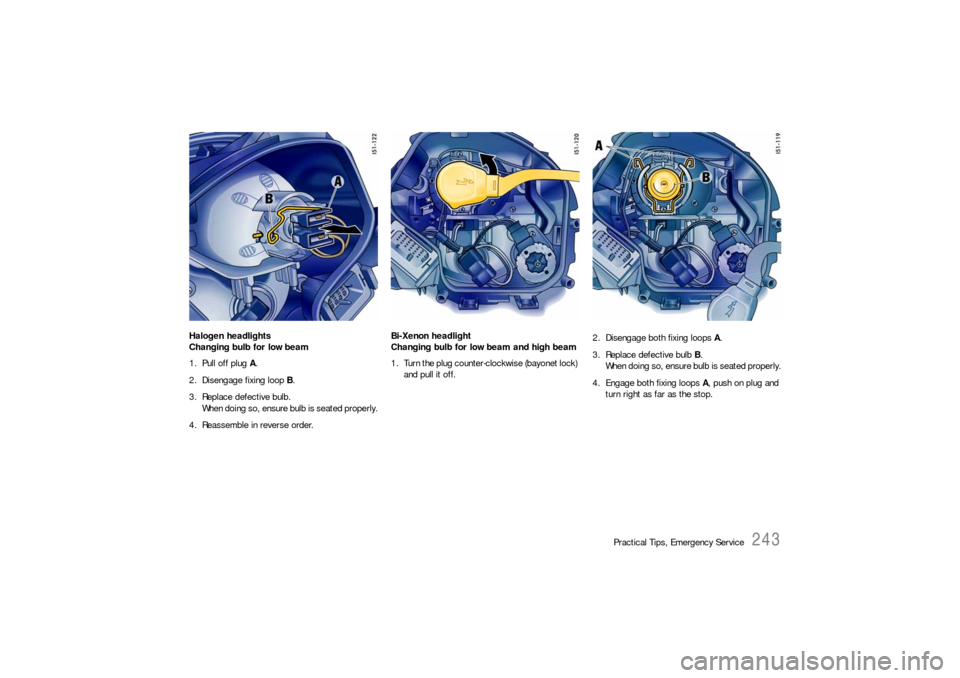
Halogen headlights
Changing bulb for low beam
1. Pull off plug A.
2. Disengage fixing loop B.
3. Replace defective bulb.
When doing so, ensure bulb is seated properly.
4. Reassemble in reverse order.Bi-Xenon headlight
Changing bulb for low beam and high beam
1. Turn the plug counter-clockwise (bayonet lock)
and pull it off.2. Disengage both fixing loops A.
3. Replace defective bulb B.
When doing so, ensure bulb is seated properly.
4. Engage both fixing loops A, push on plug and
turn right as far as the stop.
Page 244 of 276

244
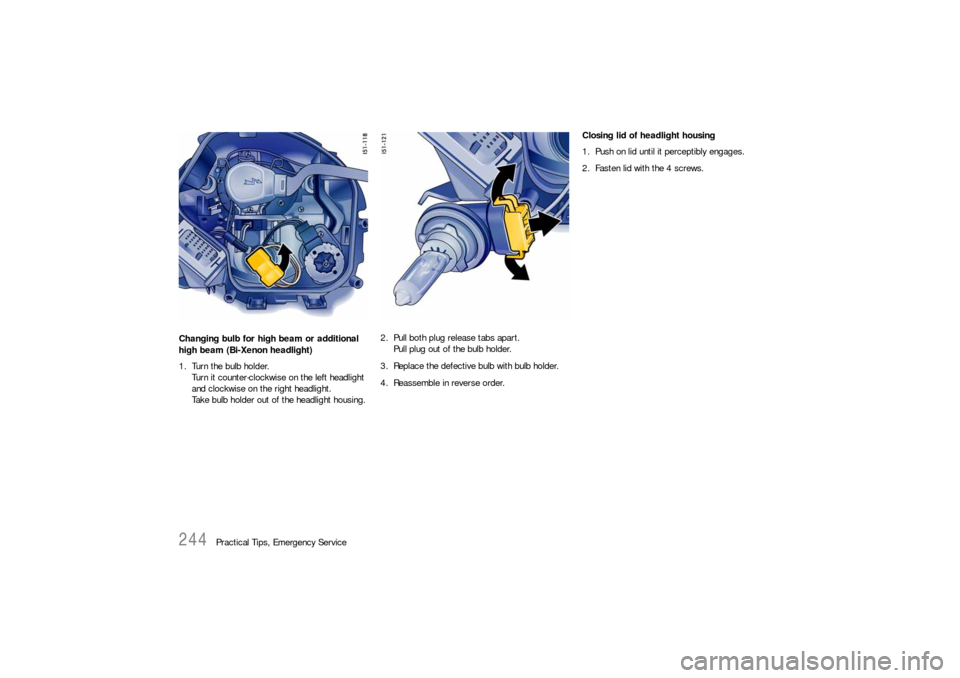
Practical Tips, Emergency Service Changing bulb for high beam or additional
high beam (Bi-Xenon headlight)
1. Turn the bulb holder.
Turn it counter-clockwise on the left headlight
and clockwise on the right headlight.
Take bulb holder out of the headlight housing.2. Pull both plug release tabs apart.
Pull plug out of the bulb holder.
3. Replace the defective bulb with bulb holder.
4. Reassemble in reverse order.Closing lid of headlight housing
1. Push on lid until it perceptibly engages.
2. Fasten lid with the 4 screws.