door lock PORSCHE BOXSTER 2005 2.G Owner's Manual
[x] Cancel search | Manufacturer: PORSCHE, Model Year: 2005, Model line: BOXSTER, Model: PORSCHE BOXSTER 2005 2.GPages: 276, PDF Size: 4.05 MB
Page 108 of 276

108
Controls, InstrumentsIf the ignition key is withdrawn and the door is
opened while the lights (not the parking light or
Welcome Home lighting) are on, a chime warns of
possible battery discharge.
In some countries, differences are possible
due to provisions of law.
Note on operation
Further individual light functions (e.g. daytime driv-
ing lights) are available in vehicles with the Sport
Chrono package.
Please observe the chapter “Individual Memory” in
the separate PCM operating instructions.
Welcome Home LightingSwitching onfMove light switch to the HOME position.
For improved visibility and security when you get
in and out of the car, the fog lights and the tail
lights remain on for a certain period of time:
–When you get out of the car, the lights are
turned on for approx. 30 seconds after the
door is opened. The off-delay time resumes
when the vehicle is locked.
On vehicles with the Sport Chrono package,
the PCM can be used to set the off-delay time.
This setting also changes the lighting period
for unlocking the vehicle.
Please observe the chapter “Individual
Memory” in the separate PCM operating
instructions.
The lights are turned on for approx. 30 seconds
when the vehicle is unlocked.
The lights go out if the ignition is switched on or
when leaving the Welcome Home lighting
If the ignition key is withdrawn and the door is ope-
ned while the lights (not the parking light left/right)
are on, a gong warns of possible battery dis-
charge.
In some countries, differences are possible
due to provisions of law.
Light SwitchLights switched off
Welcome Home Function
Parking lights, side marker lights,
license plate light, instrument illumination
Low beam, high beam
Only with ignition on
Fog lights in addition to parking lights or
low beam:
Pull switch to first click.
Indicator light on.
The fog lights will go out automatically
when the high beams are switched on.
Rear fog light in addition to the fog
lights:
Pull switch to second click.
Indicator light on.
Page 125 of 276
Controls, Instruments
125
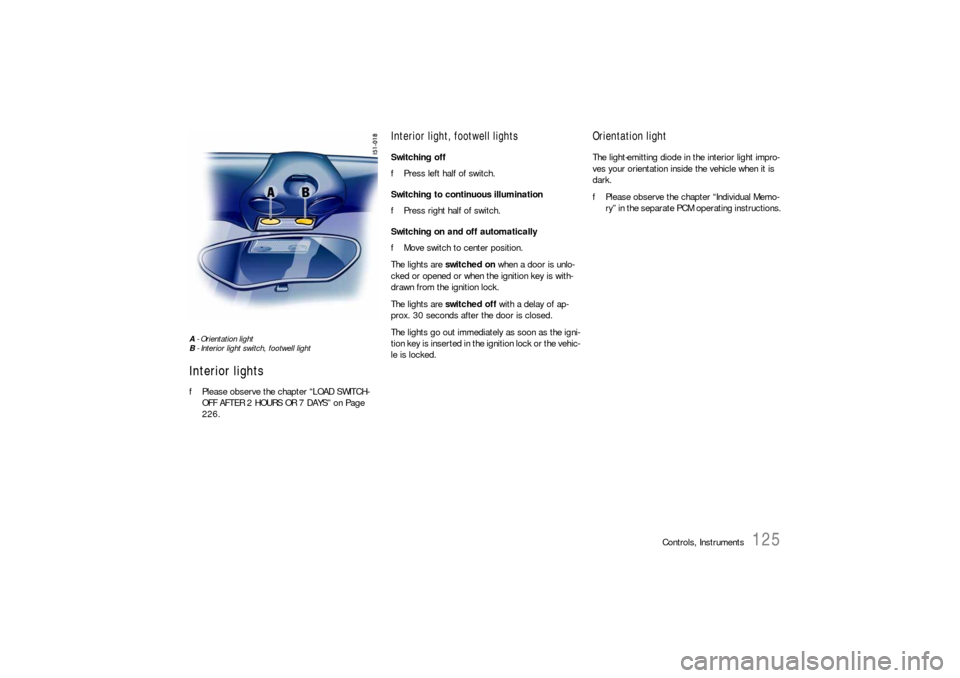
A - Orientation light
B - Interior light switch, footwell lightInterior lightsfPlease observe the chapter “LOAD SWITCH-
OFF AFTER 2 HOURS OR 7 DAYS” on Page
226.
Interior light, footwell lightsSwitching off
fPress left half of switch.
Switching to continuous illumination
fPress right half of switch.
Switching on and off automatically
fMove switch to center position.
The lights are switched on when a door is unlo-
cked or opened or when the ignition key is with-
drawn from the ignition lock.
The lights are switched off with a delay of ap-
prox. 30 seconds after the door is closed.
The lights go out immediately as soon as the igni-
tion key is inserted in the ignition lock or the vehic-
le is locked.
Orientation lightThe light-emitting diode in the interior light impro-
ves your orientation inside the vehicle when it is
dark.
fPlease observe the chapter “Individual Memo-
ry” in the separate PCM operating instructions.
Page 154 of 276
154
Mobile Roofs
Convertible Top Brief operating instructions can be found on the
back side of the driver’s sun visor.
fPlease observe the chapter “CAR CARE IN-
STRUCTIONS” on Page 191.
Warning!
When opening or closing the convertible top,
serious personal injury may occur if a per-
son’s body parts are near or in the way of the
convertible top mechanism’s moving parts.
fMake absolutely sure that nobody can be inju-
red by the convertible-top mechanism or the convertible-top compartment lid. Do not operate convertible top:
– At temperatures below 32°F/0°C.
– When one side of the car is on a curb, a hoist
or a jack.
– When items of luggage or other objects hinder
the convertible top movement or are in abrasi-
ve contact with the convertible top or rear win-
dow.
Items of luggage or objects on the luggage
tray above the engine compartment lid must
be put in the storage box or be secured under
the net to prevent their sliding out.
– Drive only with the convertible top fully open or
closed.
fAvoid frequent operation of the convertible top
with the engine off; the vehicle battery would
be unintentionally discharged rapidly.
fThe convertible top must be operated only
when the car is stationary. Make sure there is
sufficient clearance above the convertible top
(e.g. in the garage).
fTo prevent damp stains and abrasions, only
open the convertible top in a dry, clean state.
fPark your car in the shade whenever possible,
as the fabric, rubber material and color can be
harmed by long exposure to sunlight.
Door windows If the door windows are closed, they will automati-
cally be lowered a few centimeters before the con-
vertible top is opened or closed.
The door windows close automatically when the
convertible top is locked with the latching lever on
the windshield frame. Conditions for operating the convertible
top – The ignition must be switched on
(engine running or off).
– Maximum speed 30 mph (50 km/h)
The opening/closing process of the convert-
ible top will be interrupted if the maximum
speed is exceeded.
fReduce speed.
Press button again.
The opening/closing process is ended.
Page 162 of 276

162
Mobile Roofs
HardtopSince the convertible top stays open for a long
time, it must be absolutely dry and clean before
being opened.
This prevents damp stains and abrasion damage.
Your autorized Porsche dealer will be pleased to
advise you about correct hardtop storage.
Note
The inserts for locking of the pivot locks are not
installed on vehicles delivered without a hardtop.
It is essential to have the necessary parts retro-
fitted by an authorized Porsche dealer before a
hardtop is fitted for the first time.
Fitting the hardtop1. Open doors and convertible top.
2. Carefully remove both plastic covers (arrow)
out of the pivot locks, using a screwdriver.
Store plastic covers.
Note
These plastic covers are included with vehicles
that are factory-equipped with a hardtop. 3. Pull off cover A on the roll-over bar.
Page 166 of 276

166
Mobile Roofs
Removing the hardtop1. Make sure that the hardtop is placed on a
clean, soft surface.
2. Open doors.
3. Remove cover from the front locking lever.
4. Open front latch.
5. Open rear pivot locks (swivel inwards).
Unplug plug of the hardtop heated rear
window.
6. With one person on each side, grasp the
hardtop.
Lift hardtop at rear and pull out of the sockets
on the windshield frame at front.
Warning!
Danger of pinching fingers or hands.
fEvenly lift the hardtop at both sides.
7. Carefully lift the hardtop up and off the vehicle
to the rear.
8. Close front hardtop latch.
Fit cover on the front latch.
9. Close pivot locks on the vehicle with the plastic
covers.
10.Remove the connector of the convertible top
heated rear window from the empty socket
and insert into the socket.11.Swivel the sash guide of the seat belt forward.
Insert the lower retaining lugs of the cover A
from above and clip in the upper retaining lugs
on the bar.
Page 178 of 276
178
Maintenance, Car Care
Fuel
Warning!
Fuel is highly flammable and harmful to
health.
fFire, open flame and smoking are prohibited
when handling fuel.
fAvoid contact with skin or clothing.
fDo not inhale fuel vapors.
To prevent damage to the emission control
system and engine:
fNever drive the tank completely out of fuel.
fAvoid high cornering speeds after the warning lights have come on.
fPlease observe the chapter “FUEL ECONOMY”
on Page 177.
fPlease observe the chapter “EMISSION CONT-
ROL SYSTEM” on Page 182.
fPlease observe the chapter “FUEL” on Page
82.
Check engine warning light
If the warning lights in the instrument panel and on-
board computer come on and remain on while
driving, it suggests:
– an improperly fastened tank cap or
– refuelling with engine running.
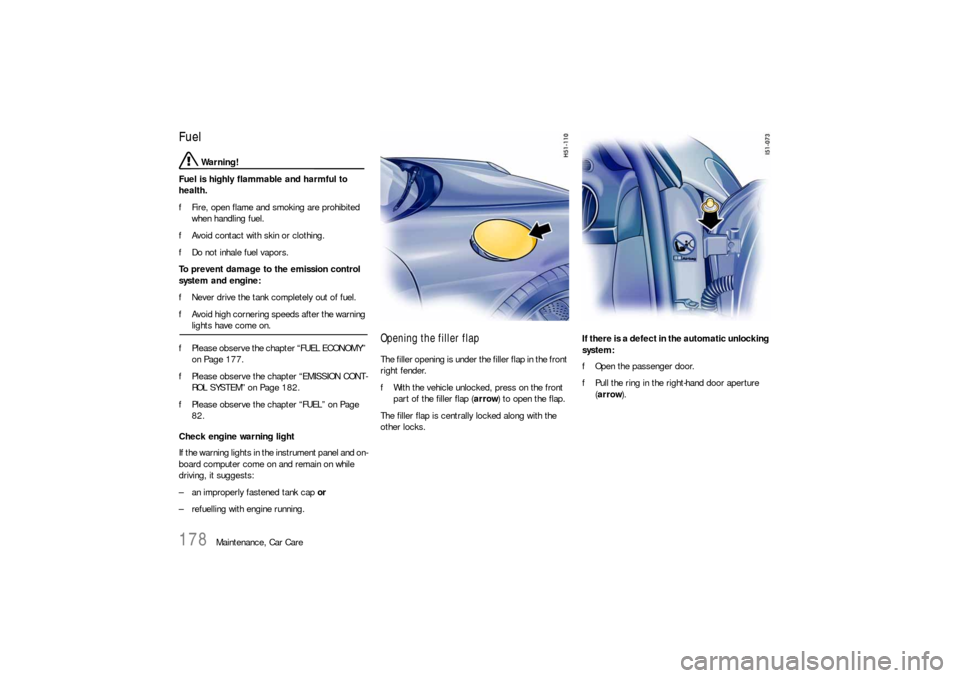
Opening the filler flap The filler opening is under the filler flap in the front
right fender.
fWith the vehicle unlocked, press on the front
part of the filler flap (arrow) to open the flap.
The filler flap is centrally locked along with the
other locks. If there is a defect in the automatic unlocking
system:
fOpen the passenger door.
fPull the ring in the right-hand door aperture
(arrow).
Page 194 of 276
194
Maintenance, Car Care Automatic car washes
Optional add-on parts or parts which project
beyond the contours of the vehicle may be
damaged by design features (e.g. brushes) of au-
tomatic car washes.
The following parts are particularly suscep-
tible to damage:
– Convertible top (hot wax treatment cannot be
used, as the wax attacks the convertible top
material),
– Windshield wipers (always switch them off to
prevent them wiping unintentionally in intermit-
tent or sensor operation)
– External telephone antenna (always unscrew)
– Fixed rear spoiler or extended rear spoiler
– Wheels (the wider the rim and the lower the tire
height, the greater the risk of damage)
– High-gloss wheels (to prevent these from get-
ting scratched, do not clean with the wheel-
cleaning brushes of the car wash).
fPlease consult the operator before using auto-
matic car washes.
fWash and dry by hand all points not reached by
a car wash, such as door and lid seams or
door sills. Note
Automatic car washes spray water at odd angles
and high pressures, which are not seen in normal
driving. Therefore, water can sometimes find its
way into the passengers compartment during or
shortly after the car wash.
Door locks fTo prevent the door locks from freezing during
the cold season, the lock cylinders should be
covered during a wash.
fShould the locks freeze, use an ordinary de-
icer. In many cases, a well warmed key can
help.
Never use excessive force.
Page 226 of 276
226
Practical Tips, Emergency Service
Electrical System In order to avoid damage and faults in electrical or
electronic systems, electrical accessories should
be installed at your authorized Porsche dealer.
fOnly use accessories authorized by Porsche.
Warning!
Risk of short circuit and fire.
Replacing fuses or relays with the engine
running or the ignition on could cause elec-
trical shock.
fDisconnected the battery during all work on
the electrical system.
Please observe the chapter “BATTERY” on Page 229.
Relays Defective relays should be changed only by an
authorized workshop.
Alarm system, central locking The status of the central locking and alarm system
is not changed by disconnecting the battery.
When the battery is disconnected, the alarm sys-
tem ceases to function. Overload protection If the central locking system is operated more
than ten times within a minute, further operation is
blocked for 30 seconds.
Load switch-off after 2 hours or 7 daysIf the ignition key is removed, loads which are
switched on or are in standby mode (such as the
luggage compartment light, interior light and
radio) are automatically switched off after approx.
2hours.
If the vehicle is not started or unlocked with the
remote control within 7days, the remote control
standby function is switched off (to save the
vehicle battery).
1. In this case, unlock the driver's door with the
key at the door lock.
Leave the door closed in order to prevent the
alarm system from being triggered.
2. Press button 1 on the remote control.
The remote control is now activated again.
Page 228 of 276
228
Practical Tips, Emergency Service
Emergency unlocking of the front luggage
compartment lidIf the battery is discharged, the lid can be opened
only with the aid of a donor battery.
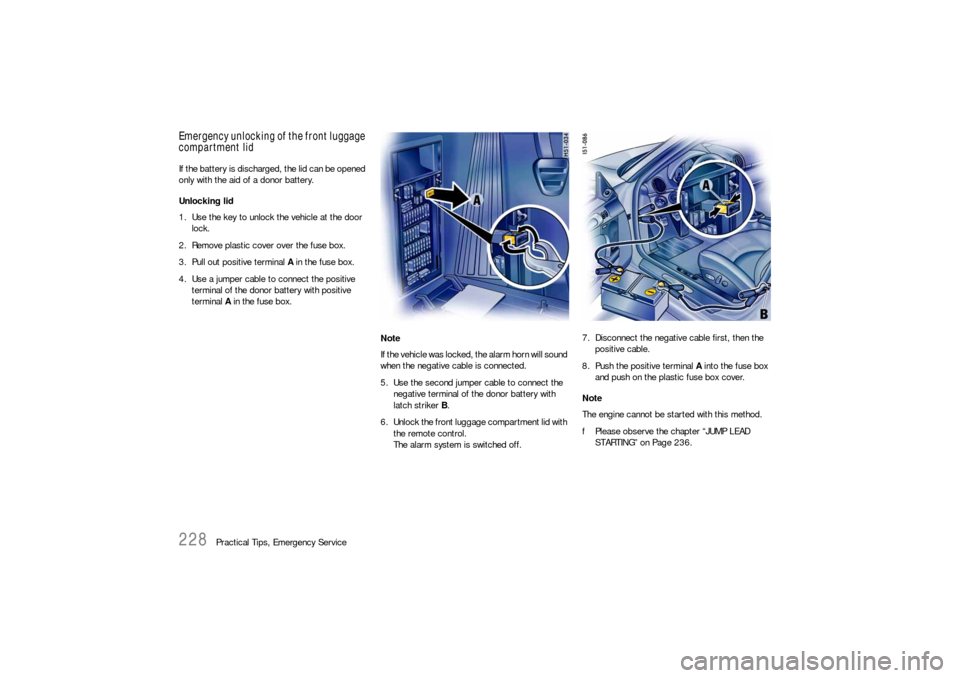
Unlocking lid
1. Use the key to unlock the vehicle at the door
lock.
2. Remove plastic cover over the fuse box.
3. Pull out positive terminal A in the fuse box.
4. Use a jumper cable to connect the positive
terminal of the donor battery with positive
terminal A in the fuse box.
Note
If the vehicle was locked, the alarm horn will sound
when the negative cable is connected.
5. Use the second jumper cable to connect the
negative terminal of the donor battery with
latch striker B.
6. Unlock the front luggage compartment lid with
the remote control.
The alarm system is switched off.7. Disconnect the negative cable first, then the
positive cable.
8. Push the positive terminal A into the fuse box
and push on the plastic fuse box cover.
Note
The engine cannot be started with this method.
fPlease observe the chapter “JUMP LEAD
STARTING” on Page 236.
Page 231 of 276
Practical Tips, Emergency Service
231
Winter drivingThe capacity and ability of the battery to store
power decreases at low outside temperatures.
Moreover, the battery is more heavily loaded in the
winter months, e.g. by the heated rear window,
the more frequent use of additional lights, the
blower and the windshield wipers, etc.
fHave the battery checked before winter
begins.
Keep the battery well charged to prevent it from
freezing.
A discharged battery can freeze even at
23°F/-5 °
C, but a fully charged one only freezes at
-40°F/-40 °C.
Laying up the vehicleIf the vehicle stands for long periods in the garage
or workshop, the doors and lids should be closed.
fPlease observe the chapter “EMERGENCY
UNLOCKING OF THE FRONT LUGGAGE
COMPARTMENT LID” on Page 228.
fWithdraw the ignition key and, if necessary,
disconnect the battery.
When the battery is disconnected, the
alarm system ceases to function!
Even if you put your vehicle out of operation, the
battery still discharges.
fThe battery must be charged, i.e. connected
to a charger, approximately every 6 weeks in
order to preserve functioning.
Always observe the instructions of the charger
manufacturer.
fStore a battery that has been removed in a
dark, cool place, but not subject to frost.
Replacing the batteryThe battery is subject to normal wear: its service
life depends heavily on the care you give it,
climatic conditions and the conditions of use
(distances, loads).
It is not possible to use the details on the battery
case to determine a comparable battery that
meets all the specific requirements of Porsche.
fUse only a battery that meets the specific
requirements of your vehicle as a replacement.
We recommend that you use an Orignal
Porsche battery.
fPlease observe the disposal instructions for
batteries!