heating PORSCHE BOXSTER 2006 2.G Owners Manual
[x] Cancel search | Manufacturer: PORSCHE, Model Year: 2006, Model line: BOXSTER, Model: PORSCHE BOXSTER 2006 2.GPages: 296, PDF Size: 4.12 MB
Page 33 of 296
Controls, Instruments
33
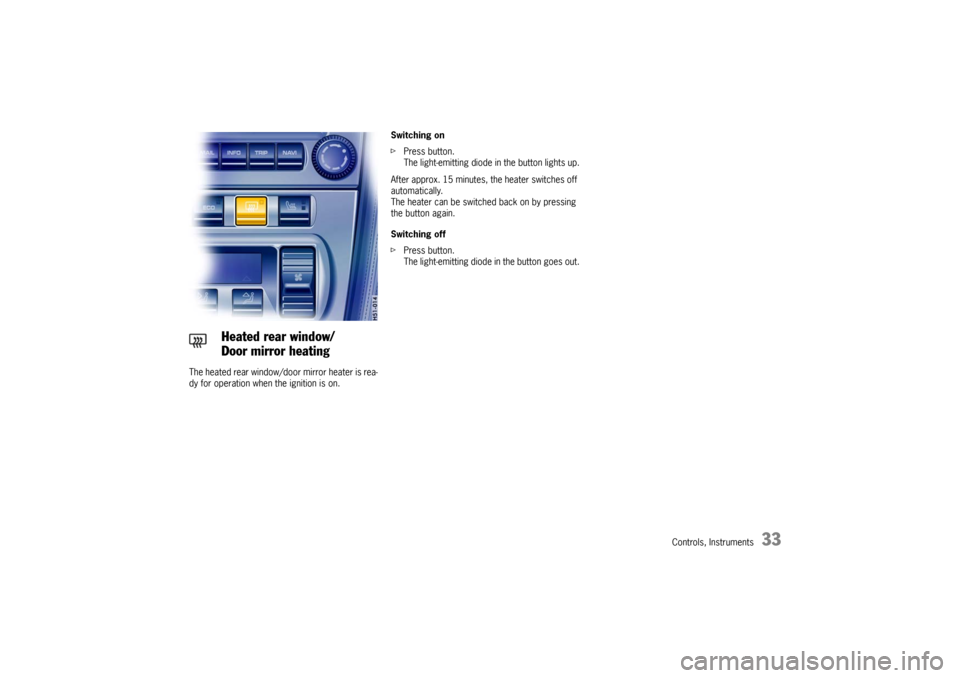
The heated rear window/door mirror heater is rea-
dy for operation when the ignition is on. Switching on
fPress button.
The light-emitting diode in the button lights up.
After approx. 15 minutes, the heater switches off
automatically.
The heater can be switched back on by pressing
the button again.
Switching off
fPress button.
The light-emitting diode in the button goes out.
Heated rear window/
Door mirror heating
Page 38 of 296
38
Controls, Instruments
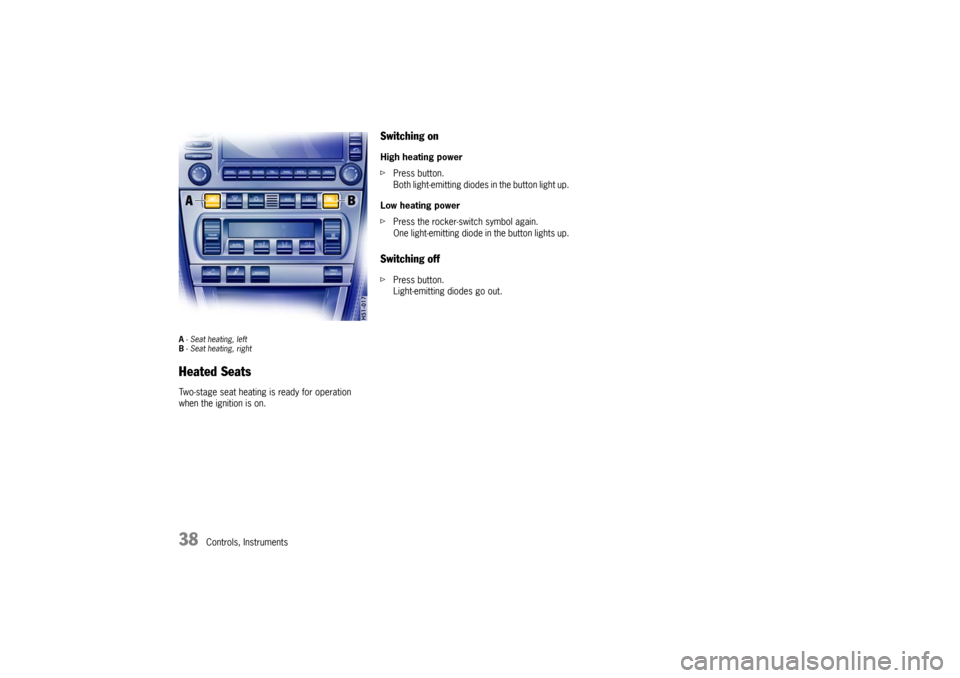
A- Seat heating, left
B- Seat heating, rightHeated SeatsTwo-stage seat heating is ready for operation
when the ignition is on.
Switching onHigh heating power
fPress button.
Both light-emitting diodes in the button light up.
Low heating power
fPress the rocker-switch symbol again.
One light-emitting diode in the button lights up.Switching offfPress button.
Light-emitting diodes go out.
Page 59 of 296

Controls, Instruments
59
Brake pedal
Warning!
Risk of an accident.
Any obstruction of the pedal could increase
the stopping distance.
fAlways check the movement of the brake pedal
before driving and make sure that it is not obs-
tructed by a floor mat or any other object.
fSecure the floor mat to prevent it from sliding
into positions that could interfere with the safe
operation of your vehicle.
Your Porsche dealer will be glad to offer you
floor mats of the correct size including a secu-ring possibility.
Note
In case one of the two brake circuits fails, increa-
sed pedal travel is required to bring your vehicle
to a full stop.
Warning!
To avoid overheating and premature wear of
the brakes:
fBefore descending a steep grade, reduce
speed and shift the transmission into a lower
gear or driving position to control speed.
fDo not ride the “brakes” by resting your foot on
the pedal when not intending to apply brake
pressure.
fDo not hold the pedal down too long or too of-
ten.
This could cause the brakes to get hot and not function properly.
Page 72 of 296

72
Controls, Instruments
Operation, Instruments 1 Light switch
2 Turn signals/
headlight dimmer/flasher lever
3 Ignition Lock/locking the steering column
4 Hands-free microphone for telephone
5Horn
6 Windshield wiper/washer lever
7 Porsche Communication Management/Radio
8 Interior temperature sensor, GPS antenna
9 Emergency flasher switch10 Central locking button,
Readiness display for alarm system
11 Cupholder
12 Operating lever for on-board computer
13 Locking lever for steering-wheel adjustment
14 Operating lever for cruise control
15 Control panel for heating, ventilation and air
conditioning system
16 Buttons for rear spoiler,
Porsche Active Suspension Management
(PASM),
Sport Mode,
Porsche Stability Management (PSM)
17 Seat heating, left/right
Page 130 of 296
130
Controls, Instruments
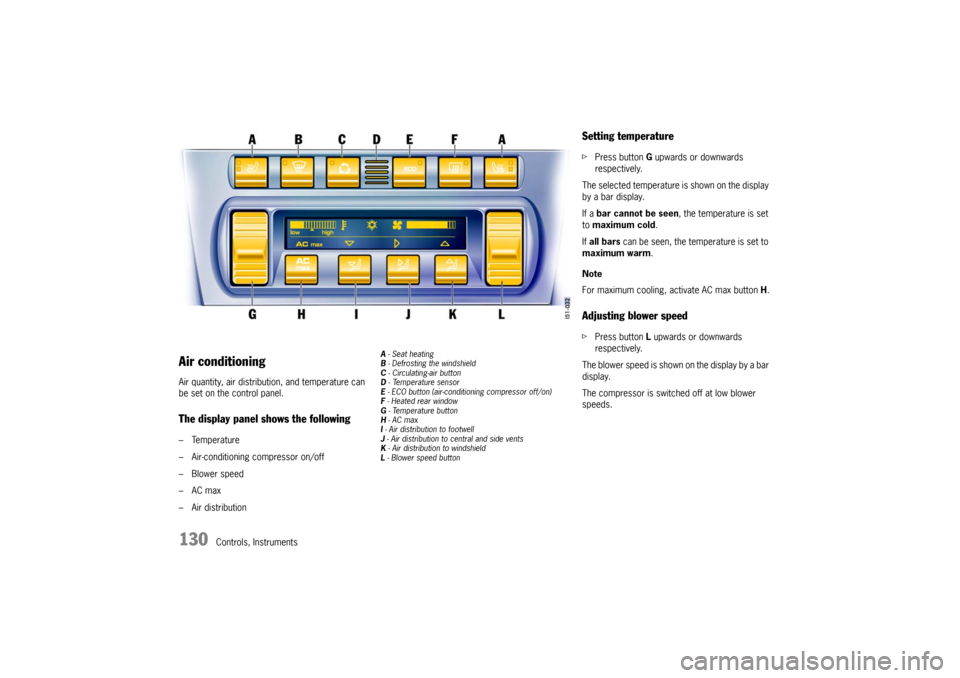
Air conditioningAir quantity, air distribution, and temperature can
be set on the control panel.The display panel shows the following– Temperature
– Air-conditioning compressor on/off
–Blower speed
–AC max
– Air distribution
A - Seat heating
B - Defrosting the windshield
C - Circulating-air button
D - Te m p e r a t u r e s e n s o r
E - ECO button (air-conditioning compressor off/on)
F - Heated rear window
G - Temperature button
H - AC max
I - Air distribution to footwell
J - Air distribution to central and side vents
K - Air distribution to windshield
L - Blower speed button
Setting temperaturefPress button G upwards or downwards
respectively.
The selected temperature is shown on the display
by a bar display.
If a bar cannot be seen, the temperature is set
to maximum cold.
If all bars can be seen, the temperature is set to
maximum warm.
Note
For maximum cooling, activate AC max button H.Adjusting blower speedfPress button L upwards or downwards
respectively.
The blower speed is shown on the display by a bar
display.
The compressor is switched off at low blower
speeds.
Page 133 of 296
Controls, Instruments
133
Automatic air conditioning systemThe automatic air-conditioning system controls
the preselected interior temperature completely
automatically.
If necessary, the automatic system can be
manually influenced.
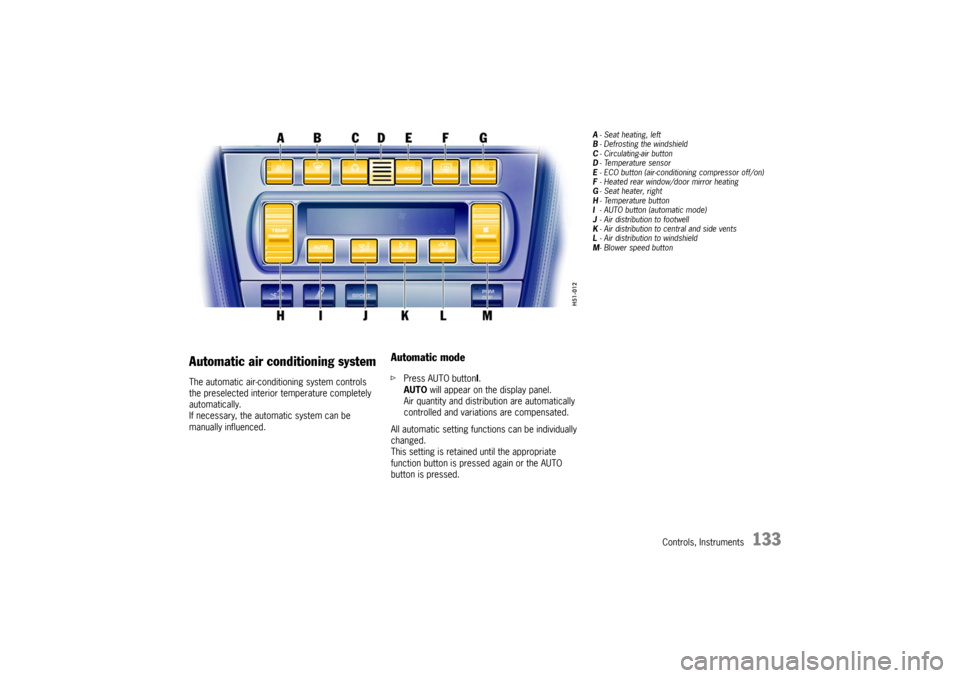
Automatic modefPress AUTO buttonI.
AUTO will appear on the display panel.
Air quantity and distribution are automatically
controlled and variations are compensated.
All automatic setting functions can be individually
changed.
This setting is retained until the appropriate
function button is pressed again or the AUTO
button is pressed.
A- Seat heating, left
B- Defrosting the windshield
C- Circulating-air button
D-Temperature sensor
E- ECO button (air-conditioning compressor off/on)
F- Heated rear window/door mirror heating
G-Seat heater, right
H-Temperature button
I- AUTO button (automatic mode)
J- Air distribution to footwell
K- Air distribution to central and side vents
L- Air distribution to windshield
M-Blower speed button
Page 134 of 296

134
Controls, Instruments
Setting temperaturefPress button H upwards or downwards
respectively.
To suit personal comfort, the interior temperature
can be adjusted between 61°F and 85°F/16°C
and 29.5°C.
Recommendation: 72°F/22 °C.
If “LO” or “HI” appears on the display, the system
is operating at maximum cooling or heating
power.
Automatic control is no longer active.
Note
If the preselected temperature is changed, the
blower speed can increase automatically in
automatic mode.
The desired temperature is reached more quickly
this way.
Sensors
To avoid affecting the performance of the air-
conditioning system:
fDo not cover the sun sensor on the instrument
panel or the temperature sensor D.
Defrost windshieldfPress button B (switch on or off).
The windshield is demisted or defrosted as
quickly as possible.
Air flows to the windshield only.
The light-emitting diode in the button lights up.ECO – switching the air-conditioning
compressor on and offThe air conditioning compressor switches off
automatically at temperatures below approx.
37°F/3°C and cannot be switched on, even
manually.
Whenever outside temperatures exceed approx.
37°F/3°C, the air-conditioning compressor is
always switched on in automatic mode.
The compressor can be switched off manually to
save fuel, but control comfort is then limited:
fPress ECO button E.
The compressor is switched off.
The light-emitting diode in the button lights up.
fIf the interior temperature is too high, switch
compressor back on or press AUTO button.
To dry incoming air in damp weather, do not
switch off the air-conditioning compressor.
This prevents misting of windows.
Adjusting blower speedfPress button M upwards or downwards
respectively.
The preset blower speed is increased or
decreased.
The speeds are indicated by a bar display.
The compressor is switched off at low blower
speeds.
If the button is pressed downwards at the lowest
blower stage, the blower and automatic control
are switched off. “OFF” will appear on the display
field.
Pressing the button upwards or pressing the
AUTO button switches the blower and automatic
control back on again.Circulating-air mode
Warning!
Risk of accident due to hampered vision.
In circulating-air mode, the windows may
mist up.
fOnly select circulating-air mode for short
periods.
fIf the windows mist up, switch air-circulation
mode by pressing the air-circulation button
again and selecting the “Defrost windshield” function.
Page 139 of 296
Controls, Instruments
139
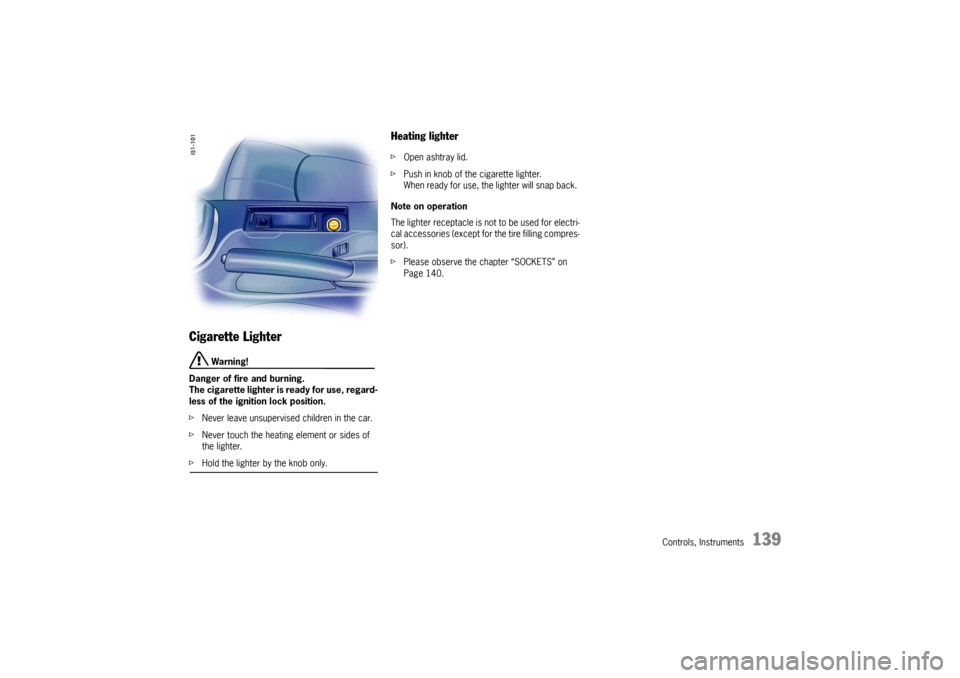
Cigarette Lighter
Warning!
Danger of fire and burning.
The cigarette lighter is ready for use, regard-
less of the ignition lock position.
fNever leave unsupervised children in the car.
fNever touch the heating element or sides of
the lighter.
fHold the lighter by the knob only.
Heating lighter fOpen ashtray lid.
fPush in knob of the cigarette lighter.
When ready for use, the lighter will snap back.
Note on operation
The lighter receptacle is not to be used for electri-
cal accessories (except for the tire filling compres-
sor).
fPlease observe the chapter “SOCKETS” on
Page 140.
Page 201 of 296

Maintenance, Car Care
201
How Emission Control Works When an automobile engine is running, it uses en-
ergy generated through the combustion of a mix-
ture of air and fuel. Depending on whether a car is
driven fast or slowly or whether the engine is cold
or hot, some of the fuel (hydrocarbons) may not
be burned completely, but may be discharged into
the engine crankcase or exhaust system. Addito-
nal hydrocarbons may enter the atmosphere th-
rough evaporation of fuel from the fuel tank. These
hydrocarbons (HC), when released into the air,
contribute to undesirable pollution.
In addition, carbon monoxide (CO) and oxides of
nitrogen (NOx) contribute to engine emissions.
They, too, are formed during the combustion pro-
cess and discharged into the exhaust system.
To reduce these pollutants, your Porsche is equip-
ped with a precisely calibrated fuel injection sys-
tem to assure a finely balanced air/fuel mixture un-
der all operating conditions.
Oxygen sensor The oxygen sensor, installed in the exhaust pipe
continuously senses the oxygen content of the ex-
haust and signals the information to an electronic
control unit. The control unit corrects the air/fuel
ratio, so the engine always receives an accurately
metered air/fuel mixture. Crankcase ventilation Through crankcase ventilation, undesirable emis-
sions from the engine crankcase are not permit-
ted to reach the outside atmosphere. These emis-
sions are recirculated from the crankcase to the
air intake system. From here the emissions mix
with the intake air and are later burned in the engi-
ne. Catalytic converters The catalytic converters are efficient ”clean-up“
devices built into the exhaust system of the vehic-
le. The catalytic converters burn the undesirable
pollutants in the exhaust gas before it is released
into the atmosphere.
The exclusive use of unleaded fuel is critical-
ly important for the life of the catalytic con-
verters. Therefore, only unleaded fuel must
be used. The catalytic converters will be damaged by:
– push or tow starting the vehicle,
– misfiring of the engine,
– turning off the ignition while the vehicle is mo-
ving or
– driving until the fuel tank is completely empty,
– by other unusual operating conditions.
fDo not continue to operate your vehicle under
these conditions, since raw fuel might reach
the catalytic converters. This could result in
overheating of the converters. Federal law pro-
hibits use of leaded fuel in this car.
Page 257 of 296

Practical Tips, Emergency Service
257
3. Run the engine of the donor car at a higher
speed.
4. Start the engine.
An attempted start using jump leads should
not last more than 15 seconds. Then allow a
waiting period of at least one minute.
5.Note
Before disconnecting the jump leads, electrical
loads such as the heated rear window and the
heating fan blower should be switched on (the
vehicle’s lights must not be switched on). This
reduces voltage peaks which may occur when
disconnecting the jump leads.
With the engine running, remove both jump
leads in reverse order.