warning lights PORSCHE BOXSTER 2006 2.G Owners Manual
[x] Cancel search | Manufacturer: PORSCHE, Model Year: 2006, Model line: BOXSTER, Model: PORSCHE BOXSTER 2006 2.GPages: 296, PDF Size: 4.12 MB
Page 4 of 296

4Fuel Quality Your engine is designed to provide optimum performance and fuel economy using
unleaded premium fuel with an octane rating of 98 RON (93 CLC or AKI).
Porsche therefore recommends the use of these fuels in your vehicle.
Porsche also recognizes that these fuels may not always be available. Be assured that your vehicle will operate
properly on unleaded premium fuels with octane numbers of at least 95 RON (90 CLC or AKI),
since the engine’s “Electronic Oktane™ knock control” will adapt the ignition timing, if necessary. Fuels containing alcohol and ether Some areas of the U.S. require oxygenated fuels during certain portions of the year.
Oxygenated fuels are fuels which contain alcohols (such as methanol or ethanol) or ether (such as MTBE).
Under normal conditions, the amount of these compounds in the fuel will not affect driveability.
You may use oxygenated fuels in your Porsche, provided the octane requirements for your vehicle are met.
We recommend, however, to change to a different fuel or station if any of the following problems occur with your vehicle:
– Deterioration of driveability and performance.
– Substantially reduced fuel economy.
– Vapor lock and non-start problems, especially at high altitude or at high temperature.
– Engine malfunction or stalling. Fuels containing MMT Some North American fuels contain an octane enhancing additive called methylcyclopentadienyl manganese tricarbonyl (MMT).
If such fuels are used, your emission control system performance may be negatively affected.
The check engine warning lights on your instrument panel may turn on.
If this occurs, Porsche recommends you stop using fuels containing MMT.
Page 11 of 296

Controls, Instruments
11 Controls, Instruments
Before driving off... ...................................... 12
Break in hints for the first
2,000 miles/3,000 kilometers ...................... 14
Keys ........................................................... 17
Security Wheel Bolts.................................... 17
Central Locking in Cars without Alarm System 19
Doors ......................................................... 25
Alarm System,
Passenger Compartment Monitoring ............. 26
Power Windows ........................................... 28
Inside mirror ................................................ 30
Automatic Anti-Glare Interior Mirror
and Door Mirrors ......................................... 30
Door Mirrors................................................ 31
Seat Adjustment .......................................... 34
Seat Memory ............................................... 36
Heated Seats .............................................. 38
Steering Wheel Adjustment ........................... 39
Multi-functional steering wheel....................... 40
Sun Visors................................................... 41
Safety Belts.................................................. 42
Child Restraint Systems................................ 45
LATCH System
Child seat bracket on the passenger’s seat .... 49
Airbag Systems ........................................... 50
Clutch Pedal ................................................ 56
Parking Brake .............................................. 57
Brakes ........................................................ 58
ABS Brake System
(Antilock Brake System) ................................ 61
Sport Mode ................................................. 63
Porsche Stability Management (PSM)............. 64Porsche Active Suspension Management
(PASM) ........................................................ 67
Retractable Spoiler ...................................... 68
Parking Aids ................................................ 70
Operation, Instruments ................................. 72
Ignition/Starter Switch with anti-theft
Steering Lock .............................................. 74
Starting Procedures ..................................... 76
Stopping engine........................................... 77
Instrument Panel USA Models ....................... 79
Automatic Speed Control Indicator light ......... 82
Instrument Illumination.................................. 82
Trip Odometer ............................................. 83
Speedometer .............................................. 84
Changing over between
Miles / Kilometers........................................ 84
Tachometer ................................................. 85
Turn Signal Indicator Light ............................ 85
High Beam .................................................. 85
Cooling System ........................................... 86
Tiptronic...................................................... 87
Fuel ............................................................ 88
Clock .......................................................... 89
Outside temperature .................................... 89
Check Engine Warning Light.......................... 90
Central warning light .................................... 91
Brake warning light USA ............................... 91
Brake warning light Canada .......................... 91
On-Board Computer (BC) .............................. 92
Light Switch .............................................. 124
Welcome Home Lighting ............................. 124
Automatic Headlight Beam Adjustment ........ 125Turn Signal/ Headlight Dimmer/Parking light /
Flasher Lever............................................. 125
Windshield Wiper / Washer Lever ................ 126
Automatic Speed Control ............................ 128
Air conditioning .......................................... 130
Automatic air conditioning system ............... 133
Central and side vents................................ 136
Fresh-air intake .......................................... 136
Emergency Flasher Switch .......................... 137
Ashtray ..................................................... 138
Cigarette Lighter ........................................ 139
Sockets .................................................... 140
Interior lights ............................................. 141
Storage in the passenger compartment ....... 142
Cupholder
(holder for drinks cans and cups) ................ 144
Luggage Storage on
Engine Compartment Lid ............................ 146
Fire extinguisher ........................................ 147
Trunk Entrapment ...................................... 148
Luggage compartment lids ......................... 150
Luggage Compartment.............................. 152
Rear luggage compartment ........................ 153
Porsche Communication Management (PCM) 154
Car Audio Operation/Tips ........................... 155
HomeLink .................................................. 158
Manual Transmission, Clutch ....................... 162
Tiptronic S................................................. 163
Convertible Top.......................................... 170
Windstop ................................................... 177
Hardtop..................................................... 178
Page 13 of 296

Controls, Instruments
13
In the driver’s seat... fCheck operation of the horn.
fPosition seat for easy reach of foot pedals and
controls.
To reduce the possibility of injury from the air-
bag deployment, you should always sit back as
far from the steering wheel as is practical,
while still maintaining full vehicle control.
fAdjust the inside and outside rear view mirrors.
fBuckle your safety belts.
fCheck operation of the foot and parking brake.
fCheck all warning and indicator lights with
ignition on and engine not running.
fStart engine and check all warning displays for
warning symbols.
fNever leave an idling car unattended.
fLock doors from inside, especially with child-
ren in the car to prevent inadvertent opening of
doors from inside or outside.
Drive with doors locked.
On the road... fNever drive after you have consumed alcohol
or drugs.
fAlways have your safety belt fastened.
fAlways drive defensively.
Expect the unexpected.
fUse signals to indicate turns and lane changes.
fTurn on headlights at dusk or when the driving
conditions warrant it.
fAlways keep a safe distance from the vehicle in
front of you, depending on traffic, road and
weather conditions.
fReduce speed at night and during inclement
weather.
Driving in wet weather requires caution and re-
duced speeds, particularly on roads with stan-
ding water, as the handling characteristics of
the vehicle may be impaired due to hydropla-
ning of the tires.
fAlways observe speed limits and obey road
signs and traffic laws.
fWhen tired, get well off the road, stop and take
a rest. Turn the engine off. Do not sit in the ve-
hicle with engine idling.
fPlease observe the chapter “ENGINE EX-
HAUST” on Page 8.fWhen parked, always set the parking brake.
Move the Tiptronic selector lever to ”P“ or the
gearshift lever to reverse or first gear.
On hills also turn the front wheels toward the
curb.
fWhen emergency repairs become necessary,
move the vehicle well off the road. Turn on the
emergency flasher and use other warning de-
vices to alert other motorists. Do not park or
operate the vehicle in areas where the hot ex-
haust system may come in contact with dry
grass, brush, fuel spill or other flammable ma-
terial.
fMake it a habit to have the engine oil checked
with every fuel filling.
Danger!
Danger of fire in engine compartment due to
burning cigars or cigarettes.
fDo not throw any lit cigars or cigarettes out of
the vehicle.
They can be blown into the air inlets by the air
flow and cause a fire in the engine compart-
ment.
fPlease observe the chapter “ASHTRAY” on Page 138.
Page 18 of 296
18
Controls, Instruments
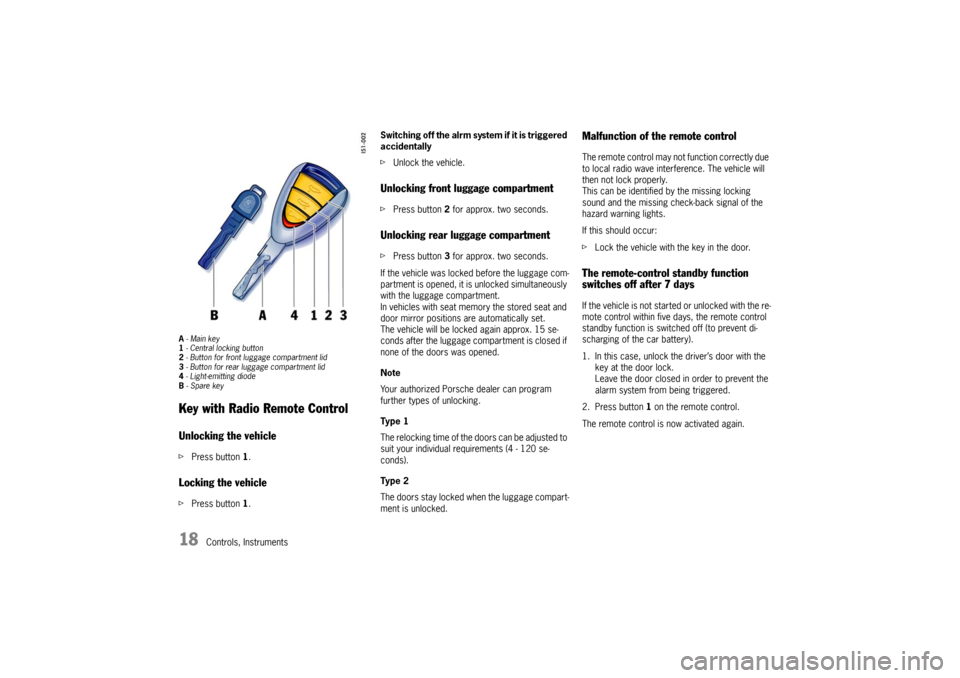
A - Main key
1 - Central locking button
2 - Button for front luggage compartment lid
3 - Button for rear luggage compartment lid
4 - Light-emitting diode
B - Spare key Key with Radio Remote ControlUnlocking the vehiclefPress button 1.Locking the vehiclefPress button 1.Switching off the alrm system if it is triggered
accidentally
fUnlock the vehicle.
Unlocking front luggage compartment fPress button 2 for approx. two seconds. Unlocking rear luggage compartment fPress button 3 for approx. two seconds.
If the vehicle was locked before the luggage com-
partment is opened, it is unlocked simultaneously
with the luggage compartment.
In vehicles with seat memory the stored seat and
door mirror positions are automatically set.
The vehicle will be locked again approx. 15 se-
conds after the luggage compartment is closed if
none of the doors was opened.
Note
Your authorized Porsche dealer can program
further types of unlocking.
Ty p e 1
The relocking time of the doors can be adjusted to
suit your individual requirements (4 - 120 se-
conds).
Ty p e 2
The doors stay locked when the luggage compart-
ment is unlocked.
Malfunction of the remote controlThe remote control may not function correctly due
to local radio wave interference. The vehicle will
then not lock properly.
This can be identified by the missing locking
sound and the missing check-back signal of the
hazard warning lights.
If this should occur:
fLock the vehicle with the key in the door.The remote-control standby function
switches off after 7 days If the vehicle is not started or unlocked with the re-
mote control within five days, the remote control
standby function is switched off (to prevent di-
scharging of the car battery).
1. In this case, unlock the driver’s door with the
key at the door lock.
Leave the door closed in order to prevent the
alarm system from being triggered.
2. Press button 1 on the remote control.
The remote control is now activated again.
Page 20 of 296
20
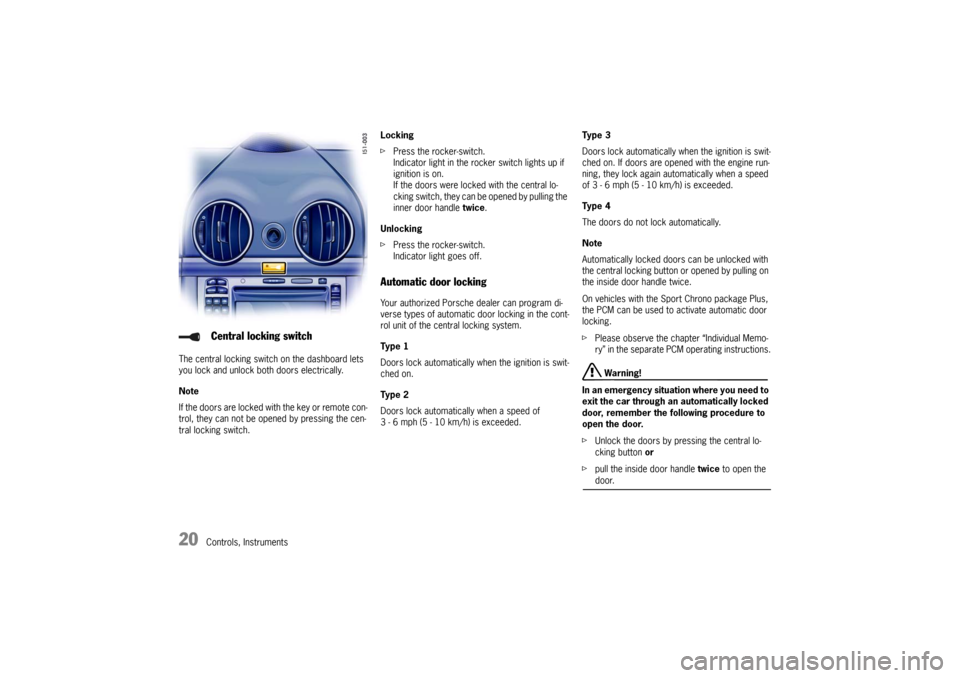
Controls, Instruments The central locking switch on the dashboard lets
you lock and unlock both doors electrically.
Note
If the doors are locked with the key or remote con-
trol, they can not be opened by pressing the cen-
tral locking switch. Locking
fPress the rocker-switch.
Indicator light in the rocker switch lights up if
ignition is on.
If the doors were locked with the central lo-
cking switch, they can be opened by pulling the
inner door handle twice.
Unlocking
fPress the rocker-switch.
Indicator light goes off.
Automatic door locking Your authorized Porsche dealer can program di-
verse types of automatic door locking in the cont-
rol unit of the central locking system.
Ty p e 1
Doors lock automatically when the ignition is swit-
ched on.
Ty p e 2
Doors lock automatically when a speed of
3 - 6 mph (5 - 10 km/h) is exceeded. Ty p e 3
Doors lock automatically when the ignition is swit-
ched on. If doors are opened with the engine run-
ning, they lock again automatically when a speed
of 3 - 6 mph (5 - 10 km/h) is exceeded.
Ty p e 4
The doors do not lock automatically.
Note
Automatically locked doors can be unlocked with
the central locking button or opened by pulling on
the inside door handle twice.
On vehicles with the Sport Chrono package Plus,
the PCM can be used to activate automatic door
locking.
fPlease observe the chapter “Individual Memo-
ry” in the separate PCM operating instructions.
Warning!
In an emergency situation where you need to
exit the car through an automatically locked
door, remember the following procedure to
open the door.
fUnlock the doors by pressing the central lo-
cking button or
fpull the inside door handle twice to open the door.
Central locking switch
Page 30 of 296
30
Controls, Instruments
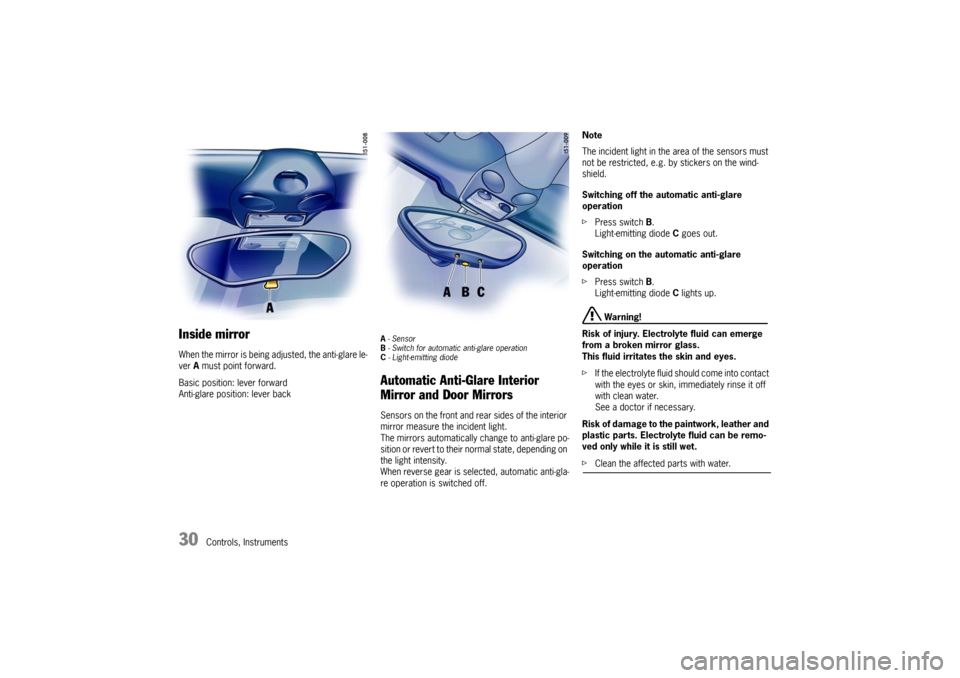
Inside mirror When the mirror is being adjusted, the anti-glare le-
ver A must point forward.
Basic position: lever forward
Anti-glare position: lever back
A - Sensor
B - Switch for automatic anti-glare operation
C - Light-emitting diode Automatic Anti-Glare Interior
Mirror and Door Mirrors Sensors on the front and rear sides of the interior
mirror measure the incident light.
The mirrors automatically change to anti-glare po-
sition or revert to their normal state, depending on
the light intensity.
When reverse gear is selected, automatic anti-gla-
re operation is switched off. Note
The incident light in the area of the sensors must
not be restricted, e.g. by stickers on the wind-
shield.
Switching off the automatic anti-glare
operation
fPress switch B.
Light-emitting diode C goes out.
Switching on the automatic anti-glare
operation
fPress switch B.
Light-emitting diode C lights up.
Warning!
Risk of injury. Electrolyte fluid can emerge
from a broken mirror glass.
This fluid irritates the skin and eyes.
fIf the electrolyte fluid should come into contact
with the eyes or skin, immediately rinse it off
with clean water.
See a doctor if necessary.
Risk of damage to the paintwork, leather and
plastic parts. Electrolyte fluid can be remo-
ved only while it is still wet.
fClean the affected parts with water.
Page 42 of 296

42
Controls, Instruments
Safety Belts
Warning!
Always make sure your and your passenger’s
safety belts are properly fastened while the
vehicle is in motion.
Failure to follow safety belt warnings may re-
sult in serious personal injury or death.
fFor your and your passenger’s protection, use
safety belts at all times while the vehicle is in
motion.
fUse appropriate child restraint systems for all
small children.
Proper wearing of safety belts
fS a f e t y b e l t s m u s t b e p o s i t i o n e d o n t h e b o d y a s
to restrain the upper body and lap from sliding
forward. Improperly positioned safety belts
can cause serious personal injury or death in
case of an accident.
fThe shoulder belt should always rest on your
upper body. The shoulder belt should never be
worn behind your back or under your arm.
fFor maximum effectiveness, the lap belt
should be worn low across the hips.
fPregnant women should position the belt as
low as possible across the pelvis. Make sure it
is not pressing against the abdomen. fBelts should not be worn twisted.
fDo not wear belts over rigid or breakable ob-
jects in or on your clothing, such as eye glas-
ses, pens, keys, etc. as these may cause inju-
ry.
fSeveral layers of heavy clothing may interfere
with proper positioning of belts.
fBelts must not rub against sharp objects or da-
mage may occur to the belt.
fTwo occupants should never share the same
belt at the same time.
Care and maintenance
fKeep belt buckles free of any obstruction that
may prevent a secure locking.
fBelts that have been subjected to excesssive
stretch forces in an accident must be inspec-
ted or replaced to ensure their continued effec-
tiveness in restraining you.
The same applies to belt tensioner systems
which have been triggered.
In addition, the anchor points of the belts
should be checked.
fIf safety belts do not work properly, see your
authorized Porsche dealer immediately.
fI f t h e b e l t s s h o w d a m a g e t o w e b b i n g , b i n d i n g s ,
buckles or retractors, they should be replaced
to ensure safe operation.
fDo not modify or disassemble the safety belts
in your vehicle. fThe belts must be kept clean or the retractors
may not work properly.
Please observe the chapter “CAR CARE IN-
STRUCTIONS” on Page 209.
fNever bleach or dye safety belts.
fDo not allow safety belts to retract until they
are completely dry after cleaning or this may
cause damage to the belt.
Belt tensioner Depending on the force of an impact, fastened
safety belts are tightened in an accident.
The belt tensioners are triggered by:
– Front, side and rear impacts of sufficient
severity.
– Vehicle rollover.
Note
The belt tensioner system can be triggered only
once; the system must be replaced afterward.
If there is a fault in the belt-tensioner system, the
airbag warning light lights up.
Work may be performed on the belt-tensioner sys-
tem only by an authorized Porsche dealer.
Smoke is released when the belt tensioners are
triggered. This does not indicate a fire in the
vehicle.
Page 48 of 296
48
Controls, Instruments Automatic deactivation of the passenger’s
airbags Danger!
The use of a child restraint system in the
passenger seat can result in serious
personal injury or death to the child from an
airbag deployment.
fPlease observe the chapter “PASSENGER
AIRBAG OFF INDICATOR LAMP DOES NOT
LIGHT UP” on Page 49.
fBefore transporting a child on the passenger’s
seat:
Please observe the chapter “CHILD RESTRAINT SYSTEMS” on Page 51.
– When an up to one-year old child is seated
in the child restraint system, the front airbag is
automatically deactivated on the passenger si-
de.
– When an adult is seated in the front seat the
front airbag remains active on the passenger‘s
side.
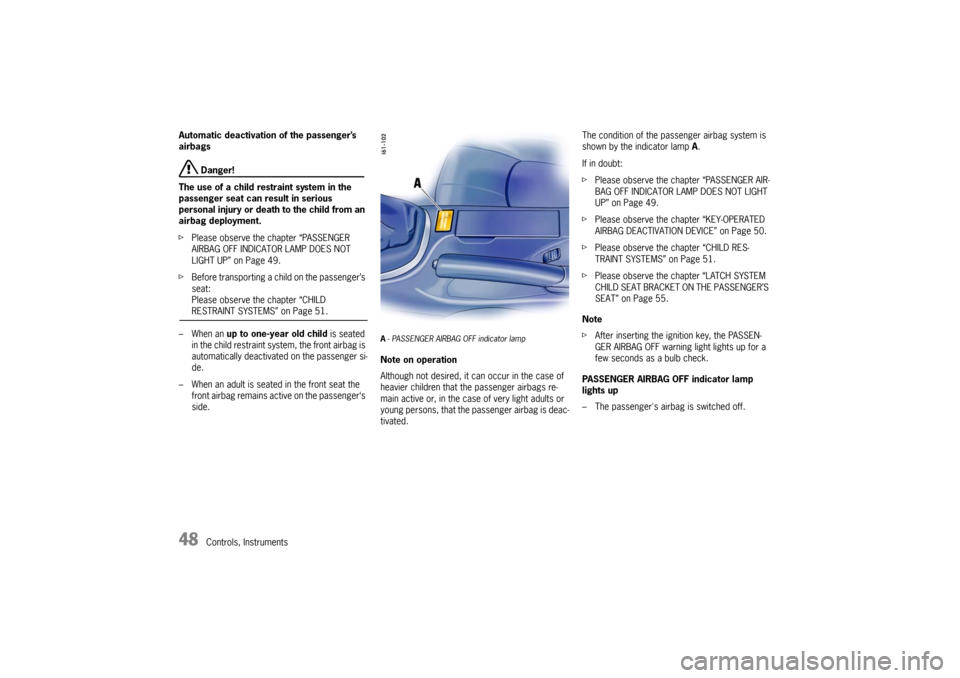
A- PASSENGER AIRBAG OFF indicator lampNote on operation
Although not desired, it can occur in the case of
heavier children that the passenger airbags re-
main active or, in the case of very light adults or
young persons, that the passenger airbag is deac-
tivated.The condition of the passenger airbag system is
shown by the indicator lamp A.
If in doubt:
fPlease observe the chapter “PASSENGER AIR-
BAG OFF INDICATOR LAMP DOES NOT LIGHT
UP” on Page 49.
fPlease observe the chapter “KEY-OPERATED
AIRBAG DEACTIVATION DEVICE” on Page 50.
fPlease observe the chapter “CHILD RES-
TRAINT SYSTEMS” on Page 51.
fPlease observe the chapter “LATCH SYSTEM
CHILD SEAT BRACKET ON THE PASSENGER’S
SEAT” on Page 55.
Note
fAfter inserting the ignition key, the PASSEN-
GER AIRBAG OFF warning light lights up for a
few seconds as a bulb check.
PASSENGER AIRBAG OFF indicator lamp
lights up
– The passenger's airbag is switched off.
Page 57 of 296
Controls, Instruments
57
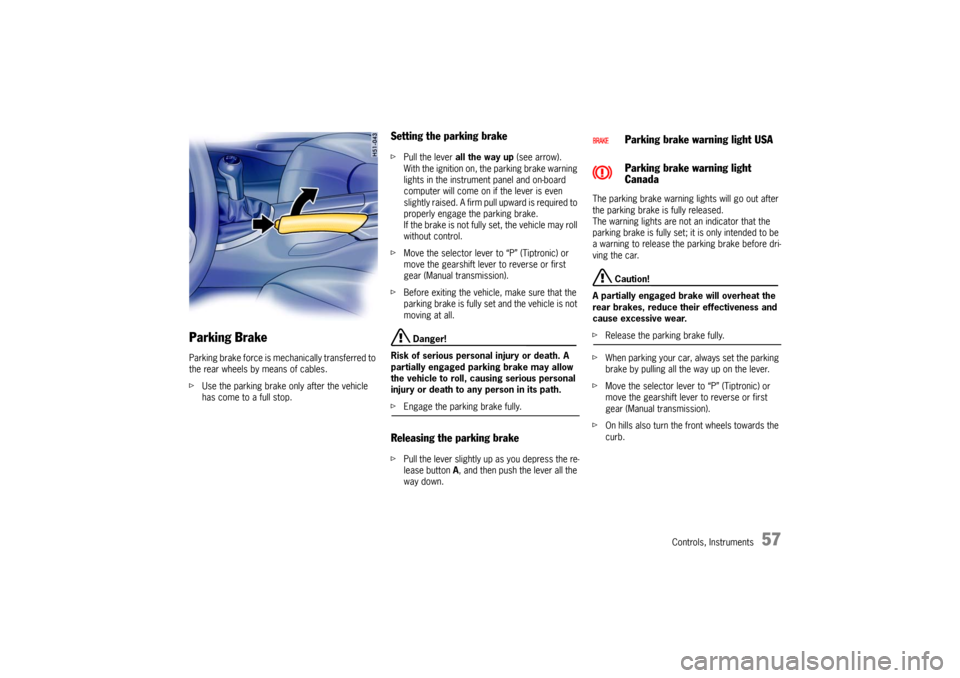
Parking Brake Parking brake force is mechanically transferred to
the rear wheels by means of cables.
fUse the parking brake only after the vehicle
has come to a full stop.
Setting the parking brake fPull the lever all the way up (see arrow).
With the ignition on, the parking brake warning
lights in the instrument panel and on-board
computer will come on if the lever is even
slightly raised. A firm pull upward is required to
properly engage the parking brake.
If the brake is not fully set, the vehicle may roll
without control.
fMove the selector lever to “P” (Tiptronic) or
move the gearshift lever to reverse or first
gear (Manual transmission).
fBefore exiting the vehicle, make sure that the
parking brake is fully set and the vehicle is not
moving at all.
Danger!
Risk of serious personal injury or death. A
partially engaged parking brake may allow
the vehicle to roll, causing serious personal
injury or death to any person in its path.
fEngage the parking brake fully.Releasing the parking brake fPull the lever slightly up as you depress the re-
lease button A, and then push the lever all the
way down. The parking brake warning lights will go out after
the parking brake is fully released.
The warning lights are not an indicator that the
parking brake is fully set; it is only intended to be
a warning to release the parking brake before dri-
ving the car.
Caution!
A partially engaged brake will overheat the
rear brakes, reduce their effectiveness and
cause excessive wear.
fRelease the parking brake fully.
fWhen parking your car, always set the parking
brake by pulling all the way up on the lever.
fMove the selector lever to “P” (Tiptronic) or
move the gearshift lever to reverse or first
gear (Manual transmission).
fOn hills also turn the front wheels towards the
curb.
Parking brake warning light USA
Parking brake warning light
Canada
Page 58 of 296

58
Controls, Instruments
Brakes fMake it a habit to check the operation of your
brakes before driving.
Keep in mind that the braking distance increases
very rapidly as the speed increases. At 60 mph or
100 km/h, for example, it is not twice but four ti-
mes longer than 30 mph or 50 km/h. Tire traction
is also less effective when the roads are wet or
slippery.
fTherefore, always maintain a safe distance
from the car in front of you.
Vehicles without Porsche Ceramic
Composite Brake (PCCB)
Even though the brake discs consist of alloyed
grey cast iron, they will unavoidably start to corro-
de if your car is parked for an extended period.
The brakes will tend to “rub” as a result.
The nature, extent and effects of corrosion de-
pend on the amount of time the vehicle was par-
ked, whether granular or liquid road salt was
spread and whether grease-dissolving agents
were used in car washes.
If the braking comfort is noticeably impaired, we
recommend having the brake system checked by
experts at an authorized Porsche dealer.
Brake system function Your Porsche is equipped with a power assisted
hydraulic dual circuit brake system with disc bra-
kes at the front and rear.
Both circuits function independently. One brake
circuit operates the front and the other operates
the rear.
If one brake circuit has failed, the other will still
operate. However, you will notice an increased pe-
dal travel when you apply the brakes.
Failure of one brake circuit will cause the stopping
distance to increase.
Warning!
Risk of an accident.
In the unlikely event of hydraulic failure of
one brake circuit:
fPush the brake pedal down firmly and hold it in
that position.
A mechanical linkage activates the second cir-
cuit, and you will be able to bring the vehicle to
a stop.
fAfter bringing your vehicle to a complete stop,
avoid driving the vehicle and instead have it to-
wed to the nearest authorized Porsche dealer for repair. If the warning lights in the instrument panel and on-
board computer go on while driving, the brake flu-
id level may be too low, or (if the brake pedal travel
has increased) one of the two brake circuits may
have failed.
A greater braking pressure will be required, stop-
ping distances will be longer and the braking beha-
vior will change, particularly in curves.
With correctly adjusted brakes, and a correctly
working brake system, the pedal travel to the
point of brake actuation should be 1-3/16" to
1-9/16" or 30 to 40 mm.
Whenever the brake pedal travel exceeds this dis-
tance, have the brake system checked.
Brake warning light USA
Brake warning light
Canada