PORSCHE BOXSTER 2009 2.G Manual Online
Manufacturer: PORSCHE, Model Year: 2009, Model line: BOXSTER, Model: PORSCHE BOXSTER 2009 2.GPages: 294, PDF Size: 6.89 MB
Page 81 of 294

Operation, Safety
79
Automatic Headlight Beam Adjustment Vehicles with Bi-Xenon headlights feature
dynamic headlight beam adjustment.
When the ignition is switched on, the level of the
headlight beam automatica lly changes in accord-
ance with the vehicle load.
The level of the headlight beam is automatically
kept constant during acceleration and braking.
Checking operation
1. Switch the low beam on.
2. Insert ignition key and switch ignition on. The light beam first dips all the way down and
is then adapted to the vehicle load.
If this test item is not met, the headlight beam
adjustment system must be checked by an author-
ized Porsche dealer.
Welcome Home LightingSwitching on
f Move light switch to the HOME position.
For improved visibility and security when you get
in and out of the car, the daytime driving lights and
the tail lights remain on for a certain period of
time:
– When you get out of the car , the lights are
turned on for approx. 30 seconds after the
door is opened. The off-delay time resumes
when the vehicle is locked.
On vehicles with the Sport Chrono Package
Plus, the PCM can be used to set the off-delay
time. This setting also changes the lighting
period for unlocking the vehicle.
Please observe the chapter “Individual
Memory” in the separate PCM operating
instructions.
– The lights are turned on for approx. 30 seconds when the vehicle is unlocked.
The lights go out if the ig nition is switched on
or when leaving the Welcome Home lighting.
Page 82 of 294
80
Operation, SafetyWarning chime
If the ignition key is withdrawn and the door is
opened while the lights (not the Welcome Home
lighting) are on, a
chime warns of possible bat-
tery discharge.
In some countries, differences are possible
due to provisions of law.
Vehicles with the Sport Chrono Package Plus
Further individual light functions are available in ve-
hicles with the Sport Chrono Package Plus.
f Please observe the chapter “Individual
Memory” in the separate PCM operating
instructions.
Daytime driving lightsUSA only:
The daytime driving lights can be activated/deacti-
vated in the on-board computer.
fPlease see the chapter “ON-BOARD
COMPUTER (BC)” on Page 130.Welcome Home LightingSwitching on
fMove light switch to the HOME position.
For improved visibility and security when you get
in and out of the car, the fog lights and the tail
lights remain on for a certain period of time:
– When you get out of the car , the lights are
turned on for approx. 30 seconds after the
door is opened. The off-delay time resumes
when the vehicle is locked.
On vehicles with the Sport Chrono Package
Plus, the PCM can be used to set the off-delay
time. This setting also changes the lighting
period for unlocking the vehicle.
Please observe the chapter “Individual
Memory” in the separate PCM operating
instructions.
– The lights are turned on for approx. 30 seconds when the vehicle is unlocked .
The lights go out if the ignition is switched on
or when leaving the Welcome Home lighting.
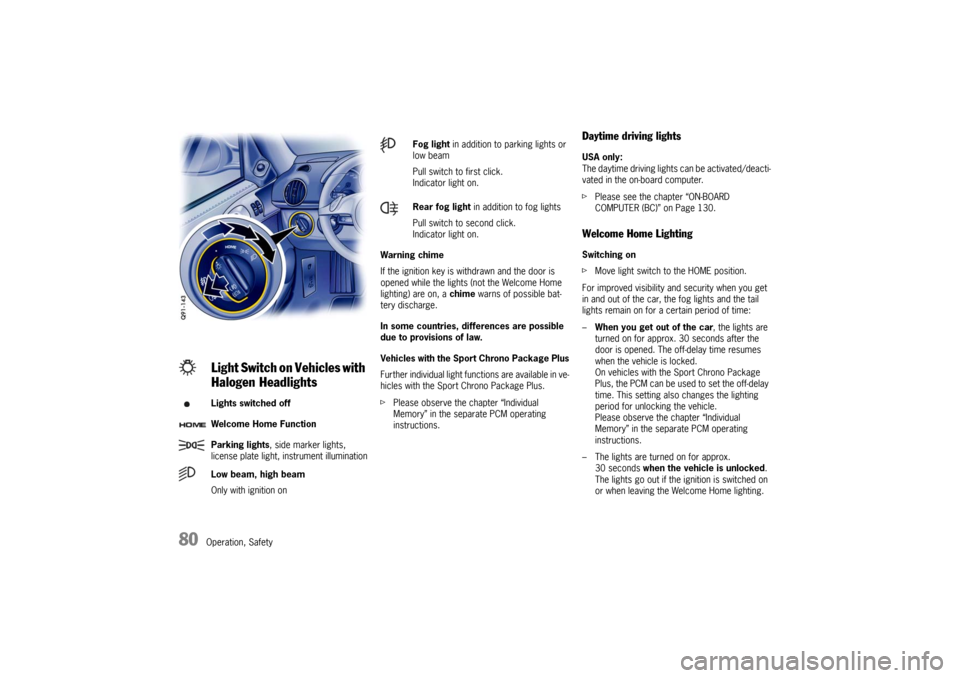
Light Switch on Vehicles with
Halogen HeadlightsLights switched off
Welcome Home Function
Parking lights , side marker lights,
license plate light, instrument illumination
Low beam, high beam
Only with ignition on
Fog light in addition to parking lights or
low beam
Pull switch to first click.
Indicator light on.
Rear fog light in addition to fog lights
Pull switch to second click.
Indicator light on.
Page 83 of 294
Operation, Safety
81
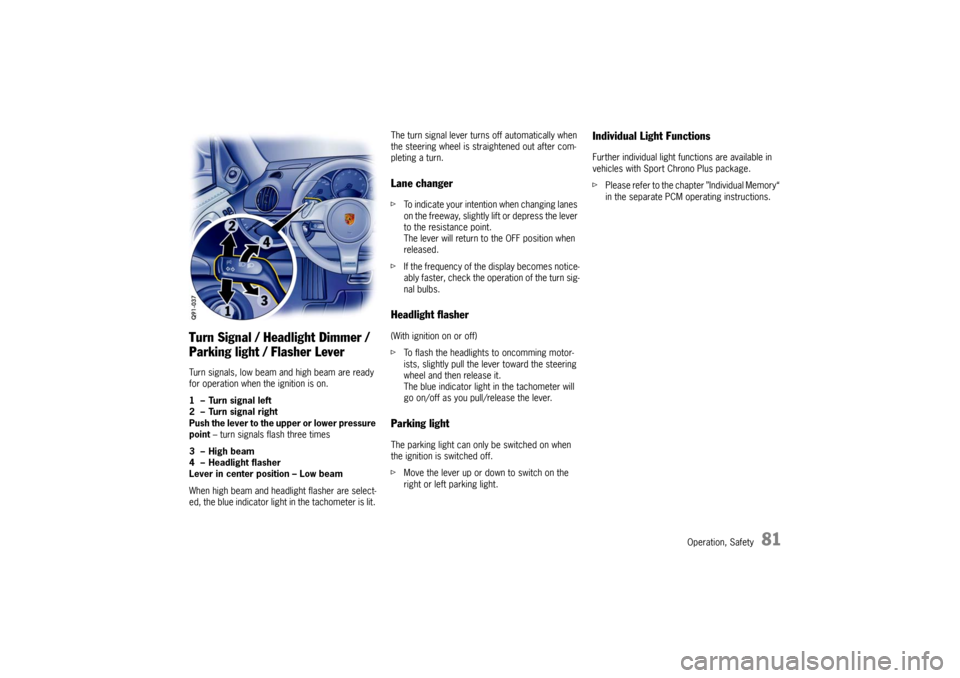
Turn Signal / Headlight Dimmer /
Parking light / Flasher Lever Turn signals, low beam and high beam are ready
for operation when the ignition is on.
1 – Turn signal left
2 – Turn signal right
Push the lever to the upper or lower pressure
point – turn signals flash three times
3 – High beam
4 – Headlight flasher
Lever in center position – Low beam
When high beam and head light flasher are select-
ed, the blue indicator light in the tachometer is lit. The turn signal lever turns off automatically when
the steering wheel is st
raightened out after com-
pleting a turn.
Lane changer f To indicate your intention when changing lanes
on the freeway, slightly lift or depress the lever
to the resistance point.
The lever will return to the OFF position when
released.
f If the frequency of the display becomes notice-
ably faster, check the operation of the turn sig-
nal bulbs. Headlight flasher (With ignition on or off)
fTo flash the headlights to oncomming motor-
ists, slightly pull the lever toward the steering
wheel and then release it.
The blue indicator light in the tachometer will
go on/off as you pull/release the lever. Parking lightThe parking light can only be switched on when
the ignition is switched off.
fMove the lever up or down to switch on the
right or left parking light.
Individual Light FunctionsFurther individual light functions are available in
vehicles with Sport Chrono Plus package.
f Please refer to the chapter ”Individual Memory“
in the separate PCM operating instructions.
Page 84 of 294
82
Operation, Safety
Windshield Wiper/ Washer Lever
Warning!
Danger of injury when the windshield wipers
operate unintentionally, e.g. in intermittent
or rain sensor operation.
Risk of damage to the windshield, wiper sys-
tem and headlight washer.
f Avoid running the wiper blades over a dry
windshield to prevent scratching the glass.
Spray washer fluid on the windshield first.
A scratched windshield will reduce visibility.
f Always loosen wiper blades from frozen glass
before operating wipers to prevent damage to
the wiper motor or blades.
f Always switch off windshield wipers in car
wash to prevent them wiping unintentionally
(intermittent or sensor operation).
f Always switch off windshield wipers before
cleaning the windshield to avoid unintentional
operation (intermittent or sensor operation).
f Do not operate the headlight washer in car
washes.
f Do not operate headlight washer when it is frozen.
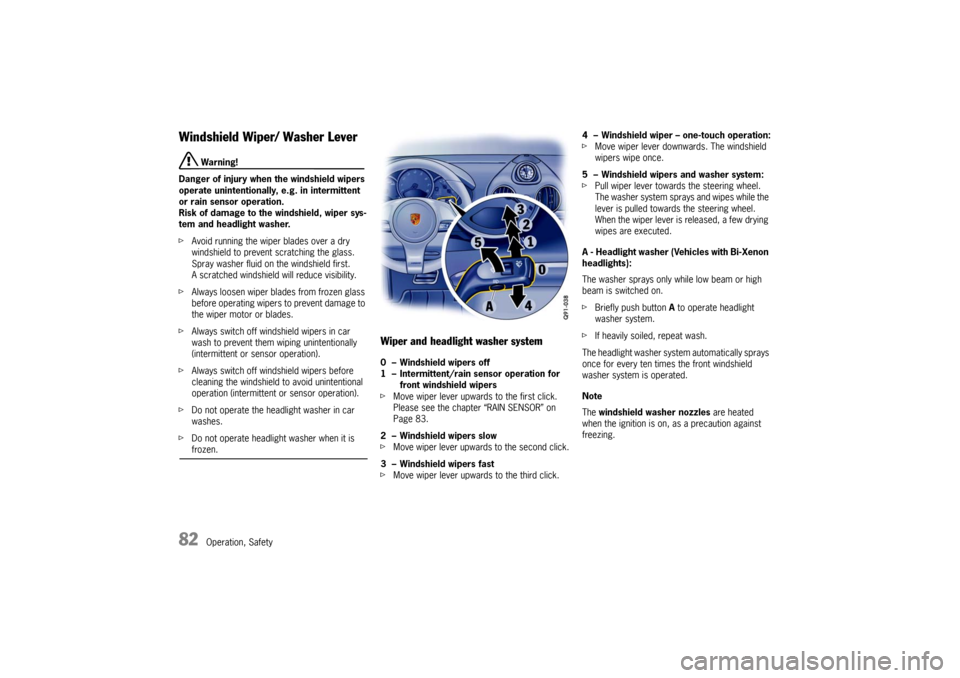
Wiper and headlight washer system0 – Windshield wipers off
1 – Intermittent/rain sensor operation for
front windshield wipers
f Move wiper lever upwards to the first click.
Please see the chapter “RAIN SENSOR” on
Page 83.
2 – Windshield wipers slow
f Move wiper lever upwards to the second click.
3 – Windshield wipers fast
f Move wiper lever upwards to the third click. 4 – Windshield wiper – one-touch operation:
f
Move wiper lever downwards. The windshield
wipers wipe once.
5 – Windshield wipers and washer system:
f Pull wiper lever towards the steering wheel.
The washer system sprays and wipes while the
lever is pulled towards the steering wheel.
When the wiper lever is released, a few drying
wipes are executed.
A - Headlight washer (Vehicles with Bi-Xenon
headlights):
The washer sprays only while low beam or high
beam is switched on.
f Briefly push button A to operate headlight
washer system.
f If heavily soiled, repeat wash.
The headlight washer system automatically sprays
once for every ten times the front windshield
washer system is operated.
Note
The windshield washer nozzles are heated
when the ignition is on, as a precaution against
freezing.
Page 85 of 294
Operation, Safety
83
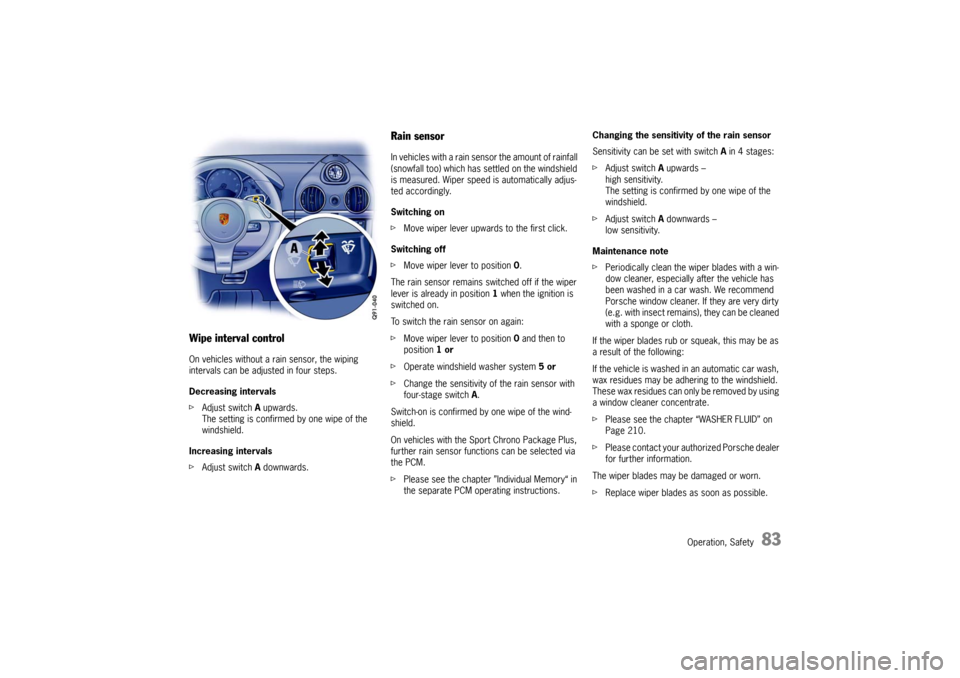
Wipe interval controlOn vehicles without a rain sensor, the wiping
intervals can be adjusted in four steps.
Decreasing intervals
fAdjust switch A upwards.
The setting is confirmed by one wipe of the
windshield.
Increasing intervals
f Adjust switch A downwards.
Rain sensorIn vehicles with a rain sensor the amount of rainfall
(snowfall too) which has se ttled on the windshield
is measured. Wiper speed is automatically adjus-
ted accordingly.
Switching on
f Move wiper lever upwards to the first click.
Switching off
f Move wiper lever to position 0.
The rain sensor remains switched off if the wiper
lever is already in position 1 when the ignition is
switched on.
To switch the rain sensor on again:
f Move wiper lever to position 0 and then to
position 1 or
f Operate windshield washer system 5 or
f Change the sensitivity of the rain sensor with
four-stage switch A.
Switch-on is confirmed by one wipe of the wind-
shield.
On vehicles with the Sport Chrono Package Plus,
further rain sensor functi ons can be selected via
the PCM.
f Please see the chapter ”Individual Memory“ in
the separate PCM operating instructions. Changing the sensitivity of the rain sensor
Sensitivity can be set with switch
A in 4 stages:
f Adjust switch A upwards –
high sensitivity.
The setting is confirmed by one wipe of the
windshield.
f Adjust switch A downwards –
low sensitivity.
Maintenance note
f Periodically clean the wiper blades with a win-
dow cleaner, especially after the vehicle has
been washed in a car wash. We recommend
Porsche window cleaner. If they are very dirty
(e.g. with insect remains), they can be cleaned
with a sponge or cloth.
If the wiper blades rub or squeak, this may be as
a result of the following:
If the vehicle is washed in an automatic car wash,
wax residues may be adhering to the windshield.
These wax residues can only be removed by using
a window cleaner concentrate.
f Please see the chapter “WASHER FLUID” on
Page 210.
f Please contact your auth orized Porsche dealer
for further information.
The wiper blades may be damaged or worn.
f Replace wiper blades as soon as possible.
Page 86 of 294
84
Operation, Safety
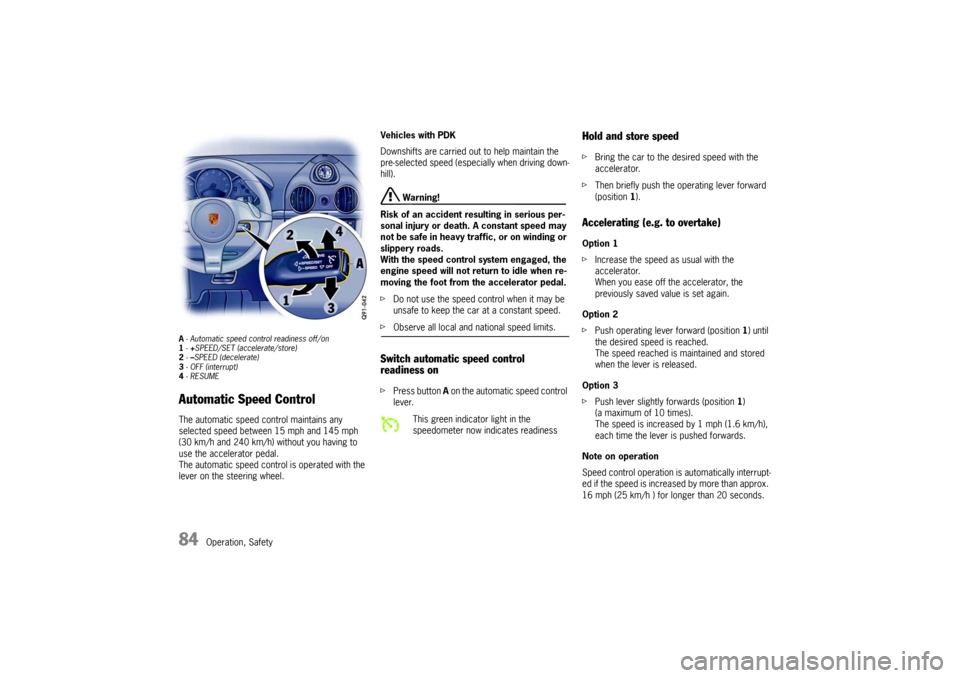
A- Automatic speed control readiness off/on
1 -+SPEED/SET (accelerate/store)
2 -–SPEED (decelerate)
3 - OFF (interrupt)
4 -RESUMEAutomatic Speed Control The automatic speed control maintains any
selected speed between 15 mph and 145 mph
(30 km/h and 240 km/h) without you having to
use the accelerator pedal.
The automatic speed control is operated with the
lever on the steering wheel. Vehicles with PDK
Downshifts are carried out to help maintain the
pre-selected speed (especially when driving down-
hill).
Warning!
Risk of an accident resulting in serious per-
sonal injury or death. A constant speed may
not be safe in heavy traf fic, or on winding or
slippery roads.
With the speed control system engaged, the
engine speed will not return to idle when re-
moving the foot from the accelerator pedal.
f Do not use the speed co ntrol when it may be
unsafe to keep the car at a constant speed.
f Observe all local and national speed limits. Switch automatic speed control
readiness onfPress button A on the automatic speed control
lever.
Hold and store speed f Bring the car to the desired speed with the
accelerator.
f Then briefly push the operating lever forward
(position 1).Accelerating (e.g. to overtake) Option 1
f Increase the speed as usual with the
accelerator.
When you ease off the accelerator, the
previously saved value is set again.
Option 2
f Push operating lever forward (position 1) until
the desired speed is reached.
The speed reached is maintained and stored
when the lever is released.
Option 3
f Push lever slightly forwards (position 1 )
(a maximum of 10 times).
The speed is increased by 1 mph (1.6 km/h),
each time the lever is pushed forwards.
Note on operation
Speed control operation is automatically interrupt-
ed if the speed is increased by more than approx.
16 mph (25 km/h ) for lo nger than 20 seconds.
This green indicator light in the
speedometer now indicates readiness
Page 87 of 294

Operation, Safety
85
Decelerating Option 1
fPull operating lever towards the steering wheel
(position 2) until the desired speed is reached.
The speed reached is maintained and stored
when the lever is released.
Option 2
f Briefly move lever towards the steering wheel
(position 2 ) (a maximum of 10 times).
The speed is reduced by 1 mph (1.6 km/h),
each time the lever is moved towards the
steering wheel.
Vehicles with PDK
Downshifts are carried o ut to improve decelera-
tion (especially when driving downhill).
Interrupting automatic speed control
operation f Pull operating lever downwards briefly
(position 3) or
f Operate brake or clutch pedal or
f Switch PDK to selector lever position N.
f Please see the chapter “PORSCHE DOPPEL-
KUPPLUNG (PDK)” on Page 174.
The speed driven before the interruption remains
stored in the memory.
Automatic speed control operation is
interrupted automatically:
– If the set vehicle speed is exceeded by more than approx. 16 mph (25 km/h) for longer than
20 seconds.
– If the actual vehicle sp eed falls to approx.
37 mph (60 km/h) below the set vehicle speed
for longer than 60 seconds (upward slopes).
– For PSM control operations.
Resuming the stored speed f Briefly push operating lever upwards
(position 4).
The speed control accelerates/decelerates
the vehicle to the stored speed.
The stored speed should only be recalled when
traffic conditions and the road surface so permit.Switching automatic speed control
readiness off f Press button A on the automatic speed control
lever.
The green readiness light in the speedometer
goes off.
Note
The stored speed value is cleared when the
vehicle is parked and the ignition is switched off.
Important note
On upward or downward slopes, the set speed
cannot always be maintained by the automatic
speed control.
f To obtain sufficient engine braking or a better
engine-speed range, a lo wer gear needs to be
selected.
Page 88 of 294
86
Operation, Safety
Cupholder(holder for drink cans and cups)fKeep the cupholder closed while driving.
Warning!
Risk of scalding or da mage due to spilling
drinks.
f Only use beverage containers which fit.
f Never put overfull containers in the cupholder.
fNever place hot drinks in the cupholder.
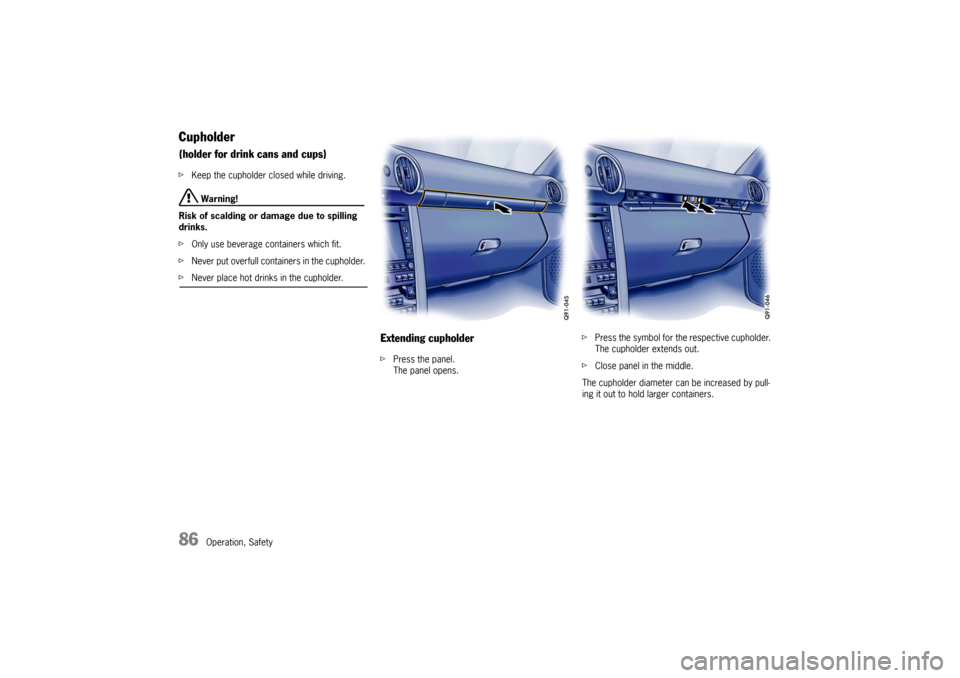
Extending cupholderfPress the panel.
The panel opens. f
Press the symbol for the respective cupholder.
The cupholder extends out.
f Close panel in the middle.
The cupholder diameter can be increased by pull-
ing it out to hold larger containers.
Page 89 of 294
Operation, Safety
87
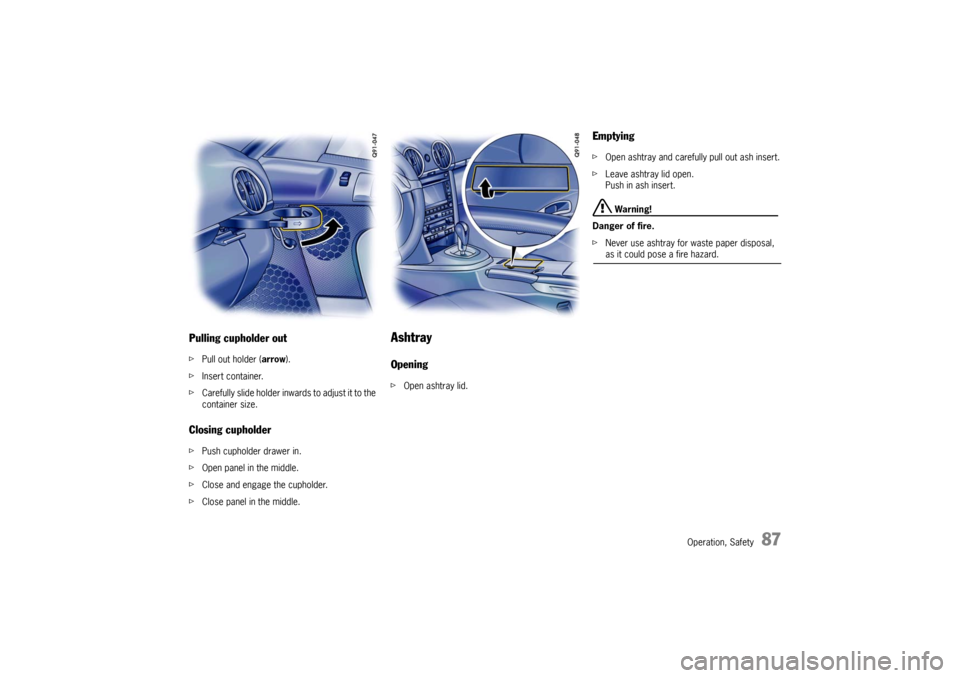
Pulling cupholder outfPull out holder (arrow ).
f Insert container.
f Carefully slide holder inwards to adjust it to the
container size.Closing cupholder fPush cupholder drawer in.
f Open panel in the middle.
f Close and engage the cupholder.
f Close panel in the middle.
Ashtray Opening fOpen ashtray lid.
Emptying f Open ashtray and carefully pull out ash insert.
f Leave ashtray lid open.
Push in ash insert.
Warning!
Danger of fire.
f Never use ashtray for waste paper disposal, as it could pose a fire hazard.
Page 90 of 294
88
Operation, Safety Danger!
Danger of fire in engine compartment due to
burning cigars or cigarettes.
Serious personal injury or death could result
from fire in the engine compartment.
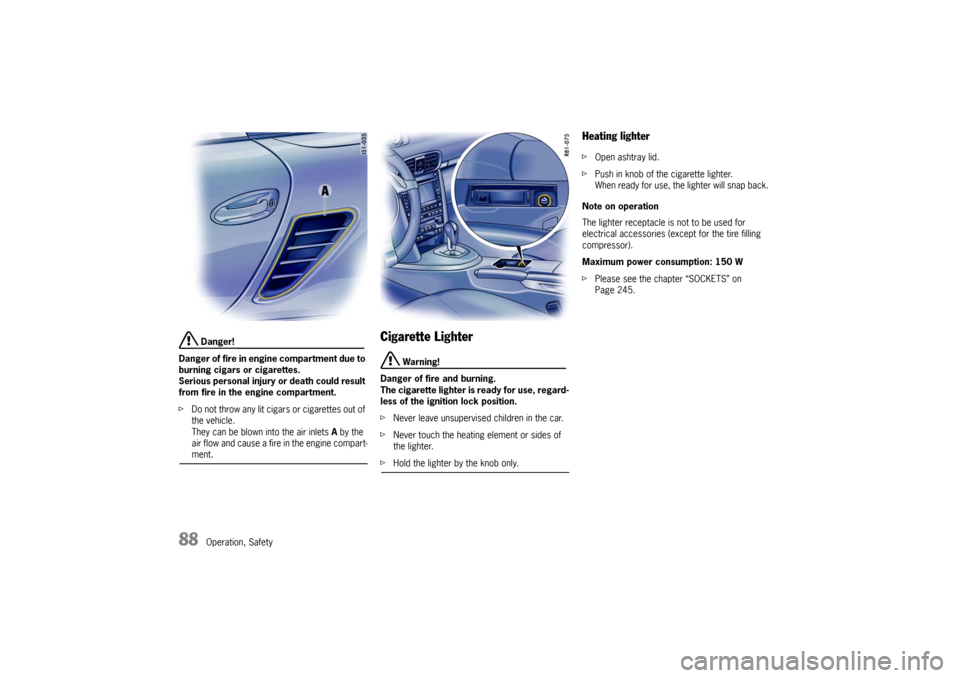
f Do not throw any lit cigars or cigarettes out of
the vehicle.
They can be blown into the air inlets A by the
air flow and cause a fire in the engine compart-ment.
Cigarette Lighter
Warning!
Danger of fire and burning.
The cigarette lighter is ready for use, regard-
less of the ignition lock position.
f Never leave unsupervised children in the car.
f Never touch the heating element or sides of
the lighter.
fHold the lighter by the knob only.
Heating lighter fOpen ashtray lid.
f Push in knob of the cigarette lighter.
When ready for use, the lighter will snap back.
Note on operation
The lighter receptacle is not to be used for
electrical accessories (except for the tire filling
compressor).
Maximum power consumption: 150 W
f Please see the chapter “SOCKETS” on
Page 245.