headlights PORSCHE BOXSTER S 2010 2.G User Guide
[x] Cancel search | Manufacturer: PORSCHE, Model Year: 2010, Model line: BOXSTER S, Model: PORSCHE BOXSTER S 2010 2.GPages: 294, PDF Size: 6.89 MB
Page 212 of 294
210
Maintenance, Car Care
Washer FluidCapacity – Without headlight cleaning system:approximately 2.6 quarts (2.5 liters).
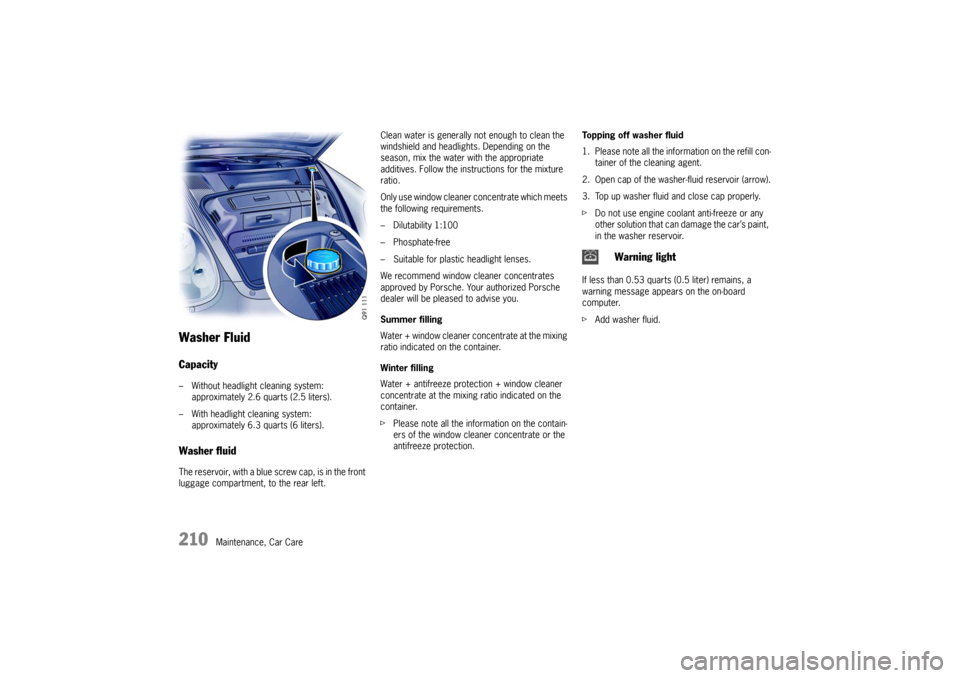
– With headlight cleaning system: approximately 6.3 quarts (6 liters). Washer fluidThe reservoir, with a blue screw cap, is in the front
luggage compartment, to the rear left. Clean water is generally
not enough to clean the
windshield and headlights. Depending on the
season, mix the water with the appropriate
additives. Follow the instructions for the mixture
ratio.
Only use window cleaner concentrate which meets
the following requirements.
– Dilutability 1:100
– Phosphate-free
– Suitable for plastic headlight lenses.
We recommend window cleaner concentrates
approved by Porsche. Your authorized Porsche
dealer will be pleased to advise you.
Summer filling
Water + window cleaner concentrate at the mixing
ratio indicated on the container.
Winter filling
Water + antifreeze protection + window cleaner
concentrate at the mixing ratio indicated on the
container.
f Please note all the info rmation on the contain-
ers of the window cleaner concentrate or the
antifreeze protection. Topping off washer fluid
1. Please note all the info
rmation on the refill con-
tainer of the cleaning agent.
2. Open cap of the washer-fluid reservoir (arrow).
3. Top up washer fluid and close cap properly.
f Do not use engine coolant anti-freeze or any
other solution that can damage the car’s paint,
in the washer reservoir.
If less than 0.53 quarts (0.5 liter) remains, a
warning message appears on the on-board
computer.
f Add washer fluid.
Warning light
Page 220 of 294
218
Maintenance, Car Care
Light alloy wheels fPlease see the chapter “WASHING” on
Page 214.
Warning!
Danger of accident re sulting in serious per-
sonal injury or death if cleaning agents (e.g.
wheel cleaning agents) come into contact
with the brake discs.
The resulting film on the brake discs can im-
pair braking performance.
f Make sure that no cleaning agent comes into
contact with the brake discs.
f If cleaning agent has come into contact with
the brake discs, thoroughly clean the brake
discs with a strong jet of water.
f Paying attention to any road users behind you,
dry the brake discs by applying the brakes at short intervals.
Metal particles (such as brass or copper in brake
dust) must not remain too long on alloy wheels.
Contact corrosion can cause pitting.
Cleaners with an oxide-removing effect or the
wrong pH value, as are commonly used for other
metals, as well as mechanical tools and products,
will damage the oxide layer and are therefore
unsuitable.
f Use only cleaners for alloy wheels (pH value
9.5). Products with the wrong pH value can destroy the protective layer on the wheels.
We recommend Porsche cleaner for alloy rims.
f If possible, wash the wheels every two weeks
with a sponge or washing brush. If the wheels
are exposed to road salt, grit or industrial dust,
weekly cleaning is necessary.
Door, roof, lid and window seals
Caution!
The lubricant coating on the inner door seals,
convertible top and hardtop seals may be
damaged by unsuitable cleaning and care agents.
f Do not use any chemic al cleaning agents
or solvents.
f Do not use any preservative agents.
f Wash dirt (e.g. abrasion, dust, road salt and
grit) from all seals regularly using warm
soapy water.
f If there is a risk of frost, protect the outer door
seals and lid seals against freezing into place
with a suitable care product.
Headlights, lights, interior and exterior
plastic parts, adhesive filmsfUse only clean water and a little dishwashing
detergent to clean light lenses, plastic head-
light lenses, plastic parts, adhesive films and
surfaces.
Do not clean when dry.
Use a soft sponge or a so ft, lint-free cloth. Gen-
tly wipe the surface without applying too much
pressure.
An interior window cleaner can also be used to
clean plastic surfaces (always read the cleaning
instructions on the container). We recommend
Porsche interior window cleaner.
f Gently wipe the surfac e without applying too
much pressure.
f Do not clean when dry.
f Never use other chemical cleaners or
solvents.
f Rinse cleaned surfaces with clear water.Leather Characteristics and special features
The natural surface markings of leather, e.g.
creases, healed scars, in sect sting marks, struc-
tural differences and slight variations in shade and
grain add to the attractiveness of the natural leath-
er product.
Page 223 of 294
Practical Tips, Emergency Service
221
Practical Tips, Emergency Service
Exercise Extreme Caution when Working
on your Vehicle .
....................................... 222
Tires/Wheels .............. ............................. 223
Loading Information ................................... 234
Wheel Bolts .......... ................................... 236
Changing a wheel ... ................................... 237
Flat Tire ....................... ............................. 239
Lifting the Vehicle with a Lifting Platform
or Garage Lift ........ ................................... 242
Spacers ..................... .............................. 243
Electrical System ..................................... 245
Battery ................. ................................... 249
Replacing the remote-con trol battery ......... 254
Emergency Starting with Jumper Cables ..... 255
Bulb chart .............. ................................... 257
Lights, Replacing Bulb s ............................. 257
Headlights ............. ................................... 258
Number Plate Light . ................................... 266
Changing Light-Emitting Diodes and Long-Life
Bulbs ......................... .............................. 266
Adjusting Headlights .................................. 267
Towing ....................... .............................. 269
Page 259 of 294

Practical Tips, Emergency Service
257
Bulb chart
Ty p e , r a t i n g
Halogen low beam H7, 55W
Halogen high beam H9, 65W
Low beam/high beam with Bi-Xen on headlights Philips, D2S 35W
Additional high beam with Bi-Xenon headlights H7, 55 W
Turn signal light, front Philips HY21W
Turn signal light, side WY5W
Fog light H8, 35W
License plate light C5W
Lights, Replacing Bulbs
Warning!
Risk of short circuit.
f Always switch off the relevant consumer when
changing bulbs.
Risk of serious personal injury or death.
The Bi-Xenon headlights are under high
voltage when installed.
f Be careful during all work in the area of the Bi-
Xenon headlights.
Risk of damage. Bulbs of a higher wattage
can damage the lamp housing.
f Only the bulbs shown in the chart may be used.
f New bulbs must be clean and free from oil,
grease and fingerprints. Therefore, never
touch bulbs with your bare hands.
Use a cloth or soft paper while replacing bulbs.
Page 260 of 294
258
Practical Tips, Emergency Service
Headlights
Caution!
Risk of damage to headlights due to exces-
sive temperatures and abrasion.
f To ensure optimum ventilation, do not cover
the gap between headlight and body
(e.g. “stone guards” or films).
f Use soapy water only to clean light lenses and
plastic headlight lenses.
In no case may chemical cleaners or other vol-
atile cleaning fluids be used.
f To prevent scratches, do not rub with a dry or merely moist cloth, tissue or insect sponges.
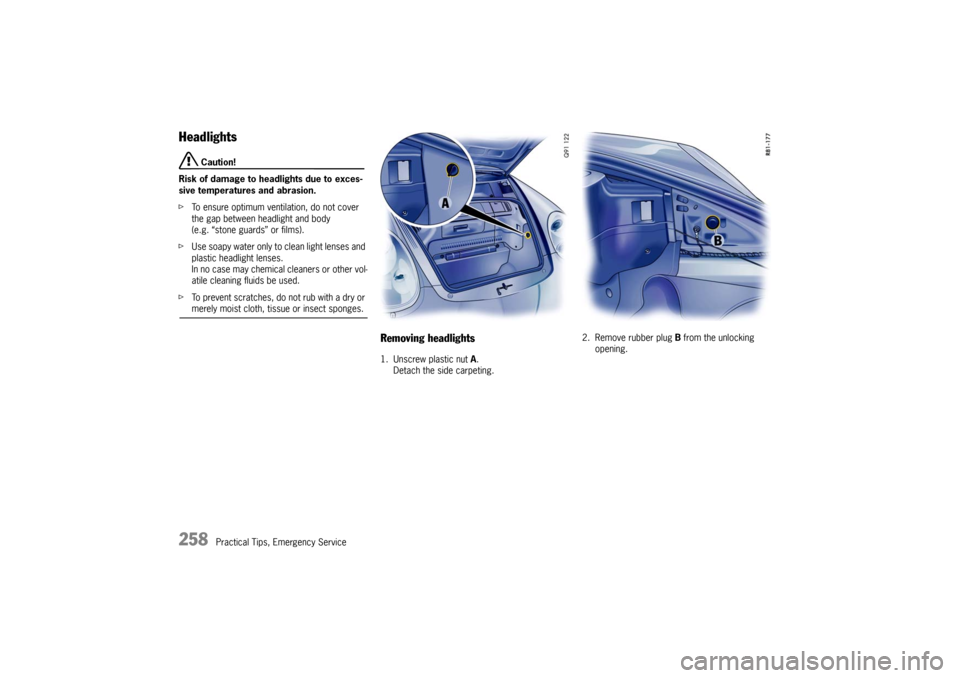
Removing headlights1. Unscrew plastic nut A.
Detach the side carpeting. 2. Remove rubber plug
B from the unlocking
opening.
Page 262 of 294

260
Practical Tips, Emergency Service
Changing bulb for low beam
Halogen headlights1. Pull off plug A.
2. Disengage fixing clip B.
3. Replace defective bulb. When doing so, ensure bulb is seated properly.
4. Reassemble in reverse order.
Closing the cover of the headlight housing
1. Push on cover until it is felt to engage.
2. Fasten cover with the 4 screws.
Changing bulb for high beam
Halogen headlights1. Turn housing cover counter-clockwise and take it off. 2. Turn bulb holder clockwise and remove it
(bayonet lock).
3. Pull both plug release tabs apart and pull plug out.
4. Replace the defective bulb with bulb holder.
5. Insert bulb holder and turn it as far as it will go to the left.
6. Close the housing cover.
Page 263 of 294

Practical Tips, Emergency Service
261
Changing bulb for low beam/high beam
Bi-Xenon headlights1. Unscrew the 3 screws A on the control unit and
remove the control unit. 2. Turn the plug counter-clockwise and pu
ll it off. 3. Disengage both fixing clips.
4. Replace defective bulb.When doing so, ensure bulb is seated properly.
5. Engage both fixing clips, push on plug and turn right as far as the stop.
6. Fit control unit and screw tight.
Closing the cover of the headlight housing
1. Push on cover until it is felt to engage.
2. Fasten cover with the 4 screws.
Page 264 of 294

262
Practical Tips, Emergency Service
Changing bulb for additional high beam
Bi-Xenon headlights1. Turn housing cover counter-clockwise and take it off. 2. Pull off plug. 3. Disengage fixing clip.
4. Replace defective bulb.
5. Engage fixing clip, insert plug and close housing cover.
Page 265 of 294

Practical Tips, Emergency Service
263
Changing bulb for turn signal light
Halogen/Bi-Xenon headlights1. Turn housing cover counter-clockwise and take it off. 2. Turn bulb holder counter-clockwise and
remove it (bayonet lock). 3. Replace the defective bulb (bayonet lock).
4. Insert the bulb holder and turn it clockwise.
5. Close the housing cover.
Page 268 of 294
266
Practical Tips, Emergency Service
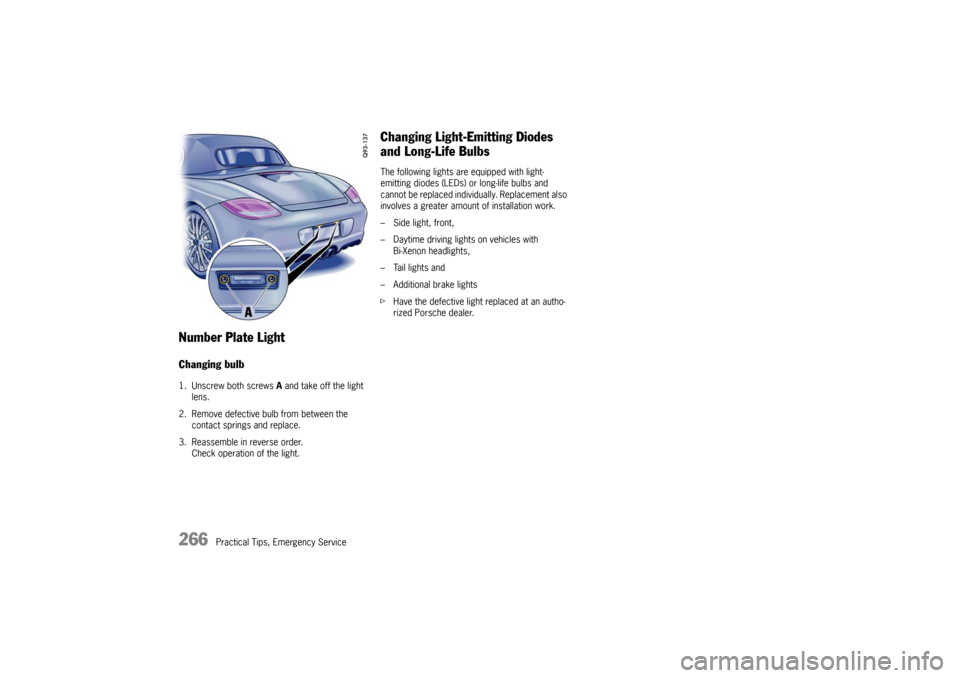
Number Plate LightChanging bulb1. Unscrew both screws A and take off the light
lens.
2. Remove defective bulb from between the contact springs and replace.
3. Reassemble in reverse order. Check operation of the light.
Changing Light-Emitting Diodes
and Long-Life BulbsThe following lights are equipped with light-
emitting diodes (LEDs) or long-life bulbs and
cannot be replaced indivi dually. Replacement also
involves a greater amount of installation work.
– Side light, front,
– Daytime driving lights on vehicles with Bi-Xenon headlights,
– Tail lights and
– Additional brake lights
f Have the defective light replaced at an autho-
rized Porsche dealer.