light switch PORSCHE CAYMAN 2006 1.G Owner's Manual
[x] Cancel search | Manufacturer: PORSCHE, Model Year: 2006, Model line: CAYMAN, Model: PORSCHE CAYMAN 2006 1.GPages: 280, PDF Size: 4.89 MB
Page 63 of 280

Controls, Instruments
63
Examples of PSM control operations
– If the “front wheels of the vehicle drift” on a
bend, the rear wheel on the inside of the bend
is braked and the engine power is reduced if
necessary.
– If the rear of the vehicle swings out on a bend,
the front wheel on the outside of the bend is
braked.
PSM should always be switched on during
“normal” driving.
However, it may be advantageous to switch off
PSM temporarily in exceptional situations, for
example:
– On a loose surface or in deep snow,
– When “rocking the vehicle free”, or
– When using snow chains.
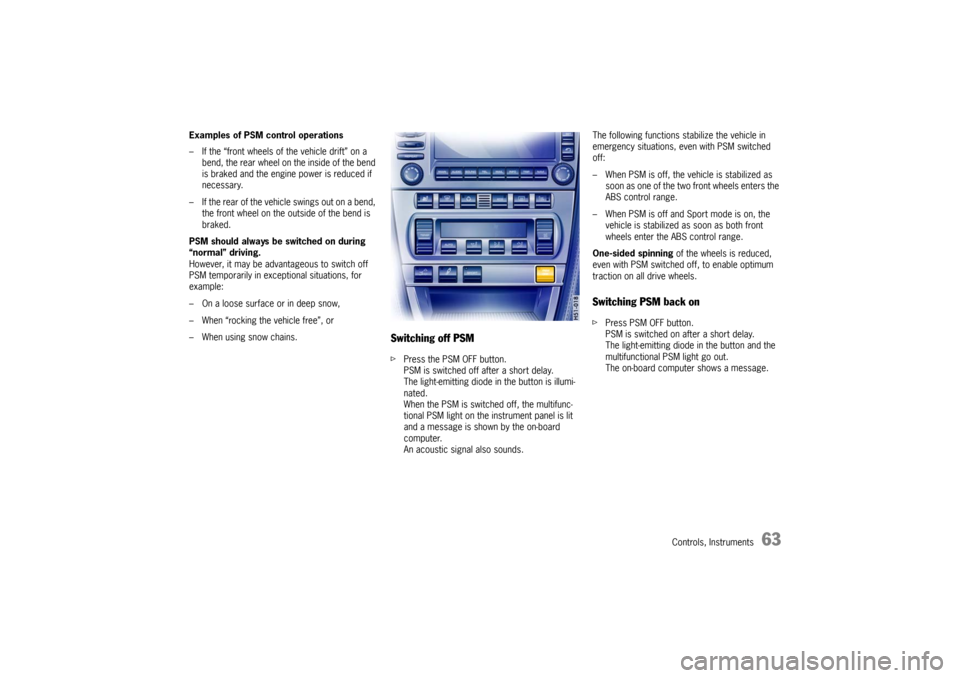
Switching off PSMfPress the PSM OFF button.
PSM is switched off after a short delay.
The light-emitting diode in the button is illumi-
nated.
When the PSM is switched off, the multifunc-
tional PSM light on the instrument panel is lit
and a message is shown by the on-board
computer.
An acoustic signal also sounds.The following functions stabilize the vehicle in
emergency situations, even with PSM switched
off:
– When PSM is off, the vehicle is stabilized as
soon as one of the two front wheels enters the
ABS control range.
– When PSM is off and Sport mode is on, the
vehicle is stabilized as soon as both front
wheels enter the ABS control range.
One-sided spinning of the wheels is reduced,
even with PSM switched off, to enable optimum
traction on all drive wheels.
Switching PSM back onfPress PSM OFF button.
PSM is switched on after a short delay.
The light-emitting diode in the button and the
multifunctional PSM light go out.
The on-board computer shows a message.
Page 64 of 280

64
Controls, Instruments
Sport modeA sportier car set-up is obtained when Sport mode
is switched on.
PSM interventions are later than in Normal mode;
the vehicle can be maneuvered with greater agility
at its performance limits, without the need to
dispense with the assistance of PSM in
emergency situations. This helps to achieve
optimal lap times, particularly on race circuits with
a dry road surface.
– The multifunctional light on the instrument
panel lights up for a lamp check when the
ignition is switched on.
– The light indicates a control operation by
flashing, including when PSM is switched off
(brake control in the event of one-sided wheel
spin).
– In conjunction with a message on the on-board
computer, the light indicates that PSM is
switched off.
An acoustic signal also sounds.– Faults are displayed by the light in conjunction
with a message on the on-board computer.
PSM is out of order.
fPlease go to a qualified specialist workshop.
We recommend a Porsche partner for this
work as they have trained workshop personnel
and the necessary parts and tools.
fPlease observe the chapter “STORING YOUR
PORSCHE” on Page 203.
TowingfPlease observe the chapter “TOWING” on Page
260.Checks on test standsWhen carrying out brake tests on roller test
stands a maximum testing speed of 5 mph
(8 km/h) must not be exceeded.
Handbrake checks on the roller brake tester
must be performed only with the ignition switched
off.
Multifunctional PSM light
Page 65 of 280

Controls, Instruments
65
PASM makes two running-gear setups available to
the driver: “Normal” and “Sport”.
The selection is made via a button on the center
console.
After the ignition is switched off, PASM is automat-
ically reset to Normal mode.
In Normal mode the running gear is in a sporty and
comfortable setup.
Sport mode offers a markedly sporty shock
absorber tuning (e.g. for driving on the race
circuit).
The variable suspension system selects the
appropriate damping level for each wheel
according to the situation and conditions of
driving.
Example:
If the vehicle is driven in a markedly sporty manner
in Normal mode, PASM automatically adapts the
shock-absorber behavior to the driving situation in
this case as well.
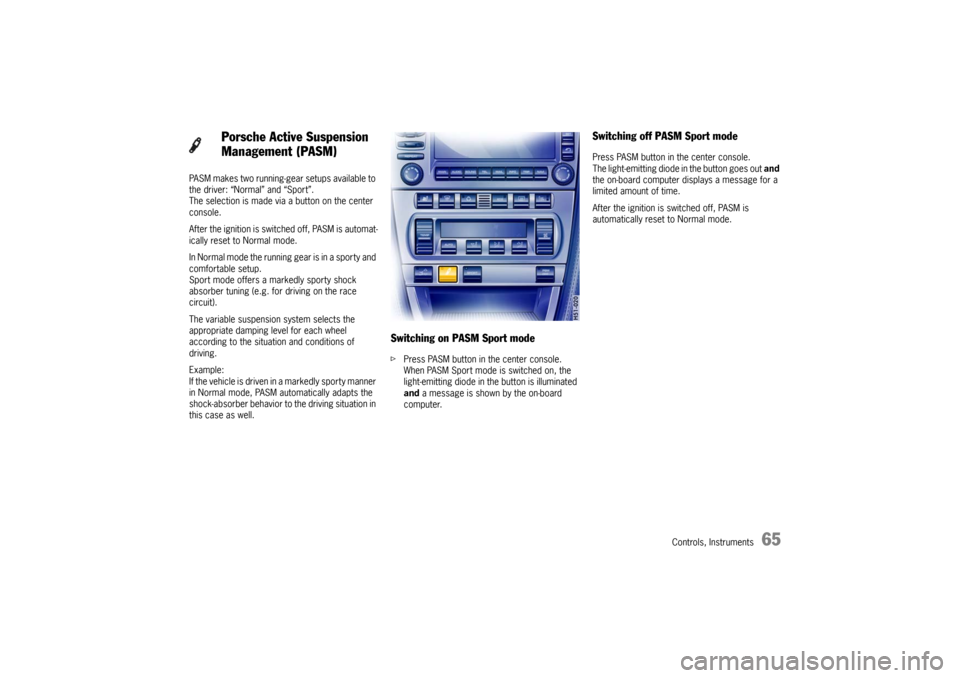
Switching on PASM Sport modefPress PASM button in the center console.
When PASM Sport mode is switched on, the
light-emitting diode in the button is illuminated
and a message is shown by the on-board
computer.
Switching off PASM Sport modePress PASM button in the center console.
The light-emitting diode in the button goes out and
the on-board computer displays a message for a
limited amount of time.
After the ignition is switched off, PASM is
automatically reset to Normal mode.
Porsche Active Suspension
Management (PASM)
Page 67 of 280

Controls, Instruments
67
Extending
fPress button briefly.
The rear spoiler extends to its final position.
The light-emitting diode in the button lights up.
The rear spoiler remains extended even after
switching off the ignition.
Retracting
fat speeds between 0 and 20 mph
(0 and 30 km/h)
Press and hold button until the rear spoiler has
reached its final position.
The light-emitting diode in the button goes out.
The rear spoiler changes to automatic mode.
fat speeds between 20 and 60 mph
(30 and 100 km/h)
Press button briefly.
The rear spoiler retracts, the light-emitting
diode in the button goes out.
The rear spoiler changes to automatic mode.
fat speeds over 60 mph (100 km/h)
Press button briefly.
The rear spoiler remains extended, the light-
emitting diode in the button goes out.
The rear spoiler changes to automatic mode.Manually retracting an extended rear spoiler
after switching on the ignition again
1. Press button briefly.
The light-emitting diode in the button lights up.
The rear spoiler is now in manual mode.
2. Press and hold button until the rear spoiler has
reached its final position.
The light-emitting diode in the button goes out.
The rear spoiler changes to automatic mode.
Page 69 of 280

Controls, Instruments
69
Limits of ultrasonic measurement
The parking assistant system cannot detect:
– sound-absorbing obstacles (e.g. powder
snow),
– sound-reflecting obstacles (e.g. glass surfac-
es, flat painted surfaces)
– and very thin obstacles.
Other ultrasound sources (e.g. pneumatic brakes
of other vehicles, jackhammers) can interfere with
detection of obstacles.
Fault indication
The parking assistant system indicates a fault in
two ways:
– After reverse gear has been selected, the
short signal tone is followed by a continuous
tone of the same pitch:
This indicates that sensors are soiled or cov-
ered with ice.
– After reverse gear has been selected, the
short signal tone is followed by a continuous
tone with a much lower pitch:
This indicates a general system fault. Please
have the fault remedied at an authorized
Porsche dealer.
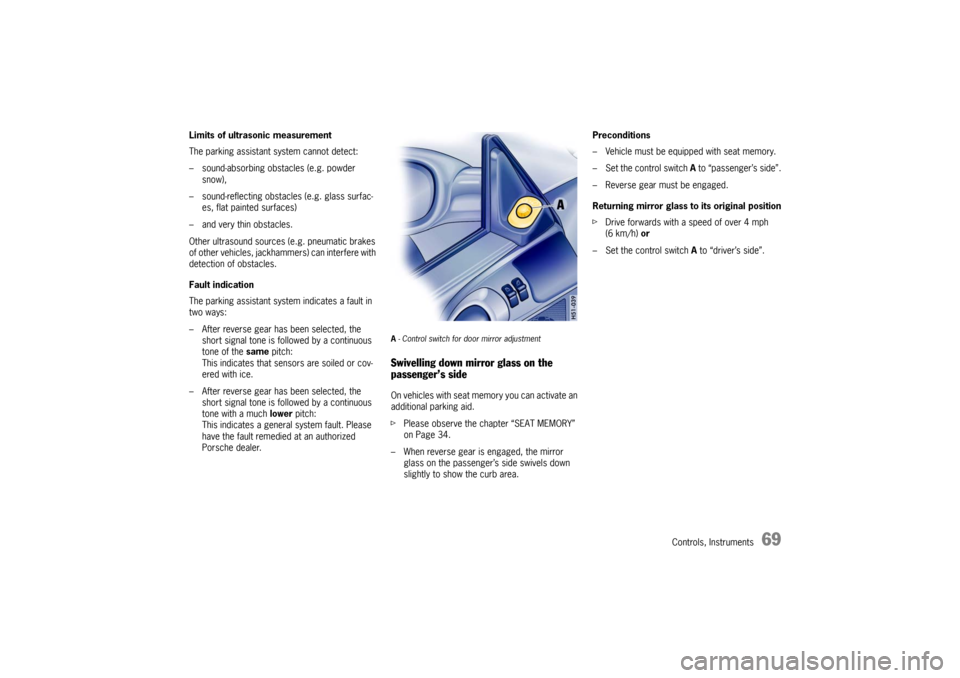
A - Control switch for door mirror adjustment Swivelling down mirror glass on the
passenger’s side On vehicles with seat memory you can activate an
additional parking aid.
fPlease observe the chapter “SEAT MEMORY”
on Page 34.
– When reverse gear is engaged, the mirror
glass on the passenger’s side swivels down
slightly to show the curb area. Preconditions
– Vehicle must be equipped with seat memory.
– Set the control switch A to “passenger’s side”.
– Reverse gear must be engaged.
Returning mirror glass to its original position
fDrive forwards with a speed of over 4 mph
(6 km/h) or
– Set the control switch A to “driver’s side”.
Page 70 of 280

70
Controls, Instruments
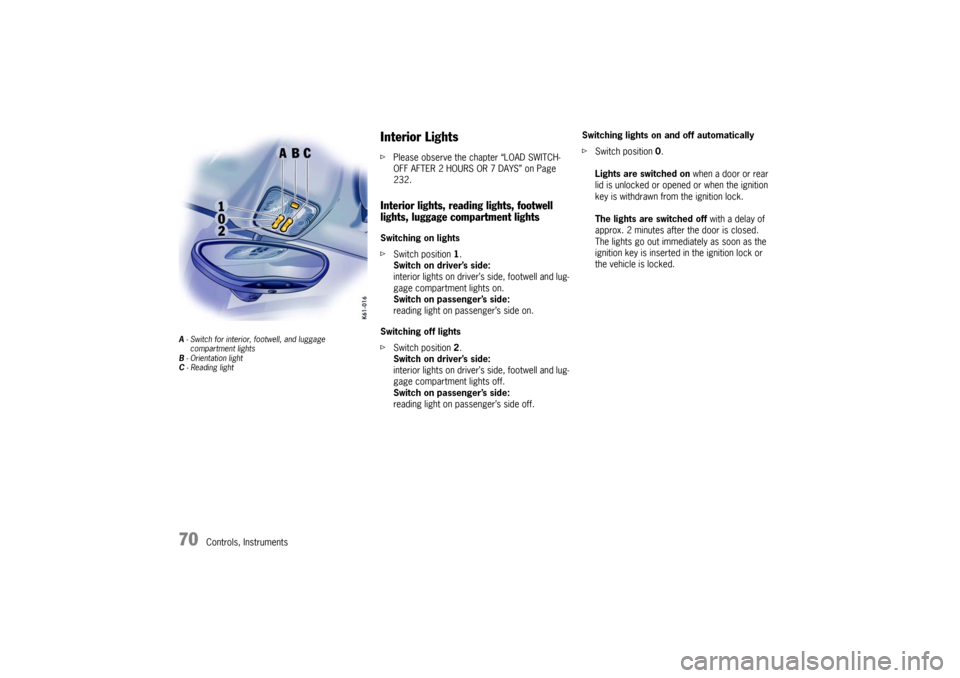
A - Switch for interior, footwell, and luggage
compartment lights
B - Orientation light
C - Reading light
Interior LightsfPlease observe the chapter “LOAD SWITCH-
OFF AFTER 2 HOURS OR 7 DAYS” on Page
232.Interior lights, reading lights, footwell
lights, luggage compartment lightsSwitching on lights
fSwitch position 1.
Switch on driver’s side:
interior lights on driver’s side, footwell and lug-
gage compartment lights on.
Switch on passenger’s side:
reading light on passenger’s side on.
Switching off lights
fSwitch position 2.
Switch on driver’s side:
interior lights on driver’s side, footwell and lug-
gage compartment lights off.
Switch on passenger’s side:
reading light on passenger’s side off.Switching lights on and off automatically
fSwitch position 0.
Lights are switched on when a door or rear
lid is unlocked or opened or when the ignition
key is withdrawn from the ignition lock.
The lights are switched off with a delay of
approx. 2 minutes after the door is closed.
The lights go out immediately as soon as the
ignition key is inserted in the ignition lock or
the vehicle is locked.
Page 72 of 280

72
Controls, Instruments
Operation, Instruments 1 Light switch
2 Turn signals/
headlight dimmer/flasher lever
3 Ignition lock/locking the steering column
4 Hands-free microphone for telephone
5Horn
6 Windshield wiper/washer lever
Rear window wiper
7 Porsche Communication Management/Radio
8 Interior temperature sensor, GPS antenna
9 Emergency flasher switch10 Central locking button,
Readiness display for alarm system
11 Cupholder
12 Operating lever for on-board computer
13 Locking lever for steering-wheel adjustment
14 Operating lever for cruise control
15 Control panel for heating, ventilation and air
conditioning system
16 Buttons for rear spoiler,
Porsche Active Suspension Management
(PASM),
Sport Mode,
Porsche Stability Management (PSM)
17 Seat heating, left/right
Page 79 of 280

Controls, Instruments
79
Instrument Panel USA Models Also refer to the corresponding chapter in
the Owner’s Manual.
1 Speedometer with analogue display
2 Tire pressure warning light
3 Turn signal indicator light left
4 Tachometer
5 High beam indicator light
6 Turn signal indicator light right
7 ABS warning light
8 Cooling system
Temperature gauge, warning light
9Fuel
Level gauge, warning light
10 Adjusting button for instrument illumination
and trip counter
11 Odometer and daily trip mileage display
12 Automatic speed control indicator light
13 Light sensor for instrument illumination14 Airbag warning light
15 Emission control warning light (Check Engine)
16 Central warning light
17 On-board computer display
18 Porsche Stability Management
Multifunctional PSM light
19 Brake warning light
20 Safety belt warning light
21 Tiptronic indicator
22 Clock and outside temperature display
23 Adjustment button for clockWhen the ignition is switched on, the warning
lights light up for a lamp check.
Note
Warnings that have been given are stored in the
appropriate control unit memory and can be read
out at an authorized Porsche dealer.
This information can help to warn you about situa-
tions which may be hazardous to you or your car.
Page 81 of 280

Controls, Instruments
81
Instrument Panel Canada Models Also refer to the corresponding chapter in
the Owner’s Manual.
1 Speedometer with analogue display
2 Tire pressure warning light
3 Turn signal indicator light left
4 Tachometer
5 High beam indicator light
6 Turn signal indicator light right
7 ABS warning light
8 Cooling system
Temperature gauge, warning light
9Fuel
Level gauge, warning light
10 Adjusting button for instrument illumination
and trip counter
11 Odometer and daily trip mileage display
12 Automatic speed control indicator light
13 Light sensor for instrument illumination14 Airbag warning light
15 Emission control warning light (Check Engine)
16 Central warning light
17 On-board computer display
18 Porsche Stability Management
Multifunctional PSM light
19 Brake warning light
20 Safety belt warning light
21 Tiptronic indicator
22 Clock and outside temperature display
23 Adjustment button for clockWhen the ignition is switched on, the warning
lights light up for a lamp check.
Note
Warnings that have been given are stored in the
appropriate control unit memory and can be read
out at an authorized Porsche dealer.
This information can help to warn you about situa-
tions which may be hazardous to you or your car.
Page 82 of 280

82
Controls, Instruments
A- Adjustment button for instrument illumination and
trip counter Indicates automatic speed control readiness.
Instrument Illumination The illumination is automatically adjusted to the
ambient brightness by the light sensor in the
tachometer.
In addition, when the car lights are switched on,
the instrument and switch symbol brightness can
be manually adjusted.
Warning!
Risk of an accident, personal injury and loss
of control.
fDo not reach through the steering-wheel spokes while driving.
Automatic Speed Control
Indicator light
Dimming instrument illumination
fTurn adjustment button A in the appropriate di-
rection and hold it until the desired brightness
has been reached.
The chosen level of brightness is indicated by
a bar display in the display field of the on-board
computer.
Note
When the vehicle lights are switched on, the scale
lighting for bright dials is switched on and off au-
tomatically depending on ambient brightness.