tow PORSCHE CAYMAN 2006 1.G Owners Manual
[x] Cancel search | Manufacturer: PORSCHE, Model Year: 2006, Model line: CAYMAN, Model: PORSCHE CAYMAN 2006 1.GPages: 280, PDF Size: 4.89 MB
Page 12 of 280

12
Controls, Instruments
Dear Porsche Owner A lot has gone into the manufacture of your
Porsche, including advanced engineering, rigid
quality control and demanding inspections.
These engineering and safety features will be
enhanced by you... the safe driver... – who knows his car and all controls,
– who maintains the vehicle properly,
– who uses driving skills wisely, and always
drives within her/his own capabilities and the
level of familiarity with the vehicle.
You will find helpful hints in this manual on how to
perform most of the checks listed on the following
pages.
If in doubt, have these checks performed by your
authorized Porsche dealer.
Before driving off... Check the following items first fTurn the engine off before you attempt any
checks or repairs on the vehicle.
fBe sure the tires are inflated correctly.
Check tires for damage and tire wear.
fSee that wheel bolts are properly tightened
and not loose or missing.
fCheck engine oil level, add if necessary.
Make it a habit to have engine oil checked with
every fuel filling.
fCheck all fluid levels such as windshield wash-
er and brake fluid levels.
fBe sure the vehicle battery is well charged and
cranks the engine properly.
fCheck all doors and lids for proper operation
and latch them properly.
fCheck and if necessary replace worn or
cracked wiper blades.
fSee that all windows are clear and unobstruct-
ed.
fCheck air intake slots and area between front
lid and windshield are free of snow and ice, so
the heater and the windshield wipers work
properly. fIf a child will be riding in the vehicle, check
child seat/child seat restraint system to ensure
that restraints are properly adjusted.
fCheck all exterior and interior lights for opera-
tion and that the lenses are clean.
fCheck the headlights for proper aim, and if
necessary, have them adjusted.
fCheck under the vehicle for leaks.
fBe sure all luggage is stowed securely.
Emergency equipment It is good practice to carry emergency equipment
in your vehicle.
Some of the items you should have are:
window scraper, snow brush, container or bag of
sand or salt, emergency light, small shovel, first-
aid kit, etc.
Page 13 of 280

Controls, Instruments
13
In the driver’s seat... fCheck operation of the horn.
fPosition seat for easy reach of foot pedals and
controls.
To reduce the possibility of injury from the air-
bag deployment, you should always sit back as
far from the steering wheel as is practical,
while still maintaining full vehicle control.
fAdjust the inside and outside rear view mirrors.
fBuckle your safety belts.
fCheck operation of the foot and parking brake.
fCheck all warning and indicator lights with
ignition on and engine not running.
fStart engine and check all warning displays for
warning symbols.
fNever leave an idling car unattended.
fLock doors from inside, especially with chil-
dren in the car to prevent inadvertent opening
of doors from inside or outside.
Drive with doors locked.
On the road... fNever drive after you have consumed alcohol
or drugs.
fAlways have your safety belt fastened.
fAlways drive defensively.
Expect the unexpected.
fUse signals to indicate turns and lane changes.
fTurn on headlights at dusk or when the driving
conditions warrant it.
fAlways keep a safe distance from the vehicle in
front of you, depending on traffic, road and
weather conditions.
fReduce speed at night and during inclement
weather.
Driving in wet weather requires caution and re-
duced speeds, particularly on roads with
standing water, as the handling characteristics
of the vehicle may be impaired due to hydro-
planing of the tires.
fAlways observe speed limits and obey road
signs and traffic laws.
fWhen tired, get well off the road, stop and take
a rest. Turn the engine off. Do not sit in the ve-
hicle with engine idling.
fPlease observe the chapter “ENGINE EX-
HAUST” on Page 8.fWhen parked, always set the parking brake.
Move the Tiptronic selector lever to ”P“ or the
gearshift lever to reverse or first gear.
On hills also turn the front wheels toward the
curb.
fWhen emergency repairs become necessary,
move the vehicle well off the road. Turn on the
emergency flasher and use other warning de-
vices to alert other motorists. Do not park or
operate the vehicle in areas where the hot ex-
haust system may come in contact with dry
grass, brush, fuel spill or other flammable ma-
terial.
fMake it a habit to have the engine oil checked
with every fuel filling.
Danger!
Danger of fire in engine compartment due to
burning cigars or cigarettes. Serious perso-
nal injury or death could result from fire in
the engine compartment.
fDo not throw any lit cigars or cigarettes out of
the vehicle.
They can be blown into the air inlets by the air
flow and cause a fire in the engine compart-
ment.
fPlease observe the chapter “ASHTRAY” on Page 138.
Page 30 of 280
30
Controls, Instruments
Folding in door mirrors
Warning!
Danger of injury to fingers if the mirror
accidentally flips back when being folded in.
fExercise extreme caution when folding in
mirror by hand. Do not let go of the mirror
before the locking lever is locked or the mirror is fully unfolded.
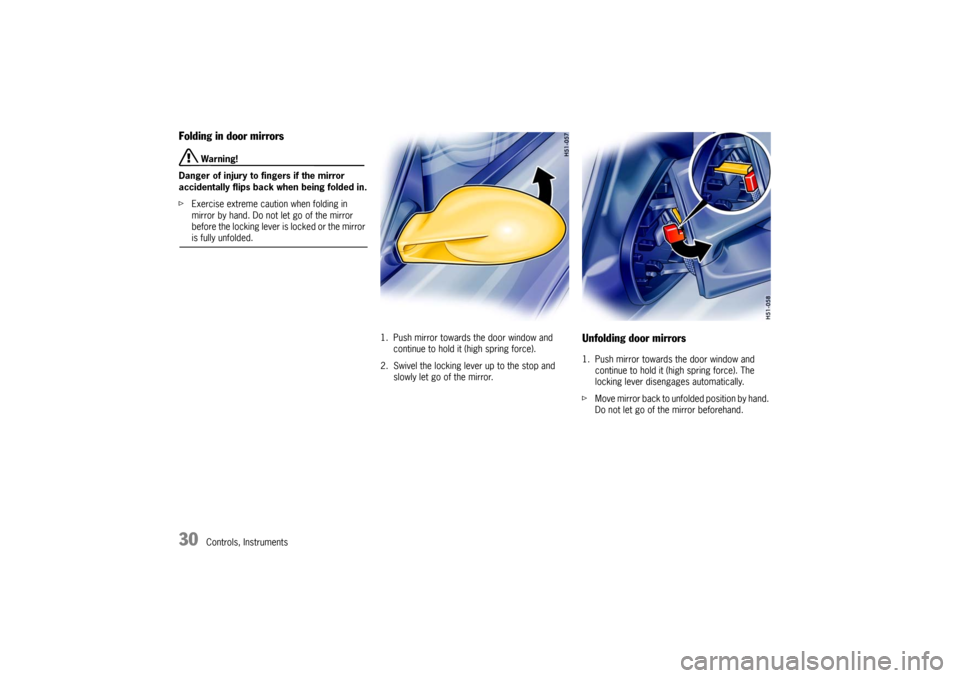
1. Push mirror towards the door window and
continue to hold it (high spring force).
2. Swivel the locking lever up to the stop and
slowly let go of the mirror.
Unfolding door mirrors1. Push mirror towards the door window and
continue to hold it (high spring force). The
locking lever disengages automatically.
fMove mirror back to unfolded position by hand.
Do not let go of the mirror beforehand.
Page 41 of 280
Controls, Instruments
41
An audio-visual warning system is interconnect-
ed with the driver’s safety belt.
Every time the ignition is turned on, the gong will
sound for about 6 seconds to remind driver and
passenger to buckle up.
In addition, the gong will sound for approx. 90 sec-
onds if the vehicle speed exceeds 15 mph
(24 km/h).
The safety belt warning light in the instrument
panel and on-board computer will go off as soon
as the driver has buckled up.
Inertia reel retractor The combination lap/shoulder belt with inertia reel
locking mechanism adjusts automatically to your
size and movements as long as the pull on the belt
is slow.
Rapid deceleration during hard braking or a colli-
sion locks the belt. The belt will also lock when you
drive up or down a steep hill or in a sharp curve,
otherwise, the shoulder belt will not inhibit your
upper body movement.
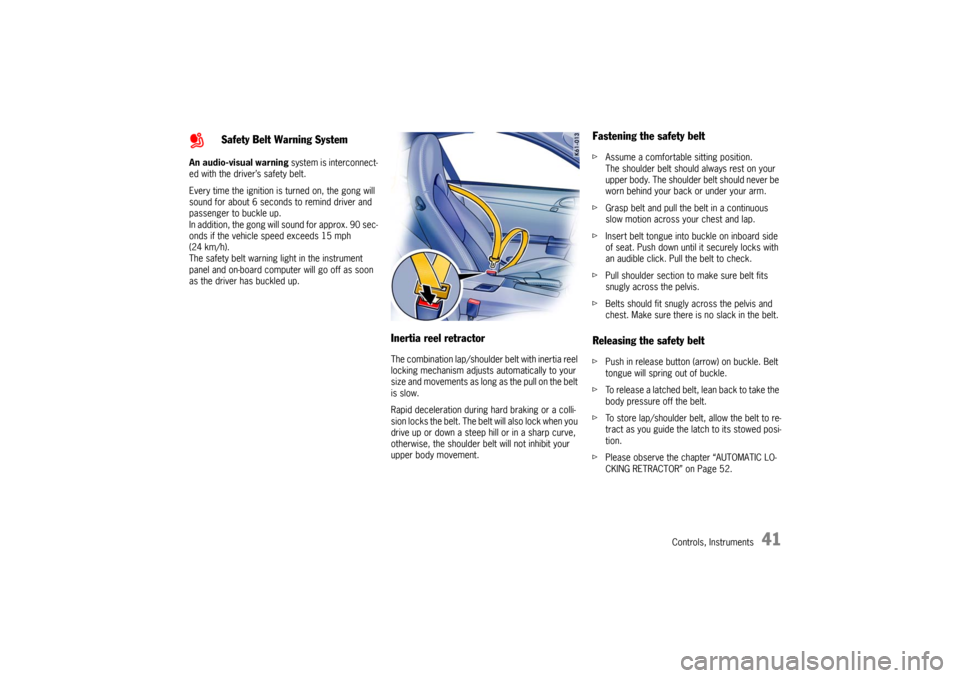
Fastening the safety beltfAssume a comfortable sitting position.
The shoulder belt should always rest on your
upper body. The shoulder belt should never be
worn behind your back or under your arm.
fGrasp belt and pull the belt in a continuous
slow motion across your chest and lap.
fInsert belt tongue into buckle on inboard side
of seat. Push down until it securely locks with
an audible click. Pull the belt to check.
fPull shoulder section to make sure belt fits
snugly across the pelvis.
fBelts should fit snugly across the pelvis and
chest. Make sure there is no slack in the belt. Releasing the safety beltfPush in release button (arrow) on buckle. Belt
tongue will spring out of buckle.
fTo release a latched belt, lean back to take the
body pressure off the belt.
fTo store lap/shoulder belt, allow the belt to re-
tract as you guide the latch to its stowed posi-
tion.
fPlease observe the chapter “AUTOMATIC LO-
CKING RETRACTOR” on Page 52.
Safety Belt Warning System
Page 56 of 280

56
Controls, Instruments The parking brake warning lights will go out after
the parking brake is fully released.
The warning lights are not an indicator that the
parking brake is fully set; it is only intended to be
a warning to release the parking brake before driv-
ing the car. Caution!
A partially engaged brake will overheat the
rear brakes, reduce their effectiveness and
cause excessive wear.
fRelease the parking brake fully.
fWhen parking your car, always set the parking
brake by pulling all the way up on the lever.
fMove the selector lever to “P” (Tiptronic) or
move the gearshift lever to reverse or first
gear (Manual transmission).
fOn hills also turn the front wheels towards the
curb.
Brakes fMake it a habit to check the operation of your
brakes before driving.
Keep in mind that the braking distance increases
very rapidly as the speed increases. At 60 mph or
100 km/h, for example, it is not twice but four
times longer than 30 mph or 50 km/h. Tire trac-
tion is also less effective when the roads are wet
or slippery.
fTherefore, always maintain a safe distance
from the car in front of you.
Vehicles without Porsche Ceramic
Composite Brake (PCCB)
Even though the brake discs consist of alloyed
grey cast iron, they will unavoidably start to cor-
rode if your car is parked for an extended period.
The brakes will tend to “rub” as a result.
The nature, extent and effects of corrosion de-
pend on the amount of time the vehicle was
parked, whether granular or liquid road salt was
spread and whether grease-dissolving agents
were used in car washes.
If the braking comfort is noticeably impaired, we
recommend having the brake system checked by
experts at an authorized Porsche dealer.
Brake system function Your Porsche is equipped with a power assisted
hydraulic dual circuit brake system with disc
brakes at the front and rear.
Both circuits function independently. One brake
circuit operates the front and the other operates
the rear.
If one brake circuit has failed, the other will still op-
erate. However, you will notice an increased pedal
travel when you apply the brakes.
Failure of one brake circuit will cause the stopping
distance to increase.
Warning!
Risk of an accident.
In the unlikely event of hydraulic failure of
one brake circuit:
fPush the brake pedal down firmly and hold it in
that position.
A mechanical linkage activates the second cir-
cuit, and you will be able to bring the vehicle to
a stop.
fAfter bringing your vehicle to a complete stop,
avoid driving the vehicle and instead have it
towed to the nearest authorized Porsche deal-er for repair.
Parking brake warning light USA
Parking brake warning light
Canada
Page 61 of 280

Controls, Instruments
61
Sport ModeA sportier car set-up is obtained when Sport mode
is switched on. Interventions by the Porsche
control systems are intentionally shifted towards
greater agility and driving performance.
– PASM (Porsche Active Suspension Manage-
ment) is automatically changed to Sport mode,
resulting in a stiffer suspension setup.
– The Tiptronic S switches to a sporty gear-
changing map and shortens the gear shifting
periods. Gear changes take place faster.
– PSM (Porsche Stability Management) control is
sporty. PSM interventions are later than in
Normal mode; the vehicle can be maneuvered
with greater agility at its performance limits,
without the need to dispense with the assist-
ance of PSM in emergency situations. This
helps to achieve optimal lap times, particularly
on race circuits with a dry road surface.
– The electronic accelerator pedal reacts
sooner, and the engine is more responsive to
throttle inputs. When Sport mode is switched
on, this function is activated only after the
driver has floored the accelerator pedal or
released it briefly.
– The rpm limiter characteristic is “harder”, i.e.
the engine is immediately throttled when the
performance limits are reached.
fPlease observe the appropriate chapters of
this Manual.
Switching Sport mode on and offfPress SPORT button in the center console.
When Sport mode is switched on, the light-
emitting diode in the SPORT button is lit.When Sport mode is switched on, the logo SPORT
appears next to the digital speedometer.
Switching Sport mode on and off simultaneously
activates and deactivates the Sport mode of the
PA S M .
If PASM Sport mode was activated with the PASM
button, PASM remains active.
After the ignition is switched off, Sport mode and
PSAM Sport mode are automatically reset to Nor-
mal mode.
Page 64 of 280

64
Controls, Instruments
Sport modeA sportier car set-up is obtained when Sport mode
is switched on.
PSM interventions are later than in Normal mode;
the vehicle can be maneuvered with greater agility
at its performance limits, without the need to
dispense with the assistance of PSM in
emergency situations. This helps to achieve
optimal lap times, particularly on race circuits with
a dry road surface.
– The multifunctional light on the instrument
panel lights up for a lamp check when the
ignition is switched on.
– The light indicates a control operation by
flashing, including when PSM is switched off
(brake control in the event of one-sided wheel
spin).
– In conjunction with a message on the on-board
computer, the light indicates that PSM is
switched off.
An acoustic signal also sounds.– Faults are displayed by the light in conjunction
with a message on the on-board computer.
PSM is out of order.
fPlease go to a qualified specialist workshop.
We recommend a Porsche partner for this
work as they have trained workshop personnel
and the necessary parts and tools.
fPlease observe the chapter “STORING YOUR
PORSCHE” on Page 203.
TowingfPlease observe the chapter “TOWING” on Page
260.Checks on test standsWhen carrying out brake tests on roller test
stands a maximum testing speed of 5 mph
(8 km/h) must not be exceeded.
Handbrake checks on the roller brake tester
must be performed only with the ignition switched
off.
Multifunctional PSM light
Page 90 of 280
90
Controls, Instruments If the battery voltage drops abruptly, a warning
m e s s a g e w i l l b e d i s p l a y e d b y t h e o n - b o a rd c o m p u -
ter.
If the warning is displayed by the on-board
computer while the engine is running or while
driving:
fStop the car in a safe place and stop the
engine.
Possible causes
– Defect in the battery charging system.
– Broken drive belt. Warning!
Risk of an accident and risk of engine dam-
age.
A broken drive belt means there is no power
assistance to the steering (more effort is re-
quired to steer) and coolant pump function
will stop.
fDo not continue driving.
fHave the fault remedied at the nearest author-ized Porsche dealer. The warning light in the instrument panel comes
on when the ignition is first turned on and remains
on briefly as a bulb check. If the light does not
come on, have the bulb replaced promptly.
If the warning lights in the instrument panel and on-
board computer come on and remain on while
driving, it suggests:
– a potential engine control problem and the
need for system service or
– an improperly fastened tank cap or
– refueling with engine running.
Although the vehicle is usually driveable and will
not require towing, see your dealer for service as
soon as possible.
Caution!
If the Check engine light in the instrument
panel is flashing, severe catalytic converter
damage and power loss will soon occur.
Prolonged driving with the Check engine light
on could cause damage to the emission con-
trol system. It also could affect fuel economy
and driveability.
fHave the fault remedied at the nearest author-ized Porsche dealer immediately.
Battery
Check Engine
Warning Light
Page 124 of 280
124
Controls, Instruments
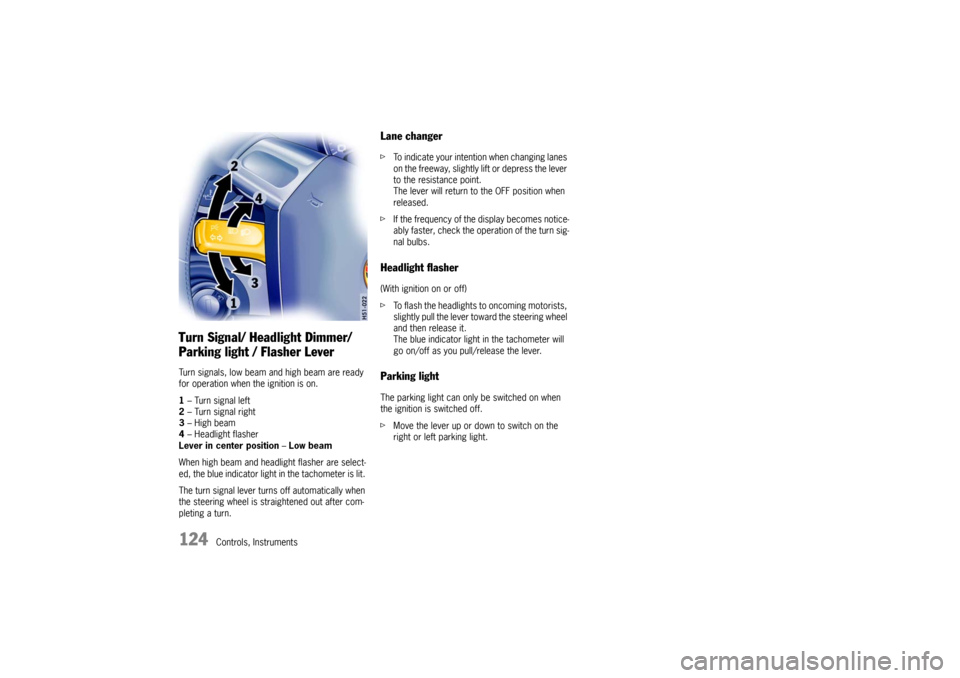
Turn Signal/ Headlight Dimmer/
Parking light / Flasher Lever Turn signals, low beam and high beam are ready
for operation when the ignition is on.
1– Turn signal left
2– Turn signal right
3–High beam
4– Headlight flasher
Lever in center position–Low beam
When high beam and headlight flasher are select-
ed, the blue indicator light in the tachometer is lit.
The turn signal lever turns off automatically when
the steering wheel is straightened out after com-
pleting a turn.
Lane changer fTo indicate your intention when changing lanes
on the freeway, slightly lift or depress the lever
to the resistance point.
The lever will return to the OFF position when
released.
fIf the frequency of the display becomes notice-
ably faster, check the operation of the turn sig-
nal bulbs. Headlight flasher (With ignition on or off)
fTo flash the headlights to oncoming motorists,
slightly pull the lever toward the steering wheel
and then release it.
The blue indicator light in the tachometer will
go on/off as you pull/release the lever. Parking lightThe parking light can only be switched on when
the ignition is switched off.
fMove the lever up or down to switch on the
right or left parking light.
Page 125 of 280
Controls, Instruments
125
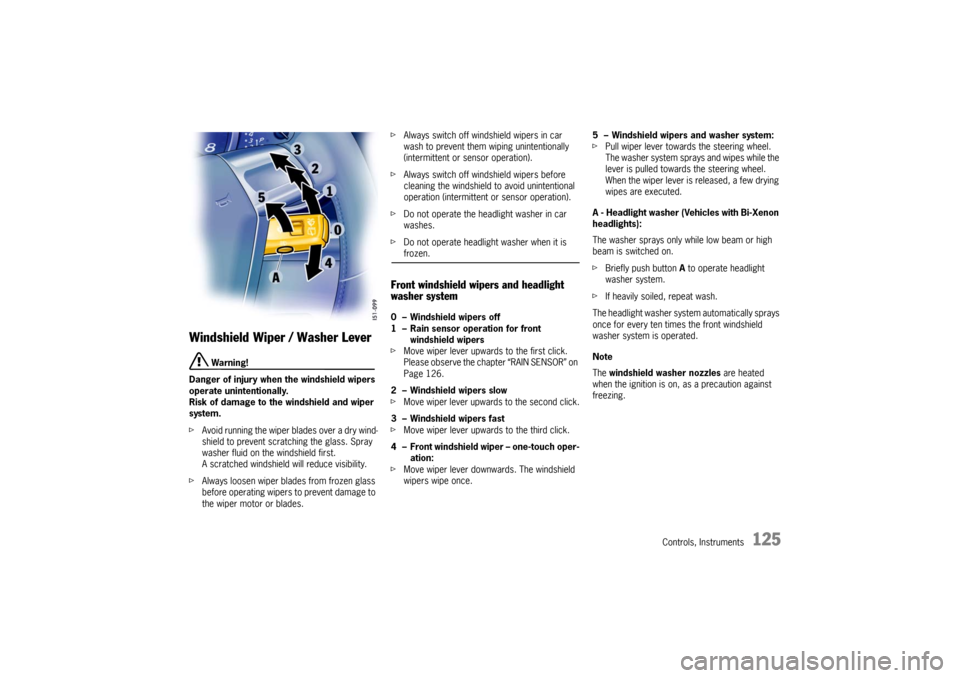
Windshield Wiper / Washer Lever
Warning!
Danger of injury when the windshield wipers
operate unintentionally.
Risk of damage to the windshield and wiper
system.
fAvoid running the wiper blades over a dry wind-
shield to prevent scratching the glass. Spray
washer fluid on the windshield first.
A scratched windshield will reduce visibility.
fAlways loosen wiper blades from frozen glass
before operating wipers to prevent damage to
the wiper motor or blades. fAlways switch off windshield wipers in car
wash to prevent them wiping unintentionally
(intermittent or sensor operation).
fAlways switch off windshield wipers before
cleaning the windshield to avoid unintentional
operation (intermittent or sensor operation).
fDo not operate the headlight washer in car
washes.
fDo not operate headlight washer when it is
frozen.
Front windshield wipers and headlight
washer system0 – Windshield wipers off
1 – Rain sensor operation for front
windshield wipers
fMove wiper lever upwards to the first click.
Please observe the chapter “RAIN SENSOR” on
Page 126.
2 – Windshield wipers slow
fMove wiper lever upwards to the second click.
3 – Windshield wipers fast
fMove wiper lever upwards to the third click.
4 – Front windshield wiper – one-touch oper-
ation:
fMove wiper lever downwards. The windshield
wipers wipe once.5 – Windshield wipers and washer system:
fPull wiper lever towards the steering wheel.
The washer system sprays and wipes while the
lever is pulled towards the steering wheel.
When the wiper lever is released, a few drying
wipes are executed.
A - Headlight washer (Vehicles with Bi-Xenon
headlights):
The washer sprays only while low beam or high
beam is switched on.
fBriefly push button A to operate headlight
washer system.
fIf heavily soiled, repeat wash.
The headlight washer system automatically sprays
once for every ten times the front windshield
washer system is operated.
Note
The windshield washer nozzles are heated
when the ignition is on, as a precaution against
freezing.