wheel bolts PORSCHE CAYMAN 2009 1.G User Guide
[x] Cancel search | Manufacturer: PORSCHE, Model Year: 2009, Model line: CAYMAN, Model: PORSCHE CAYMAN 2009 1.GPages: 284, PDF Size: 5.94 MB
Page 229 of 284

Practical Tips, Emergency Service
227
Changing a wheel
Warning!
Risk of serious personal injury or death. The
car may slip off the jack.
f Make sure that no one is in the vehicle when
jacking up and changing a wheel.
f Always place the car on stable supports if work
has to be carried out under the car.
Risk of damage to the brake discs of the
Porsche Ceramic Composite Brake (PCCB).
f Always screw in both assembly aids when changing a wheel.
Note
The tools required for changing a wheel (e.g. jack,
wheel bolt wrench, assembly aids) are not sup-
plied with the car.
Your authorized Porsche dealer will be pleased to
advise you.
1. Apply the handbrake fully and engage 1st gear or PDK selector-lever position P and remove
the ignition key.
2. Switch on the hazard warning lights if neces- sary.
3. Secure the car against rolling away, e.g. by
means of wedges under the wheels on the op-
posite side.
This is particularly important on slopes. 4. Slightly slacken the whee
l bolts of the wheel to
be changed.
5. Lift the car only at the specified jacking points.
6. Raise the car until the wheel lifts off the ground.
Please see the chapter “LIFTING THE VEHICLE
WITH A LIFTING PLATFORM OR GARAGE LIFT”
on Page 232.
7. Remove 1 or 2 wheel bolts (see respective illustration).
8. Screw in assembly aids instead of the wheel bolts.
Screw in assembly aid for cars without Porsche Ceramic
Composite Brake9. Remove the remaining wheel bolts.
Note on operation
f To remove or mount the spacers:
Please see the chapter “SPACERS” on
Page 233.
Page 230 of 284

228
Practical Tips, Emergency Service
Screw in two assembly aids for cars with Porsche
Ceramic Composite Brake10.Take the wheel off and put a new wheel on.
Please see the chapter “WHEEL BOLTS” on
Page 226.
11.Insert wheel bolts and tighten by hand.
12.Remove assembly aids, screw in remaining wheel bolts.
Initially tighten bolts only slightly in diagonally
opposite sequence so that the wheel
is centred.
13.Inflate the tire if necessary. Please see the chapter “TIRE PRESSURE FOR
COLD TIRES (68 °F/ 20 °C)” on Page 267.
14.Lower the car fully and remove the jack.
15.Tighten wheel bolts in diagonally opposite sequence.
f Immediately after changing a wheel, use
a torque wrench to check the prescribed
tightening torque (96 ftlb./130 Nm).
Note on operation for vehicles with
Tire Pressure Monitoring
f On vehicles with Tire Pressure Monitoring, the
settings on the on-board computer must be
updated after the wheel change.
f Please see the chapter “TIRE PRESSURE FOR
COLD TIRES (68 °F/ 20 °C)” on Page 267.
Checking tire pressure with a
pressure gage1. Remove the valve stem cap from the tire.
2. Press the pressure gage onto the valve stem.
Note on operation
fDo not press too hard or force the valve stem
sideways, or air will escape.
If the sound of air escaping from the tire is
heard, reposition the pressure gage.
3. Read the tire pressure on the gage stem and compare it to the permissble tire pressure.
This information can be found on the tire pres-
sure plate or in the chapter Technical Data.
Please see the chapter “TIRE PRESSURE FOR
COLD TIRES (68 °F/ 20 °C)” on Page 267.
4. Remove the pressure gage.
f Please see the chapter “TPM TIRE PRESSURE
MONITORING” on Page 151.
Page 235 of 284

Practical Tips, Emergency Service
233
SpacersfUse the spacers only together with wheels and
fastening parts approved by Porsche.
Before having spacers fitted, find out about the
current approval status.
Mounting an emergency spare wheel
If 5 mm spacers are mounted, these must not be
removed to mount an emergency spare wheel.
Fitting snow chains
The use of snow chains is not permitted when
5 mm spacers are mounted.
Caution!
Risk of damage to the wheel housings if the
5 mm spacers are not removed before fitting
snow chains.
f To permit the fitting of snow chains, have the 5 mm spacers removed on all 4 wheels.Note on operation
f
To fit/remove the spacers:
Please consult an authorized Porsche dealer.
f Please see the chapter “CHANGING A WHEEL”
on Page 227.
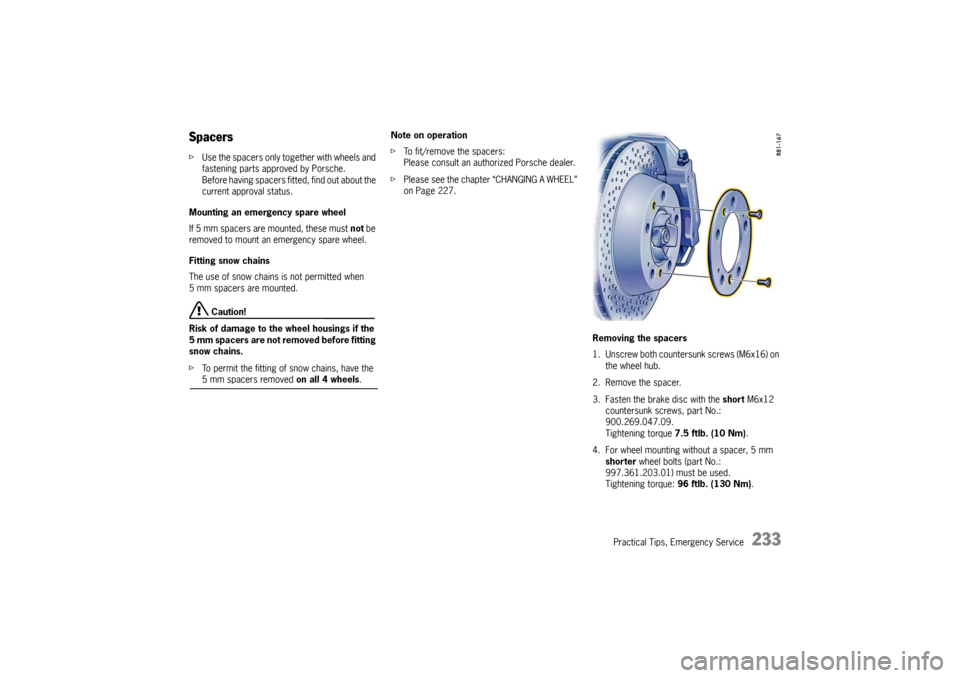
Removing the spacers
1. Unscrew both countersunk screws (M6x16) on the wheel hub.
2. Remove the spacer.
3. Fasten the brake disc with the short M6x12
countersunk screws, part No.:
900.269.047.09.
Tightening torque 7.5 ftlb. (10 Nm) .
4. For wheel mounting without a spacer, 5 mm
shorter wheel bolts (part No.:
997.361.203.01 ) must be used.
Tightening torque: 96 ftlb. (130 Nm) .
Page 236 of 284

234
Practical Tips, Emergency Service
f
Please see the chapter “CHANGING A WHEEL”
on Page 227.
Mounting the spacers
1. Remove wheel.
2. Unscrew both countersunk screws (M6x12) on the break disc.
3. Fasten the spacer with the long M6x16
countersunk screws.
Tightening torque 7.5 ftlb. (10 Nm) .
4. Fit wheel. To do this use the longer wheel
bolts for fastening the wheels.
Tightening torque: 96 ftlb. (130 Nm) .
f Please see the chapter “CHANGING A WHEEL”
on Page 227.
Required scope of parts if the spacers are
removed
Short countersunk screws (M6x12)
Part No: 900.269.047.09
1 set short wheel bolts
Part No: 997.361.203.01
Short anti-theft protection
Part No: 996.361.057.01
f For information on the spacers: Please see the
chapter “SPACERS” on Page 233.
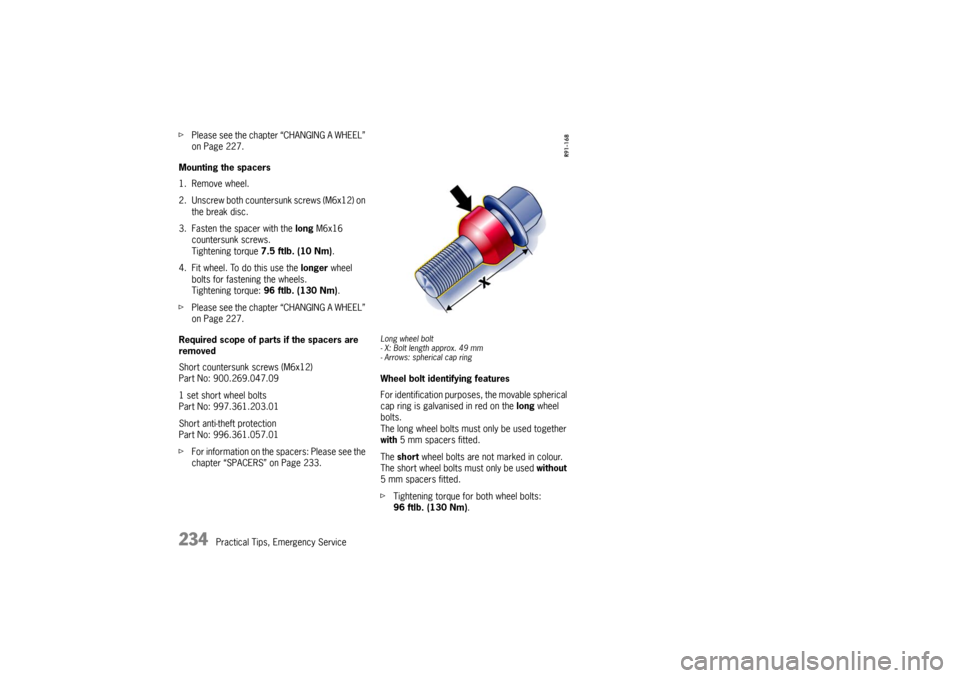
Long wheel bolt
- X: Bolt length approx. 49 mm
- Arrows: spherical cap ringWheel bolt identifying features
For identification purposes, the movable spherical
cap ring is galvanised in red on the long wheel
bolts.
The long wheel bolts must only be used together
with 5 mm spacers fitted.
The short wheel bolts are not marked in colour.
The short wheel bolts must only be used without
5 mm spacers fitted.
f Tightening torque for both wheel bolts:
96 ftlb. (130 Nm) .
Page 269 of 284

Technical Data
267
Tire Pressure for Cold Tires (68 °F/ 20 °C)fThese tire pressures apply only to the ti re makes and types approved by Porsche.
Please see the chapter “ WHEEL BOLTS” on Page 226.
f Please see the chapter “TPM TIRE PRESSURE MONITORING” on Page 151.
Summer and snow tires Cayman, Cayman S
17 inch wheels front30 psi (2.0 bar)
rear 31 psi (2.1 bar)
18 inch wheels front30 psi (2.0 bar)
rear 31 psi (2.1 bar)
19 inch wheels front 32 psi (2.2 bar)
rear 34 psi (2.3 bar)
Page 271 of 284

Technical Data
269
fWhen changing tires or fitting new ones: Please see the chapter “WHEEL BOLTS” on Page 226.
Danger!
Installation of sizes not authorized by
Porsche may have a dangerous effect on
the driving stability and could result in
serious personal injury or death.
f Before mounting new tires, check with yourPorsche dealer about the current release status.
Cayman S Tires Rim Rim offset Track
Summer tires
front 235/40 ZR 18 91Y 8 J x 18 H2 57 mm 58.5 in./1486 mm
rear 265/40 ZR 18 101Y XL 9 J x 18 H2 43 mm 60.2 in./1528 mm
or front 235/35 ZR 19 87Y 8 J x 19 H2 57 mm 58.5 in./1486 mm
rear 265/35 ZR 19 94Y 9.5 J x 19 H2 46 mm 59.9 in./1522 mm
or front 235/35 ZR 19 87Y 8.5 J x 19 H2 55 mm 58.7 in./1490 mm
rear 265/35 ZR 19 94Y 10 J x 19 H2 42 mm 60.2 in./1530 mm
Snow tires front235/40 R 18 91V M+S 8 J x 18 H2 57 mm 58.5 in./1486 mm
rear * 255/40 R 18 95V M+S 9 J x 18 H2 43 mm 60.2 in./1528 mm
The load capacity coefficient (e.g. ”91“) and maximum sp eed code letter (e.g. ”Y“) are minimum requirements.
Tire and rim sizes Extensive tests are performed before specific tires and wheels are approved by Porsche. Your Porsche dealer has information
about approved tires and wheels and is happy to assist you. If aftermarket tires and/or wheels are installed which are not
approved by Porsche, the vehicle’s roadability and handling characteristics might be impaired. Since Porsche has no data on
such combinations, Porsche cannot st and behind the safety or durability of these aftermarket combinations.
Snow chains Can be mounted only on the rear wheels; maximum speed 30 mph/50 km/h. Use only Porsche authorized fine-link
cross-type or edge chains. Snow chain clearance can be guaranteed only with the tire + rim combination marked*
without spacers. Please see the chapter “SPACERS” on Page 233.
Page 283 of 284

Index
281
Checking pressure .............................. 228
Inscription .......................................... 222
Loading information ............................ 224
New tires ............... .............................. 10
Pressure .................... ................ 214, 270
Pressure monitoring ............................ 151
Pressure plate ........ ............................ 265
Removing and storing.......................... 219
Sealant ...................... ................ 229, 230
Sidewall ..................... ........................ 222
Size ................................................... 222
Snow tires .............. ............................ 220
Tools ................ ........................................... 94
Towing ........................... .................... 259, 261
Towing hook............... ................................ 259
TPM Tire pressure moni toring ...................... 151
Track ............................. ............................ 268
Transmission Drive-Off Assistant... ............................ 176
Fluid........................... ................ 201, 271
Manual transmission ............................ 176
Porsche Doppelkupplung (PDK) .... 176, 178
Trip Odometer ............ ................................ 125
Trunk entrapment ....... ................................ 100
Turn signal Indicator light.......... ............................ 127
Turn signal light, front Changing bulb......... ............................ 253
Turn signals ......................................... 81, 127
UUndercoating ................ ......................198, 206VValves ........................................................218
Vanity mirror............. ....................................41
Vehicle Care......................... ..........................203
Engine number....................................265
Identification ......... ..............................264
Identification labe l ...............................264
Identification numbe r ...........................264
Lifting................... ..............................232
Load capacity ....... ..............................225
Putting into operat ion ..........................241
Safety compliance st icker ....................264
Washing ................... ..........................204
Vehicle identification number ........................264
Ventilation .................... ..............................113
Vents ................... ......................110, 113, 116
Viscosity, engine oil .....................................191
Voice control, button . ..................................134
Voice control, PCM ... ..................................134
WWarning lights and me ssages ...................... 166
Washer
Fluid ........................ .......................... 200
Fluid warning light. .............................. 200
Washer fluid ................................. .............. 271
Washer lever................................ ................ 82
Washing ...................... .............................. 204
Weights ........................................... .......... 272
Welcome Home Function ........................ 79, 80
Wheel ................. ................. 10, 213, 268, 269
Alignment ................ .......................... 219
Balancing........................................... 219
Bolts ....................... .......................... 226
Care ........................ .......................... 213
Changing ................. .......................... 229
Checking pressure ............................. 228
Inscription ............ .............................. 222
Loading information . ........................... 224
Securing bolts...... .............................. 226
Security wheel bolts ............................. 15
Sidewall ................... .......................... 222
Size .................................................. 222
Tire pressure ....... .............................. 214
Tire pressure plate ............... .............. 265
Tire sealant .............. .................. 229, 230
Wheels
Assembly aids for wheel changes ........ 227
Care ........................ .......................... 207
TPM sensors............ .......................... 219
Windows...................... .............................. 206
Anti-crushing protection ........................ 28
Care ........................ .......................... 206
Opening/Closing ...................... ............ 27