warning light PORSCHE CAYMAN 2009 1.G Repair Manual
[x] Cancel search | Manufacturer: PORSCHE, Model Year: 2009, Model line: CAYMAN, Model: PORSCHE CAYMAN 2009 1.GPages: 284, PDF Size: 5.94 MB
Page 191 of 284

Maintenance, Car Care
189
If the vehicle is driven at a high rate of speed,
climatic conditions are warm, and the load is high,
the oil should be checked more frequently, as
driving conditions will determine the rate of oil
consumption.
– The engine in your vehicle depends on oil to lubricate and cool all of its moving parts.
Therefore, the engine oil should be checked
regularly and kept at the required level.
– Make it a habit to have the engine oil level checked at every fuel filling.
– The oil pressure warning light is not an oil level
indicator.
The oil pressure warning light indicates serious
engine damage may be occuring when lit, if en-
gine rpm is above idle speed.Engine Oil Level f Please see the chapter “EXERCISE EXTREME
CAUTION WHEN WORKING ON YOUR VEHICLE”
on Page 186.
f Regularly check the oil level using the on-board
computer after the vehicle is refuelled.
Please see the chapter “OIL DISPLAY AND
MEASUREMENT OF THE ENGINE OIL LEVEL”
on Page 161.
The difference between the minimum and maxi-
mum marks on the segment display is approx.
1.3 quarts (1.25 liters).
Each segment of the display corresponds to ap-
prox. 0.42 quart (0.4 liter).
Topping off engine oil
Warning!
Engine oil is hazardous to your health and
may be fatal if swallowed.
f Keep engine oil out of children’s reach.
Used engine oil contains chemicals that have
caused cancer in laboratory animals.
f Always protect your skin by washing thorough-ly with soap and water. Caution!
Risk of damage from overflowing engine oil.
f Take care while checking and topping up
engine oil not to soil the luggage compartment or items of luggage.
Note
The Check Engine warning light may light up if the
cap of the oil filler opening is opened while the
engine is running.
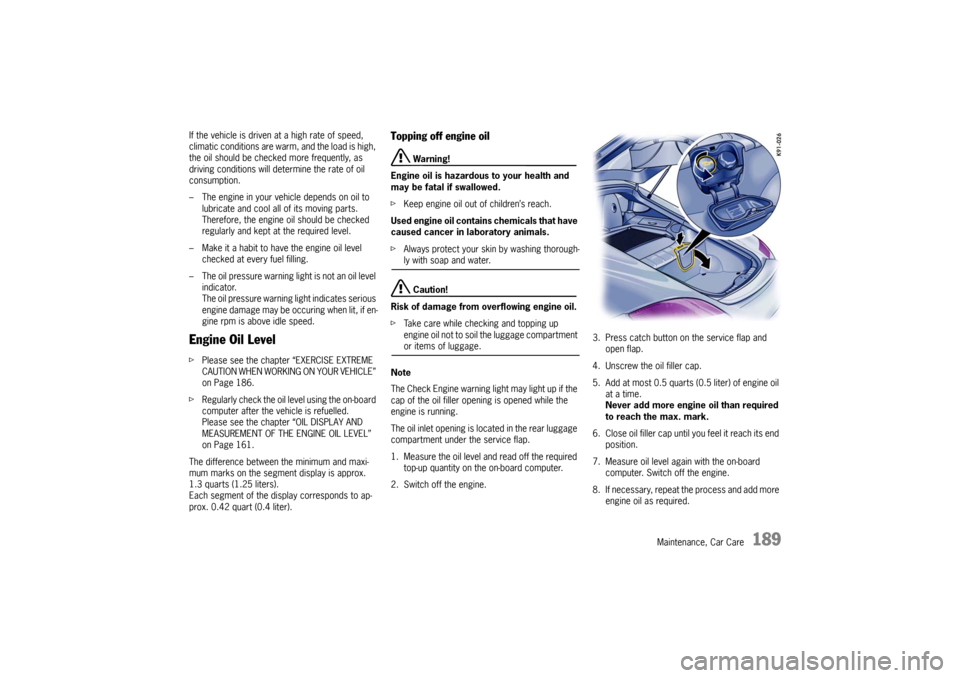
The oil inlet opening is located in the rear luggage
compartment under the service flap.
1. Measure the oil level and read off the required top-up quantity on the on-board computer.
2. Switch off the engine. 3. Press catch button on the service flap and
open flap.
4. Unscrew the oil filler cap.
5. Add at most 0.5 quarts (0.5 liter) of engine oil at a time.
Never add more engine oil than required
to reach the max. mark.
6. Close oil filler cap until you feel it reach its end position.
7. Measure oil level again with the on-board computer. Switch off the engine.
8. If necessary, repeat the process and add more engine oil as required.
Page 194 of 284

192
Maintenance, Car Care
Brake Fluid LevelfPlease see the chapter “EXERCISE EXTREME
CAUTION WHEN WORKING ON YOUR VEHICLE”
on Page 186.
f Use only new (unused) Original Porsche
brake fluid.
Warning!
Brake fluid is hazardous to your health, and
may be fatal if swallowed.
Brake fluid also attacks paintwork.
f Keep brake fluid out of children’s reach.
f Take care while topping off brake fluid not to
soil the luggage compartment or items of lug-gage.
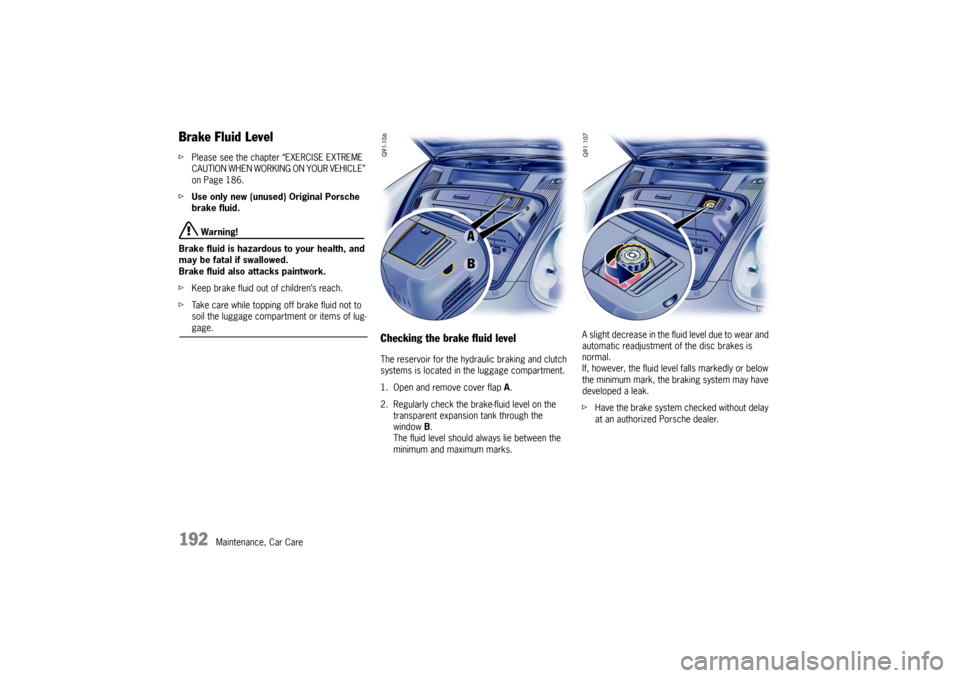
Checking the brake fluid levelThe reservoir for the hydraulic braking and clutch
systems is located in the luggage compartment.
1. Open and remove cover flap A.
2. Regularly check the brake-fluid level on the transparent expansion tank through the
window B.
The fluid level should always lie between the
minimum and maximum marks. A slight decrease in the fluid level due to wear and
automatic readjustment of
the disc brakes is
normal.
If, however, the fluid level falls markedly or below
the minimum mark, the br aking system may have
developed a leak.
f Have the brake system checked without delay
at an authorized Porsche dealer.
Page 195 of 284

Maintenance, Car Care
193
Changing the brake fluid Brake fluid absorbs moisture from the air over
time. This accumulation of water lowers the boil-
ing point and, under certain operating conditions,
can affect the braking performance.
Therefore have the brake fluid changed in accord-
ance with the change intervals stated in the
brochure “Maintenance”. – The warning lights on the instrument panel and
on the on-board computer indicate an insuffi-
cient brake fluid level.
– If the warning light lights up on the instrument
panel and the warning message appears on
the on-board computer in combination with a
larger pedal travel, a brake circuit may have
failed.
If the warning lights should light up when
driving:
f Stop immediately in a suitable place.
f Do not continue driving.
Consult an authorized Porsche dealer.
Warning light USA
Warning light Canada
Page 197 of 284

Maintenance, Car Care
195
Fuel
Warning!
Fuel is highly flammable and harmful to
health.
f Fire, open flame and smoking are prohibited
when handling fuel.
f Avoid contact with skin or clothing.
f Do not inhale fuel vapors.
To prevent damage to the emission control
system and engine:
f Never drive the tank completely out of fuel.
f Avoid high cornering speeds after the warning lights have come on.
f Please see the chapter “FUEL ECONOMY” on
Page 194.
Please see the chapter “EMISSION CONTROL
SYSTEM” on Page 198.
Please see the chapter “LEVEL GAGE” on
Page 130.
Check engine warning light
If the warning lights in the instrument panel and on-
board computer come on and remain on while
driving, it suggests:
– a potential engine control problem and the need for system service or
– an improperly fastened tank cap or – refueling with engine running.
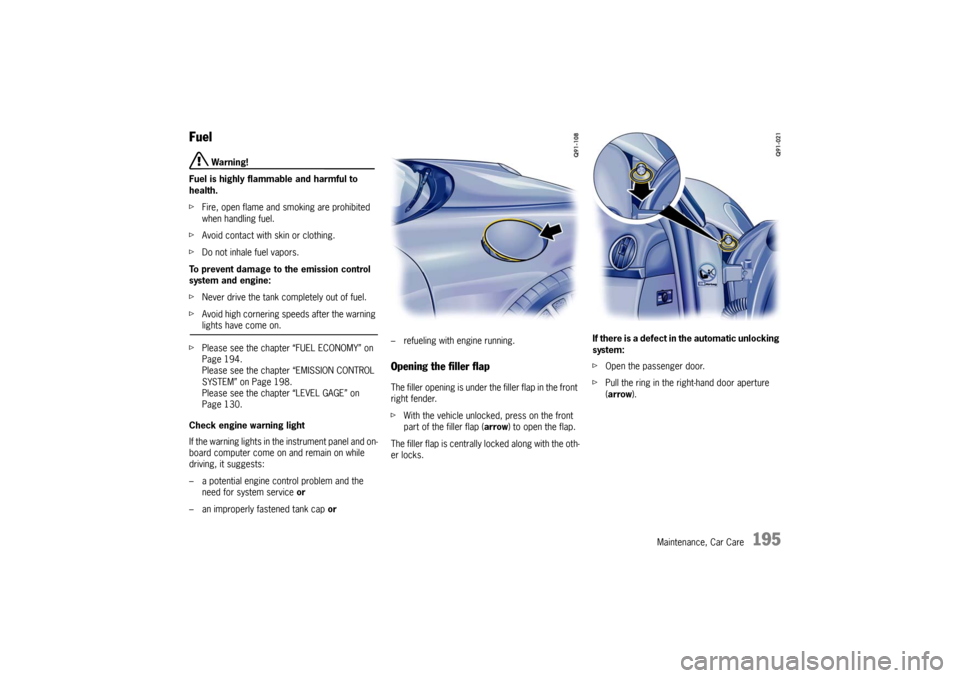
Opening the filler flapThe filler opening is under th
e filler flap in the front
right fender.
f With the vehicle unlocked, press on the front
part of the filler flap ( arrow) to open the flap.
The filler flap is centrally locked along with the oth-
er locks. If there is a defect in
the automatic unlocking
system:
f Open the passenger door.
f Pull the ring in the right-hand door aperture
(arrow ).
Page 202 of 284

200
Maintenance, Car Care
Washer FluidCapacity – Without headlight cleaning system:approximately 2.6 quarts (2.5 liters).
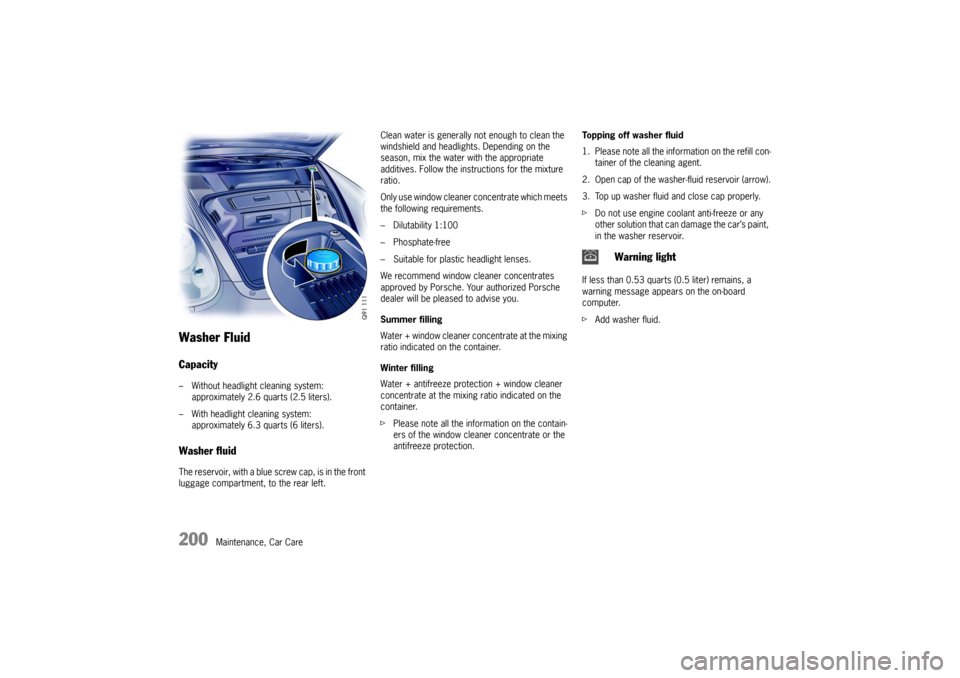
– With headlight cleaning system: approximately 6.3 quarts (6 liters). Washer fluidThe reservoir, with a blue screw cap, is in the front
luggage compartment, to the rear left. Clean water is generally
not enough to clean the
windshield and headlights. Depending on the
season, mix the water with the appropriate
additives. Follow the instructions for the mixture
ratio.
Only use window cleaner concentrate which meets
the following requirements.
– Dilutability 1:100
– Phosphate-free
– Suitable for plastic headlight lenses.
We recommend window cleaner concentrates
approved by Porsche. Your authorized Porsche
dealer will be pleased to advise you.
Summer filling
Water + window cleaner concentrate at the mixing
ratio indicated on the container.
Winter filling
Water + antifreeze protection + window cleaner
concentrate at the mixing ratio indicated on the
container.
f Please note all the info rmation on the contain-
ers of the window cleaner concentrate or the
antifreeze protection. Topping off washer fluid
1. Please note all the info
rmation on the refill con-
tainer of the cleaning agent.
2. Open cap of the washer-fluid reservoir (arrow).
3. Top up washer fluid and close cap properly.
f Do not use engine coolant anti-freeze or any
other solution that can damage the car’s paint,
in the washer reservoir.
If less than 0.53 quarts (0.5 liter) remains, a
warning message appears on the on-board
computer.
f Add washer fluid.
Warning light
Page 206 of 284

204
Maintenance, Car Care
Washing The best method of protecting your car from the
damaging effects of the environment is frequent
washing and the application of a preservative. The
underside of your vehicle should also be thorough-
ly washed for cinders, salt or sanding at winter’s
end.
The longer salt, road du st and industrial dust,
dead insects, bird droppi ngs or substances from
trees (resin, pollen) are allowed to remain on the
bodywork, the more serious is their harmful ef-
fect.
New cars should be washed carefully with plenty
of clear water to protect the new paint work. Dark
paint finishes show up the smallest of surface
damage (e.g., scratches) more readily than lighter
colors.
Dark colors are also more susceptible to scratch-
ing because of the compos ition of their pigments
and require particularly careful paint care.
f Do not wash your car in bright sunlight or while
the bodywork is still hot.
f When washing by hand, use abundant water, a
soft sponge or wash brush, and Porsche car
shampoo.
f Begin by spraying the body thoroughly with wa-
ter to rinse away loose dirt. f
After washing, rinse the car with plenty of wa-
ter and then dry with a chamois leather.
Do not use the same chamois leather for dry-
ing as you use for cleaning the windshield and
windows.
Warning!
Moisture which gets on to the brakes during
a car wash can reduce braking efficiency or
make the brakes pull unevenly which could
increase the danger of an accident, causing
serious personal injuries or death.
f After washing the car, test the brakes and
steering and briefly brake the discs dry.
When doing this, take care not to hamper other
road users behind you (traffic conditions permitting).
Automatic car washes
f Please see the chapter “WIPER BLADES” on
Page 202.
Optional add-on parts or parts which project
beyond the contours of the vehicle may be
damaged by design features (e.g. brushes) of au-
tomatic car washes. The following parts are particularly
susceptible to damage:
– Windshield wipers (alw
ays switch them off to
prevent them wiping unintentionally in intermit-
tent or sensor operation)
– External antennas (always unscrew)
– Rear spoiler
– Wheels (the wider the rim and the lower the tire height, the greater the risk of damage)
– High-gloss wheels (to prevent these from get- ting scratched, do not clean with the wheel-
cleaning brushes of the car wash).
f Please consult the operator before using auto-
matic car washes.
f Wash and dry by hand all points not reached by
a car wash, such as door and lid seams or
door sills.
Note
Automatic car washes spray water at odd angles
and high pressures, which are not seen in normal
driving. Therefore, water can sometimes find its
way into the passengers compartment during or
shortly after the car wash.
Page 209 of 284

Maintenance, Car Care
207
Warning!
Danger of fire resulting in serious personal
injury or death.
f Do not apply additional undercoating or rust-
proofing on or near the exhaust manifold, ex-
haust pipes, catalytic converters or heat
shields. During driving the substance used for undercoating could overheat and ignite.
f Before applying fresh underseal, carefully
remove any deposits of dirt and grease. Once
it has dried, the new undercoating compound
forms a tough protective coating which
provides efficient rust-proofing of the floor
panels and components.
f Always apply a fresh coating of suitable pre-
servative to unprotected areas after cleaning
the underside of the body, the transmission,
the engine or carrying out repairs to under-
body, engine or transmission components.
Effective rust-proofing is particularly important
during the cold weather seas on. If your car is driv-
en frequently in areas wh ere salt has been spread
on the roads, the whole engine compartment
should be cleaned thoroughly after the winter to
prevent salt from causing any lasting damage. A
full under-body wash should also be performed at
the same time.
Stainless steel exhaust tailpipesStainless steel exhaust tailpipes can discolor due
to soiling, strong heat, and combustion residues.
The original polish can be achieved again using
commercially available metal polishing paste or
metal polish.Light alloy wheels f Please see the chapter “WASHING” on
Page 204.
Warning!
Danger of accident resulting in serious per-
sonal injury or death if cleaning agents (e.g.
wheel cleaning agents) come into contact
with the brake discs.
The resulting film on the brake discs can im-
pair braking performance.
f Make sure that no clea ning agent comes into
contact with the brake discs.
f If cleaning agent has come into contact with
the brake discs, thoroughly clean the brake
discs with a strong jet of water.
f Paying attention to any road users behind you,
dry the brake discs by applying the brakes at short intervals. Metal particles (such as brass or copper in brake
dust) must not remain to
o long on alloy wheels.
Contact corrosion can cause pitting.
Cleaners with an oxide-removing effect or the
wrong pH value, as are commonly used for other
metals, as well as mechanical tools and products,
will damage the oxide layer and are therefore
unsuitable.
f Use only cleaners for alloy wheels
(pH value 9.5). Products with the wrong
pH value can destroy the protective layer
on the wheels.
We recommend Porsche cleaner for alloy rims.
f If possible, wash the wheels every two weeks
with a sponge or washing brush. If the wheels
are exposed to road salt, grit or industrial dust,
weekly cleaning is necessary.
Page 211 of 284

Maintenance, Car Care
209
Fabric, upholstery, carpets and
floor-mats fUse only a vacuum clea ner or a medium stiff
brush.
f Remove stains and spots with Porsche stain
remover.
To protect carpets, the Porsche range of accesso-
ries includes mats of the correct size and with the
appropriate fastening.
Warning!
Risk of an accident resulting in serious per-
sonal injury or death.
f Always check the movement of the pedals be-
fore driving and make sure that they are not ob-
structed by a floor-mat or any other object.
f Secure the floor-mat to prevent it from sliding
into positions that could interfere with the safe
operation of your vehicle - do not install them
loosely in the vehicle.
Your Porsche dealer will be glad to offer you nonskid floor-mats of the correct size.
Cleaning fabric liningsfFabric linings on pillar s, convertible top liner
and sun blinds, etc. must be cleaned only
using suitable cleaning agents or a suitable dry
foam and a soft brush.Alcantara f Do not use a leather care product to clean
Alcantara.
For regular care it is sufficient to clean the cover
with a soft brush.
Heavy abrasion or rubbing when cleaning causes
a lasting change in the surface.
Cleaning when lightly soiled
f Wet a soft cloth with water or a neutral soap
solution and wipe off the dirt.
Cleaning when heavily soiled
f Wet a soft cloth with lukewarm water or
thinned white spirit and dab the dirt from the
outside in.
Cleaning safety belts f Use mild detergent to clean soiled belts.
f When drying, avoid direct sunlight.
f Only use suitable cleaning agents.
f Do not tint or bleach the belts.
The belt fabric could be weakened, thus affec-
ting safety.
Page 216 of 284

214
Practical Tips, Emergency Service
and a half (1-1/2) times as well on the government
course as a tire graded 100.
The relative performance of tires depends upon
the actual conditions of
their use, however, and
may depart significantly fr om the norm due to var-
iations in driving habits, service practices and dif-
ferences in road characteristics and climate.
Traction AA, A, B, C
The traction grades, from highest to lowest, are
AA, A, B, and C and they represent the tire’s ability
to stop on wet pavement as measured under con-
trolled conditions on specified government test
surfaces of asphalt and concrete.
A tire marked C may have poor traction perform-
ance.
Warning!
The traction grade assigned to this is based on
braking (straight-ahead) traction tests and does
not include cornering (turned) traction, accelera-
tion, hydroplaning or peak traction characteris-
tics.
Temperature A, B, C
The temperature grades ar e A (the highest), B and
C, representing the tire’s resistance to the gener-
ation of heat and its abilit y to dissipate heat when
tested under controlled conditions on a specified
indoor laboratory test wheel.
Sustained high temperatur es can cause the mate-
rial of the tire to degenerate and reduce tire life,
and excessive temperature can lead to sudden tire failure.
The grade C corresponds to a level of perform-
ance which all passenger car tires must meet un-
der the Federal Motor Vehi
cle Safety Standard No.
109.
Grades B and A represent higher levels of per-
formance on the laboratory test wheel than the
minimum required by law.
Warning!
The temperature grade for this tire is established
for a tire that is properly inflated and not overload-
ed.
Excessive speed, underinflation, or excessive
loading, either separately or in combination, can
cause heat buildup and possible tire failure, result-
ing in serious personal injury or death. Tire pressures
Warning!
Incorrect tire pressure causes increased tire
wear and adversely affects road handling.
This could lead to tire fa ilure, resulting in loss
of control, leading to serious personal injury
or death.
f Always use an accurate tire pressure gage
when checking inflation pressures.
f Do not exceed the maximum tire pressure list-
ed on the tire sidewall.
Please see the chapter “TIRE PRESSURE PLA-
TE” on Page 265. f
Cold tire inflation pressure means: all tires
must be cold, ambient temperature maximum
(68 °F/20 °C)
, when adjusting the inflation
pressure.
Avoid sunlight striking the tires before measur-
ing cold pressures, since the pressures would
rise from temperature influence.
f Valve caps protect the valve from dust and dirt,
and thus from leakage.
Always screw caps tightly down.
Replace missing caps immediately.
f Use only plastic valve caps.
f Do not use commercially available sealant or
tire inflating bottles. Only use Porsche
approved tire sealant.
f Please see the chapter “TIRE PRESSURE FOR
COLD TIRES (68 °F/ 20 °C)” on Page 267.
Page 229 of 284

Practical Tips, Emergency Service
227
Changing a wheel
Warning!
Risk of serious personal injury or death. The
car may slip off the jack.
f Make sure that no one is in the vehicle when
jacking up and changing a wheel.
f Always place the car on stable supports if work
has to be carried out under the car.
Risk of damage to the brake discs of the
Porsche Ceramic Composite Brake (PCCB).
f Always screw in both assembly aids when changing a wheel.
Note
The tools required for changing a wheel (e.g. jack,
wheel bolt wrench, assembly aids) are not sup-
plied with the car.
Your authorized Porsche dealer will be pleased to
advise you.
1. Apply the handbrake fully and engage 1st gear or PDK selector-lever position P and remove
the ignition key.
2. Switch on the hazard warning lights if neces- sary.
3. Secure the car against rolling away, e.g. by
means of wedges under the wheels on the op-
posite side.
This is particularly important on slopes. 4. Slightly slacken the whee
l bolts of the wheel to
be changed.
5. Lift the car only at the specified jacking points.
6. Raise the car until the wheel lifts off the ground.
Please see the chapter “LIFTING THE VEHICLE
WITH A LIFTING PLATFORM OR GARAGE LIFT”
on Page 232.
7. Remove 1 or 2 wheel bolts (see respective illustration).
8. Screw in assembly aids instead of the wheel bolts.
Screw in assembly aid for cars without Porsche Ceramic
Composite Brake9. Remove the remaining wheel bolts.
Note on operation
f To remove or mount the spacers:
Please see the chapter “SPACERS” on
Page 233.