sensor PORSCHE CAYNNE 2004 1.G Owners Manual
[x] Cancel search | Manufacturer: PORSCHE, Model Year: 2004, Model line: CAYENNE, Model: PORSCHE CAYENNE 2004 1.GPages: 379, PDF Size: 13.91 MB
Page 57 of 379
Seats, Mirrors and Steering Wheel
57
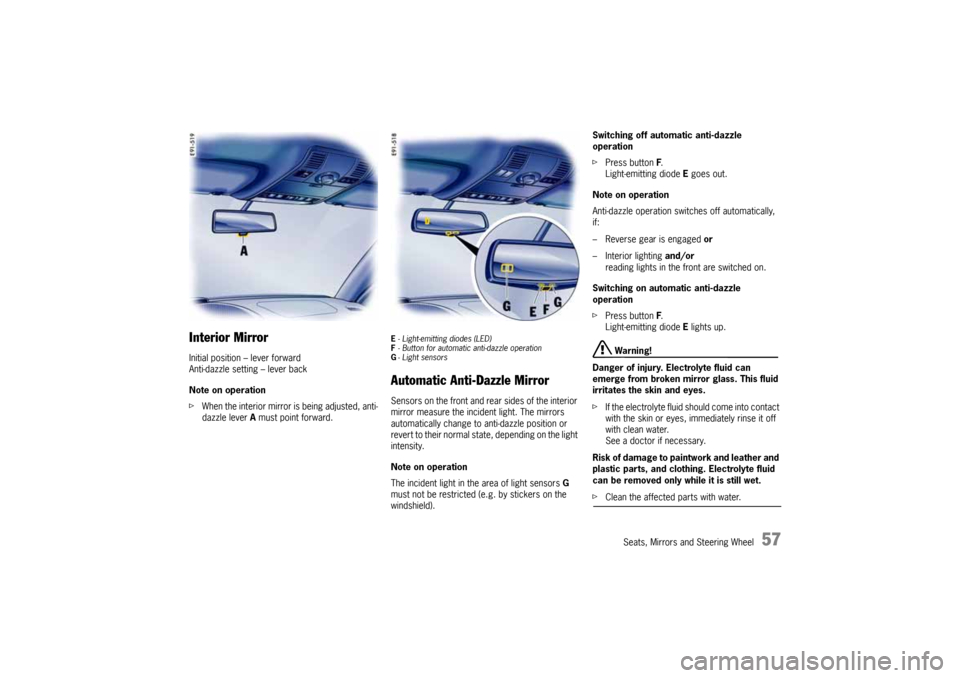
Interior MirrorInitial position – lever forward
Anti-dazzle setting – lever back
Note on operation
fWhen the interior mirror is being adjusted, anti-
dazzle lever A must point forward.
E- Light-emitting diodes (LED)
F- Button for automatic anti-dazzle operation
G- Light sensorsAutomatic Anti-Dazzle MirrorSensors on the front and rear sides of the interior
mirror measure the incident light. The mirrors
automatically change to anti-dazzle position or
revert to their normal state, depending on the light
intensity.
Note on operation
The incident light in the area of light sensors G
must not be restricted (e.g. by stickers on the
windshield).Switching off automatic anti-dazzle
operation
fPress button F.
Light-emitting diode E goes out.
Note on operation
Anti-dazzle operation switches off automatically,
if:
– Reverse gear is engaged or
– Interior lighting and/or
reading lights in the front are switched on.
Switching on automatic anti-dazzle
operation
fPress button F.
Light-emitting diode E lights up.
Warning!
Danger of injury. Electrolyte fluid can
emerge from broken mirror glass. This fluid
irritates the skin and eyes.
fIf the electrolyte fluid should come into contact
with the skin or eyes, immediately rinse it off
with clean water.
See a doctor if necessary.
Risk of damage to paintwork and leather and
plastic parts, and clothing. Electrolyte fluid
can be removed only while it is still wet.
fClean the affected parts with water.
10_Cayenne_21_KW17.book Seite 57 Donnerstag, 9. April 2009 3:33 15
Page 70 of 379
70
Air Conditioning, Parking Heater and Heated Rear Window
Automatically Controlled 2-Zone
Air-ConditioningDepending on various factors (e.g. sunlight, air
quality), the air-conditioning system controls the
preset interior temperature fully automatically.
Temperature can be set individually/separately for
the two left and right air-conditioned areas.
You can manually influence the automatic system.
This individual adjustment is shown on the
air-conditioning display panel.Please read the information on:
–REST mode,
–ECON mode and
– Air-conditioning compressor
on page 65.
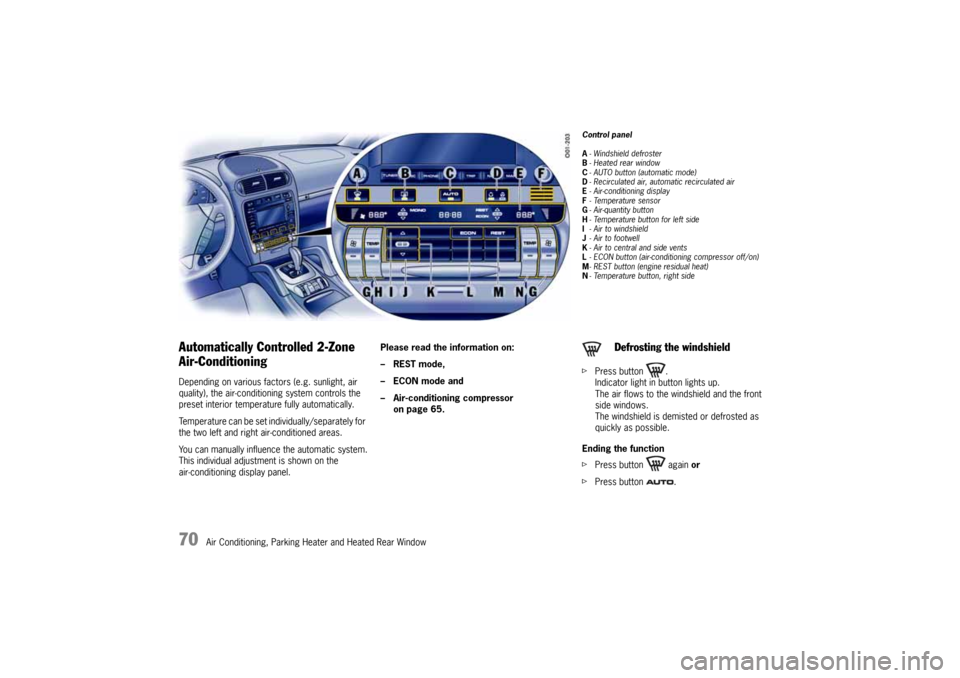
Control panel
A- Windshield defroster
B-Heated rear window
C- AUTO button (automatic mode)
D- Recirculated air, automatic recirculated air
E- Air-conditioning display
F-Temperature sensor
G- Air-quantity button
H- Temperature button for left side
I- Air to windshield
J- Air to footwell
K- Air to central and side vents
L- ECON button (air-conditioning compressor off/on)
M- REST button (engine residual heat)
N- Temperature button, right sidefPress button .
Indicator light in button lights up.
The air flows to the windshield and the front
side windows.
The windshield is demisted or defrosted as
quickly as possible.
Ending the function
fPress button again or
fPress button .
Defrosting the windshield
10_Cayenne_21_KW17.book Seite 70 Donnerstag, 9. April 2009 3:33 15
Page 71 of 379
Air Conditioning, Parking Heater and Heated Rear Window
71
Automatic modefPress button .
Indicator light in button lights up.
Air quantity and air distribution are automati-
cally controlled and variations are compensa-
ted.
Note on operation
If necessary, the automatic system can be manu-
ally influenced.
This manual setting is retained until the appropri-
ate function button is pressed again or the button
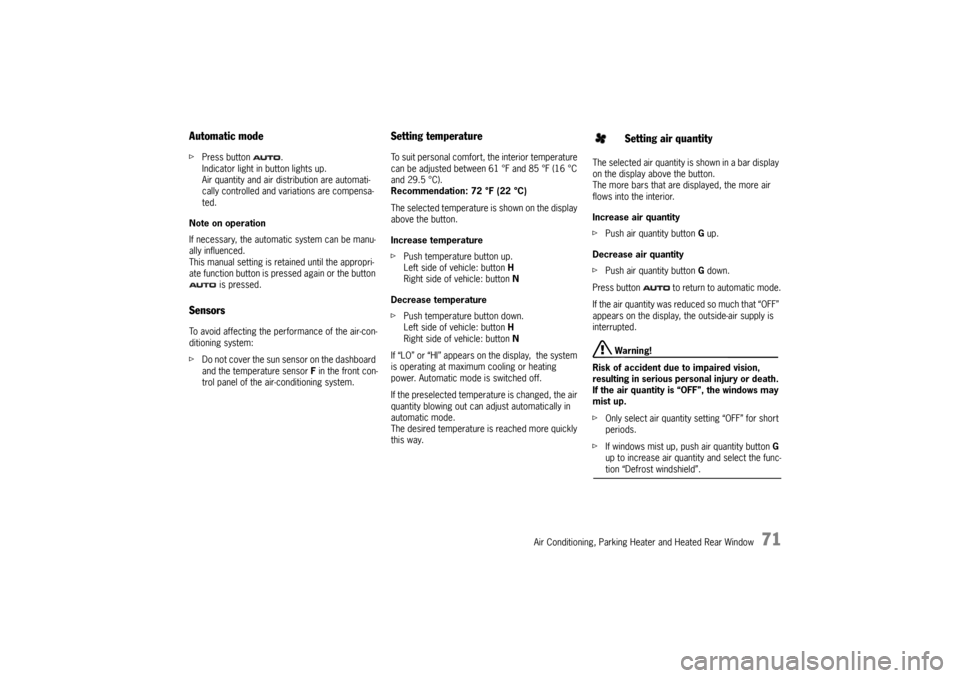
is pressed.SensorsTo avoid affecting the performance of the air-con-
ditioning system:
fDo not cover the sun sensor on the dashboard
and the temperature sensor F in the front con-
trol panel of the air-conditioning system.
Setting temperatureTo suit personal comfort, the interior temperature
can be adjusted between 61 °F and 85 °F (16 °C
and 29.5 °C).
Recommendation: 72 °F (22 °C)
The selected temperature is shown on the display
above the button.
Increase temperature
fPush temperature button up.
Left side of vehicle: button H
Right side of vehicle: button N
Decrease temperature
fPush temperature button down.
Left side of vehicle: button H
Right side of vehicle: button N
If “LO” or “HI” appears on the display, the system
is operating at maximum cooling or heating
power. Automatic mode is switched off.
If the preselected temperature is changed, the air
quantity blowing out can adjust automatically in
automatic mode.
The desired temperature is reached more quickly
this way.The selected air quantity is shown in a bar display
on the display above the button.
The more bars that are displayed, the more air
flows into the interior.
Increase air quantity
fPush air quantity button G up.
Decrease air quantity
fPush air quantity button G down.
Press button to return to automatic mode.
If the air quantity was reduced so much that “OFF”
appears on the display, the outside-air supply is
interrupted.
Warning!
Risk of accident due to impaired vision,
resulting in serious personal injury or death.
If the air quantity is “OFF”, the windows may
mist up.
fOnly select air quantity setting “OFF” for short
periods.
fIf windows mist up, push air quantity button G
up to increase air quantity and select the func-tion “Defrost windshield”.
Setting air quantity
10_Cayenne_21_KW17.book Seite 71 Donnerstag, 9. April 2009 3:33 15
Page 75 of 379
Air Conditioning, Parking Heater and Heated Rear Window
75
Automatically Controlled 4-Zone
Air-ConditioningDepending on various factors (e.g. ambient tem-
perature, sunlight, air quality), the air-conditioning
system controls the preset interior temperature
fully automatically.
Temperature, air quantity and air distribution can
be set individually/separately for the four air-con-
ditioned areas front left, front right, rear left and
rear right.
You can manually influence the automatic system.
This individual adjustment is shown on the
air-conditioning display panel.Please read the information on:
–REST mode,
–ECON mode and
– air-conditioning compressor
on page 65.
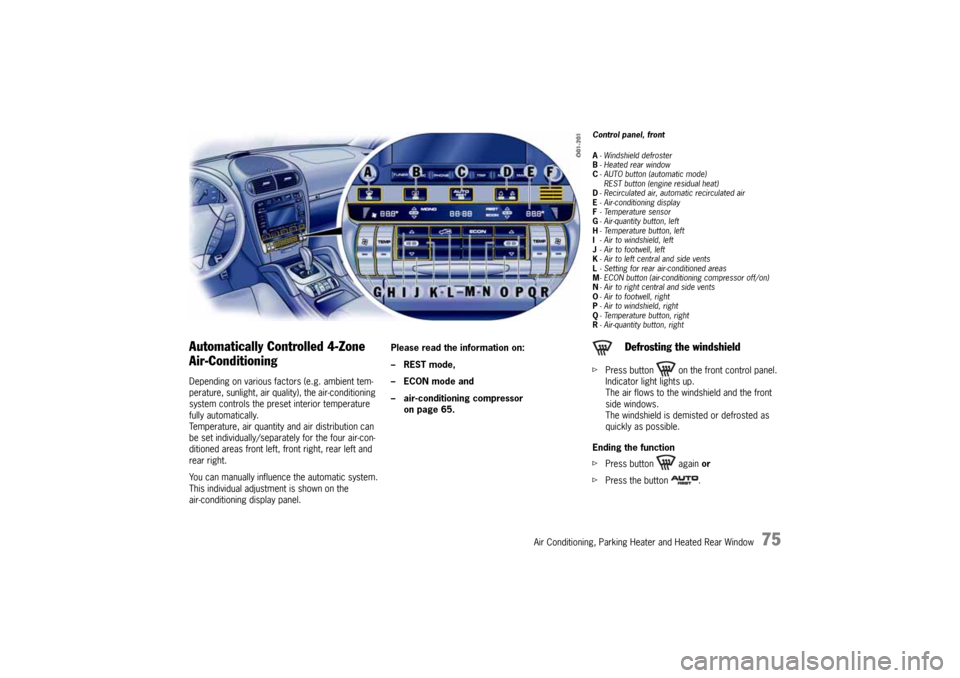
Control panel, front
A- Windshield defroster
B-Heated rear window
C- AUTO button (automatic mode)
REST button (engine residual heat)
D- Recirculated air, automatic recirculated air
E- Air-conditioning display
F-Temperature sensor
G- Air-quantity button, left
H-Temperature button, left
I- Air to windshield, left
J- Air to footwell, left
K- Air to left central and side vents
L- Setting for rear air-conditioned areas
M- ECON button (air-conditioning compressor off/on)
N- Air to right central and side vents
O- Air to footwell, right
P- Air to windshield, right
Q- Temperature button, right
R- Air-quantity button, rightfPress button on the front control panel.
Indicator light lights up.
The air flows to the windshield and the front
side windows.
The windshield is demisted or defrosted as
quickly as possible.
Ending the function
fPress button again or
fPress the button .
Defrosting the windshield
10_Cayenne_21_KW17.book Seite 75 Donnerstag, 9. April 2009 3:33 15
Page 76 of 379
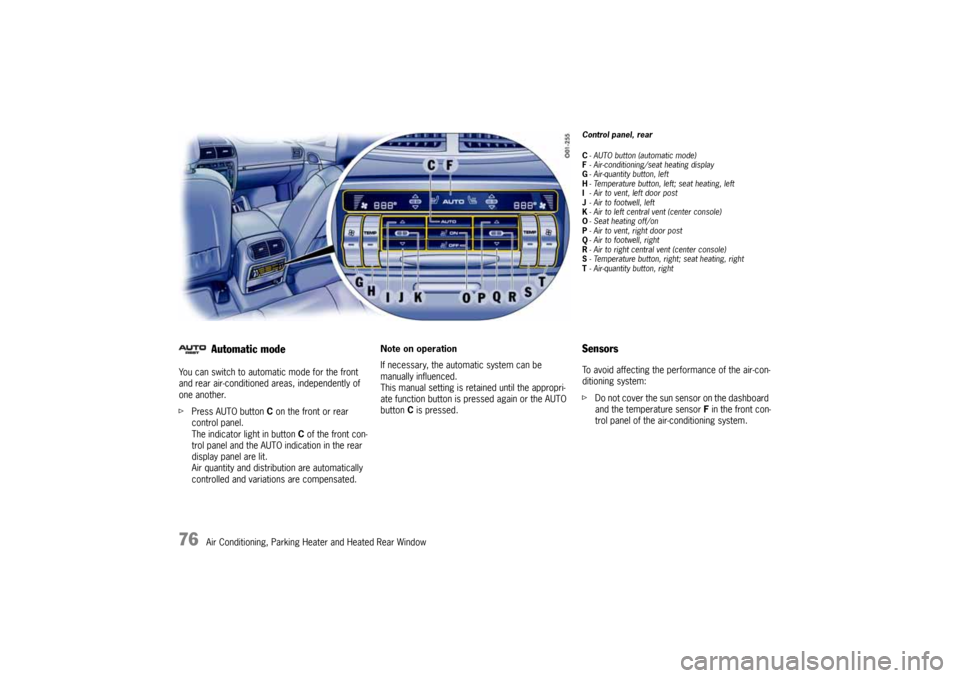
76
Air Conditioning, Parking Heater and Heated Rear Window You can switch to automatic mode for the front
and rear air-conditioned areas, independently of
one another.
fPress AUTO button C on the front or rear
control panel.
The indicator light in button C of the front con-
trol panel and the AUTO indication in the rear
display panel are lit.
Air quantity and distribution are automatically
controlled and variations are compensated.Note on operation
If necessary, the automatic system can be
manually influenced.
This manual setting is retained until the appropri-
ate function button is pressed again or the AUTO
button C is pressed.Automatic mode
Control panel, rear
C- AUTO button (automatic mode)
F- Air-conditioning/seat heating display
G- Air-quantity button, left
H- Temperature button, left; seat heating, left
I- Air to vent, left door post
J- Air to footwell, left
K- Air to left central vent (center console)
O-Seat heating off/on
P- Air to vent, right door post
Q- Air to footwell, right
R- Air to right central vent (center console)
S- Temperature button, right; seat heating, right
T- Air-quantity button, rightSensorsTo avoid affecting the performance of the air-con-
ditioning system:
fDo not cover the sun sensor on the dashboard
and the temperature sensor F in the front con-
trol panel of the air-conditioning system.
10_Cayenne_21_KW17.book Seite 76 Donnerstag, 9. April 2009 3:33 15
Page 104 of 379
104
Lights, Turn Signals and Windshield Wipers
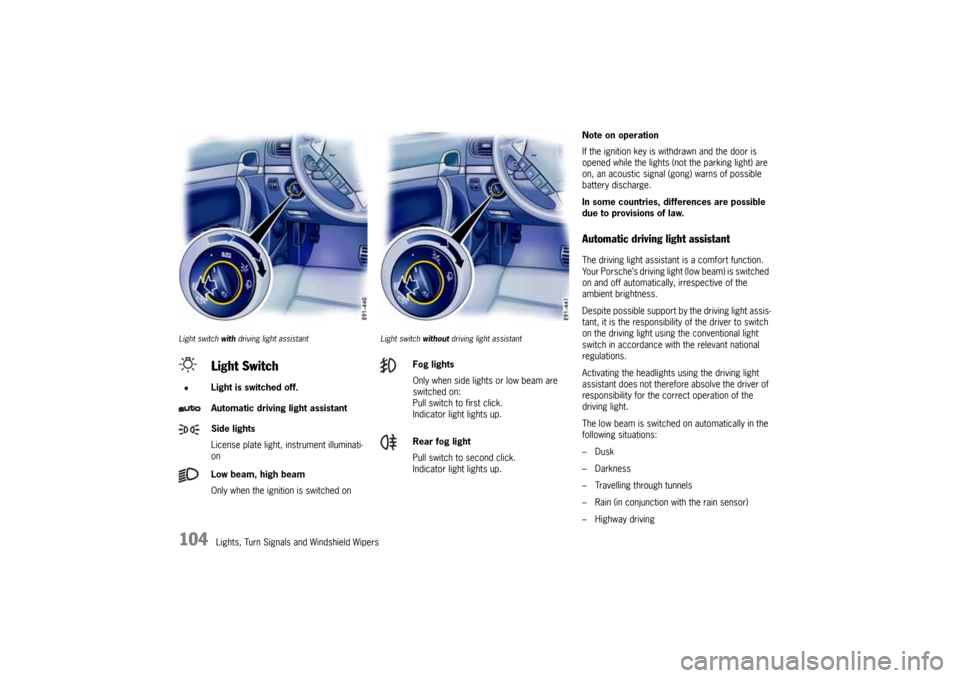
Light switch with driving light assistant Light switch without driving light assistant
Note on operation
If the ignition key is withdrawn and the door is
opened while the lights (not the parking light) are
on, an acoustic signal (gong) warns of possible
battery discharge.
In some countries, differences are possible
due to provisions of law.Automatic driving light assistantThe driving light assistant is a comfort function.
Your Porsche’s driving light (low beam) is switched
on and off automatically, irrespective of the
ambient brightness.
Despite possible support by the driving light assis-
tant, it is the responsibility of the driver to switch
on the driving light using the conventional light
switch in accordance with the relevant national
regulations.
Activating the headlights using the driving light
assistant does not therefore absolve the driver of
responsibility for the correct operation of the
driving light.
The low beam is switched on automatically in the
following situations:
–Dusk
– Darkness
– Travelling through tunnels
– Rain (in conjunction with the rain sensor)
– Highway driving
Light SwitchLight is switched off.
Automatic driving light assistant
Side lights
License plate light, instrument illuminati-
on
Low beam, high beam
Only when the ignition is switched on
Fog lights
Only when side lights or low beam are
switched on:
Pull switch to first click.
Indicator light lights up.
Rear fog light
Pull switch to second click.
Indicator light lights up.
10_Cayenne_21_KW17.book Seite 104 Donnerstag, 9. April 2009 3:33 15
Page 110 of 379
110
Lights, Turn Signals and Windshield Wipers
Brief overview – Windshield wipersThis brief overview does not replace the informati-
on provided in the chapter “Windshield wiper/
washer stalk”.
In particular, warnings are not replaced by this
brief overview.
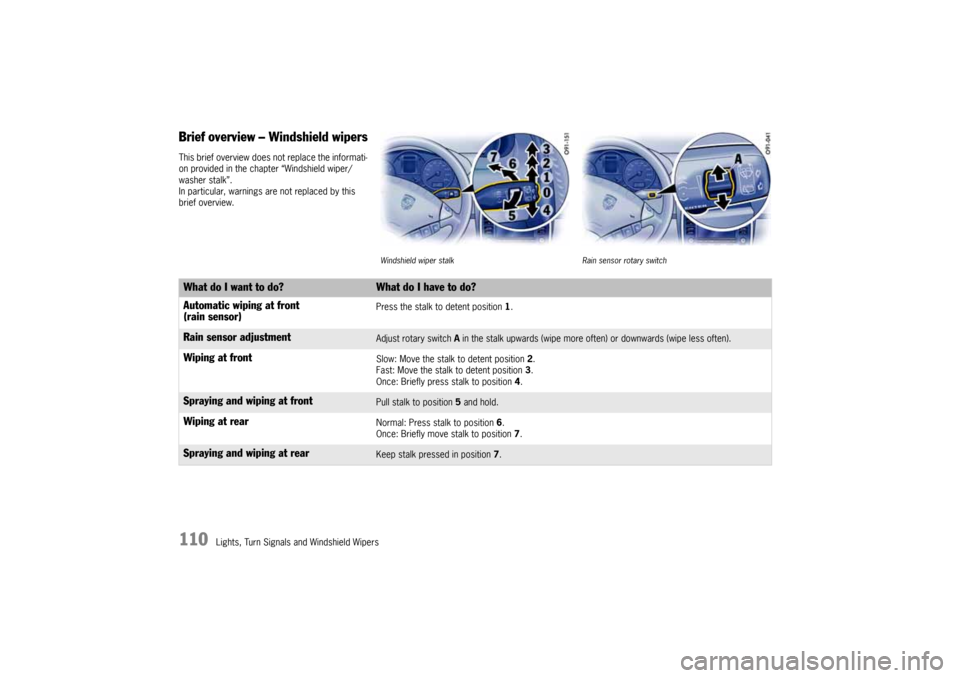
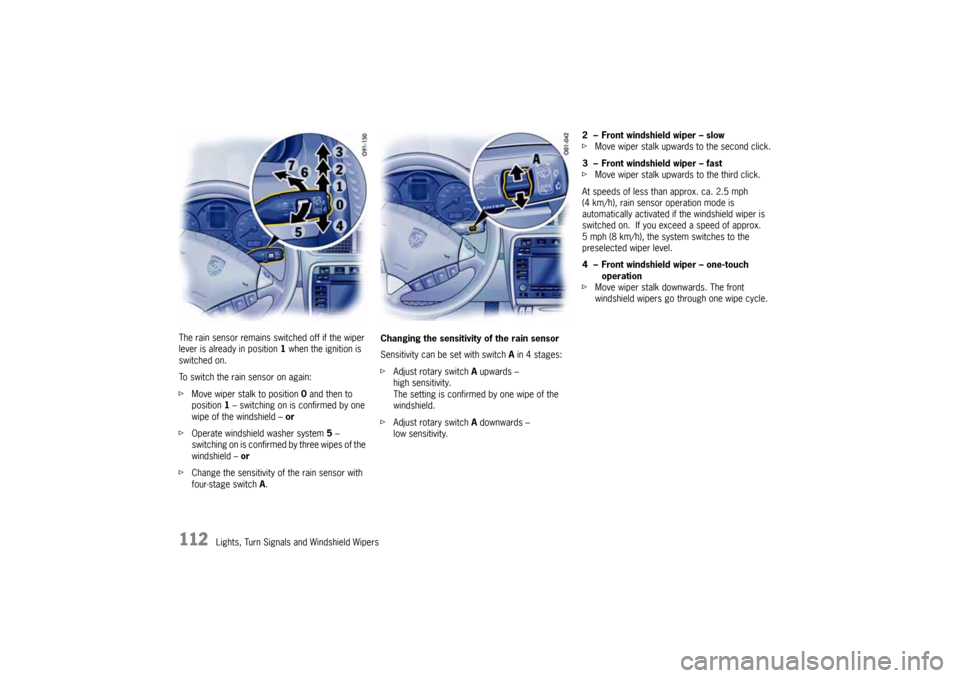
Windshield wiper stalk Rain sensor rotary switch
What do I want to do?
What do I have to do?
Automatic wiping at front
(rain sensor)Press the stalk to detent position 1.
Rain sensor adjustment
Adjust rotary switch A in the stalk upwards (wipe more often) or downwards (wipe less often).
Wiping at front
Slow: Move the stalk to detent position 2.
Fast: Move the stalk to detent position 3.
Once: Briefly press stalk to position 4.
Spraying and wiping at front
Pull stalk to position 5 and hold.
Wiping at rear
Normal: Press stalk to position 6.
Once: Briefly move stalk to position 7.
Spraying and wiping at rear
Keep stalk pressed in position 7.
10_Cayenne_21_KW17.book Seite 110 Donnerstag, 9. April 2009 3:33 15
Page 111 of 379
Lights, Turn Signals and Windshield Wipers
111
Windshield Wiper/Washer Stalk
Warning!
Danger of injury when the windshield wipers
operate unintentionally.
Risk of damage to the engine compartment
lid, windshield and wiper system.
fOnly wipe the windshield when sufficiently wet,
otherwise it could be scratched.
fLoosen frozen wiper blades before driving off.
fDo not operate headlight washer when it is
frozen.
fAlways switch off windshield wipers in car
wash to prevent them wiping unintentionally
(rain sensor operation).
fDo not operate headlight washer in car
washes.
fAlways switch off windshield wipers before
cleaning the windshield to avoid unintentional
operation (rain sensor operation).
fAlways hold the wiper arm securely when
replacing the wiper blade.fAlways switch the windshield wipers off (wiper
stalk in position 0) before opening the engine
compartment lid. If the wiper arms are not in
end position, they will automatically move to
this position when the engine compartment lid
is opened. This will happen even if the ignition
is off.
The wiper arms remain in this position until the
lid is closed and the wiper system is switched
off and then on again.
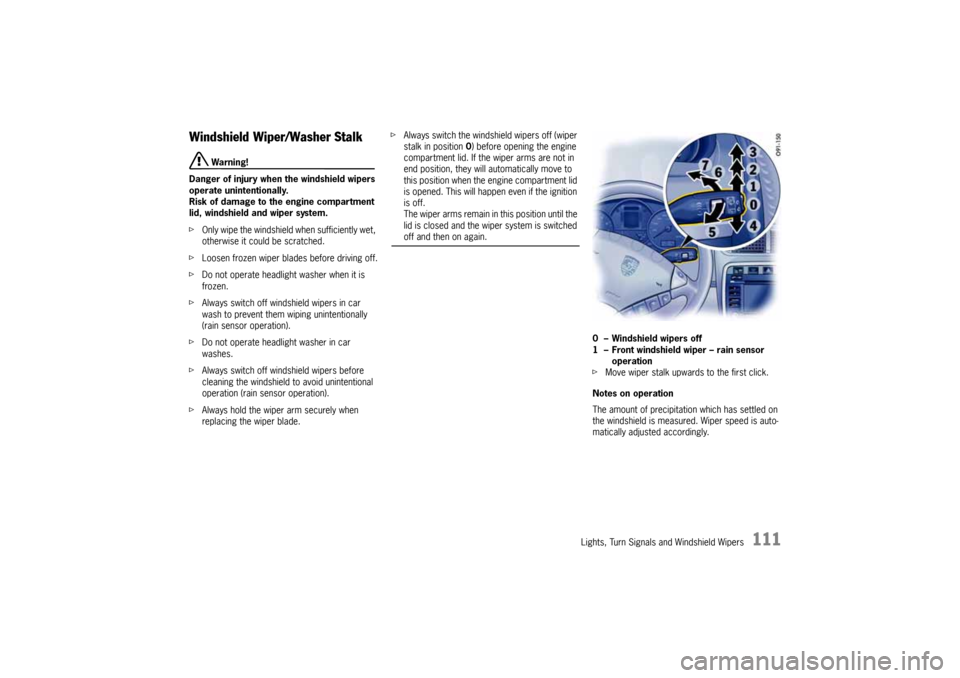
0 – Windshield wipers off
1 – Front windshield wiper – rain sensor
operation
fMove wiper stalk upwards to the first click.
Notes on operation
The amount of precipitation which has settled on
the windshield is measured. Wiper speed is auto-
matically adjusted accordingly.
10_Cayenne_21_KW17.book Seite 111 Donnerstag, 9. April 2009 3:33 15
Page 112 of 379
112
Lights, Turn Signals and Windshield Wipers The rain sensor remains switched off if the wiper
lever is already in position 1 when the ignition is
switched on.
To switch the rain sensor on again:
fMove wiper stalk to position 0 and then to
position 1 – switching on is confirmed by one
wipe of the windshield – or
fOperate windshield washer system 5 –
switching on is confirmed by three wipes of the
windshield – or
fChange the sensitivity of the rain sensor with
four-stage switch A.Changing the sensitivity of the rain sensor
Sensitivity can be set with switch A in 4 stages:
fAdjust rotary switch A upwards –
high sensitivity.
The setting is confirmed by one wipe of the
windshield.
fAdjust rotary switch A downwards –
low sensitivity.2 – Front windshield wiper – slow
fMove wiper stalk upwards to the second click.
3 – Front windshield wiper – fast
fMove wiper stalk upwards to the third click.
At speeds of less than approx. ca. 2.5 mph
(4 km/h), rain sensor operation mode is
automatically activated if the windshield wiper is
switched on. If you exceed a speed of approx.
5 mph (8 km/h), the system switches to the
preselected wiper level.
4 – Front windshield wiper – one-touch
operation
fMove wiper stalk downwards. The front
windshield wipers go through one wipe cycle.
10_Cayenne_21_KW17.book Seite 112 Donnerstag, 9. April 2009 3:33 15
Page 147 of 379
Multi-Purpose Display and Instruments
147
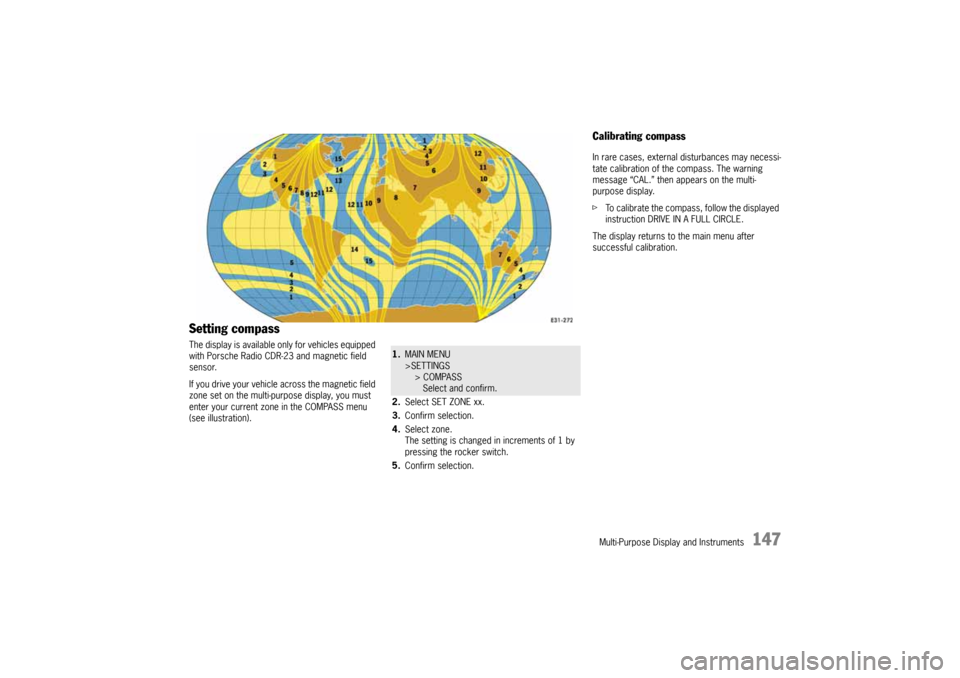
Setting compassThe display is available only for vehicles equipped
with Porsche Radio CDR-23 and magnetic field
sensor.
If you drive your vehicle across the magnetic field
zone set on the multi-purpose display, you must
enter your current zone in the COMPASS menu
(see illustration).
1.MAIN MENU
>SETTINGS
> COMPASS
Select and confirm.
2.Select SET ZONE xx.
3.Confirm selection.
4.Select zone.
The setting is changed in increments of 1 by
pressing the rocker switch.
5.Confirm selection.
Calibrating compassIn rare cases, external disturbances may necessi-
tate calibration of the compass. The warning
message “CAL.” then appears on the multi-
purpose display.
fTo calibrate the compass, follow the displayed
instruction DRIVE IN A FULL CIRCLE.
The display returns to the main menu after
successful calibration.
10_Cayenne_21_KW17.book Seite 147 Donnerstag, 9. April 2009 3:33 15