headlight PORSCHE CAYNNE 2010 1.G Owner's Guide
[x] Cancel search | Manufacturer: PORSCHE, Model Year: 2010, Model line: CAYENNE, Model: PORSCHE CAYENNE 2010 1.GPages: 379, PDF Size: 13.91 MB
Page 330 of 379
330
Minor Repairs Changing bulb for additional high beam
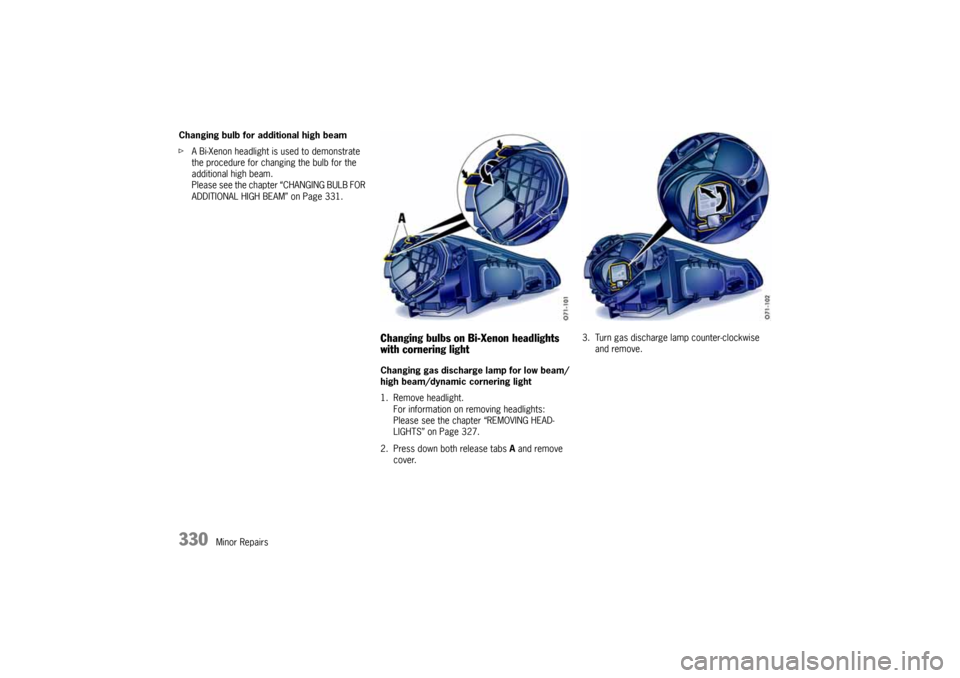
fA Bi-Xenon headlight is used to demonstrate
the procedure for changing the bulb for the
additional high beam.
Please see the chapter “CHANGING BULB FOR
ADDITIONAL HIGH BEAM” on Page 331.
Changing bulbs on Bi-Xenon headlights
with cornering lightChanging gas discharge lamp for low beam/
high beam/dynamic cornering light
1. Remove headlight.
For information on removing headlights:
Please see the chapter “REMOVING HEAD-
LIGHTS” on Page 327.
2. Press down both release tabs A and remove
cover.3. Turn gas discharge lamp counter-clockwise
and remove.
10_Cayenne_21_KW17.book Seite 330 Donnerstag, 9. April 2009 3:33 15
Page 331 of 379
Minor Repairs
331
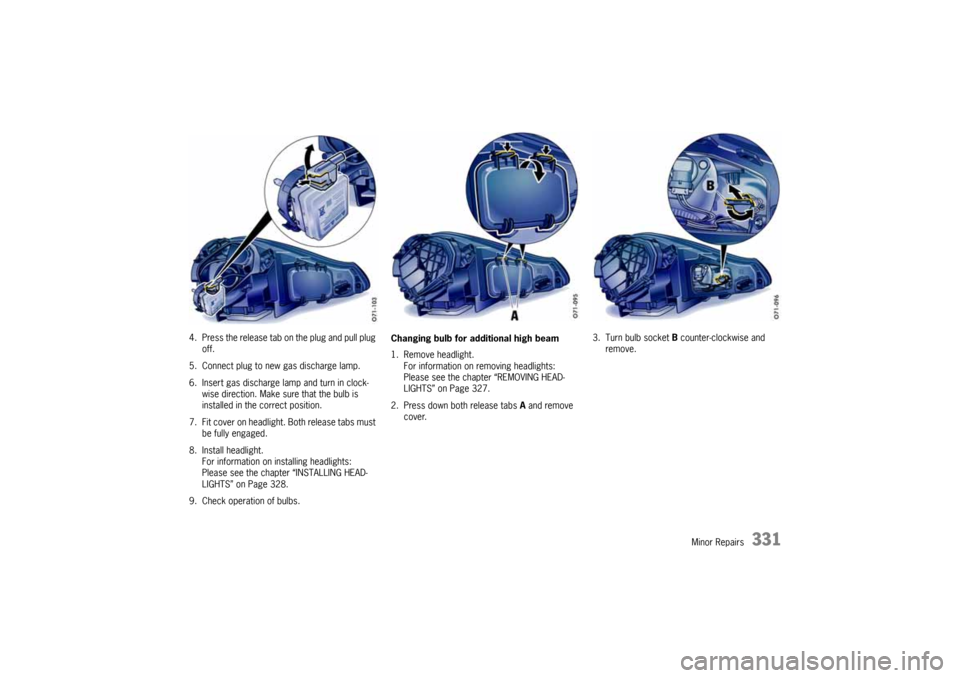
4. Press the release tab on the plug and pull plug
off.
5. Connect plug to new gas discharge lamp.
6. Insert gas discharge lamp and turn in clock-
wise direction. Make sure that the bulb is
installed in the correct position.
7. Fit cover on headlight. Both release tabs must
be fully engaged.
8. Install headlight.
For information on installing headlights:
Please see the chapter “INSTALLING HEAD-
LIGHTS” on Page 328.
9. Check operation of bulbs.Changing bulb for additional high beam
1. Remove headlight.
For information on removing headlights:
Please see the chapter “REMOVING HEAD-
LIGHTS” on Page 327.
2. Press down both release tabs A and remove
cover.3. Turn bulb socket B counter-clockwise and
remove.
10_Cayenne_21_KW17.book Seite 331 Donnerstag, 9. April 2009 3:33 15
Page 332 of 379
332
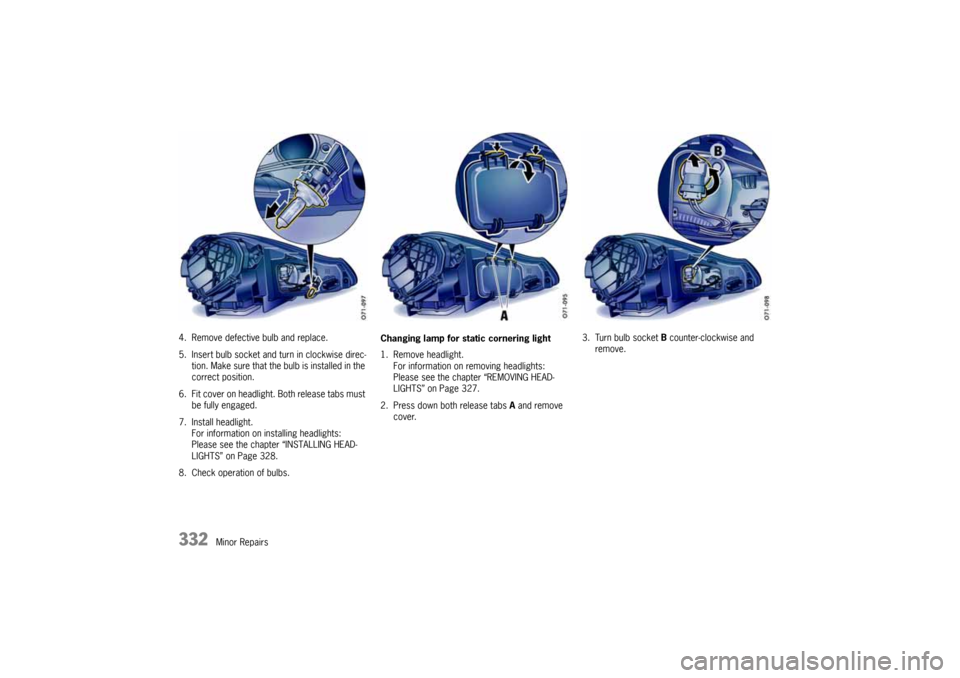
Minor Repairs 4. Remove defective bulb and replace.
5. Insert bulb socket and turn in clockwise direc-
tion. Make sure that the bulb is installed in the
correct position.
6. Fit cover on headlight. Both release tabs must
be fully engaged.
7. Install headlight.
For information on installing headlights:
Please see the chapter “INSTALLING HEAD-
LIGHTS” on Page 328.
8. Check operation of bulbs.Changing lamp for static cornering light
1. Remove headlight.
For information on removing headlights:
Please see the chapter “REMOVING HEAD-
LIGHTS” on Page 327.
2. Press down both release tabs A and remove
cover.3. Turn bulb socket B counter-clockwise and
remove.
10_Cayenne_21_KW17.book Seite 332 Donnerstag, 9. April 2009 3:33 15
Page 333 of 379
Minor Repairs
333
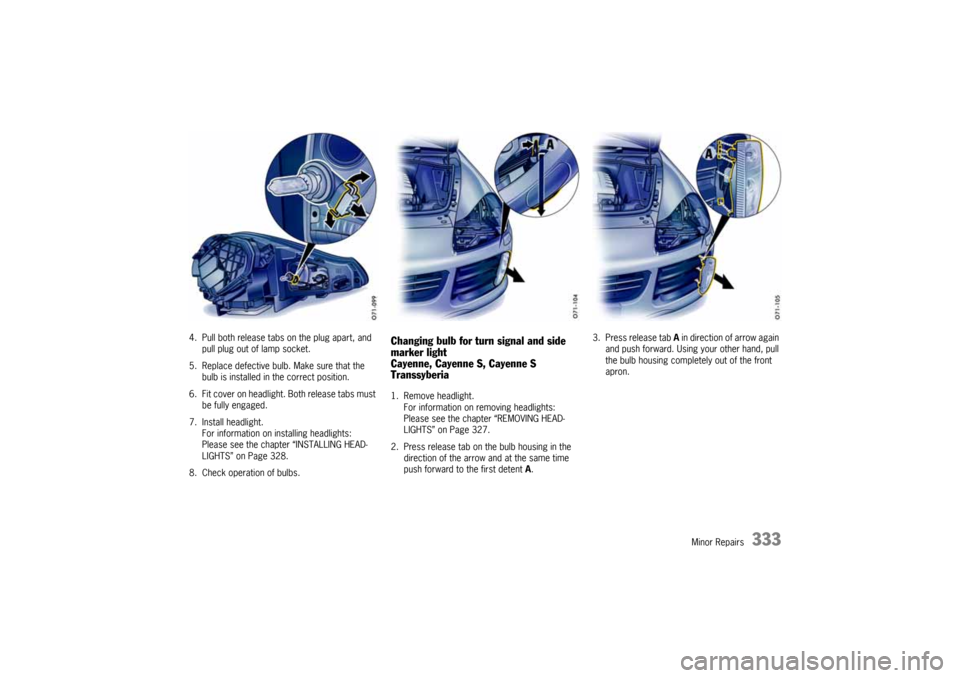
4. Pull both release tabs on the plug apart, and
pull plug out of lamp socket.
5. Replace defective bulb. Make sure that the
bulb is installed in the correct position.
6. Fit cover on headlight. Both release tabs must
be fully engaged.
7. Install headlight.
For information on installing headlights:
Please see the chapter “INSTALLING HEAD-
LIGHTS” on Page 328.
8. Check operation of bulbs.
Changing bulb for turn signal and side
marker light
Cayenne, Cayenne S, Cayenne S
Transsyberia1. Remove headlight.
For information on removing headlights:
Please see the chapter “REMOVING HEAD-
LIGHTS” on Page 327.
2. Press release tab on the bulb housing in the
direction of the arrow and at the same time
push forward to the first detent A.3. Press release tab A in direction of arrow again
and push forward. Using your other hand, pull
the bulb housing completely out of the front
apron.
10_Cayenne_21_KW17.book Seite 333 Donnerstag, 9. April 2009 3:33 15
Page 335 of 379
Minor Repairs
335
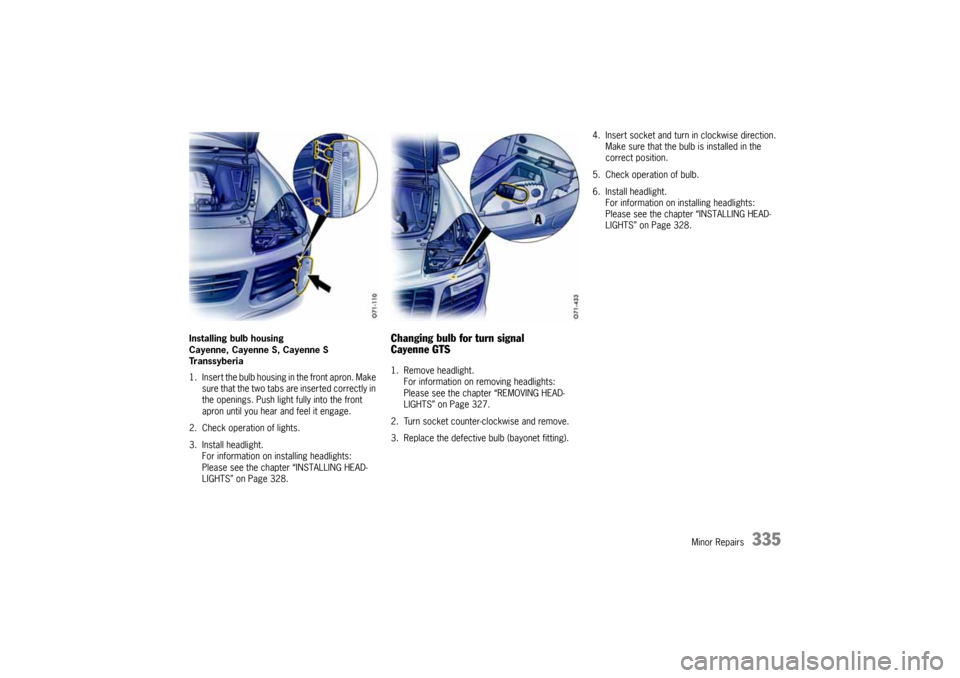
Installing bulb housing
Cayenne, Cayenne S, Cayenne S
Transsyberia
1. Insert the bulb housing in the front apron. Make
sure that the two tabs are inserted correctly in
the openings. Push light fully into the front
apron until you hear and feel it engage.
2. Check operation of lights.
3. Install headlight.
For information on installing headlights:
Please see the chapter “INSTALLING HEAD-
LIGHTS” on Page 328.
Changing bulb for turn signal
Cayenne GTS1. Remove headlight.
For information on removing headlights:
Please see the chapter “REMOVING HEAD-
LIGHTS” on Page 327.
2. Turn socket counter-clockwise and remove.
3. Replace the defective bulb (bayonet fitting).4. Insert socket and turn in clockwise direction.
Make sure that the bulb is installed in the
correct position.
5. Check operation of bulb.
6. Install headlight.
For information on installing headlights:
Please see the chapter “INSTALLING HEAD-
LIGHTS” on Page 328.
10_Cayenne_21_KW17.book Seite 335 Donnerstag, 9. April 2009 3:33 15
Page 339 of 379
Minor Repairs
339
Headlight AdjustmentfCheck tire pressure and adjust if necessary.
fPlease see the chapter “TIRE PRESSURES,
COLD (68 °F/20 °C)” on Page 354.
fPlease see the chapter “REPLACING BULBS”
on Page 326.Adjustment
The adjustment is made with the vehicle ready to
drive and the fuel tank completely filled.
T h e d r i ve r ' s s e a t m u s t b e l o a d e d b y a p e r s o n o r a
165lbs. (75kg) weight and the tire pressures must
meet the prescribed values. After being loaded,
the car must be rolled a few meters so that the
suspension can settle.
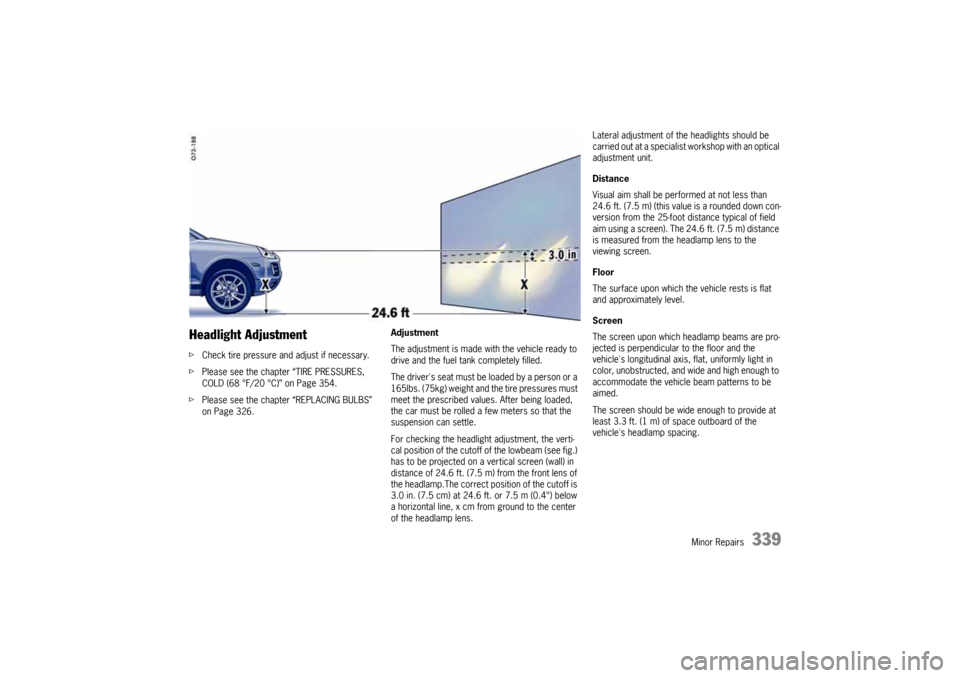
For checking the headlight adjustment, the verti-
cal position of the cutoff of the lowbeam (see fig.)
has to be projected on a vertical screen (wall) in
distance of 24.6 ft. (7.5 m) from the front lens of
the headlamp.The correct position of the cutoff is
3.0 in. (7.5 cm) at 24.6 ft. or 7.5 m (0.4°) below
a horizontal line, x cm from ground to the center
of the headlamp lens.
Lateral adjustment of the headlights should be
carried out at a specialist workshop with an optical
adjustment unit.
Distance
Visual aim shall be performed at not less than
24.6 ft. (7.5 m) (this value is a rounded down con-
version from the 25-foot distance typical of field
aim using a screen). The 24.6 ft. (7.5 m) distance
is measured from the headlamp lens to the
viewing screen.
Floor
The surface upon which the vehicle rests is flat
and approximately level.
Screen
The screen upon which headlamp beams are pro-
jected is perpendicular to the floor and the
vehicle's longitudinal axis, flat, uniformly light in
color, unobstructed, and wide and high enough to
accommodate the vehicle beam patterns to be
aimed.
The screen should be wide enough to provide at
least 3.3 ft. (1 m) of space outboard of the
vehicle's headlamp spacing.
10_Cayenne_21_KW17.book Seite 339 Donnerstag, 9. April 2009 3:33 15
Page 340 of 379
340
Minor Repairs
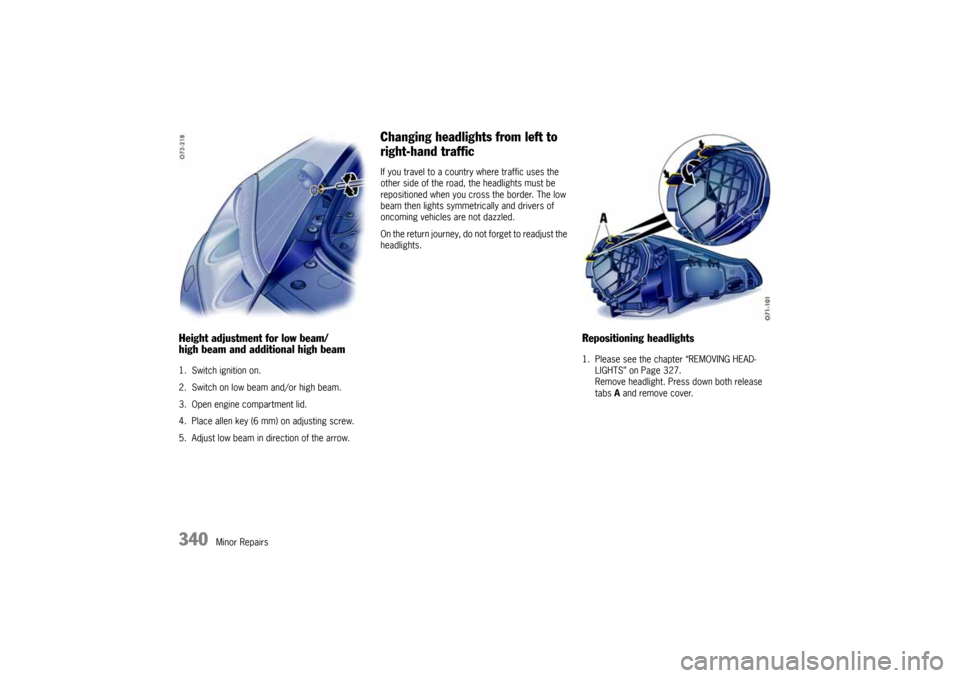
Height adjustment for low beam/
high beam and additional high beam1. Switch ignition on.
2. Switch on low beam and/or high beam.
3. Open engine compartment lid.
4. Place allen key (6 mm) on adjusting screw.
5. Adjust low beam in direction of the arrow.
Changing headlights from left to
right-hand trafficIf you travel to a country where traffic uses the
other side of the road, the headlights must be
repositioned when you cross the border. The low
beam then lights symmetrically and drivers of
oncoming vehicles are not dazzled.
On the return journey, do not forget to readjust the
headlights.
Repositioning headlights1. Please see the chapter “REMOVING HEAD-
LIGHTS” on Page 327.
Remove headlight. Press down both release
tabs A and remove cover.
10_Cayenne_21_KW17.book Seite 340 Donnerstag, 9. April 2009 3:33 15
Page 341 of 379
Minor Repairs
341
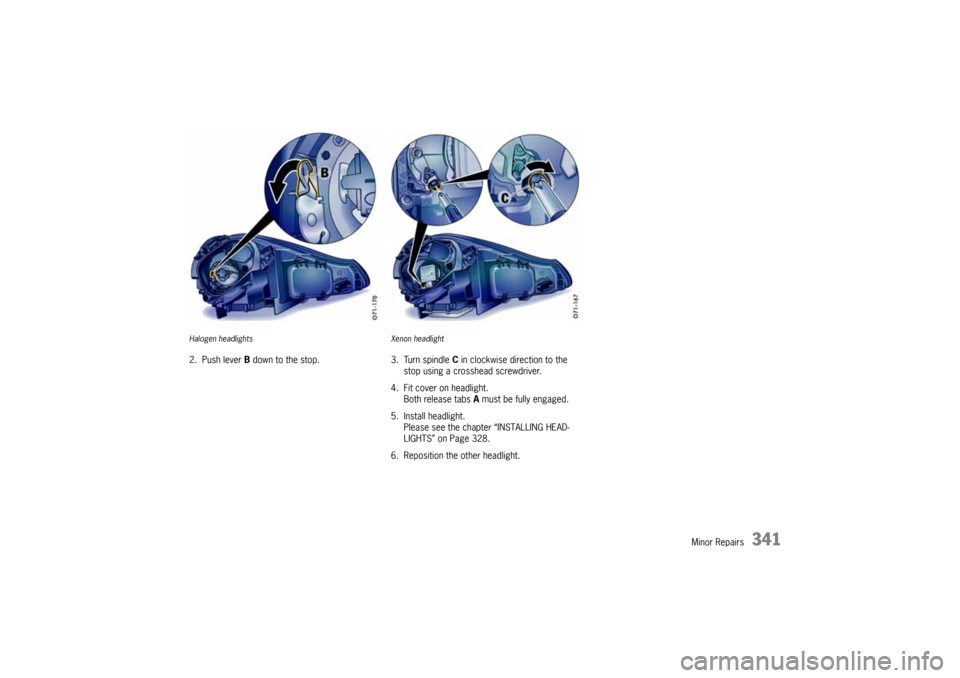
Halogen headlights2. Push lever B down to the stop.
Xenon headlight3. Turn spindle C in clockwise direction to the
stop using a crosshead screwdriver.
4. Fit cover on headlight.
Both release tabs A must be fully engaged.
5. Install headlight.
Please see the chapter “INSTALLING HEAD-
LIGHTS” on Page 328.
6. Reposition the other headlight.
10_Cayenne_21_KW17.book Seite 341 Donnerstag, 9. April 2009 3:33 15
Page 359 of 379
Tire Pressure and Technical Data
359
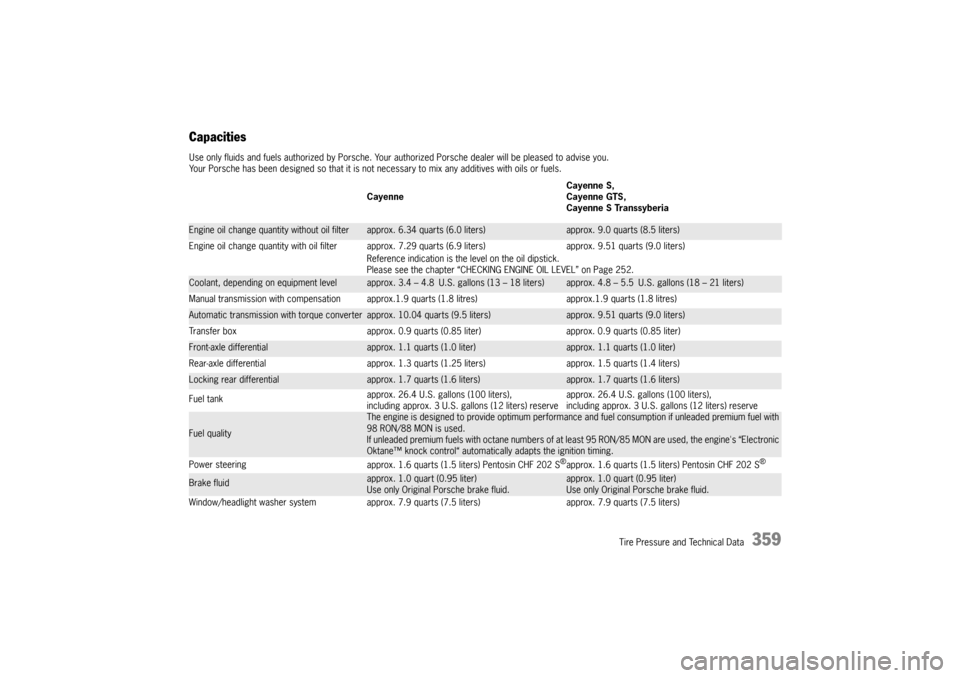
CapacitiesUse only fluids and fuels authorized by Porsche. Your authorized Porsche dealer will be pleased to advise you.
Your Porsche has been designed so that it is not necessary to mix any additives with oils or fuels.
CayenneCayenne S,
Cayenne GTS,
Cayenne S TranssyberiaEngine oil change quantity without oil filter
approx. 6.34 quarts (6.0 liters)
approx. 9.0 quarts (8.5 liters)
Engine oil change quantity with oil filter approx. 7.29 quarts (6.9 liters) approx. 9.51 quarts (9.0 liters)
Reference indication is the level on the oil dipstick.
Please see the chapter “CHECKING ENGINE OIL LEVEL” on Page 252.
Coolant, depending on equipment level
approx. 3.4 – 4.8 U.S. gallons (13 – 18 liters)
approx. 4.8 – 5.5 U.S. gallons (18 – 21 liters)
Manual transmission with compensation approx.1.9quarts (1.8 litres) approx.1.9 quarts (1.8 litres)
Automatic transmission with torque converter
approx. 10.04 quarts (9.5 liters)
approx. 9.51 quarts (9.0 liters)
Transfer box approx. 0.9 quarts (0.85 liter) approx. 0.9 quarts (0.85 liter)
Front-axle differential
approx. 1.1 quarts (1.0 liter)
approx. 1.1 quarts (1.0 liter)
Rear-axle differential approx. 1.3 quarts (1.25 liters) approx. 1.5 quarts (1.4 liters)
Locking rear differential
approx. 1.7 quarts (1.6 liters)
approx. 1.7 quarts (1.6 liters)
Fuel tankapprox. 26.4 U.S. gallons (100 liters),
including approx. 3 U.S. gallons (12 liters) reserveapprox. 26.4 U.S. gallons (100 liters),
including approx. 3 U.S. gallons (12 liters) reserve
Fuel quality
The engine is designed to provide optimum performance and fuel consumption if unleaded premium fuel with
98 RON/88 MON is used.
If unleaded premium fuels with octane numbers of at least 95 RON/85 MON are used, the engine's “Electronic
Oktane™ knock control“ automatically adapts the ignition timing.
Power steering
approx. 1.6 quarts (1.5 liters) Pentosin CHF 202 S
®approx. 1.6 quarts (1.5 liters) Pentosin CHF 202 S
®
Brake fluid
approx. 1.0 quart (0.95 liter)
Use only Original Porsche brake fluid.
approx. 1.0 quart (0.95 liter)
Use only Original Porsche brake fluid.
Window/headlight washer system approx. 7.9 quarts (7.5 liters) approx. 7.9 quarts (7.5 liters)
10_Cayenne_21_KW17.book Seite 359 Donnerstag, 9. April 2009 3:33 15
Page 362 of 379
362
Index
Index2-zone air conditioning
Air-conditioning sensors
.................................... 71
Defrosting windshield
........................................ 70
Functional description
....................................... 70
Information on air-conditioning compressor
........... 65
Opening the cover flap
...................................... 64
Operating overview
........................................... 70
REST mode
..................................................... 65
Setting air distribution
....................................... 72
Setting air quantity
........................................... 71
Setting fan
...................................................... 71
Setting temperature
......................................... 71
Sun sensor
..................................................... 71
Switching air-conditioning compressor on/off
........ 65
Switching automatic mode on/off
........................ 71
Switching ECON mode on/off
............................. 65
Switching Mono function on/off
.......................... 72
Switching on automatic recirculating-air mode
....... 72
Switching on recirculating-air mode
..................... 72
Temperature sensor
......................................... 71
Using engine residual heat
................................. 65
4-wheel drive
Functional description
..................................... 182
Warning message on multi-purpose display
......... 154
4-zone air conditioning
Air-conditioning sensors
.................................... 76
Controlling rear air-conditioned areas
with the front control panel
................................ 79
Defrosting windshield
........................................ 75
Disabling control panel (rear)
.............................. 79
Disabling control panel
for air-conditioned areas at the rear
..................... 79
Functional description
....................................... 75
Information on air-conditioning compressor
........... 65
Opening the cover flap
...................................... 64
Operating overview, front
.................................. 75
Operating overview, rear
................................... 76
REST mode
..................................................... 65
Setting air distribution
....................................... 77
Setting air quantity
........................................... 77
Setting fan
...................................................... 77
Setting temperature
......................................... 77
Sun sensor
..................................................... 76
Switching air-conditioning compressor on/off
........ 65
Switching automatic mode on/off
........................ 76
Switching ECON mode on/off
............................. 65
Switching Mono function on/off
.......................... 78
Switching on automatic recirculating-air mode
....... 78
Switching on recirculating-air mode
..................... 78
Temperature sensor
......................................... 76
Using engine residual heat
................................. 65
AABD (Automatic brake differential)
Automatic deactivation
.................................... 184
Functional description
..................................... 182
ABS (anti-lock brake system)
Functional description
..................................... 186
Off-road ABS functional description
................... 187
Warning light on the tachometer
....................... 187
Warning message on multi-purpose display
......... 153
Additional door mirrors when towing a trailer
............... 234
Additional high beam
Changing bulb (Bi-Xenon headlights)
................... 331
Changing bulb (halogen headlights)
................... 330
Installing headlights
........................................ 328
Removing headlights
....................................... 327
Adhesive films, care instructions
................................ 275
Adjusting seat position
............................................... 36
Adjusting the opening height of the automatic rear lid
...... 26
After driving off-road
................................................ 196
Aftermarket Alarms
................................................. 219
Air cleaner maintenance instructions
.......................... 260
Air conditioner
Child lock (4-zone air conditioning)
...................... 79
Defrosting windshield with 2-zone air conditioning
.. 70
Defrosting windshield with 4-zone air conditioning
.. 75
Defrosting windshield with manual air conditioning
.67
Disabling control panel for air-conditioned areas
at the rear
...................................................... 79
Functional description of 2-zone air conditioning
.... 70
Functional description of 4-zone air conditioning
.... 75
Functional description of manual air-conditioning
.... 67
Information on air-conditioning compressor
........... 65
Opening the cover flap
...................................... 64
Operating overview of 2-zone air conditioning
........ 70
Operating overview
of 4-zone air conditioning, front
.......................... 75
Operating overview
of 4-zone air conditioning, rear
........................... 76
Operating overview of manual air conditioning
....... 67
Overview of air-conditioning systems
................... 64
Setting air distribution with 2-zone air conditioning
.71
Setting air distribution with 4-zone air conditioning
.77
Setting air distribution with manual air conditioning
.68
Setting air quantity with 2-zone air conditioning
..... 71
Setting air quantity with 4-zone air conditioning
..... 77
Setting air quantity with manual air conditioning
..... 68
Setting fan with 2-zone air conditioning
................ 71
Setting fan with 4-zone air conditioning
................ 77
Setting fan with manual air conditioning
................ 68
Setting temperature with 2-zone air conditioning
.... 71
Setting temperature with 4-zone air conditioning
.... 77
Setting temperature with manual air conditioning
... 68
Sun sensor for 2-zone air conditioning
................. 71
Sun sensor for 4-zone air conditioning
................. 76
Switching air-conditioning compressor on/off
........ 65
Switching automatic mode on/off
with 2-zone air conditioning
................................ 71
Switching automatic mode on/off
with 4-zone air conditioning
................................ 76
Switching child protection on/off
(4-zone air conditioning)
.................................... 79
Switching ECON mode on/off
............................. 65
Switching on automatic recirculating-air mode
with 2-zone air conditioning
................................ 72
Switching on automatic recirculating-air mode
with 4-zone air conditioning
................................ 78
Switching on recirculating air-mode
with manual air conditioning
............................... 68
Switching REST mode on/off
.............................. 65
Temperature sensor for 2-zone air conditioning
..... 71
Temperature sensor for 4-zone air conditioning
..... 76
Which system is in my car?
................................ 64
Air conditioning
Fresh-air intake
................................................ 80
Vents
............................................................. 79
10_Cayenne_21_KW17.book Seite 362 Donnerstag, 9. April 2009 3:33 15