change wheel PORSCHE CAYNNE 2010 1.G Owners Manual
[x] Cancel search | Manufacturer: PORSCHE, Model Year: 2010, Model line: CAYENNE, Model: PORSCHE CAYENNE 2010 1.GPages: 379, PDF Size: 13.91 MB
Page 5 of 379

5
In the driver's seat...fCheck operation of the horn.
fPosition seat for easy reach of foot pedals and
controls.To reduce the possibility of injury from
the airbag deployment, you should always sit
back as far from the steering wheel as is
practical, while still maintaining full vehicle
control.
fAdjust the headrest so that the upper edge of
the headrest is brought to eye level or higher.
fAdjust the inside and outside rear view mirrors.
fBuckle your safety belts.
fCheck operation of the foot and parking brake.
fCheck all warning and indicator lights with
ignition on and engine not running.
fStart engine and check all warning displays for
warning symbols.
fNever leave an idling car unattended.
fLock doors from inside, especially with
children in the car to prevent inadvertent
opening of doors from inside or outside. Drive
with doors locked.
On the road...fNever drive after you have consumed alcohol
or drugs.
fAlways have your safety belt fastened.
fAlways drive defensively.
Expect the unexpected.
fUse signals to indicate turns and lane changes.
fTurn on headlights at dusk or when the driving
conditions warrant it.
fAlways keep a safe distance from the vehicle in
front of you, depending on traffic, road and
weather conditions.
fReduce speed at night and during inclement
weather.
Driving in wet weather requires caution and
reduced speeds, particularly on roads with
standing water, as the handling characteristics
of the vehicle may be impaired due to hydropla-
ning of the tires.
fAlways observe speed limits and obey road
signs and traffic laws.
fWhen tired, get well off the road, stop and take
a rest. Turn the engine off. Do not sit in the
vehicle with engine idling.
Please see the chapter “ENGINE EXHAUST” on
Page 2.fWhen parked, always put the parking brake on
and put the gearshift lever in neutral or the
Tiptronic selector lever in position P.
On hills also turn the front wheels toward the
curb.
fWhen emergency repairs become necessary,
move the vehicle well off the road. Turn on the
emergency flasher and use other warning
devices to alert other motorists. Do not park
or operate the vehicle in areas where the hot
exhaust system may come in contact with dry
grass, brush, spilled fuel or other flammable
material.
fMake it a habit to have the engine oil checked
with every refueling.
10_Cayenne_21_KW17.book Seite 5 Donnerstag, 9. April 2009 3:33 15
Page 38 of 379
38
Seats, Mirrors and Steering Wheel
Storing driver’s seat settingsStoring settings on a person button and a car
key
1. Apply the parking brake.
2. Switch ignition on.
3. Make the required adjustments to the seat,
mirror, steering wheel and safety belt.
4. Briefly press the SET memory button and,
within 10 seconds, hold down one of the per-
son buttons (1, 2 or 3) until an acknowledge
tone is obtained.
The settings are now stored on the desired
person button.
5. Withdraw car key or switch ignition off in
vehicles that have Porsche Entry & Drive.
6. Press the SET memory button within
10 seconds and keep the button depressed
until an acknowledge tone is obtained.
The settings are now assigned to the car key.
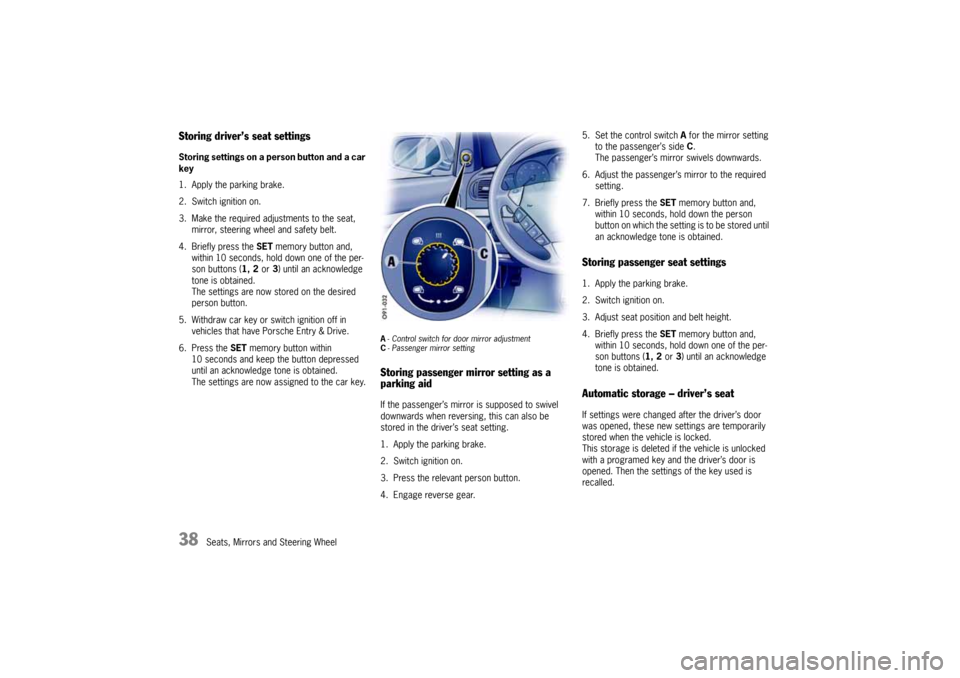
A-Control switch for door mirror adjustment
C- Passenger mirror settingStoring passenger mirror setting as a
parking aidIf the passenger’s mirror is supposed to swivel
downwards when reversing, this can also be
stored in the driver’s seat setting.
1. Apply the parking brake.
2. Switch ignition on.
3. Press the relevant person button.
4. Engage reverse gear.5. Set the control switch A for the mirror setting
to the passenger’s side C.
The passenger’s mirror swivels downwards.
6. Adjust the passenger’s mirror to the required
setting.
7. Briefly press the SET memory button and,
within 10 seconds, hold down the person
button on which the setting is to be stored until
an acknowledge tone is obtained.
Storing passenger seat settings1. Apply the parking brake.
2. Switch ignition on.
3. Adjust seat position and belt height.
4. Briefly press the SET memory button and,
within 10 seconds, hold down one of the per-
son buttons (1, 2 or 3) until an acknowledge
tone is obtained.Automatic storage – driver’s seatIf settings were changed after the driver’s door
was opened, these new settings are temporarily
stored when the vehicle is locked.
This storage is deleted if the vehicle is unlocked
with a programed key and the driver’s door is
opened. Then the settings of the key used is
recalled.
10_Cayenne_21_KW17.book Seite 38 Donnerstag, 9. April 2009 3:33 15
Page 45 of 379

Seats, Mirrors and Steering Wheel
45
Airbag SystemsThe airbags in combination with the safety belts
make up a safety system which offers the driver
and the passenger the greatest known protection
from injuries in case of accident.
Your vehicle is equipped with weight sensing for
the passenger's seat in accordance with
U.S. Federal/Canadian Motor Vehicle Safety
Standard 208.
Even if your vehicle is equipped with airbags, the
safety belts must be worn at all times,
because the front airbag system is only actuated
by frontal collisions with an impact of sufficient se-
verity.
Below the deployment threshold of the airbag
system, and during types of collisions which do
not cause the actuation of the system, the safety
belts provide the primary protection to the
occupants when correctly worn. Therefore, all
persons within the vehicle must wear safety
belts at all times (in many states, state law
requires the use of safety belts).
fPlease see the chapter “SAFETY BELTS” on
Page 42.
The front airbags are located under the padded
steering wheel panel on the driver’s side and, on
the passenger's side, in the dashboard.
The side airbags for the front seats are installed
on the side in the seat backrests.
The head airbags are installed above the doors
in the roof area.
Danger!
To provide optimal occupant protection, air-
bags must inflate at very high speed. If you
are not wearing your safety belt or are too
close to the airbag when it is deployed, infla-
ting airbags can result in serious personal in-
jury or death.
Improper handling of weight sensing can
unintentionally impair switching the
passenger's airbag off and on.
fMake sure there are no people, animals or ob-
jects between the driver or passenger and the
area into which the airbag inflates.
fSit back as far from the dashboard or steering
wheel as is practical, while still maintaining full
vehicle control.
fAlways hold the steering wheel by the outer
rim. Never rest your hands on the airbag panel.
fAlways fasten seat belts because triggering
of the airbag system depends on the force and
angle of impact.
fDo not transport heavy objects on or in front of
the passenger seat. These could impair the
function of the airbag, the seat belts, and
weight sensing.
fDo not hang objects (e.g., jackets, coats, coat
hangers) over the backrest.fAlways keep the lid of the door storage com-
partment closed. Objects must not protrude
out of the door storage compartment.
The storage compartment must be closed
while driving.
fNo changes must be made to the wiring or
components of the airbag system.
fDo not add any additional coverings or stickers
to the steering wheel or in the area of the
passenger airbag, side airbags and head
airbags. Doing so may adversely affect the
functioning of the airbag system or cause
harm to the occupants if the airbag system
should deploy.
Do not use protective seat covers.
fDo not modify the seat coverings. Do not
attach additional cushions, protective
coverings, or pillows to the passenger's seat.
Do not affix things to the passenger's seat or
cover it with other materials. Do not cover the
back of the backrest. Do not make changes to
the passenger's seat and to the seat base
frame.
fDo not undertake any wiring for electrical ac-
cessory equipment in the vicinity of the airbag
wiring harnesses. Doing so may disable the
airbag system or cause inadvertent inflation.
fIf the warning light comes on, the airbag
system should be repaired immediately by
your authorized Porsche dealer.
10_Cayenne_21_KW17.book Seite 45 Donnerstag, 9. April 2009 3:33 15
Page 56 of 379
56
Seats, Mirrors and Steering Wheel
Door mirror heatingThe door mirror heater is ready for operation
when the ignition is switched on.
Switching on
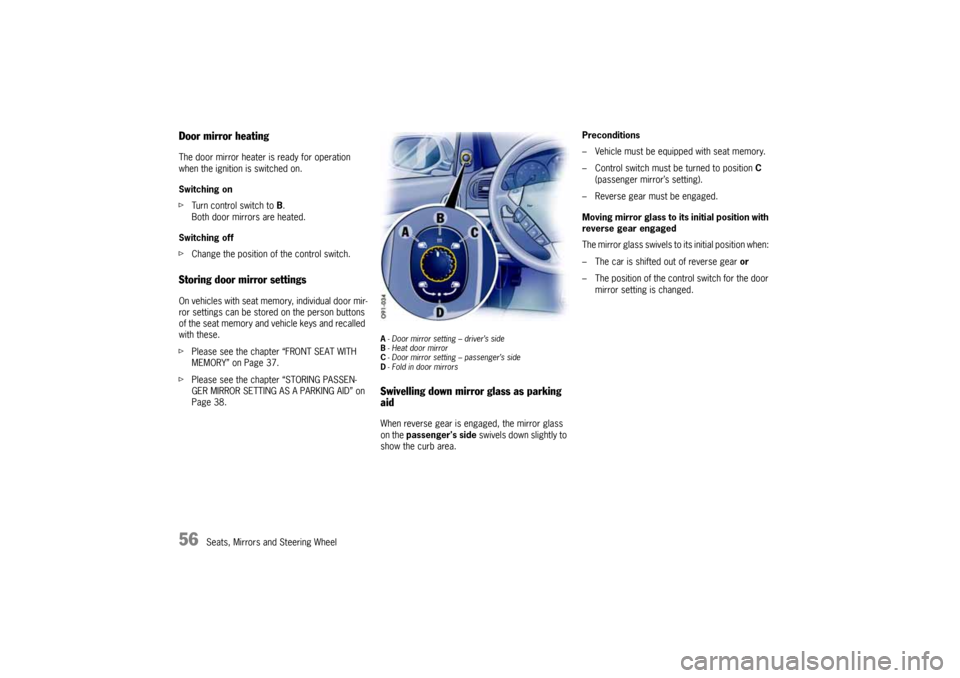
fTurn control switch to B.
Both door mirrors are heated.
Switching off
fChange the position of the control switch.Storing door mirror settingsOn vehicles with seat memory, individual door mir-
ror settings can be stored on the person buttons
of the seat memory and vehicle keys and recalled
with these.
fPlease see the chapter “FRONT SEAT WITH
MEMORY” on Page 37.
fPlease see the chapter “STORING PASSEN-
GER MIRROR SETTING AS A PARKING AID” on
Page 38.
A- Door mirror setting – driver’s side
B- Heat door mirror
C- Door mirror setting – passenger’s side
D- Fold in door mirrorsSwivelling down mirror glass as parking
aidWhen reverse gear is engaged, the mirror glass
on the passenger's side swivels down slightly to
show the curb area.Preconditions
– Vehicle must be equipped with seat memory.
– Control switch must be turned to position C
(passenger mirror’s setting).
– Reverse gear must be engaged.
Moving mirror glass to its initial position with
reverse gear engaged
The mirror glass swivels to its initial position when:
– The car is shifted out of reverse gear or
– The position of the control switch for the door
mirror setting is changed.
10_Cayenne_21_KW17.book Seite 56 Donnerstag, 9. April 2009 3:33 15
Page 57 of 379

Seats, Mirrors and Steering Wheel
57
Interior MirrorInitial position – lever forward
Anti-dazzle setting – lever back
Note on operation
fWhen the interior mirror is being adjusted, anti-
dazzle lever A must point forward.
E- Light-emitting diodes (LED)
F- Button for automatic anti-dazzle operation
G- Light sensorsAutomatic Anti-Dazzle MirrorSensors on the front and rear sides of the interior
mirror measure the incident light. The mirrors
automatically change to anti-dazzle position or
revert to their normal state, depending on the light
intensity.
Note on operation
The incident light in the area of light sensors G
must not be restricted (e.g. by stickers on the
windshield).Switching off automatic anti-dazzle
operation
fPress button F.
Light-emitting diode E goes out.
Note on operation
Anti-dazzle operation switches off automatically,
if:
– Reverse gear is engaged or
– Interior lighting and/or
reading lights in the front are switched on.
Switching on automatic anti-dazzle
operation
fPress button F.
Light-emitting diode E lights up.
Warning!
Danger of injury. Electrolyte fluid can
emerge from broken mirror glass. This fluid
irritates the skin and eyes.
fIf the electrolyte fluid should come into contact
with the skin or eyes, immediately rinse it off
with clean water.
See a doctor if necessary.
Risk of damage to paintwork and leather and
plastic parts, and clothing. Electrolyte fluid
can be removed only while it is still wet.
fClean the affected parts with water.
10_Cayenne_21_KW17.book Seite 57 Donnerstag, 9. April 2009 3:33 15
Page 58 of 379
58
Seats, Mirrors and Steering Wheel
Steering WheelTiptronic rocker switchesThe Porsche Tiptronic is a six-speed transmission
and features an “automatic” and a “manual” gear-
shift mode.
You can change temporarily to manual mode using
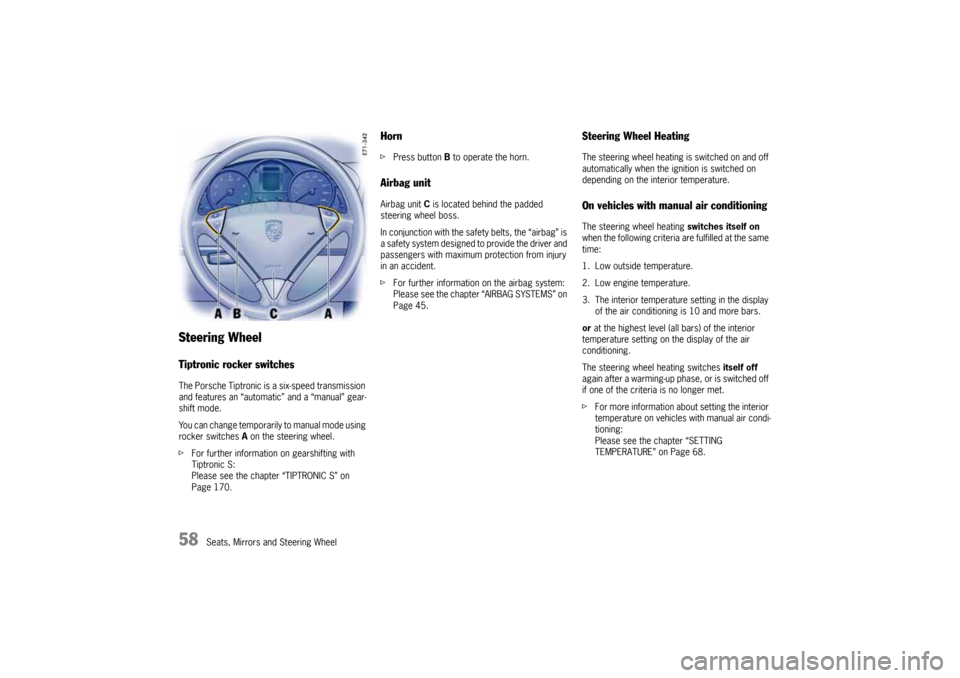
rocker switches A on the steering wheel.
fFor further information on gearshifting with
Tiptronic S:
Please see the chapter “TIPTRONIC S” on
Page 170.
HornfPress button B to operate the horn.Airbag unitAirbag unit C is located behind the padded
steering wheel boss.
In conjunction with the safety belts, the “airbag” is
a safety system designed to provide the driver and
passengers with maximum protection from injury
in an accident.
fFor further information on the airbag system:
Please see the chapter “AIRBAG SYSTEMS” on
Page 45.
Steering Wheel HeatingThe steering wheel heating is switched on and off
automatically when the ignition is switched on
depending on the interior temperature.On vehicles with manual air conditioningThe steering wheel heating switches itself on
when the following criteria are fulfilled at the same
time:
1. Low outside temperature.
2. Low engine temperature.
3. The interior temperature setting in the display
of the air conditioning is 10 and more bars.
or at the highest level (all bars) of the interior
temperature setting on the display of the air
conditioning.
The steering wheel heating switches itself off
again after a warming-up phase, or is switched off
if one of the criteria is no longer met.
fFor more information about setting the interior
temperature on vehicles with manual air condi-
tioning:
Please see the chapter “SETTING
TEMPERATURE” on Page 68.
10_Cayenne_21_KW17.book Seite 58 Donnerstag, 9. April 2009 3:33 15
Page 120 of 379
120
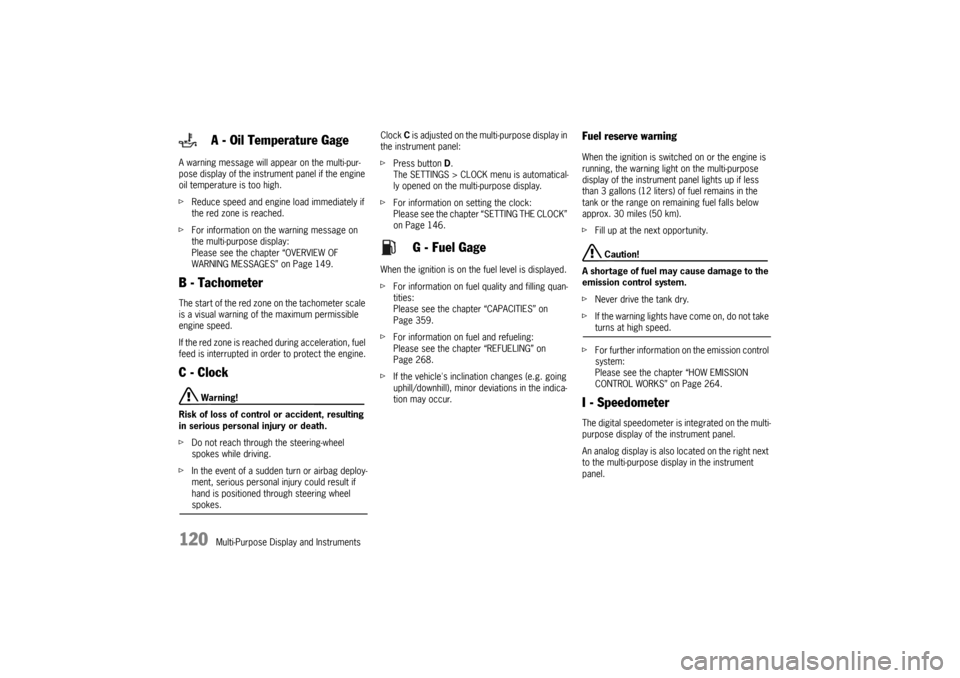
Multi-Purpose Display and Instruments A warning message will appear on the multi-pur-
pose display of the instrument panel if the engine
oil temperature is too high.
fReduce speed and engine load immediately if
the red zone is reached.
fFor information on the warning message on
the multi-purpose display:
Please see the chapter “OVERVIEW OF
WARNING MESSAGES” on Page 149.
B - TachometerThe start of the red zone on the tachometer scale
is a visual warning of the maximum permissible
engine speed.
If the red zone is reached during acceleration, fuel
feed is interrupted in order to protect the engine.C - Clock
Warning!
Risk of loss of control or accident, resulting
in serious personal injury or death.
fDo not reach through the steering-wheel
spokes while driving.
fIn the event of a sudden turn or airbag deploy-
ment, serious personal injury could result if
hand is positioned through steering wheel spokes.Clock C is adjusted on the multi-purpose display in
the instrument panel:
fPress button D.
The SETTINGS > CLOCK menu is automatical-
ly opened on the multi-purpose display.
fFor information on setting the clock:
Please see the chapter “SETTING THE CLOCK”
on Page 146.
When the ignition is on the fuel level is displayed.
fFor information on fuel quality and filling quan-
tities:
Please see the chapter “CAPACITIES” on
Page 359.
fFor information on fuel and refueling:
Please see the chapter “REFUELING” on
Page 268.
fIf the vehicle's inclination changes (e.g. going
uphill/downhill), minor deviations in the indica-
tion may occur.
Fuel reserve warningWhen the ignition is switched on or the engine is
running, the warning light on the multi-purpose
display of the instrument panel lights up if less
than 3 gallons (12 liters) of fuel remains in the
tank or the range on remaining fuel falls below
approx. 30 miles (50 km).
fFill up at the next opportunity.
Caution!
A shortage of fuel may cause damage to the
emission control system.
fNever drive the tank dry.
fIf the warning lights have come on, do not take turns at high speed.
fFor further information on the emission control
system:
Please see the chapter “HOW EMISSION
CONTROL WORKS” on Page 264.
I - SpeedometerThe digital speedometer is integrated on the multi-
purpose display of the instrument panel.
An analog display is also located on the right next
to the multi-purpose display in the instrument
panel.
A - Oil Temperature Gage
G - Fuel Gage
10_Cayenne_21_KW17.book Seite 120 Donnerstag, 9. April 2009 3:33 15
Page 133 of 379

Multi-Purpose Display and Instruments
133
fIf a tire pressure message is displayed, correct
the tire pressure at the next opportunity.
fIncomplete entries or selection of the wrong
tires on the multi-purpose display affect
correct indication of warnings and messages.
The settings in the TYRE PRESSURE menu
must be updated after wheel changes, use of
a spare wheel or changes in vehicle loading.
fUse only the pressure differences shown in the
TYRE PRESSURE menu or from tire pressure
messages or warnings when correcting the
tire pressure.
fTires lose air over time without a tire defect
being present. A tire pressure warning will then
appear on the multi-purpose display.
Correct tire pressure.
Functional description of Tire Pressure
MonitoringTire Pressure Monitoring continuously monitors
tire pressure and tire temperature on all four
wheels and warns the driver when the tire
pressure is too low.The display as well as the settings for Tire
Pressure Monitoring take place on the multi-
purpose display in the sub-menu
TYRE PRESSURE.
However, the tire pressure must still be set
manually on the wheel.
The deviations in the tire pressures from the
required pressures are shown in the sub-menu
TYRE PRESSURE.
Example:
If the tire pressure display shows “–4 psi
(–0.3 bar)”, you must increase the tire pressure by
4 psi (0.3 bar).
The tire pressures to be monitored are fixed in the
Tire Pressure Monitoring system and cannot be
changed.
The following settings must be made to permit
correct monitoring.
–Tires
Select the type and size of the tires fitted on
the vehicle.
–Load
Select the type of loading.
Note on operation
Settings can be made only when the vehicle is
stationary.
fFor information on tires and wheels:
Please see the chapter “TIRES/WHEELS” on
Page 281.
Warning!
Your vehicle has also been equipped with a TPM
malfunction indicator to indicate when the system
is not operating properly.
The TPM malfunction indicator is combined with
the low tire pressure telltale.
When the system detects a malfunction, the
telltale will flash for approximately one minute and
then remain continuously illuminated. This
sequence will continue upon subsequent vehicle
start-ups as long as the malfunction exists.
When the malfunction indicator is illuminated, the
system may not be able to detect or signal low tire
pressure as intended.
TPM malfunctions may occur for a variety of
reasons, including the installation of replacement
or alternate tires or wheels on the vehicle that
prevent the TPM from functioning properly.
Always check the TPM malfunction telltale after
replacing one or more tires or wheels on your
vehicle to ensure that the replacement or alternate
tires and wheels allow the TPM to continue to
function properly.Warning light
10_Cayenne_21_KW17.book Seite 133 Donnerstag, 9. April 2009 3:33 15
Page 136 of 379
136
Multi-Purpose Display and Instruments
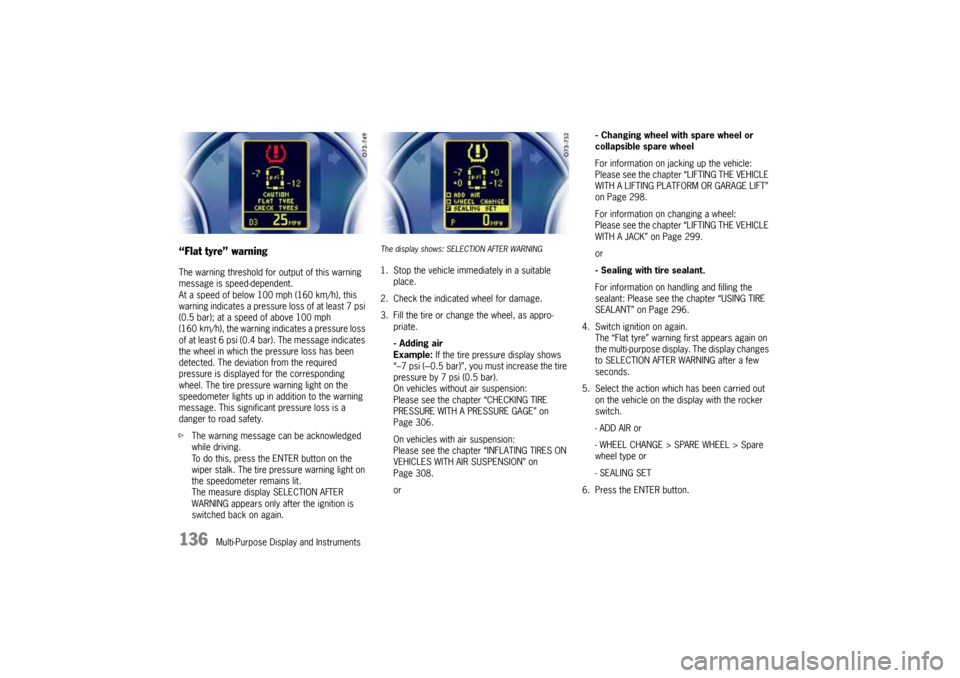
“Flat tyre” warningThe warning threshold for output of this warning
message is speed-dependent.
At a speed of below 100 mph (160 km/h), this
warning indicates a pressure loss of at least 7 psi
(0.5 bar); at a speed of above 100 mph
(160 km/h), the warning indicates a pressure loss
of at least 6 psi (0.4 bar). The message indicates
the wheel in which the pressure loss has been
detected. The deviation from the required
pressure is displayed for the corresponding
wheel. The tire pressure warning light on the
speedometer lights up in addition to the warning
message. This significant pressure loss is a
danger to road safety.
fThe warning message can be acknowledged
while driving.
To do this, press the ENTER button on the
wiper stalk. The tire pressure warning light on
the speedometer remains lit.
The measure display SELECTION AFTER
WARNING appears only after the ignition is
switched back on again.
The display shows: SELECTION AFTER WARNING1. Stop the vehicle immediately in a suitable
place.
2. Check the indicated wheel for damage.
3. Fill the tire or change the wheel, as appro-
priate.
- Adding air
Example: If the tire pressure display shows
“–7 psi (---0.5 bar)”, you must increase the tire
pressure by 7 psi (0.5 bar).
On vehicles without air suspension:
Please see the chapter “CHECKING TIRE
PRESSURE WITH A PRESSURE GAGE” on
Page 306.
On vehicles with air suspension:
Please see the chapter “INFLATING TIRES ON
VEHICLES WITH AIR SUSPENSION” on
Page 308.
or- Changing wheel with spare wheel or
collapsible spare wheel
For information on jacking up the vehicle:
Please see the chapter “LIFTING THE VEHICLE
WITH A LIFTING PLATFORM OR GARAGE LIFT”
on Page 298.
For information on changing a wheel:
Please see the chapter “LIFTING THE VEHICLE
WITH A JACK” on Page 299.
or
- Sealing with tire sealant.
For information on handling and filling the
sealant: Please see the chapter “USING TIRE
SEALANT” on Page 296.
4. Switch ignition on again.
The “Flat tyre” warning first appears again on
the multi-purpose display. The display changes
to SELECTION AFTER WARNING after a few
seconds.
5. Select the action which has been carried out
on the vehicle on the display with the rocker
switch.
- ADD AIR or
- WHEEL CHANGE > SPARE WHEEL > Spare
wheel type or
- SEALING SET
6. Press the ENTER button.
10_Cayenne_21_KW17.book Seite 136 Donnerstag, 9. April 2009 3:33 15
Page 138 of 379
138
Multi-Purpose Display and Instruments The spare wheel and collapsible spare wheel are
not equipped with wheel transmitters and are not
monitored by Tire Pressure Monitoring.
Wheel change (without warning)The settings of the multi-purpose display must be
updated after changing wheels or tires on the
vehicle.
Please see the chapter “SETTING THE TIRE TYPE
AND SIZE” on Page 134.Setting spare wheel/sealant (without
warning)If you have fitted a spare wheel or collapsible
spare wheel or used tire sealant without being
requested to do so by a “Flat tyre” warning on the
multi-purpose display, you must subsequently
update the settings in the TYRE PRESSURE sub-
menu.Setting spare wheel.
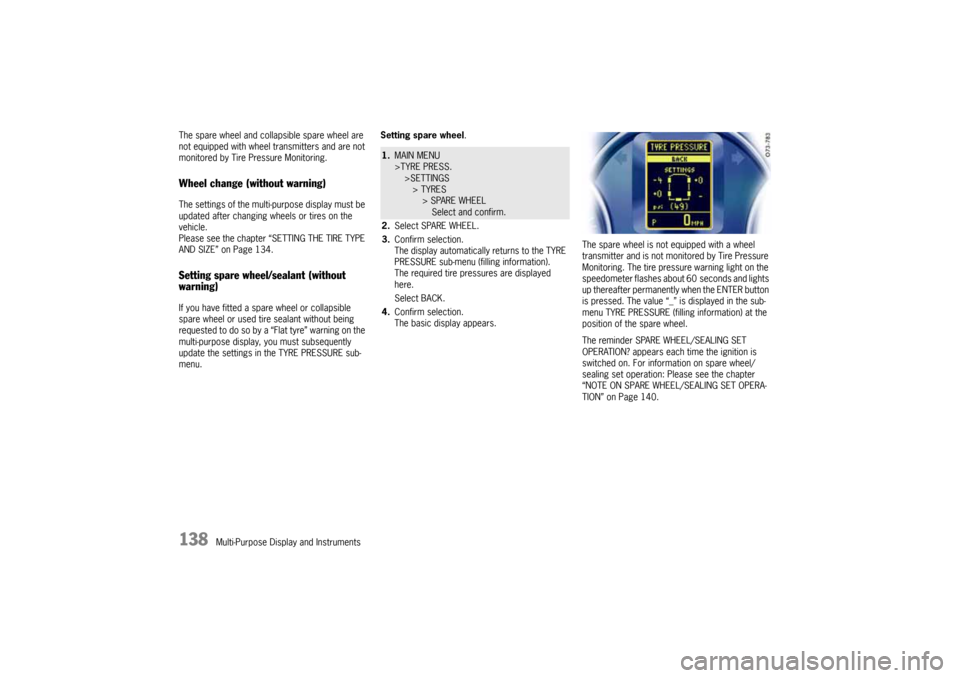
The spare wheel is not equipped with a wheel
transmitter and is not monitored by Tire Pressure
Monitoring. The tire pressure warning light on the
speedometer flashes about 60 seconds and lights
up thereafter permanently when the ENTER button
is pressed. The value “_” is displayed in the sub-
menu TYRE PRESSURE (filling information) at the
position of the spare wheel.
The reminder SPARE WHEEL/SEALING SET
OPERATION? appears each time the ignition is
switched on. For information on spare wheel/
sealing set operation: Please see the chapter
“NOTE ON SPARE WHEEL/SEALING SET OPERA-
TION” on Page 140.
1.MAIN MENU
>TYRE PRESS.
>SETTINGS
> TYRES
> SPARE WHEEL
Select and confirm.
2.Select SPARE WHEEL.
3.Confirm selection.
The display automatically returns to the TYRE
PRESSURE sub-menu (filling information).
The required tire pressures are displayed
here.
Select BACK.
4.Confirm selection.
The basic display appears.
10_Cayenne_21_KW17.book Seite 138 Donnerstag, 9. April 2009 3:33 15