height PORSCHE CAYNNE S 2005 1.G User Guide
[x] Cancel search | Manufacturer: PORSCHE, Model Year: 2005, Model line: CAYENNE S, Model: PORSCHE CAYENNE S 2005 1.GPages: 380, PDF Size: 3.17 MB
Page 232 of 380

232
Shifting Gear, Traction Systems
Water crossingfPlease observe the chapter “GROUND CLEA-
RANCE” on Page 366.
Danger!
Danger of drowning if water enters the vehi-
cle. Risk of damage to the engine and acces-
sories if water penetrates.
fBefore driving through water, check the water
depthA, water speed and the condition of the
surface beneath it.
The water must not be deeper than 20 in./
50 cm (22 in./55.5 cm for vehicles with level
control and height adjustment).
fCheck the door sills and rubber seals before
starting to drive.
fDo not drive through deep or rapidly flowing
water.
Deep or rapidly flowing water, e.g. mountain
streams, can cause the car to deviate from the
desired path.
fAvoid a "bow wave" by driving at an appropriate
speed.
fNever open the doors when driving through wa-
ter.Soiling can impair the braking action.
fCheck and clean the brakes if they have been
soiled.
Danger of steering assistance failing during
a long journey in the water if the drive belt
slips.
fIf the steering assistance fails, more effort will
be required to steer.
Danger of damaging electrical systems
fAvoid driving through salt water.
Notes on operation
fActivate Low Range.
fSwitch the air conditioner off.
fSwitch the headlights off.
Page 236 of 380

236
Shifting Gear, Traction Systems
Air Suspension with Level Control
and Height AdjustmentOn vehicles with air suspension, the driver can set
five different level steps manually.
The preselected level is automatically adjusted to
suit the vehicle speed.
The height of the car is automatically kept
constant when the car is loaded.
Tip on driving
It is not permissible to drive on public roads with
the car in the terrain or special terrain setting.Note on operation
Frequent level changes can cause the compressor
to overheat. In this case, the compressor must
cool for several minutes before the level adjust-
ment is fully functional again.
Normal levelThe ground clearance at normal level is around
8.5 in. (217 mm).Terrain levelThis setting is intended for off-road driving, field
paths and forest paths, etc.
The vehicle is raised by around 1 in. (26 mm) com-
pared to normal level.
Terrain level can be selected only manually at
speeds below around 50 mph (80 km/h).
The car is automatically lowered to normal level at
speeds exeeding around 50 mph (80 km/h).
The car is automatically raised to terrain level
when Low Range is activated.
Special terrain levelThis setting is intended only for extremely chal-
lenging terrain requiring maximum ground clear-
ance. The vehicle is raised by 2.2 in. (56 mm)
compared to normal level.
Special terrain level can be selected only at
speeds below around 19 mph (30 km/h).
The car is automatically lowered to terrain level at
speeds exeeding around 9 mph (30 km/h).Low levelThis level is intended for high-speed driving. Above
speeds of around 78 mph (125 km/h), the car is
lowered by around 1 in. (27 mm) compared to nor-
mal level.
When the speed drops to below around 25 mph
(40 km/h), the car is automatically raised to nor-
mal level.Special low levelAt extremely high speeds, for example when oper-
ated on a race track, the car is lowered 0.4 in.
(11 mm) compared to the low level.
Page 237 of 380

Shifting Gear, Traction Systems
237
Loading level
Caution!
Risk of damage to running-gear parts, units
and the vehicle underbody.
If the car is driven off a curb when at loading level,
for example, insufficent ground clearance can
cause it to bottom out.
fAlways switch to normal level before moving off.
This setting makes it easier for you to load the lug-
gage compartment.
The vehicle is lowered by around 2.4 in. (60 mm)
compared to normal level.
The car is automatically raised to normal level at
speeds exceeding around 3 mph (5 km/h).
Setting level manuallyPreconditions
–Ignition on.
– Doors are closed.
Setting
fMove rocker switch in the appropriate direc-
tion.
This sets the next possible height.
Indication of selected level
The corresponding light-emitting diode beside the
rocker switch flashes during the control process.
The light-emitting diode is continuously lit after the
control process.
The level change is also indicated on the multi-pur-
pose display of the instrument panel.
Exceptions
Automatic changes from normal level to low level
and back are not indicated on the multi-purpose
display of the instrument panel.
Note on operation
The level selected last is stored in memory after
the ignition is switched off.Raising the vehicle
1st actuation: Terrain level
2nd actuation: Special terrain level
f f f
Page 267 of 380

Maintenance, Car Care
267
Automatic car washes
Optional add-on parts or parts which project be-
yond the contours of the vehicle may be damaged
by design features (e.g. brushes) of automatic car
washes.
The following parts are particularly
susceptible to damage:
– Windshield wipers (always switch them off to
prevent them wiping unintentionally in intermit-
tent or sensor operation).
– Door mirrors (always fold in).
– Roof Transport System (always remove com-
pletely).
– Spoiler.
– Wheels (the wider the rim and the lower the tire
height, the greater the risk of damage).
fPlease consult the operator before using
automatic car washes.
fWash and dry by hand all points not reached by
a car wash, such as door and lid seams or
door sills.
Note
Automatic car washes spray water at odd angles
and high pressures, which are not seen in normal
driving. Therefore, water can sometimes find its
way into the passengers compartment during or
shortly after the car wash.
Door lockfTo prevent the door lock from freezing during
the cold season, cover the lock barrel with a
suitable adhesive tape during washing.
fShould the locks freeze, use an ordinary de-ic-
er.
In many cases, a well warmed key can help.
Never use excessive force.
Page 289 of 380

Practical Tips, Minor Repairs
289
Example of InscriptionInscription on radial tireATire size
Example: P 255/55R18 109 Y
–P - The tire is designed for Passenger vehicle.
This information is not included on all tires.
–255 - Indication of tire width in mm
–55- Indication of tire height to tire width ratio
in percent
–R- Belt type code letter for radial–18 - Indication of rim diameter in inches
–109 - Load capacity coefficient
–Y - Speed code letter
B TIN (Tire Identification Number)
Example: DOT xx xx xxxx xxxx
–DOT
The DOT symbol indicates that the tires com-
ply with the requirements of the US Depart-
ment of Transportation and provides informa-
tion about:
– first two-digit code means manufacture’s iden-
tification mark.
– second two-digit code means tire size.
– third four-digit code means tire type code.
– fourth four-digit code means date of manufac-
ture.
If, for example, the last four numbers read
1204, the tire was produced in the 12th week
of 2004.
C Tire ply composition and material
The number of layers in the tread and sidewalls
and their material composition.
D Maximum permissible inflation pressure
The maximum permissible cold inflation pressure
to which a tire can be inflated.
fDo not exceed the permissible inflation pres-
sure.
E Maximum Load rating
The maximum load in kilograms and pounds can
be carried by the tire. If you replace tires always
use a tire that has the same maximum load rating
as the factory installed tire.
F Term of tubeless or tube tire
Identification for tubeless tires.
GRadial
The identification indicates if the tire has radial
structure.
Page 298 of 380

298
Practical Tips, Minor Repairs
Lifting the vehicle with a jack
Warning!
Danger of injury. The car may slip off the
jack.
fMake sure that no one is in the vehicle when
jacking up and changing a wheel.
fNever jack up the vehicle when it is parked on
a surface that slopes up, down or to the side.
fUse the jack only to raise the car for wheel
changing.
fAlways place the car on stable supports if work
has to be carried out under the car.
The car jack is not suitable for this.
Danger of injury if the level-control system
operates during the wheel change.
fSet the car to jacking mode before raising the
car.
Please observe the chapter “AIR SUSPENSION
WITH LEVEL CONTROL AND HEIGHT ADJUST-
MENT” on Page 236.
Risk of injury and damage if the vehicle is not
secured.
fSecure the vehicle against rolling.
fPlease observe the chapter “SECURING THE VEHICLE AGAINST ROLLING” on Page 295.Maintenance note
The jacking point on the vehicle must be free of
dirt.
1. Slightly loosen the wheel bolts of the wheel to
be changed.
2. Only set up the jack at the rear jacking point
designed for the purpose. The jack foot must
be in contact over its whole area and must be
positioned directly below the head piece.
Use a suitable support if necessary.
3. Hold jack still and wind it up until its head
enters the jacking point on the vehicle.
Only jack vehicle up until the wheel to be
changed is completely off the ground.
4. After lowering the vehicle, remove the jack.
Front jacking pointJacking point base
fSet up jack only at the points provided A or B.
Page 316 of 380
316
Practical Tips, Minor Repairs
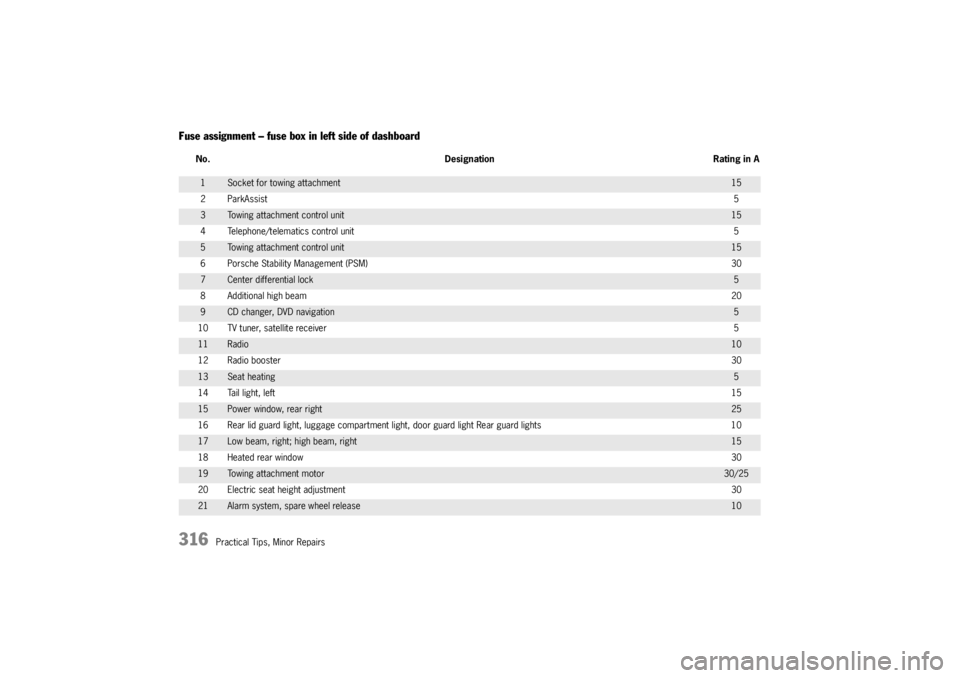
Fuse assignment – fuse box in left side of dashboard
No. Designation Rating in A1
Socket for towing attachment
15
2 ParkAssist5
3
Towing attachment control unit
15
4 Telephone/telematics control unit5
5
Towing attachment control unit
15
6 Porsche Stability Management (PSM)30
7
Center differential lock
5
8 Additional high beam20
9
CD changer, DVD navigation
5
10 TV tuner, satellite receiver5
11
Radio
10
12 Radio booster30
13
Seat heating
5
14 Tail light, left15
15
Power window, rear right
25
16 Rear lid guard light, luggage compartment light, door guard light Rear guard lights 10
17
Low beam, right; high beam, right
15
18 Heated rear window30
19
Towing attachment motor
30/25
20 Electric seat height adjustment30
21
Alarm system, spare wheel release
10
Page 349 of 380

Practical Tips, Minor Repairs
349
Height adjustment for low beam/
high beam and additional high beam1. Push down cover in the engine compartment
and remove.
2. Switch ignition on.
3. Switch on low beam and/or high beam.
4. Adjust low beam in direction of the arrow.
Changing Headlights from Left to
Right-Hand TrafficIf you travel to a corresponding country where traf-
fic uses the other side of the road, the headlights
must be partially masked with films when you
cross the border.
fYou can obtain the films and a set of instruc-
tions from an authorized Porsche dealer.
Page 365 of 380

Vehicle Identification, Technical Data
365
Dimensions1) Up to 21.9 in. (555 mm) for vehicles with air suspension at special terrain level.Cayenne S CayenneLength
188.3 in. (4782 mm)
188.3 in. (4782 mm)
Length with external spare wheel 197.6 in. (5018 mm) 197.6 in. (5018 mm)
Width
75.9 in. (1928 mm)
75.9 in. (1928 mm)
Height at DIN empty weight66.9 in. (1699 mm) 66.9 in. (1699 mm)
Height at DIN empty weight (rail)
68.5 in. (1741 mm)
68.5 in. (1741 mm)
Height at DIN empty weight (basic carrier of Roof Transport System) 70.4 in. (1789 mm) 70.4 in. (1789 mm)
Height at DIN empty weight with rear lid open
87.4 in. (2219 mm)
87.4 in. (2219 mm)
Max. wading depth 19.7 in. (500 mm)
1)
19.7 in. (500 mm)
1)
Tr a c k17" front65.2 in. (1655 mm)17" rear
65.8 in. (1670 mm)
18" front 64.8 in. (1647 mm) 64.8 in. (1647 mm)
18" rear
65.4 in. (1662 mm)
65.4 in. (1662 mm)
19" front 64.6 in. (1641 mm) 64.6 in. (1641 mm)
19" rear
65.2 in. (1656 mm)
65.2 in. (1656 mm)
20" front 64.6 in. (1641 mm) 64.6 in. (1641 mm)
20" rear
65.2 in. (1656 mm)
65.2 in. (1656 mm)
Wheelbase112.4 in. (2855 mm) 112.4 in. (2855 mm)
Overhang, front
36.4 in. (924 mm)
36.4 in. (924 mm)
rear 39.5 in. (1003 mm) 39.5 in. (1003 mm)
Tu r n i n g c i r c l e
461 in. (11.7 m)
461in. (11.7m)
Page 368 of 380
368
Index
IndexAABD ......................................... 217
,219
,221
ABS ......................................... 217
,220
,223
Off road ............................................. 224
Warning light ...................................... 223
After driving off road ................................... 228
Aftermarket Alarms ..................................... 173
Air cleaner.................................................. 254
Air conditioning
Central vents ............................. 134,140
Cover flap .......................................... 128
Disabling control panel (rear) ............... 137
Display ............................. 129
,132
,136
Footwell .................................... 134,140
Four zone ........................................... 136
Fresh-air intake ................................... 127
Mono function ..................................... 133
Rear.......................................... 137,141
REST mode ............................... 135,141
Sensors ............................................. 128
Setting air quantity ............ 130
,133
,139
Setting temperature ................... 133,138
Side vents ................................. 134,140
Two zone .................................. 129,132
Vents ................................................. 127
Windshield ................................. 134,140
Air quantity
Setting ............................. 130
,133
,139
Air suspension ................. 163
,179
,217
,236
Airbag ................................................. 49,273
Disposal ............................................... 51Function ............................................... 49
Unit ...................................................... 52
Warning light......................................... 50
Air-conditioned areas
Rear................................................... 141
Air-conditioning compressor....... 129
,135
,140
Alarm button................................................. 17
Alarm system . 21
,23,27,28,30,194
,310
Alcantara.................................................... 273
All-Season tires .................................. 358,359
All-Terrain tires ................................... 358,359
All-wheel drive ........................... 113
,217
,219
Anti-freeze content ...................................... 249
Anti-lock brake system .............. 217
,220
,223
Anti-roll bars
Disengageable .................................... 214
Armrest...................................................... 178
Ashtray
Front .................................................. 170
Rear................................................... 170
Assembly aid ..................................... 301,307
Assistance when driving downhill .................. 226
Audio
Tips ................................................... 172
AUTO button .................... 132
,133
,136
,138
AUTO-LOCK .................................................. 23
Automatic anti-dazzle operation...................... 58
Automatic brake differential ....... 217
,219
,221
Automatic circulating-air mode ............ 134,139
Automatic mode, air conditioning132
,133
,138
Automatic transmission fluid ........................ 254
BBattery ......................... 59
,62,78,174
,320
After charging ..................................... 333
Car key .............................................. 334
Care................................................... 320
Charge state....................................... 320
Charging ............................................ 333
Installing ............................................. 330
Putting vehicle into operation ...............321
Removing ........................................... 328
Removing/installing .................... 323,327
Replacing ........................................... 322
Warning light....................................... 111
Winter driving...................................... 321
Before driving off .................................12,228
Belts ............................................................ 42
Fastening ............................................. 44
Height adjustment ................................. 45
Opening ............................................... 44
Tensioner ............................................. 43
Warning light.................................. 43,48
Brake ...........................................................65
Booster ................................................ 67
Discs ................................................... 68
Pads .................................................... 68
Warning light......................................... 66
Brake fluid
Changing ............................................ 252
Brake light .................................................. 346
Brake tests................................................. 226
Brake wear