display PORSCHE CAYNNE S 2005 1.G Repair Manual
[x] Cancel search | Manufacturer: PORSCHE, Model Year: 2005, Model line: CAYENNE S, Model: PORSCHE CAYENNE S 2005 1.GPages: 380, PDF Size: 3.17 MB
Page 145 of 380

Controls, Safety, Instruments
145
Programming ON times
1. Switch ignition off.
2. Press TIMER button.
3. Select function (parking heating or parking
ventilation).
4. Select the memory using TIMER button B.
The desired memory can be selected by
pressing button B several times.
5. Set ON time using the “+” and “–” buttons A
andD.
Pressing the buttons adjusts the time on a
minute-by-minute basis. If the button is kept
depressed, the time is adjusted faster.
ON times are only valid for 24 hours.
6. Press ON/OFF button C.
Displays F and G flash for approx. 10 seconds.
ButtonC can be pressed again to switch off
the displays before this time has elapsed.
ON time I, clock symbol F and memory G are
displayed for 2 minutes after ON/OFF button C
has been pressed.
The display then goes out.
The parking heater has now been programed
and the selected memory is active (symbol G
is lit).
Note on operation
Onlyone memory can be active at any one time.Activating the memory
The parking heater runs for 30 minutes. It then
switches itself off automatically.
The program must be reactivated for every subse-
quent run.
To do this:
1. Switch ignition off.
2. Press TIMER button.
3. Select function (parking heating or parking
ventilation).
4. Select the memory using TIMER button B. The
ON time that was last saved is displayed.
5. Press ON/OFF button C.
The program is reactivated.
Displays F and G flash for approx. 10 seconds.
ButtonC can be pressed again to switch off
the displays before this time has elapsed.
ON time I, clock symbol F and memory G are
displayed for 2 minutes after ON/OFF button C
has been pressed.
The display then goes out.
The parking heater has now been programed
and the selected memory is active (symbol G
is lit).
Note on operation
Only one memory can be active at any one time.Example:
The parking heater is to activate the parking
heating function at 9:48 a.m.
To do this:
1. Switch ignition off.
2. Press TIMER button B on the front air-condi-
tioning control panel.
The symbols for the parking heating or parking
ventilation function flash on the display.
3. Press “+” button D.
This selects the parking heating function.
4. Select the memory using TIMER button B.
5. Set ON time to 9:48 a.m. using the “+” and
“–” buttons (AandD).
6. Press ON/OFF button C.
The parking heater has now been programed
and the selected memory is active.
Note on operation
If the parking heater is switched on manually prior
to program start of an active memory, this will
delete the programming.
The memory must be reactivated if it is needed.
If the memory is not reactivated, the parking
heater will not switch on.
Page 146 of 380

146
Controls, Safety, Instruments
Parking heater faultsIn the event of faults in the parking heater, no
function symbol appears on the display – only the
remaining running time is shown. The display
flashes on briefly and then goes completely dark.
fHave the parking heater checked at an
authorized Porsche dealer.
In the event of a serious accident, the parking
heater switches off automatically for safety
reasons.
The parking heater is not ready for operation.
fPlease consult an authorized Porsche dealer.
If the temperature rises, the overheating protec-
tion switches the parking heater off automatically.
The parking heater is not ready for operation.
fPlease consult an authorized Porsche dealer.
The parking heater is switched off automatically if
the voltage is too low. The parking heater is
temporarily unavailable.
Page 151 of 380
Controls, Safety, Instruments
151
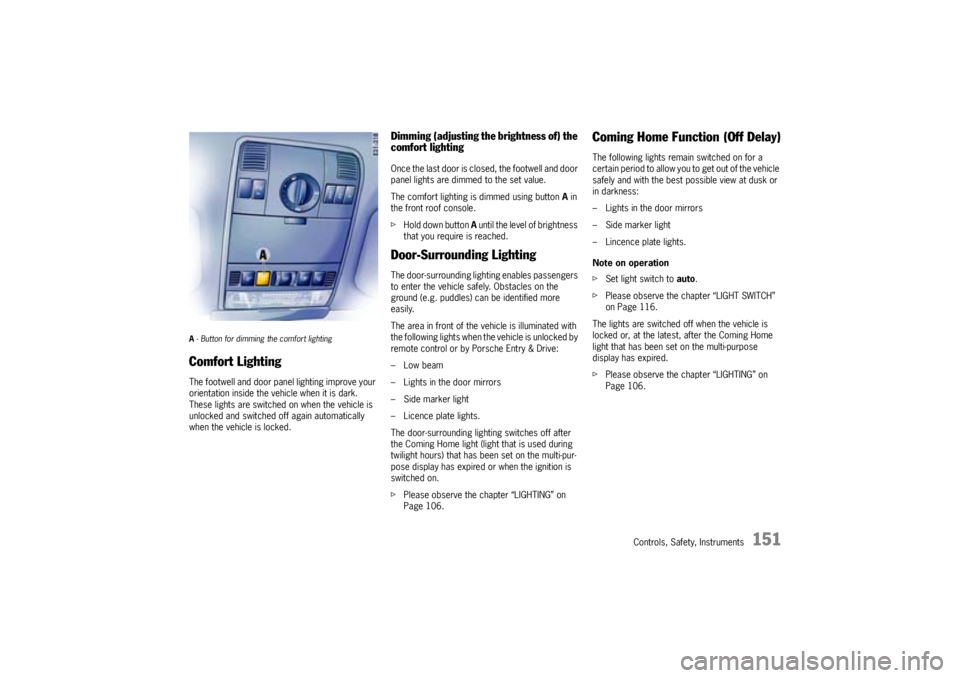
A- Button for dimming the comfort lighting Comfort LightingThe footwell and door panel lighting improve your
orientation inside the vehicle when it is dark.
These lights are switched on when the vehicle is
unlocked and switched off again automatically
when the vehicle is locked.
Dimming (adjusting the brightness of) the
comfort lightingOnce the last door is closed, the footwell and door
panel lights are dimmed to the set value.
The comfort lighting is dimmed using button A in
the front roof console.
fHold down button A until the level of brightness
that you require is reached.Door-Surrounding LightingThe door-surrounding lighting enables passengers
to enter the vehicle safely. Obstacles on the
ground (e.g. puddles) can be identified more
easily.
The area in front of the vehicle is illuminated with
the following lights when the vehicle is unlocked by
remote control or by Porsche Entry & Drive:
– Low beam
– Lights in the door mirrors
– Side marker light
– Licence plate lights.
The door-surrounding lighting switches off after
the Coming Home light (light that is used during
twilight hours) that has been set on the multi-pur-
pose display has expired or when the ignition is
switched on.
fPlease observe the chapter “LIGHTING” on
Page 106.
Coming Home Function (Off Delay)The following lights remain switched on for a
certain period to allow you to get out of the vehicle
safely and with the best possible view at dusk or
in darkness:
– Lights in the door mirrors
– Side marker light
– Lincence plate lights.
Note on operation
fSet light switch to auto.
fPlease observe the chapter “LIGHT SWITCH”
on Page 116.
The lights are switched off when the vehicle is
locked or, at the latest, after the Coming Home
light that has been set on the multi-purpose
display has expired.
fPlease observe the chapter “LIGHTING” on
Page 106.
Page 164 of 380
164
Controls, Safety, Instruments
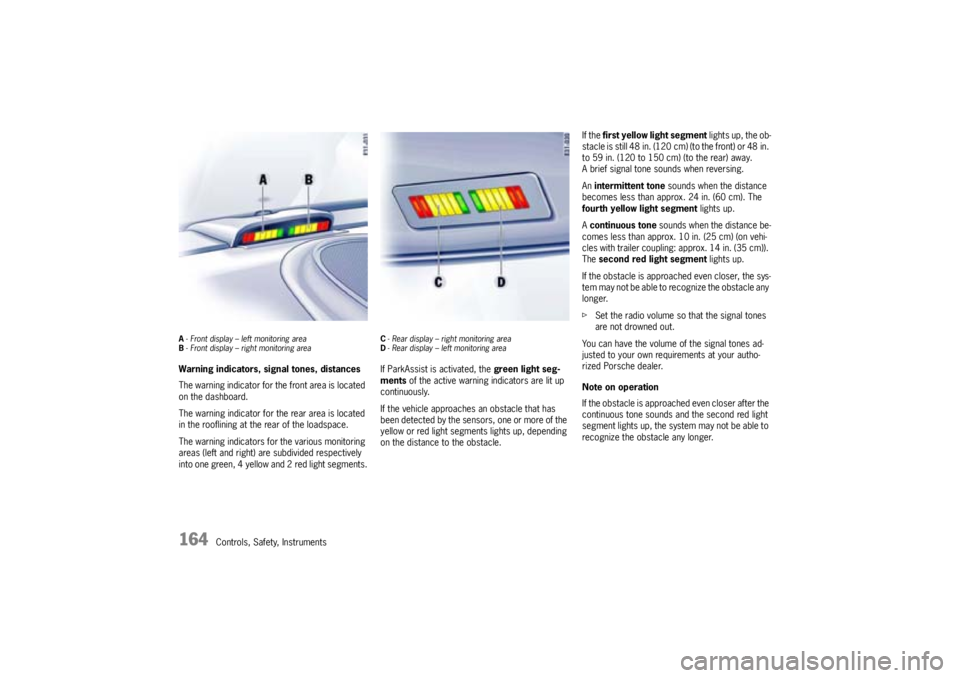
A- Front display – left monitoring area
B- Front display – right monitoring areaWarning indicators, signal tones, distances
The warning indicator for the front area is located
on the dashboard.
The warning indicator for the rear area is located
in the rooflining at the rear of the loadspace.
The warning indicators for the various monitoring
areas (left and right) are subdivided respectively
into one green, 4 yellow and 2 red light segments.
C- Rear display – right monitoring area
D- Rear display – left monitoring areaIf ParkAssist is activated, the green light seg-
ments of the active warning indicators are lit up
continuously.
If the vehicle approaches an obstacle that has
been detected by the sensors, one or more of the
yellow or red light segments lights up, depending
on the distance to the obstacle.If the first yellow light segment lights up, the ob-
stacle is still 48 in. (120 cm) (to the front) or 48 in.
to 59 in. (120 to 150 cm) (to the rear) away.
A brief signal tone sounds when reversing.
Anintermittent tone sounds when the distance
becomes less than approx. 24 in. (60 cm). The
fourth yellow light segment lights up.
Acontinuous tone sounds when the distance be-
comes less than approx. 10 in. (25 cm) (on vehi-
cles with trailer coupling: approx. 14 in. (35 cm)).
Thesecond red light segment lights up.
If the obstacle is approached even closer, the sys-
tem may not be able to recognize the obstacle any
longer.
fSet the radio volume so that the signal tones
are not drowned out.
You can have the volume of the signal tones ad-
justed to your own requirements at your autho-
rized Porsche dealer.
Note on operation
If the obstacle is approached even closer after the
continuous tone sounds and the second red light
segment lights up, the system may not be able to
recognize the obstacle any longer.
Page 185 of 380
Controls, Safety, Instruments
185
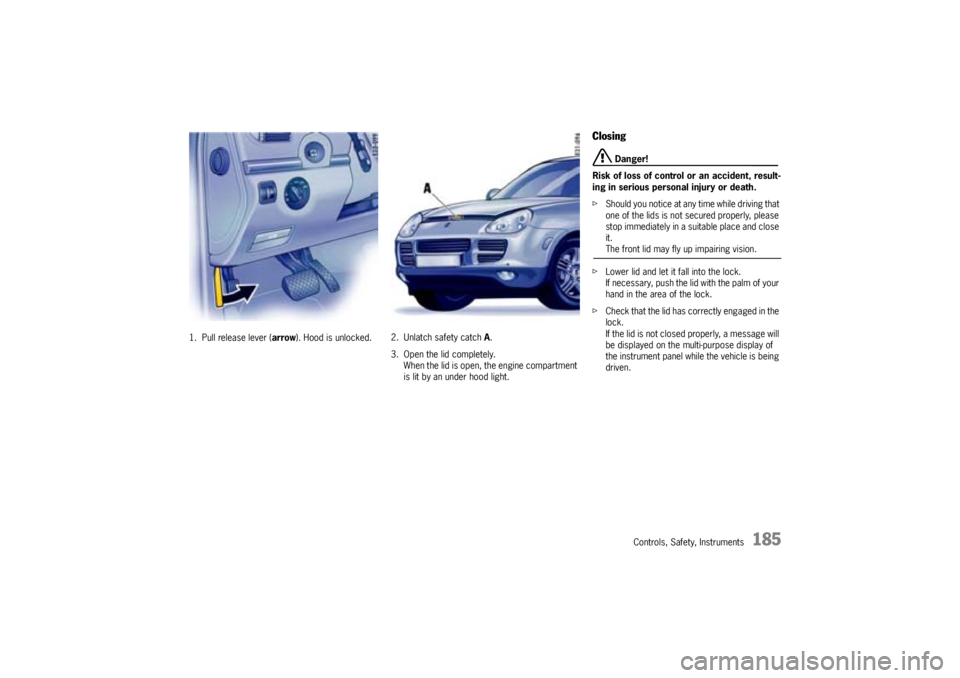
1. Pull release lever (arrow). Hood is unlocked.2. Unlatch safety catch A.
3. Open the lid completely.
When the lid is open, the engine compartment
is lit by an under hood light.
Closing
Danger!
Risk of loss of control or an accident, result-
ing in serious personal injury or death.
fShould you notice at any time while driving that
one of the lids is not secured properly, please
stop immediately in a suitable place and close
it.The front lid may fly up impairing vision.
fLower lid and let it fall into the lock.
If necessary, push the lid with the palm of your
hand in the area of the lock.
fCheck that the lid has correctly engaged in the
lock.
If the lid is not closed properly, a message will
be displayed on the multi-purpose display of
the instrument panel while the vehicle is being
driven.
Page 204 of 380

204
Shifting Gear, Traction Systems
DisplayIndicator for selector lever position and
engaged gearWhen the engine is running, the selector lever po-
sition and engaged gear are indicated.If there is a fault in the transmission:
–An X appears instead of the current gear indi-
cation on the multi-purpose display of the in-
strument panel.
The transmission no longer shifts.
fTo remedy the fault, immediately consult an au-
thorized Porsche dealer.
Selector Lever PositionsP – Parking lockIn selector lever position P, the driven wheels are
mechanically locked.
fEngage parking lock only when vehicle is
stationary.
fEngage parking lock after applying the park-
ing brake and release it before releasing the
parking brake.
fAlways apply the parking brake before leaving
the vehicle.
The ignition key can be withdrawn only in selector
lever position P.R – ReversefSelect reverse only if car is stationary and the
brake is applied.N – NeutralSelector lever position N must be selected for
towing or in car washes, for example.
fSelect the desired position for moving off
(D, M or R) only when the engine is idling and
when depressing the brake pedal.
Page 207 of 380
Shifting Gear, Traction Systems
207
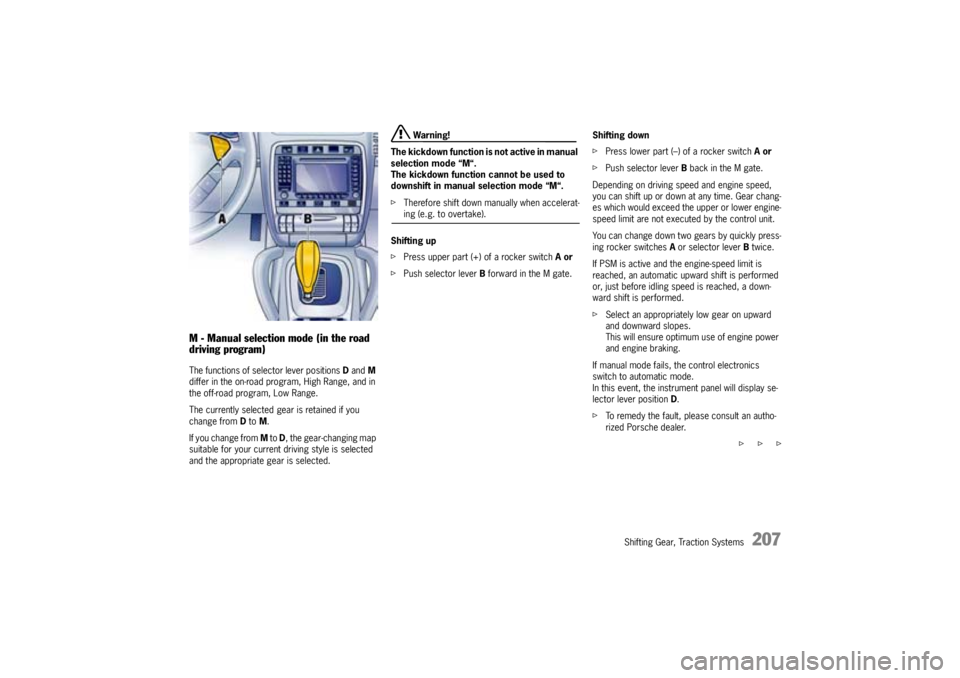
M - Manual selection mode (in the road
driving program)The functions of selector lever positions Dand M
differ in the on-road program, High Range, and in
the off-road program, Low Range.
The currently selected gear is retained if you
change from D to M.
If you change from M to D, the gear-changing map
suitable for your current driving style is selected
and the appropriate gear is selected.
Warning!
The kickdown function is not active in manual
selection mode “M“.
The kickdown function cannot be used to
downshift in manual selection mode “M“.
fTherefore shift down manually when accelerat-ing (e.g. to overtake).
Shifting up
fPress upper part (+) of a rocker switch Aor
fPush selector lever B forward in the M gate.Shifting down
fPress lower part (–) of a rocker switch Aor
fPush selector lever B back in the M gate.
Depending on driving speed and engine speed,
you can shift up or down at any time. Gear chang-
es which would exceed the upper or lower engine-
speed limit are not executed by the control unit.
You can change down two gears by quickly press-
ing rocker switches A or selector lever B twice.
If PSM is active and the engine-speed limit is
reached, an automatic upward shift is performed
or, just before idling speed is reached, a down-
ward shift is performed.
fSelect an appropriately low gear on upward
and downward slopes.
This will ensure optimum use of engine power
and engine braking.
If manual mode fails, the control electronics
switch to automatic mode.
In this event, the instrument panel will display se-
lector lever position D.
fTo remedy the fault, please consult an autho-
rized Porsche dealer.
f f f
Page 208 of 380

208
Shifting Gear, Traction Systems
M - Manual selection mode (in the off-
road driving program)The functions of selector lever positions Dand M
differ in the on-road program, High Range, and in
the off-road program, Low Range.
The currently selected gear is retained if you
change from D to M.
If you change from M to D, the gear-changing map
suitable for your current driving style is selected
and the appropriate gear is selected.
Warning!
The kickdown function is not active in manual
selection mode “M“.
The kickdown function cannot be used to
downshift in manual selection mode “M“.
fTherefore shift down manually when accelerat-ing (e.g. to overtake).
Tip on driving
The kickdown function is not active in selector le-
ver position M.
Unlike in the road driving program, an automatic
upshift is not performed when the engine-speed
limit is reached.
Shifting up
fPress upper part (+) of a rocker switch Aor
fPush selector lever B forward in the M gate.Shifting down
fPress lower part (–) of a rocker switch Aor
fPush selector lever B back in the M gate.
Depending on driving speed and engine speed,
you can shift up or down at any time. Gear chang-
es which would exceed the upper or lower engine-
speed limit are not executed by the control unit.
You can change down two gears by quickly press-
ing rocker switches A or selector lever B twice.
The gear is changed down automatically just be-
fore idle speed is reached.
fSelect an appropriately low gear on upward
and downward slopes.
This will ensure optimum use of engine power
and engine braking.
If manual mode fails, the control electronics
switch to automatic mode. In this event, the instru-
ment panel will display selector lever position D.
fTo remedy the fault, please consult an autho-
rized Porsche dealer.
Page 209 of 380

Shifting Gear, Traction Systems
209
StoppingfFor a brief stop (e.g. at a traffic light), leave the
selector lever in drive position and hold the ve-
hicle with the brake pedal.
fDo not hold the car on a slope using the accel-
erator. Use the brake pedal or the parking
brake instead.
fBefore leaving the vehicle, always apply the
handbrake and move the selector lever to
positionP.
Tip on driving
In selector lever positions D and M, the Hillholder
prevents the car from rolling backward when it has
been stopped on an upward slope with the engine
running.
fPlease observe the chapter “HILLHOLDER” on
Page 224.
ParkingfGo easy on the accelerator.
fWhen parking or maneuvring in a small space,
control the speed by careful use of the foot-
brake.Driving in winterIn wintry road conditions it is advisable to take
steep inclines in manual mode M. This prevents
the occurrence of gear changes that could cause
wheelspin.
Reduced driving programIf there is a fault in the transmission:
–An X appears instead of the current gear
indicator on the multi-purpose display of the in-
strument panel.
The transmission no longer shifts.
fTo remedy the fault, immediately consult an au-
thorized Porsche dealer.
Warning!
Reverse gear lock monitoring is disabled in
the emergency running program.
Damage to the vehicle may result as well as
loss of control, if the vehicle is moving for-
ward fast enough to cause rear wheel lockup.
fDo not shift into R while the vehicle is moving forward.
Tip on driving
3rd or 5th gear in selector position D and reverse
gearR are now available and will allow you to
reach the nearest authorized Porsche dealer.
fPlease go to your authorized Porsche dealer
as soon as possible.
Page 212 of 380
212
Shifting Gear, Traction Systems If the Low Range indicator light beside the rocker
switch flashes when you attempt to operate rock-
er switch, the conditions for a shift have not been
met:
Vehicles with manual transmission
– Vehicle is not stationary.
– Brake is not pressed.
– Gear-shift lever is not in neutral.
Vehicles with Tiptronic S
– Vehicle has exceeded or gone below the limit
speed.
– Selector lever is not in position N.
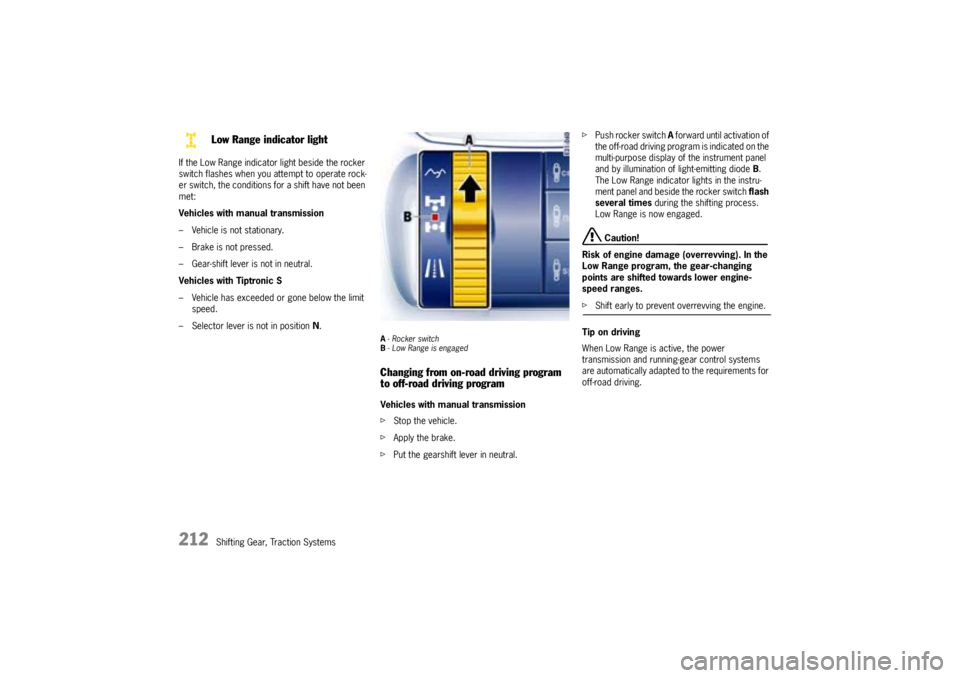
A-Rocker switch
B- Low Range is engagedChanging from on-road driving program
to off-road driving programVehicles with manual transmission
fStop the vehicle.
fApply the brake.
fPut the gearshift lever in neutral.fPush rocker switch A forward until activation of
the off-road driving program is indicated on the
multi-purpose display of the instrument panel
and by illumination of light-emitting diodeB.
The Low Range indicator lights in the instru-
ment panel and beside the rocker switch flash
several times during the shifting process.
Low Range is now engaged.
Caution!
Risk of engine damage (overrevving). In the
Low Range program, the gear-changing
points are shifted towards lower engine-
speed ranges.
fShift early to prevent overrevving the engine.
Tip on driving
When Low Range is active, the power
transmission and running-gear control systems
are automatically adapted to the requirements for
off-road driving.
Low Range indicator light