charging PORSCHE CAYNNE S 2005 1.G Owners Manual
[x] Cancel search | Manufacturer: PORSCHE, Model Year: 2005, Model line: CAYENNE S, Model: PORSCHE CAYENNE S 2005 1.GPages: 380, PDF Size: 3.17 MB
Page 78 of 380

78
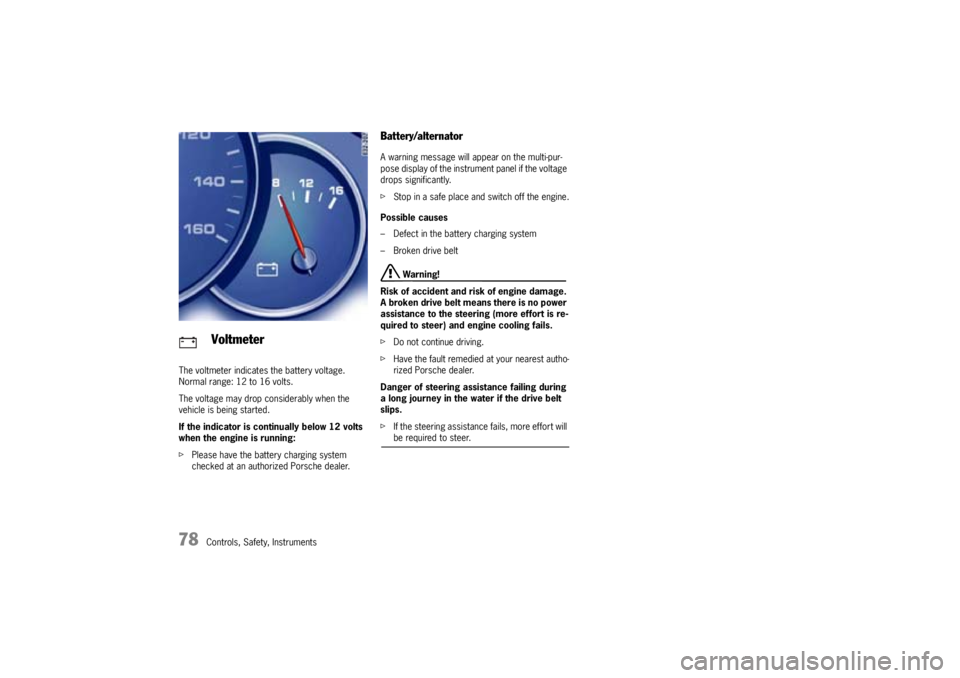
Controls, Safety, Instruments The voltmeter indicates the battery voltage.
Normal range: 12 to 16 volts.
The voltage may drop considerably when the
vehicle is being started.
If the indicator is continually below 12 volts
when the engine is running:
fPlease have the battery charging system
checked at an authorized Porsche dealer.
Battery/alternatorA warning message will appear on the multi-pur-
pose display of the instrument panel if the voltage
drops significantly.
fStop in a safe place and switch off the engine.
Possible causes
– Defect in the battery charging system
– Broken drive belt
Warning!
Risk of accident and risk of engine damage.
A broken drive belt means there is no power
assistance to the steering (more effort is re-
quired to steer) and engine cooling fails.
fDo not continue driving.
fHave the fault remedied at your nearest autho-
rized Porsche dealer.
Danger of steering assistance failing during
a long journey in the water if the drive belt
slips.
fIf the steering assistance fails, more effort will be required to steer.
Voltmeter
Page 113 of 380

Controls, Safety, Instruments
113
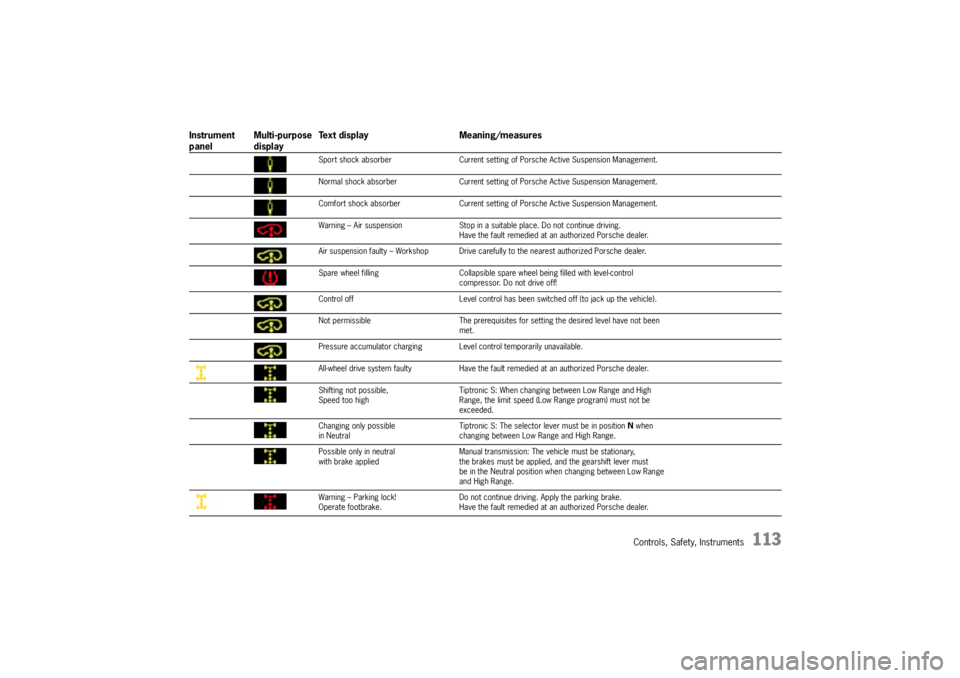
Sport shock absorber Current setting of Porsche Active Suspension Management.
Normal shock absorber Current setting of Porsche Active Suspension Management.
Comfort shock absorber Current setting of Porsche Active Suspension Management.
Warning – Air suspension Stop in a suitable place. Do not continue driving.
Have the fault remedied at an authorized Porsche dealer.
Air suspension faulty – Workshop Drive carefully to the nearest authorized Porsche dealer.
Spare wheel filling Collapsible spare wheel being filled with level-control
compressor. Do not drive off!
Control off Level control has been switched off (to jack up the vehicle).
Not permissible The prerequisites for setting the desired level have not been
met.
Pressure accumulator charging Level control temporarily unavailable.
All-wheel drive system faulty Have the fault remedied at an authorized Porsche dealer.
Shifting not possible,
Speed too highTiptronic S: When changing between Low Range and High
Range, the limit speed (Low Range program) must not be
exceeded.
Changing only possible
in NeutralTiptronic S: The selector lever must be in position Nwhen
changing between Low Range and High Range.
Possible only in neutral
with brake appliedManual transmission: The vehicle must be stationary,
the brakes must be applied, and the gearshift lever must
be in the Neutral position when changing between Low Range
and High Range.
Warning – Parking lock!
Operate footbrake.Do not continue driving. Apply the parking brake.
Have the fault remedied at an authorized Porsche dealer.
Instrument
panelMulti-purpose
displayText display Meaning/measures
Page 321 of 380

Practical Tips, Minor Repairs
321
Winter operationDuring the winter months, battery capacity tends
to decrease as temperatures drop. Additionally,
more power is consumed while starting, and the
headlights, heater, rear window defogger, etc.,
are used more frequently.
Let your Porsche dealer test the battery's capaci-
ty before winter sets in.Vehicle storageIf the car stands for long periods in the garage or
workshop, the doors and lids should be closed.
fRemove the ignition key and, if necessary, dis-
connect the battery.
Notes on operation
fWhen the battery is disconnected, the alarm
system ceases to function.
If the vehicle was locked before the battery
was disconnected, the alarm will be triggered
when the battery is reconnected.
To deactivate the alarm system:
fLock the vehicle and unlock it again.Maintenance note
Even if you put your vehicle out of operation, the
battery still discharges.
The battery will discharge more quickly if your ve-
hicle is not driven on a daily basis over a distance
of several miles. The more often you drive your ve-
hicle, and the longer the distance driven on each
trip, the more opportunity the vehicle‘s charging
system will have to recharge the batteries.
fTo preserve its efficiency, charge the battery
about every 6 weeks.
fCheck the battery acid level and top off with
distilled water if necessary.
fStore a battery that has been removed in a
dark, cool place, but not subject to freezing.
Putting vehicle into operationAfter the battery is connected or charged, the
PSM warning light lights up on the instrument pan-
el and a message appears on the multi-purpose
display of the instrument panel to indicate a fault.
This fault can be remedied with a few simple
steps:
1. Start the engine.
To do this, turn the ignition key or the control
unit (on vehicles that have Porsche Entry &
Drive) to ignition lock position 2 twice.2. Perform a few steering movements and drive
a short distance in a straight line until the PSM
warning light goes out and the message is
erased from the memory of the multi-purpose
display of the instrument panel.
3. If the warnings does not go out, then:
Drive carefully to the nearest authorized
Porsche dealer.
Have the fault remedied by an authorized
Porsche dealer.
4. After the warnings disappear:
Stop the vehicle in a suitable place.
5. Perform adaptation of the power windows:
Please observe the chapter “STORING FINAL
POSITION OF THE DOOR WINDOWS” on
Page 31.
6. On vehicles with tire pressure monitoring sys-
tem:
Please observe the chapter “SYSTEM LEAR-
NING PHASE” on Page 89.
f f f
Page 322 of 380

322
Practical Tips, Minor Repairs
Replacing the batteryThe service life of the battery is subject to normal
wear; it depends greatly on care, climatic condi-
tions, and driving conditions (distances, loads).
fOnly use an original Porsche battery, with the
correct part number, as a replacement. Only
this battery meets the specific requirements of
the vehicle.
fPlease observe the disposal instructions for
batteries.
Battery chargingAutomotive batteries loose their efficiency when
not in use. The charge available in your battery can
be measured with a battery hydrometer. We rec-
ommend that the battery voltage be tested by
your Porsche dealer who has the appropriate
equipment.
If the car is not driven for prolonged periods, the
battery must be charged at least every 6 weeks.
A discharged battery allows rapid formation of sul-
fates, leading to premature deterioration of the
plates.
Danger!
Hydrogen gas generated by the battery
could cause an explosion, resulting in severe
personal injuries.
fCharge battery in a well ventilated area.
fNever charge a frozen battery. It may explode
because of gas trapped in the ice. Allow a fro-
zen battery to thaw out first.
fIf you get electrolyte, which is an acid, in your
eyes or on your skin, immediately rinse with
cold water for several minutes and call a doc-tor.
Note
Your authorized Porsche dealer will be pleased to
advise you about a suitable charger.Slow battery charging
1. Pay attention to all warnings and follow instruc-
tions that come with your battery charger.
2. When charging, ensure adequate ventilation.
3. Remove battery.
Please observe the chapter “REMOVING AND
INSTALLING BATTERY” on Page 323.
4. All vent caps should be open.The fluid level
should meet the indicator mark in each cell.
5. Ensure that charger is switched off – danger of
short circuit!
6. Connect charger cables.Charger cables must
be connected POSITIVE (+) to POSITIVE (+)
and NEGATIVE (–) to NEGATIVE (–).
7. Switch on charger. Normally, a battery should
be charged at no more than 10 percent of its
rated capacity. Rated capacity of the battery in
your vehicle is listed on the battery housing.
8. After charging, turn off charger and disconnect
charger cables.
9. Tighten the vent caps and reinstall battery.
Please observe the chapter “REMOVING AND
INSTALLING BATTERY” on Page 323.
Page 333 of 380

Practical Tips, Minor Repairs
333
Charging the batteryYour authorized Porsche dealer will be pleased to
advise you about a suitable charger.
1. Always observe the instructions of the charger
manufacturer.
2. When charging the battery, ensure adequate
ventilation.
3. Check the acid level of a low-maintenance bat-
tery.
4. Connect charger to the jump starting points.
Only plug into the mains and switch the charg-
er on when it has been correctly connected up.
5. After charging, disconnect the charger.
6. Check the acid level of a low-maintenance bat-
tery.
After charging the battery After the battery is connected or the completely
discharged battery is charged, the PSM warning
light lights up on the instrument panel and a mes-
sage appears on the multi-purpose display of the
instrument panel to indicate a fault.
This fault can be remedied with a few simple
steps:
1. Start the engine.
To do this, turn the ignition key or the control
unit (on vehicles that have Porsche Entry &
Drive) to ignition lock position 2 twice.
2. Perform a few steering movements to the left
and to the right when vehicle is standing and
drive a short distance in a straight line until the
PSM warning light goes out and the message
is erased from the memory of the multi-pur-
pose display of the instrument panel.
3. If the warnings does not go out, then:
Drive carefully to the nearest authorized
Porsche dealer.
Have the fault remedied by an authorized
Porsche dealer.4. After the warnings disappear:
Stop the vehicle in a suitable place.
5. Perform adaptation of the power windows:
Please observe the chapter “STORING FINAL
POSITION OF THE DOOR WINDOWS” on
Page 31.
6. On vehicles with tire pressure monitoring sys-
tem:
Please observe the chapter “SYSTEM LEAR-
NING PHASE” on Page 89.
Page 368 of 380

368
Index
IndexAABD ......................................... 217
,219
,221
ABS ......................................... 217
,220
,223
Off road ............................................. 224
Warning light ...................................... 223
After driving off road ................................... 228
Aftermarket Alarms ..................................... 173
Air cleaner.................................................. 254
Air conditioning
Central vents ............................. 134,140
Cover flap .......................................... 128
Disabling control panel (rear) ............... 137
Display ............................. 129
,132
,136
Footwell .................................... 134,140
Four zone ........................................... 136
Fresh-air intake ................................... 127
Mono function ..................................... 133
Rear.......................................... 137,141
REST mode ............................... 135,141
Sensors ............................................. 128
Setting air quantity ............ 130
,133
,139
Setting temperature ................... 133,138
Side vents ................................. 134,140
Two zone .................................. 129,132
Vents ................................................. 127
Windshield ................................. 134,140
Air quantity
Setting ............................. 130
,133
,139
Air suspension ................. 163
,179
,217
,236
Airbag ................................................. 49,273
Disposal ............................................... 51Function ............................................... 49
Unit ...................................................... 52
Warning light......................................... 50
Air-conditioned areas
Rear................................................... 141
Air-conditioning compressor....... 129
,135
,140
Alarm button................................................. 17
Alarm system . 21
,23,27,28,30,194
,310
Alcantara.................................................... 273
All-Season tires .................................. 358,359
All-Terrain tires ................................... 358,359
All-wheel drive ........................... 113
,217
,219
Anti-freeze content ...................................... 249
Anti-lock brake system .............. 217
,220
,223
Anti-roll bars
Disengageable .................................... 214
Armrest...................................................... 178
Ashtray
Front .................................................. 170
Rear................................................... 170
Assembly aid ..................................... 301,307
Assistance when driving downhill .................. 226
Audio
Tips ................................................... 172
AUTO button .................... 132
,133
,136
,138
AUTO-LOCK .................................................. 23
Automatic anti-dazzle operation...................... 58
Automatic brake differential ....... 217
,219
,221
Automatic circulating-air mode ............ 134,139
Automatic mode, air conditioning132
,133
,138
Automatic transmission fluid ........................ 254
BBattery ......................... 59
,62,78,174
,320
After charging ..................................... 333
Car key .............................................. 334
Care................................................... 320
Charge state....................................... 320
Charging ............................................ 333
Installing ............................................. 330
Putting vehicle into operation ...............321
Removing ........................................... 328
Removing/installing .................... 323,327
Replacing ........................................... 322
Warning light....................................... 111
Winter driving...................................... 321
Before driving off .................................12,228
Belts ............................................................ 42
Fastening ............................................. 44
Height adjustment ................................. 45
Opening ............................................... 44
Tensioner ............................................. 43
Warning light.................................. 43,48
Brake ...........................................................65
Booster ................................................ 67
Discs ................................................... 68
Pads .................................................... 68
Warning light......................................... 66
Brake fluid
Changing ............................................ 252
Brake light .................................................. 346
Brake tests................................................. 226
Brake wear