display PORSCHE CAYNNE S 2006 1.G Owners Manual
[x] Cancel search | Manufacturer: PORSCHE, Model Year: 2006, Model line: CAYENNE S, Model: PORSCHE CAYENNE S 2006 1.GPages: 420, PDF Size: 3.81 MB
Page 268 of 420

268
Maintenance, Car Care Checking the coolant level when a warning
messages is shown on the multi-purpose
display of the instrument panel
Warning!
Danger of serious personal injury from scald-
ing. Coolant is hazardous to your health, and
may be fatal if swallowed.
fDo not open the cap of the expansion tank
while the engine is hot.
fAllow the engine to cool down before opening
the cap and protect your hands, arms and face
from any possible escape of hot coolant.
fKeep coolant out of children's reach.
fAlso, keep coolant away from your pets.They
can be attracted to it should there be a spill, or
to used coolant left in an open container. Cool-ant can be deadly to pets if consumed.1. Remove cover.
2. If the engine is hot, cover the the expansion
tank cap with a cloth.
Open cap carefully and allow any overpressure
to escape.
Then unscrew cap completely.
3. Read the coolant level.
Top up with coolant if necessary.
Only add a mixture of anti-freeze and water in
equal parts.
Antifreeze in coolant:
50% provides anti-freeze protection down to
-31°F (-35°C).
Do not exceed the max-mark.
Note on operation
fIf the coolant level exceeds the max-mark
when the engine is hot, check the coolant level
again when the engine is cold.
4. Screw the cap closed firmly and put on the
cover.
5. Have the cooling system checked by an author-
ized Porsche dealer.Maintenance note
If in an emergency pure water has been added, the
mixture ratio must be corrected at an authorized
Porsche dealer.
Marked loss of coolant indicates leakage in the
cooling system.
The cause should be remedied at an authoized
Porsche dealer immediately.
Page 270 of 420

270
Maintenance, Car Care
Changing the brake fluidBrake fluid absorbs moisture from the air over
time. This accumulation of water lowers the boil-
ing point and, under certain operating conditions,
can affect the braking action.
fTherefore, have the brake fluid changed in ac-
cordance with the change intervals stated in
the booklet “Guarantee and Maintenance”.
The warning light in the instrument panel and the
warning message on the multi-purpose display of
the instrument panel indicate
– indicate the brake level fluid is too low or,
– in conjunction with large pedal travel could in-
dicate a braking-circuit failure.
Note on operation
If the warning lights should light up while driving:
fStop immediately in a suitable place.
fDo not continue driving.
Please have the fault remedied at your nearest
authorized Porsche dealer.
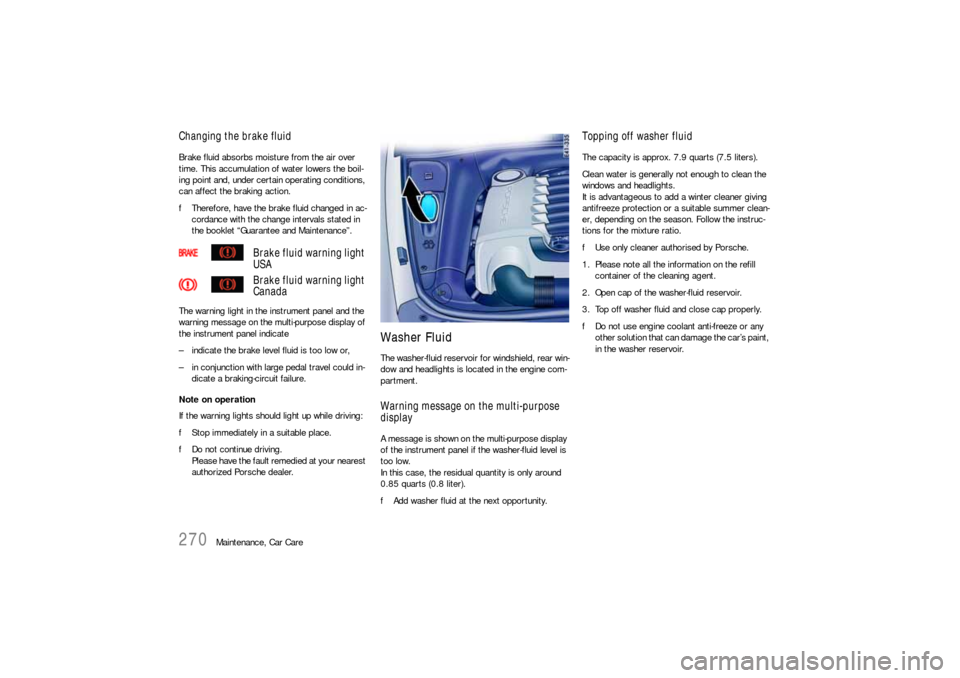
Washer FluidThe washer-fluid reservoir for windshield, rear win-
dow and headlights is located in the engine com-
partment.Warning message on the multi-purpose
displayA message is shown on the multi-purpose display
of the instrument panel if the washer-fluid level is
too low.
In this case, the residual quantity is only around
0.85 quarts (0.8 liter).
fAdd washer fluid at the next opportunity.
Topping off washer fluidThe capacity is approx. 7.9 quarts (7.5 liters).
Clean water is generally not enough to clean the
windows and headlights.
It is advantageous to add a winter cleaner giving
antifreeze protection or a suitable summer clean-
er, depending on the season. Follow the instruc-
tions for the mixture ratio.
fUse only cleaner authorised by Porsche.
1. Please note all the information on the refill
container of the cleaning agent.
2. Open cap of the washer-fluid reservoir.
3. Top off washer fluid and close cap properly.
fDo not use engine coolant anti-freeze or any
other solution that can damage the car’s paint,
in the washer reservoir.
Brake fluid warning light
USA
Brake fluid warning light
Canada
Page 280 of 420

280
Maintenance, Car Care
Fuel RecommendationsYour Porsche is equipped with catalytic convert-
ers and must use UNLEADED FUEL ONLY.
Your engine is designed to provide optimum per-
formance and fuel economy using unleaded premi-
um fuel with an octane rating of 98 RON
(93 CLC or AKI). Porsche therefore recom-
mends the use of these fuels in your vehicle.
Porsche also recognizes that these fuels may not
always be available. Be assured that your vehicle
will operate properly on unleaded premium fuels
with octane numbers of at least 95 RON
(90 CLC or AKI), since the engine's “Electronic
Oktane™ knock control“ will adapt the ignition tim-
ing, if necessary.
T h e u s e o f U N L E A D E D F U E L O N LY i s c r i t i c a l l y
important to the life of the catalytic convert-
ers. Deposits from leaded fuels will ruin the
converters and make it ineffective as an
emission control device.
Cars with catalytic converters have a smaller fuel
tank opening, and gas station pumps have smaller
nozzles. This will prevent accidental pumping of
leaded fuel into cars with catalytic converters.
Unleaded fuels may not be available outside the
continental U.S. and Canada. Therefore, we rec-
ommend you do not take your car to areas or
countries where unleaded fuel may not be availa-
ble.
Octane ratingsOctane rating indicates a fuel's ability to resist det-
onation. Therefore, buying the correct octane gas
is important to prevent engine “damage“.
The RON octane rating is based on the research
method. The CLC (U.S. Cost of Living Council oc-
tane rating) or AKI (antiknock index) octane rating
usually displayed on U.S. fuel pumps is calculated
as research octane number plus motor octane
number, divided by 2, that is written as:
The CLC or AKI octane rating is usually lower than
the RON rating:
For example: 95 RON equals 90 CLC or “AKI“
Fuels containing alcohol and etherSome areas of the U.S. require oxygenated fuels
during certain portions of the year. Oxygenated fu-
els are fuels which contain alcohols (such as meth-
anol or ethanol) or ether (such as MTBE).
Under normal conditions, the amount of these
compounds in the fuel will not affect driveability.
You may use oxygenated fuels in your Porsche,
provided the octane requirements for your vehicle
are met. We recommend, however, to change to a
different fuel or station if any of the following prob-
lems occur with your vehicle:
– Deterioration of driveability and performance.
– Substantially reduced fuel economy.
– Vapor lock and non-start problems, especially
at high altitude or at high temperature.
– Engine malfunction or stalling.
RON MON+
2 ---------------------------------- o rRM+
2 ---------------
Page 332 of 420

332
Practical Tips, Minor Repairs
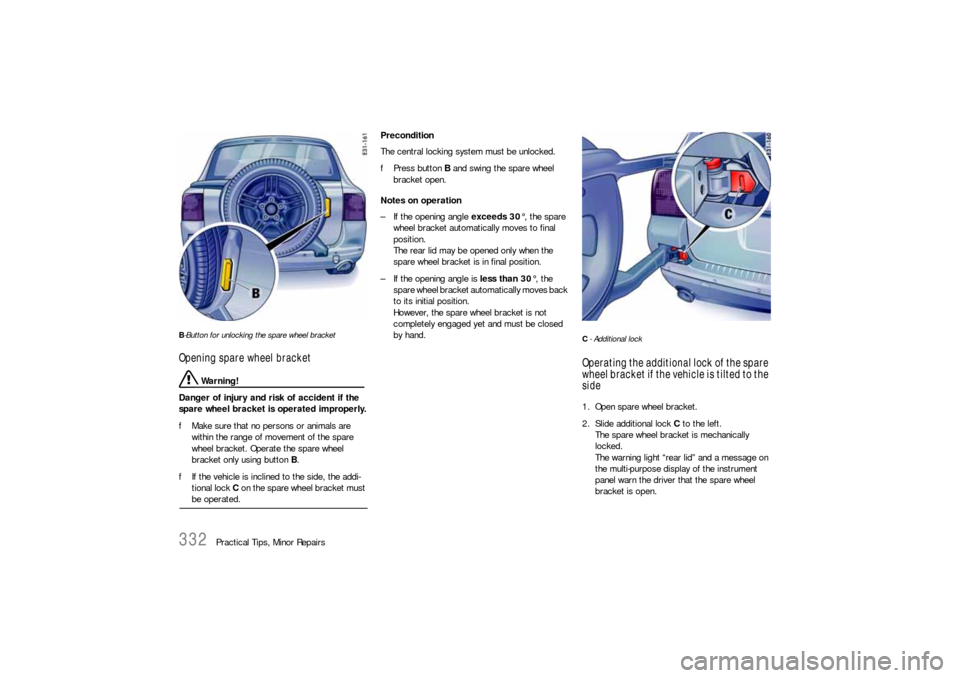
B-Button for unlocking the spare wheel bracketOpening spare wheel bracket
Warning!
Danger of injury and risk of accident if the
spare wheel bracket is operated improperly.
fMake sure that no persons or animals are
within the range of movement of the spare
wheel bracket. Operate the spare wheel
bracket only using button B.
fIf the vehicle is inclined to the side, the addi-
tional lock C on the spare wheel bracket must be operated.Precondition
The central locking system must be unlocked.
fPress button B and swing the spare wheel
bracket open.
Notes on operation
– If the opening angle exceeds 30°, the spare
wheel bracket automatically moves to final
position.
The rear lid may be opened only when the
spare wheel bracket is in final position.
– If the opening angle is less than 30°, the
spare wheel bracket automatically moves back
to its initial position.
However, the spare wheel bracket is not
completely engaged yet and must be closed
by hand.
C- Additional lock Operating the additional lock of the spare
wheel bracket if the vehicle is tilted to the
side1. Open spare wheel bracket.
2. Slide additional lock C to the left.
The spare wheel bracket is mechanically
locked.
The warning light “rear lid” and a message on
the multi-purpose display of the instrument
panel warn the driver that the spare wheel
bracket is open.
Page 333 of 420

Practical Tips, Minor Repairs
333
Closing spare wheel bracket
Warning!
Danger of injury and risk of accident if the
spare wheel bracket is operated improperly.
fOperate the spare wheel bracket only using
button B.
fIf the vehicle is tilted to the side, more effort
will be required to swing the spare wheel
bracket.
fMake sure that no persons or animals are
within the range of movement of the spare wheel bracket.
1. Check whether additional lock C is engaged. If
necessary, slide additional lock C to the right.
2. Swing spare wheel bracket closed with force.
3. Check lock and observe indication on the multi-
purpose display of the instrument panel.
The indicator light must go out when the spare
wheel bracket is locked.
Automatic locking
In the multi-purpose display of the instrument
panel, you can set different variants of locking and
unlocking the doors and the rear lid as well as the
check-back signal when locking and unlocking the
vehicle and save them on the respective remote
control.
fPlease observe the chapter “TAILGATE” on
Page 119.
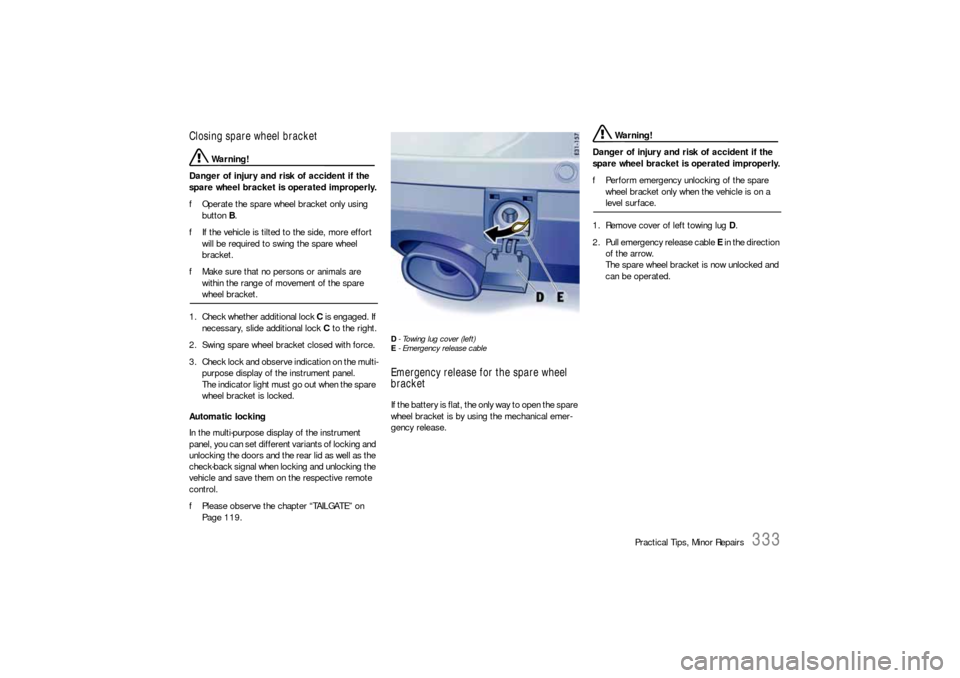
D- Towing lug cover (left)
E- Emergency release cableEmergency release for the spare wheel
bracketIf the battery is flat, the only way to open the spare
wheel bracket is by using the mechanical emer-
gency release.
Warning!
Danger of injury and risk of accident if the
spare wheel bracket is operated improperly.
fPerform emergency unlocking of the spare
wheel bracket only when the vehicle is on a level surface.
1. Remove cover of left towing lug D.
2. Pull emergency release cable E in the direction
of the arrow.
The spare wheel bracket is now unlocked and
can be operated.
Page 345 of 420

Practical Tips, Minor Repairs
345
Winter operationDuring the winter months, battery capacity tends
to decrease as temperatures drop. Additionally,
more power is consumed while starting, and the
headlights, heater, rear window defogger, etc.,
are used more frequently.
Let your Porsche dealer test the battery's capaci-
ty before winter sets in.Vehicle storageIf the car stands for long periods in the garage or
workshop, the doors and lids should be closed.
fRemove the ignition key and, if necessary, dis-
connect the battery.
Notes on operation
fWhen the battery is disconnected, the alarm
system ceases to function.
If the vehicle was locked before the battery
was disconnected, the alarm will be triggered
when the battery is reconnected.
To deactivate the alarm system:
fLock the vehicle and unlock it again.Maintenance note
Even if you put your vehicle out of operation, the
battery still discharges.
The battery will discharge more quickly if your ve-
hicle is not driven on a daily basis over a distance
of several miles. The more often you drive your ve-
hicle, and the longer the distance driven on each
trip, the more opportunity the vehicle‘s charging
system will have to recharge the batteries.
fTo preserve its efficiency, charge the battery
about every 6 weeks.
fCheck the battery acid level and top off with
distilled water if necessary.
fStore a battery that has been removed in a
dark, cool place, but not subject to freezing.
Putting vehicle into operationAfter the battery is connected or charged, the
PSM warning light lights up on the instrument pan-
el and a message appears on the multi-purpose
display of the instrument panel to indicate a fault.
This fault can be remedied with a few simple
steps:
1. Start the engine.
To do this, turn the ignition key or the control
unit (on vehicles that have Porsche Entry &
Drive) to ignition lock position 2 twice.2. Perform a few steering movements and drive
a short distance in a straight line until the PSM
warning light goes out and the message is
erased from the memory of the multi-purpose
display of the instrument panel.
3. If the warnings does not go out, then:
Drive carefully to the nearest authorized
Porsche dealer.
Have the fault remedied by an authorized
Porsche dealer.
4. After the warnings disappear:
Stop the vehicle in a suitable place.
5. Perform adaptation of the power windows:
Please observe the chapter “STORING FINAL
POSITION OF THE DOOR WINDOWS” on
Page 35.
6. On vehicles with tire pressure monitoring:
Please observe the chapter “SYSTEM LEAR-
NING PHASE” on Page 104.
f f f
Page 357 of 420

Practical Tips, Minor Repairs
357
Charging the batteryYour authorized Porsche dealer will be pleased to
advise you about a suitable charger.
1. Always observe the instructions of the charger
manufacturer.
2. When charging the battery, ensure adequate
ventilation.
3. Check the acid level of a low-maintenance bat-
tery.
4. Connect charger to the jump starting points.
Only plug into the mains and switch the charg-
er on when it has been correctly connected up.
5. After charging, disconnect the charger.
6. Check the acid level of a low-maintenance bat-
tery.
After charging the battery After the battery is connected or the completely
discharged battery is charged, the PSM warning
light lights up on the instrument panel and a mes-
sage appears on the multi-purpose display of the
instrument panel to indicate a fault.
This fault can be remedied with a few simple
steps:
1. Start the engine.
To do this, turn the ignition key or the control
unit (on vehicles that have Porsche Entry &
Drive) to ignition lock position 2 twice.
2. Perform a few steering movements to the left
and to the right when vehicle is standing and
drive a short distance in a straight line until the
PSM warning light goes out and the message
is erased from the memory of the multi-pur-
pose display of the instrument panel.
3. If the warnings does not go out, then:
Drive carefully to the nearest authorized
Porsche dealer.
Have the fault remedied by an authorized
Porsche dealer.4. After the warnings disappear:
Stop the vehicle in a suitable place.
5. Perform adaptation of the power windows:
Please observe the chapter “STORING FINAL
POSITION OF THE DOOR WINDOWS” on
Page 35.
6. On vehicles with tire pressure monitoring:
Please observe the chapter “SYSTEM LEAR-
NING PHASE” on Page 104.
Page 358 of 420

358
Practical Tips, Minor Repairs
Replacing the remote control
batteryNote
fPlease dispose of batteries in compliance with
any and all government regulations.
If the battery in the remote control becomes too
weak, a warning will appear on the multi-purpose
display in the instrument panel.
The battery should be changed if this should be
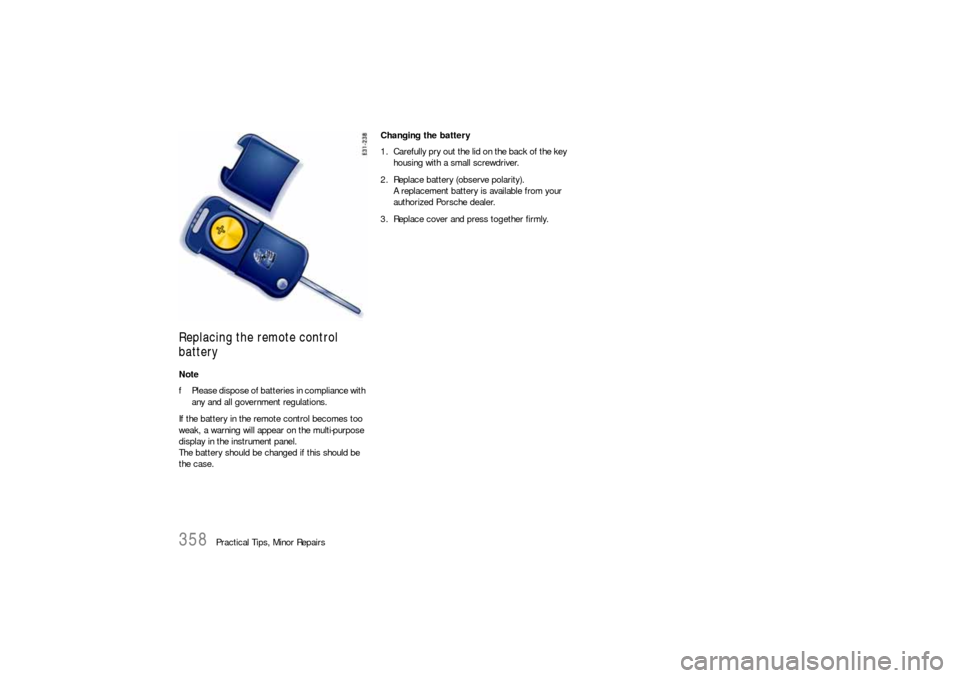
the case.Changing the battery
1. Carefully pry out the lid on the back of the key
housing with a small screwdriver.
2. Replace battery (observe polarity).
A replacement battery is available from your
authorized Porsche dealer.
3. Replace cover and press together firmly.
Page 385 of 420

Vehicle Identification, Technical Data
385
Tire Pressures, ColdThese tire filling pressures apply only to the tire makes and types approved by Porsche.
Please observe the chapter “TIRES/WHEELS” on Page 297.
fOn vehicles with Tire Pressure Monitoring, the vehicle load must be set in the multi-purpose display of the instrument panel. Please observe the chapter
“LOAD” on Page 108. Partially loaded
(up to 3 people and 46 lbs./21 kg of luggage)Cayenne S Cayenne
Tire size Front axle Rear axle Front axle Rear axle
235/65 R 17
38 psi (2.6 bar) 43 psi (2.9 bar) 38 psi (2.6 bar) 43 psi (2.9 bar) 235/60 R 18
255/55 R 18
275/45 R 19
275/40 R 20
Collapsible spare wheel 51 psi (3.5 bar) 51 psi (3.5 bar) 51 psi (3.5 bar) 51 psi (3.5 bar)
Fully loaded
(more than 3 people and 46 lbs./21 kg of lug-
gage)Cayenne S Cayenne
Tire size Front axle Rear axle Front axle Rear axle
235/65 R 17
38 psi (2.6 bar) 50 psi (3.4 bar) 38 psi (2.6 bar) 50 psi (3.4 bar) 235/60 R 18
255/55 R 18
275/45 R 19
275/40 R 20
Collapsible spare wheel 51 psi (3.5 bar) 51 psi (3.5 bar) 51 psi (3.5 bar) 51 psi (3.5 bar)
Page 392 of 420

392
Index
IndexAABD ......................................... 235
, 237
, 239
ABS ......................................... 235
, 238
, 241
Off road ............................................. 242
Warning light ...................................... 241
After driving off road................................... 246
Aftermarket Alarms ..................................... 190
Air cleaner.................................................. 272
Air conditioning
Central vents ............................. 150, 156
Cover flap .......................................... 144
Disabling control panel (rear) ............... 153
Display ............................. 145
, 148
, 152
Footwell .................................... 150, 156
Four zone ........................................... 152
Fresh-air intake ................................... 143
Mono function ..................................... 149
Rear.......................................... 153, 157
REST mode ............................... 151, 157
Sensors ............................................. 144
Setting air quantity ............ 146
, 149
, 155
Setting temperature ................... 149, 154
Side vents ................................. 150, 156
Two zone .................................. 145, 148
Vents ................................................. 143
Windshield ................................. 150, 156
Air quantity
Setting ............................. 146
, 149
, 155
Air suspension ................. 180
, 196
, 235
, 254
Airbag ................................................. 50, 292
Disposal ............................................... 51Function ............................................... 52
Switching off passenger airbag ............ 126
Switching on passenger airbag ............ 126
Unit ...................................................... 62
Warning light......................................... 54
Air-conditioned areas
Rear................................................... 157
Air-conditioning compressor....... 145
, 151
, 156
Alarm button................................................. 17
Alarm system24
, 26, 28, 29, 30, 32, 34, 35,
........................................................ 212
, 334
Alcantara.................................................... 292
All-Season tires .................................. 382, 383
All-Terrain tires ................................... 382, 383
All-wheel drive ........................... 129
, 235
, 237
Anti-freeze content ...................................... 267
Anti-lock brake system .............. 235
, 238
, 241
Anti-roll bars
Disengageable .................................... 232
Armrest...................................................... 195
Ashtray
Front .................................................. 187
Rear................................................... 187
Assembly aid ..................................... 322, 331
Assistance when driving downhill .................. 244
Audio
Tips ................................................... 189
AUTO button .................... 148
, 149
, 152
, 154
AUTO LOCK ......................................... 27, 120
AUTO UNLOCK .................................... 27, 120
Automatic anti-dazzle operation...................... 69
Automatic brake differential ....... 235
, 237
, 239Automatic circulating-air mode ............ 150
, 155
Automatic mode, air conditioning148
, 149
, 154
Automatic transmission fluid ........................ 272
BBattery ......................... 70
, 73, 90, 191
, 344
After charging ..................................... 357
Car key .............................................. 358
Care................................................... 344
Charge state....................................... 344
Charging ............................................ 357
Installing ............................................. 354
Putting vehicle into operation ...............345
Removing ........................................... 352
Removing/installing .................... 347, 351
Replacing ........................................... 346
Warning light....................................... 127
Winter driving...................................... 345
Before driving off.................................12, 246
Belts ............................................................ 46
Fastening ............................................. 48
Height adjustment ................................. 49
Opening ............................................... 48
Tensioner ............................................. 47
Warning light.................................. 47, 60
Brake ...........................................................76
Booster ................................................ 78
Discs ................................................... 79
Pads .................................................... 79
Warning light......................................... 77