ECO mode PORSCHE CAYNNE S 2006 1.G Owners Manual
[x] Cancel search | Manufacturer: PORSCHE, Model Year: 2006, Model line: CAYENNE S, Model: PORSCHE CAYENNE S 2006 1.GPages: 420, PDF Size: 3.81 MB
Page 5 of 420

5
Environmentally friendly vehiclesModern environmental technology ensures compli-
ance with all emission laws applicable worldwide.
It has the following advantages:
– Rapid “operational readiness” of the catalytic
converters ensures low emissions, even in
short-trip operation.
– Reliable operation and good emission control
over a long useful life.
fPlease observe the chapter “FUEL ECONOMY”
on Page 276.
Recycling –
for a Porsche, this is virtually an
academic questionMore than two-thirds of all Porsches ever built are
still running.
But, just in case recycling is ever necessary,
we take the following precautionary
measures:
– Utilisation-friendly design.
– Identification of materials.
– Use of recyclable materials.
– Reusable components designed for simple
removal.
Emission control is built inInnovative engine technology combines high
engine performance and environmental compati-
bility.
The engine diagnosis system electronically
monitors the components and systems that affect
exhaust gases.
This continuous monitoring and fault storage
enables swift, reliable diagnosis and fault detec-
tion.
Faults are indicated to the driver by the “Emission
control” warning light and display.
fPlease observe the chapter “EMISSION CONT-
ROL” on Page 91.
Page 45 of 420
Controls, Safety, Instruments
45
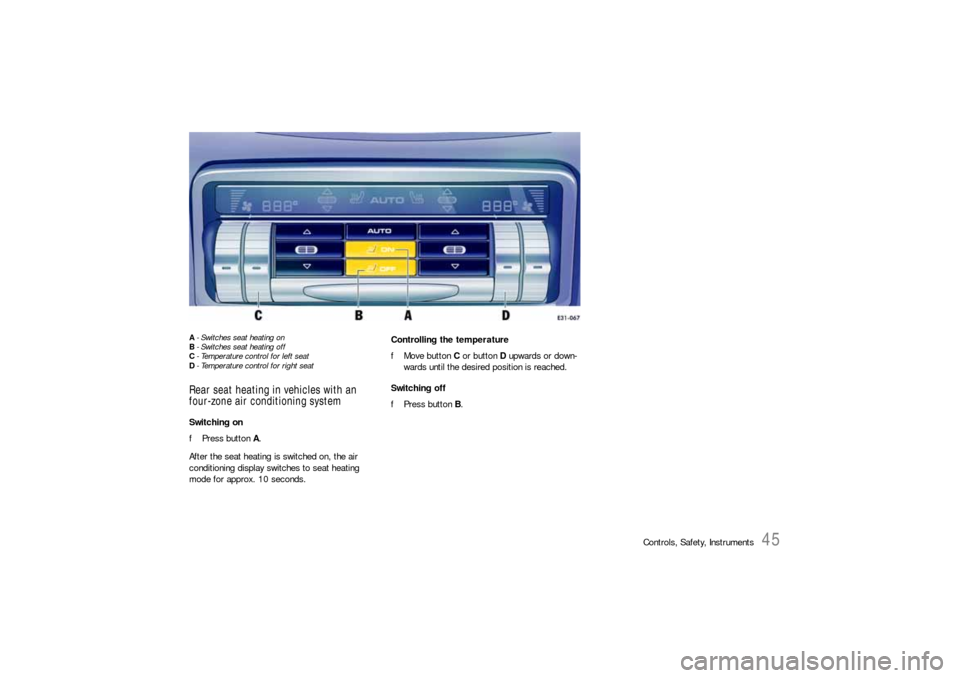
A- Switches seat heating on
B- Switches seat heating off
C- Temperature control for left seat
D- Temperature control for right seatRear seat heating in vehicles with an
four-zone air conditioning systemSwitching on
fPress button A.
After the seat heating is switched on, the air
conditioning display switches to seat heating
mode for approx. 10 seconds.Controlling the temperature
fMove button C or button D upwards or down-
wards until the desired position is reached.
Switching off
fPress button B.
Page 71 of 420

Controls, Safety, Instruments
71
Ignition lock position 1Ignition on
fTurn ignition key to position 1.
Ignition is switched on.
Note on operation
All electrical equipment can be switched on.
The warning lights light up for a lamp check.
fPlease observe the chapter “INSTRUMENT PA-
NEL USA MODELS” on Page 82.
If a load is not switched on for 10 minutes after
switching on the ignition, the ignition must be
switched on again.
Turn the ignition key to ignition lock position 3 (ig-
nition off) first.Ignition lock position 2Starting engine
fOperate footbrake.
fFully depress and hold the clutch pedal or on
vehicles with Tiptronic S:
move the selector lever to position P or N.
fDo not press the accelerator pedal.
The engine control module will provide the
correct starting mixture.
fTurn ignition key to ignition lock position 2.fDo not operate the starter longer than approx.
10 seconds.
If necessary, repeat the starting procedure af-
ter a pause of approx. 10 seconds.
Turn the ignition key to ignition lock position 3
(ignition off) first.
fDo not warm up the engine when stationary.
Drive off immediately.
Avoid high revolutions and full throttle until the
engine has reached operating temperature.
fIf battery output is insufficient, jump leads can
be used to start the engine.
Please observe the chapter “EMERGENCY
STARTING WITH JUMPER CABLES” on
Page 355.
Notes on operation
The first operation of the starter is ended
automatically when the engine starts.
If the engine does not start, subsequent starter
operations will not be ended automatically.
When the engine is started, the warning lights
must go out.
Ignition lock position 3Ignition off
fTurn ignition key to ignition lock position 3.
Locking the steering column Vehicles without Porsche Entry & Drive
The steering column is automatically locked
when the ignition key is withdrawn from the
ignition lock.
The steering column is automatically unlocked
when the ignition key is inserted into the ignition
lock.
Vehicles with Porsche Entry & Drive
The steering column is automatically locked
when the ignition is switched off and the vehicle is
locked.
Manually locking the steering column on
vehicles with Porsche Entry & Drive
fDepress the clutch on vehicles with manual
transmission.
fOnce the ignition is switched off, turn the con-
trol unit again to ignition lock position 3 and
hold it there for 2seconds.
The steering column is locked.
The steering column is automatically unlocked
by turning the control unit from ignition lock
position 0.
Page 138 of 420
138
Controls, Safety, Instruments The rain sensor remains switched off if the wiper
lever is already in position 1 when the ignition is
switched on.
To switch the rain sensor on again:
fMove wiper stalk to position 0 and then to
position 1 – switching on is confirmed by one
wipe of the windscreen – or
fOperate windscreen washer system 5 –
switching on is confirmed by three wipes of the
windscreen – or
fChange the sensitivity of the rain sensor with
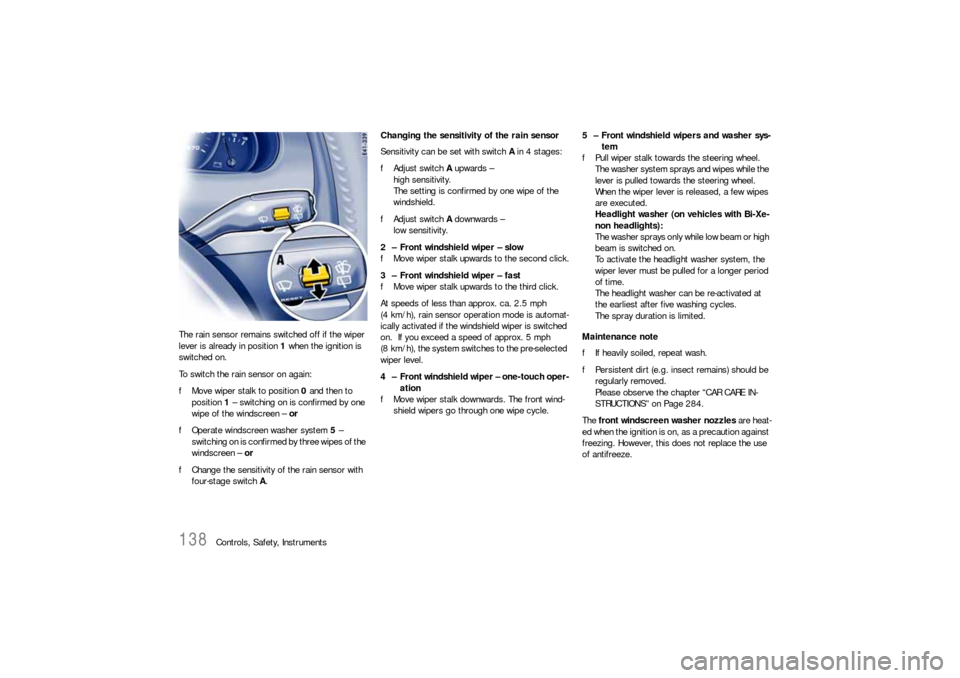
four-stage switch A.Changing the sensitivity of the rain sensor
Sensitivity can be set with switch A in 4 stages:
fAdjust switch A upwards –
high sensitivity.
The setting is confirmed by one wipe of the
windshield.
fAdjust switch A downwards –
low sensitivity.
2 – Front windshield wiper – slow
fMove wiper stalk upwards to the second click.
3 – Front windshield wiper – fast
fMove wiper stalk upwards to the third click.
At speeds of less than approx. ca. 2.5 mph
(4 km/h), rain sensor operation mode is automat-
ically activated if the windshield wiper is switched
on. If you exceed a speed of approx. 5 mph
(8 km/h), the system switches to the pre-selected
wiper level.
4 – Front windshield wiper – one-touch oper-
ation
fMove wiper stalk downwards. The front wind-
shield wipers go through one wipe cycle.5 – Front windshield wipers and washer sys-
tem
fPull wiper stalk towards the steering wheel.
The washer system sprays and wipes while the
lever is pulled towards the steering wheel.
When the wiper lever is released, a few wipes
are executed.
Headlight washer (on vehicles with Bi-Xe-
non headlights):
T h e w a s h e r s p r a ys o n l y w h i l e l o w b e a m o r h i g h
beam is switched on.
To activate the headlight washer system, the
wiper lever must be pulled for a longer period
of time.
The headlight washer can be re-activated at
the earliest after five washing cycles.
The spray duration is limited.
Maintenance note
fIf heavily soiled, repeat wash.
fPersistent dirt (e.g. insect remains) should be
regularly removed.
Please observe the chapter “CAR CARE IN-
STRUCTIONS” on Page 284.
The front windscreen washer nozzles are heat-
ed when the ignition is on, as a precaution against
freezing. However, this does not replace the use
of antifreeze.
Page 148 of 420
148
Controls, Safety, Instruments
Automatically Controlled Two-Zone
Air ConditioningDepending on various factors (e.g. sunlight, air
quality), the air-conditioning system controls the
preset interior temperature fully automatically.
If necessary, the automatic system can be manu-
ally influenced.
This individual adjustment is shown on the air-con-
ditioning display panel.Note on operation
The air conditioner settings are stored on the re-
spective remote control when switching off the ig-
nition and locking the vehicle. The “Air flow OFF”
setting is stored for approx. 60 minutes and the
“Recirculated air” setting is stored for approx.
20 minutes.
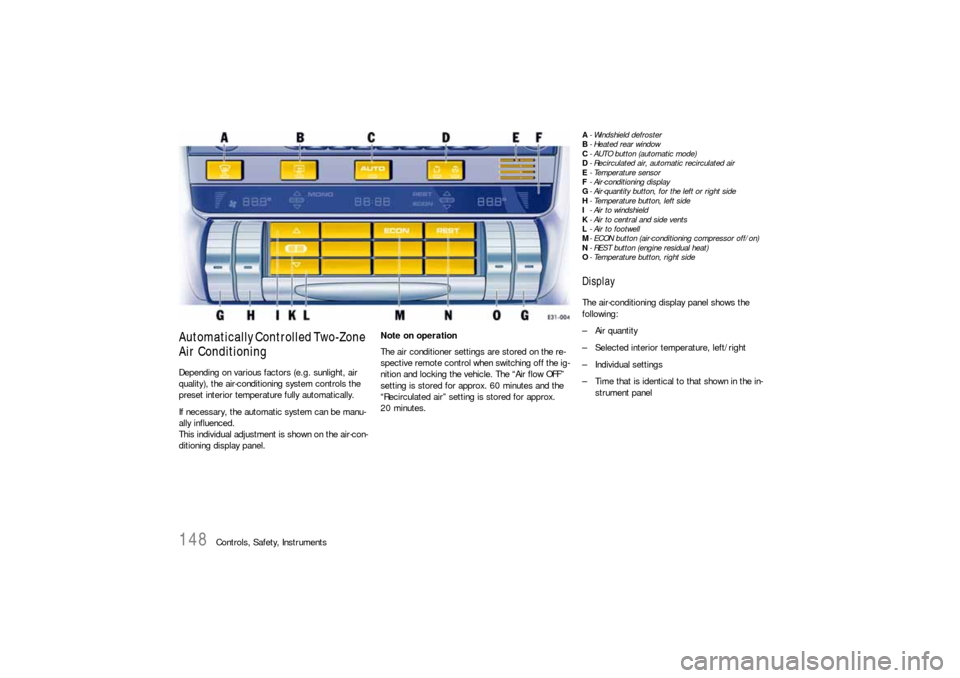
A- Windshield defroster
B-Heated rear window
C- AUTO button (automatic mode)
D- Recirculated air, automatic recirculated air
E-Temperature sensor
F- Air-conditioning display
G- Air-quantity button, for the left or right side
H- Temperature button, left side
I- Air to windshield
K- Air to central and side vents
L- Air to footwell
M- ECON button (air-conditioning compressor off/on)
N- REST button (engine residual heat)
O- Temperature button, right sideDisplayThe air-conditioning display panel shows the
following:
– Air quantity
– Selected interior temperature, left/right
– Individual settings
– Time that is identical to that shown in the in-
strument panel
Page 149 of 420

Controls, Safety, Instruments
149
Automatic modefPress AUTO button C.
Indicator light in button lights up.
Air quantity and distribution are automatically
controlled and variations are compensated.
Note on operation
If necessary, the automatic system can be manu-
ally influenced.
This manual setting is retained until the appropri-
ate function button is pressed again or the AUTO
button is pressed.
Switching MONO function on
The temperature settings for the driver’s side can
be accepted for the entire vehicle.
fPress AUTO button C for 2 seconds.
The MONO logo appears on the air-condition-
ing display panel.
Ending MONO function
fPress AUTO button C for 2 seconds or
fChange the settings in the air-conditioned are-
as.
Setting temperatureTo suit personal comfort, the interior temperature
can be adjusted between 61°F and 85°F (16°C
and 29.5°C).
Recommendation: 72°F (22°C)
fPush temperature button up or down.
Button H: left side of vehicle
Button O: right side of vehicle
The selected temperature is shown on the
display above the button.
If “LO” or “HI” appears on the display, the system
is operating at maximum cooling or heating pow-
er. Automatic mode is switched off.
If the preselected temperature is changed, the air
quantity blowing out can adjust automatically in au-
tomatic mode.
The desired temperature is reached more quickly
this way.fPush button G up or down to adjust the air
quantity.
The selected air quantity is shown in a bar
display on the display above the button.
fPress AUTO button C to return to automatic
mode.
If the air quantity was reduced so much that “OFF”
appears on the display, the outside-air supply is in-
terrupted.
Warning!
Risk of accident due to impaired vision. If the
air quantity is “OFF”, the windows may mist
up.
fOnly select recirculating-air setting for short
periods.
fIf windows mist up, turn off the recirculating-air
setting by pressing the circulating-air button
briefly and select the function “Defrost wind-
shield“.
fPush button G up (to increase air quantity). Setting air quantity
Page 150 of 420
150
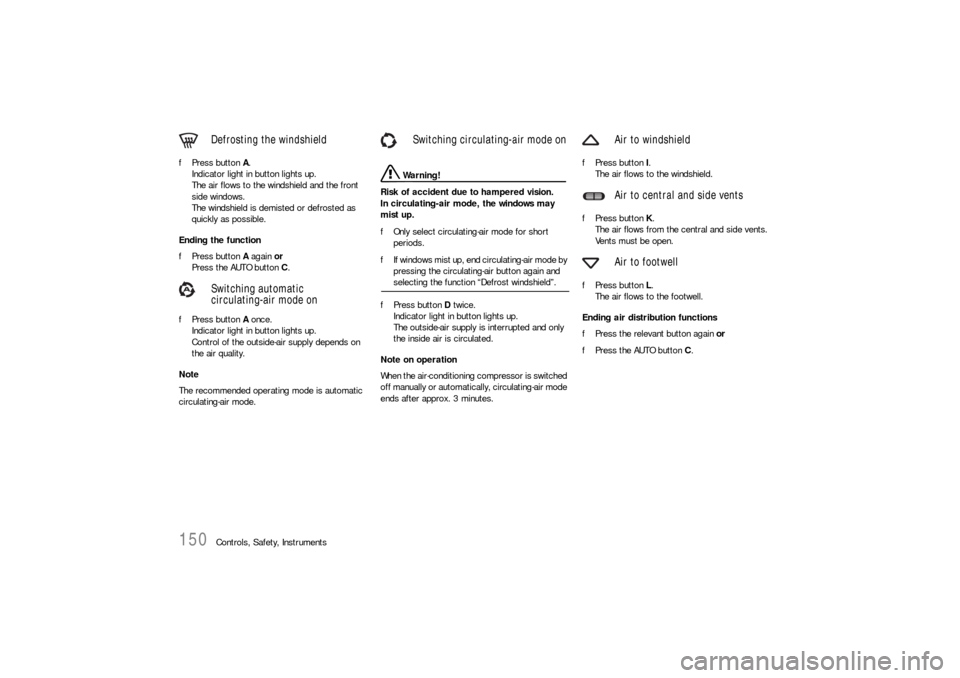
Controls, Safety, Instruments fPress button A.
Indicator light in button lights up.
The air flows to the windshield and the front
side windows.
The windshield is demisted or defrosted as
quickly as possible.
Ending the function
fPress button A again or
Press the AUTO button C.
fPress button A once.
Indicator light in button lights up.
Control of the outside-air supply depends on
the air quality.
Note
The recommended operating mode is automatic
circulating-air mode.
Warning!
Risk of accident due to hampered vision.
In circulating-air mode, the windows may
mist up.
fOnly select circulating-air mode for short
periods.
fIf windows mist up, end circulating-air mode by
pressing the circulating-air button again and selecting the function “Defrost windshield”.
fPress button D twice.
Indicator light in button lights up.
The outside-air supply is interrupted and only
the inside air is circulated.
Note on operation
When the air-conditioning compressor is switched
off manually or automatically, circulating-air mode
ends after approx. 3 minutes.fPress button I.
The air flows to the windshield.
fPress button K.
The air flows from the central and side vents.
Vents must be open.
fPress button L.
The air flows to the footwell.
Ending air distribution functions
fPress the relevant button again or
fPress the AUTO button C.
Defrosting the windshield
Switching automatic
circulating-air mode on
Switching circulating-air mode on
Air to windshield
Air to central and side vents
Air to footwell
Page 151 of 420

Controls, Safety, Instruments
151
ECON modeThe outside air that is flowing in does not dry up if
the air-conditioning compressor is switched off.
Warning!
Risk of accident due to hampered vision.
If the air-conditioning compressor is
switched off, the windows may mist up.
fDo not switch off the air-conditioning compres-sor in damp weather.
Switching air-conditioning compressor off
Whenever outside temperatures exceed 37.4°F
(3°C), the air-conditioning compressor is always
switched on in automatic mode.
The compressor can be switched off to save fuel,
but control comfort is then limited:
fPress ECON button M.
The ECON logo appears on the air-conditioning
display panel.
The air-conditioning compressor is switched
off.
Switching air-conditioning compressor on
fIf the interior temperature is too high:
Press ECON button M or
Press AUTO button C.
Information on air-conditioning
compressorThe air-conditioning compressor:
– Can switch off briefly if engine is under an ex-
treme load to ensure sufficient engine cooling.
– Switches off automatically at temperatures be-
low approx. 37.4°F (3°C) and cannot be
switched on, even manually.
– Operates most effectively with windows
closed.
If the car has been in the sun for a long time,
however, it is a good idea to ventilate the
interior briefly with the windows open.
Notes on operation
Depending on the outside temperature and humid-
ity, condensation can drip from the evaporator
and form a pool under the car.
This is normal and not a sign of leakage.
If uncooled air flows out when the lowest temper-
ature has been set (“LO”), switch off the air-condi-
tioning compressor and have the fault remedied at
an authorized Porsche dealer.
REST modeUsing engine residual heat
The residual heat of the engine can be used to
heat the interior up to 20minutes after the ignition
has been switched off.
fPress REST button N.
The air-conditioning settings cannot be
changed in REST mode.
Ending the function
fPress REST button N.
Note on operation
If the battery positive voltage is too low, REST
mode is automatically ended.
fPlease observe the chapter “WARNING LIGHTS
AND WARNING MESSAGES” on Page 124.
Page 152 of 420
152
Controls, Safety, Instruments
Automatically Controlled
Four-Zone Air ConditioningDepending on various factors (e.g. ambient tem-
perature, sunlight, air quality), the air-conditioning
system controls the preset interior temperature
fully automatically.
Temperature, air quantity and air distribution can
be set individually for the front left, front right, rear
left and rear right air-conditioned areas.If necessary, the automatic system can be manu-
ally influenced.
This individual adjustment is shown on the air-con-
ditioning display panel.
Note on operation
The air conditioner settings are stored on the re-
spective remote control when switching off the ig-
nition and locking the vehicle. The “Air flow OFF”
setting is stored for approx. 60 minutes and the
“Recirculated air” setting is stored for approx.
20 minutes.
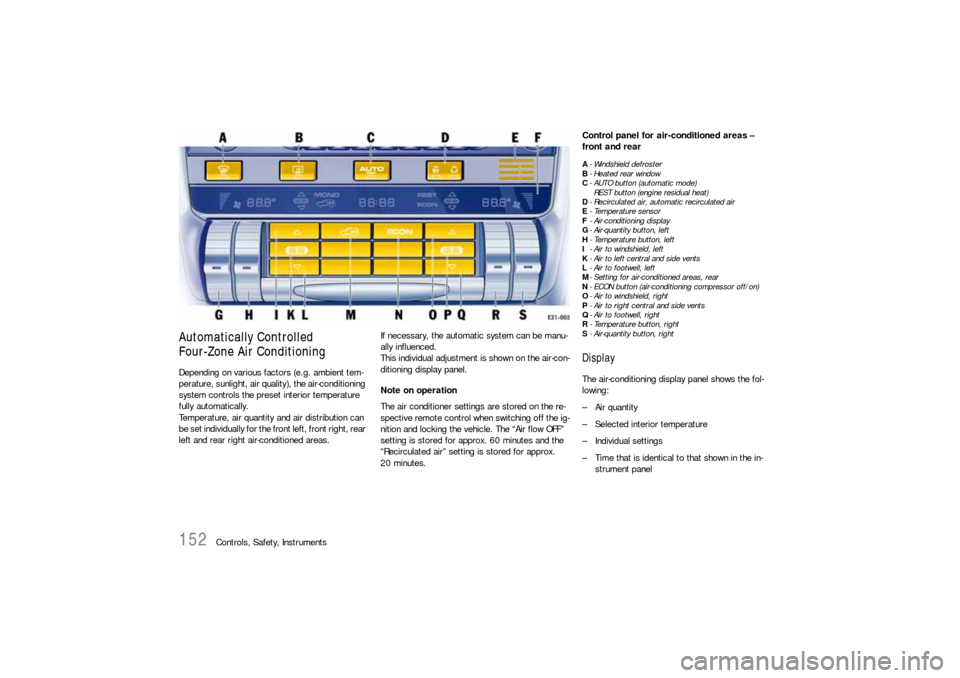
Control panel for air-conditioned areas –
front and rearA- Windshield defroster
B-Heated rear window
C- AUTO button (automatic mode)
REST button (engine residual heat)
D- Recirculated air, automatic recirculated air
E-Temperature sensor
F- Air-conditioning display
G- Air-quantity button, left
H- Temperature button, left
I- Air to windshield, left
K- Air to left central and side vents
L- Air to footwell, left
M- Setting for air-conditioned areas, rear
N- ECON button (air-conditioning compressor off/on)
O- Air to windshield, right
P-Air to right central and side vents
Q- Air to footwell, right
R- Temperature button, right
S- Air-quantity button, rightDisplayThe air-conditioning display panel shows the fol-
lowing:
– Air quantity
– Selected interior temperature
– Individual settings
– Time that is identical to that shown in the in-
strument panel
Page 153 of 420
Controls, Safety, Instruments
153
Rear seat heatingSwitching on
fPress ON button.
After the seat heating is switched on, the air condi-
tioning display switches to seat heating mode for
approx. 10 seconds.
Controlling the temperature
fMove button H or button R upwards or
downwards until the desired temperature is
reached.
Switching off
fPress OFF button.
Disabling control panel for
air-conditioned areas at the rearThe rear control panel for the air conditioning can
be disabled using the safety button in the armrest
of the driver’s door.
fPlease observe the chapter “SAFETY BUTTON”
on Page 25.
Safety button
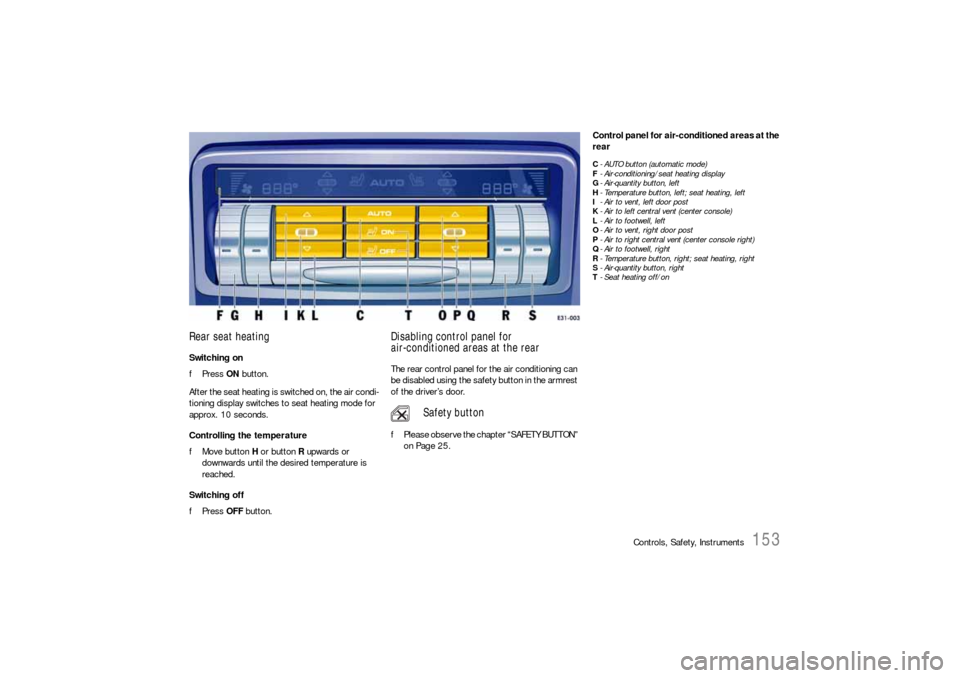
Control panel for air-conditioned areas at the
rearC- AUTO button (automatic mode)
F- Air-conditioning/seat heating display
G- Air-quantity button, left
H- Temperature button, left; seat heating, left
I- Air to vent, left door post
K- Air to left central vent (center console)
L- Air to footwell, left
O- Air to vent, right door post
P- Air to right central vent (center console right)
Q- Air to footwell, right
R- Temperature button, right; seat heating, right
S- Air-quantity button, right
T- Seat heating off/on