mirror controls PORSCHE CAYNNE S 2006 1.G Owners Manual
[x] Cancel search | Manufacturer: PORSCHE, Model Year: 2006, Model line: CAYENNE S, Model: PORSCHE CAYENNE S 2006 1.GPages: 420, PDF Size: 3.81 MB
Page 11 of 420

Controls, Safety, Instruments
11 Controls, Safety, Instruments
Porsche and the Environment .......................... 4
Never invite car theft! .................................... 16
Keys ............................................................ 17
Remote Control ............................................ 20
Porsche Entry & Drive ................................... 22
Central Locking System................................ 24
Doors .......................................................... 27
Alarm System,
Passenger Compartment Monitoring,
Inclination Sensor ......................................... 28
Power Windows ............................................ 33
Front seats................................................... 36
Front seat with memory................................. 37
Easy Entry Function ...................................... 39
Headrests .................................................... 40
Rear Seats ................................................... 41
Heated Seats – Front and Rear ...................... 44
Safety Belts.................................................. 46
Airbag Systems ............................................ 50
Child Restraint Systems ................................ 55
Child Restraint Anchorages ............................ 61
Steering Wheel ............................................. 62
Multi-Functional Steering Wheel ...................... 64
Interior Mirror ............................................... 66
Door Mirrors................................................. 67
Automatic Anti-Dazzle Mirror .......................... 69
Ignition Lock/Steering Lock ........................... 70
Starting and Stopping the Engine ................... 72
Parking Brake ............................................... 75
Brakes ......................................................... 76
Instrument Panel USA Models ........................ 82
Instrument Panel Canada Models.................... 84Oil Temperature Gauge ................................. 86
Cooling System ............................................ 87
Fuel ............................................................. 88
Odometer..................................................... 88
Clock ........................................................... 89
Voltmeter ..................................................... 90
Emission Control........................................... 91
Multi-Purpose Display.................................... 92
MPH limit...................................................... 98
Warning Lights and Warning Messages ......... 124
Light Switch ............................................... 132
Instrument Illumination ................................. 134
Automatic Headlight Beam Adjustment ......... 134
Turn signal/High Beam/
Headlight Flasher Stalk ................................ 135
Emergency flasher ...................................... 136
Windshield Wiper/Washer Stalk .................... 137
Cruise Control ............................................ 140
Vents ......................................................... 143
Fresh-air intake ........................................... 143
Heated Rear Window ................................... 144
Manual Air Conditioning ............................... 145
Automatically Controlled
Two-Zone Air Conditioning ........................... 148
Automatically Controlled
Four-Zone Air Conditioning ........................... 152
Parking Heater............................................ 158
Sun Visors .................................................. 164
Sun Blinds, Rear Side Windows .................... 165
Interior Lighting .......................................... 166
Door-Surrounding Lighting ........................... 168
Coming Home Function (Auto Shut Off Delay) 168Sliding/Lifting Roof...................................... 169
Parking Aids ............................................... 179
Garage Door Opener ................................... 184
Ashtray ...................................................... 187
Cigarette Lighter ......................................... 188
Car Audio Operation/Tips ............................ 189
Porsche Communication Management (PCM). 191
Fire Extinguisher ......................................... 192
Storage...................................................... 193
Cupholder .................................................. 197
Rear Lid ..................................................... 199
Rear Window .............................................. 201
Loadspace ................................................. 202
Luggage Compartment Cover ...................... 203
Engine Compartment Lid ............................. 204
Luggage Safety Net ....................................206
Ski Bag ...................................................... 208
Roof Transport System................................ 210
Trailer Coupling .......................................... 212
Loading Information ....................................213
Page 13 of 420

Controls, Safety, Instruments
13
In the driver's seat...fCheck operation of the horn.
fPosition seat for easy reach of foot pedals and
controls.To reduce the possibility of injury from
the airbag deployment, you should always sit
back as far from the steering wheel as is prac-
tical, while still maintaining full vehicle control.
fAdjust the inside and outside rear view mirrors.
fBuckle your safety belts.
fCheck operation of the foot and parking brake.
fCheck all warning and indicator lights with igni-
tion on and engine not running.
fStart engine and check all warning displays for
warning symbols.
fNever leave an idling car unattended.
fLock doors from inside, especially with chil-
dren in the car to prevent inadvertent opening
of doors from inside or outside. Drive with
doors locked.
On the road...fNever drive after you have consumed alcohol
or drugs.
fAlways have your safety belt fastened.
fAlways drive defensively.
Expect the unexpected.
fUse signals to indicate turns and lane changes.
fTurn on headlights at dusk or when the driving
conditions warrant it.
fAlways keep a safe distance from the vehicle in
front of you, depending on traffic, road and
weather conditions.
fReduce speed at night and during inclement
weather.
Driving in wet weather requires caution and re-
duced speeds, particularly on roads with
standing water, as the handling characteristics
of the vehicle may be impaired due to hydro-
planing of the tires.
fAlways observe speed limits and obey road
signs and traffic laws.
fWhen tired, get well off the road, stop and take
a rest. Turn the engine off. Do not sit in the ve-
hicle with engine idling.
Please observe the chapter “ENGINE EX-
HAUST” on Page 6.fWhen parked, always put the handbrake on
and put the gearshift lever in neutral or the se-
lector lever in position P.
On hills also turn the front wheels toward the
curb.
fWhen emergency repairs become necessary,
move the vehicle well off the road. Turn on the
emergency flasher and use other warning de-
vices to alert other motorists. Do not park or
operate the vehicle in areas where the hot ex-
haust system may come in contact with dry
grass, brush, fuel spill or other flammable ma-
terial.
fMake it a habit to have the engine oil checked
with every fuel filling.
Page 15 of 420

Controls, Safety, Instruments
15
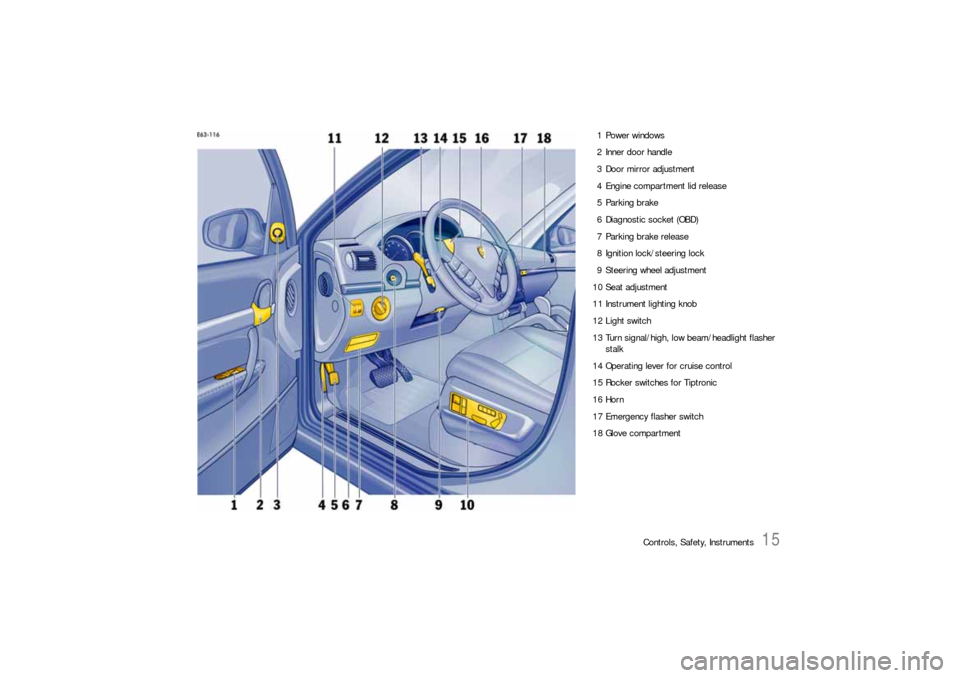
1 Power windows
2 Inner door handle
3 Door mirror adjustment
4 Engine compartment lid release
5 Parking brake
6 Diagnostic socket (OBD)
7 Parking brake release
8 Ignition lock/steering lock
9 Steering wheel adjustment
10 Seat adjustment
11 Instrument lighting knob
12 Light switch
13 Turn signal/high, low beam/headlight flasher
stalk
14 Operating lever for cruise control
15 Rocker switches for Tiptronic
16 Horn
17 Emergency flasher switch
18 Glove compartment
Page 37 of 420

Controls, Safety, Instruments
37
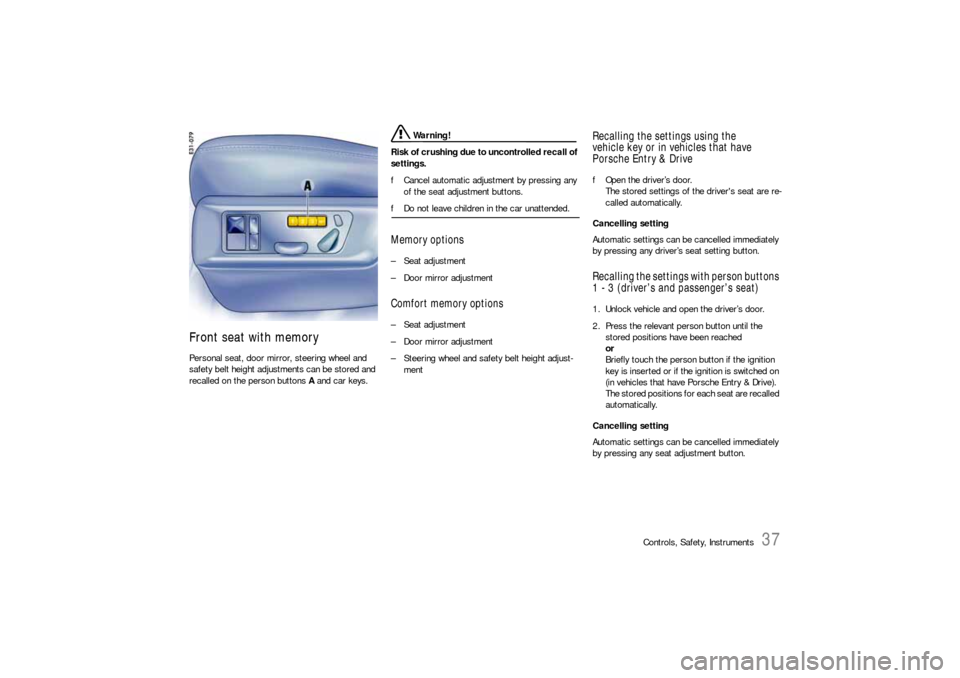
Front seat with memoryPersonal seat, door mirror, steering wheel and
safety belt height adjustments can be stored and
recalled on the person buttons A and car keys.
Warning!
Risk of crushing due to uncontrolled recall of
settings.
fCancel automatic adjustment by pressing any
of the seat adjustment buttons.
fDo not leave children in the car unattended.Memory options–Seat adjustment
– Door mirror adjustmentComfort memory options–Seat adjustment
– Door mirror adjustment
– Steering wheel and safety belt height adjust-
ment
Recalling the settings using the
vehicle key or in vehicles that have
Porsche Entry & DrivefOpen the driver’s door.
The stored settings of the driver's seat are re-
called automatically.
Cancelling setting
Automatic settings can be cancelled immediately
by pressing any driver’s seat setting button.Recalling the settings with person buttons
1 - 3 (driver’s and passenger’s seat)1. Unlock vehicle and open the driver’s door.
2. Press the relevant person button until the
stored positions have been reached
or
Briefly touch the person button if the ignition
key is inserted or if the ignition is switched on
(in vehicles that have Porsche Entry & Drive).
The stored positions for each seat are recalled
automatically.
Cancelling setting
Automatic settings can be cancelled immediately
by pressing any seat adjustment button.
Page 38 of 420

38
Controls, Safety, Instruments
Storing driver’s seat settingsStoring settings on a person button and a car
key
1. Apply the parking brake.
2. Switch ignition on.
3. Close doors.
4. Make the required adjustments to the seat,
mirror, steering wheel and safety belt.
5. Briefly press the SET memory button and,
within 10 seconds, hold down one of the per-
son buttons (1, 2 or 3) until an acknowledge
tone is obtained.
The settings are now stored on the desired
person button.
6. Withdraw car key or switch ignition off in vehi-
cles that have Porsche Entry & Drive.
7. Press the SET memory button within
10 seconds and keep the button depressed
until an acknowledge tone is obtained.
The settings are now assigned to the car key.
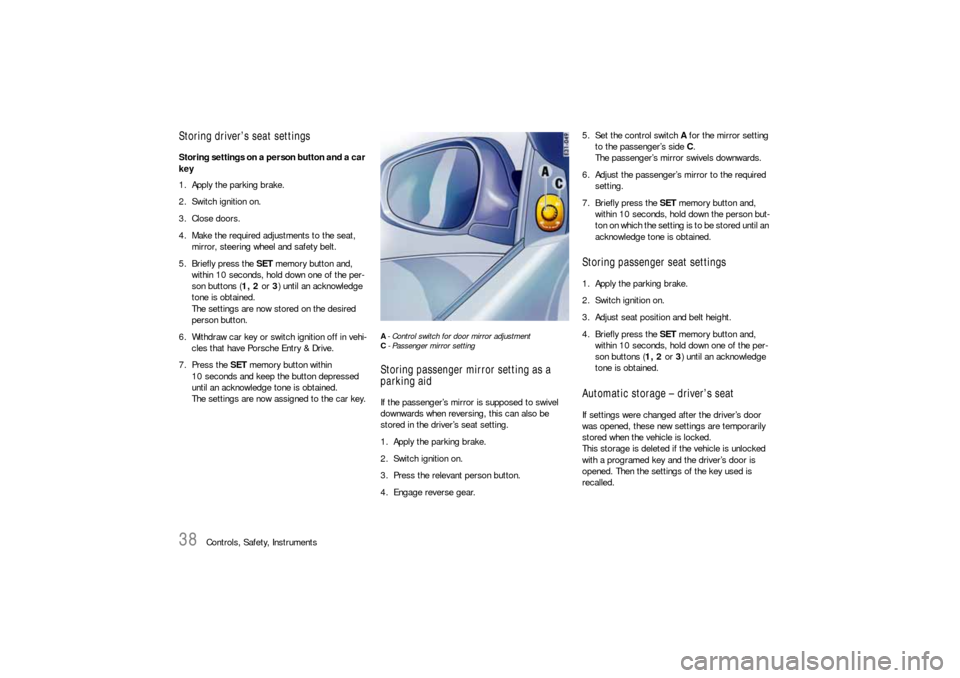
A-Control switch for door mirror adjustment
C- Passenger mirror settingStoring passenger mirror setting as a
parking aidIf the passenger’s mirror is supposed to swivel
downwards when reversing, this can also be
stored in the driver’s seat setting.
1. Apply the parking brake.
2. Switch ignition on.
3. Press the relevant person button.
4. Engage reverse gear.5. Set the control switch A for the mirror setting
to the passenger’s side C.
The passenger’s mirror swivels downwards.
6. Adjust the passenger’s mirror to the required
setting.
7. Briefly press the SET memory button and,
within 10 seconds, hold down the person but-
ton on which the setting is to be stored until an
acknowledge tone is obtained.
Storing passenger seat settings1. Apply the parking brake.
2. Switch ignition on.
3. Adjust seat position and belt height.
4. Briefly press the SET memory button and,
within 10 seconds, hold down one of the per-
son buttons (1, 2 or 3) until an acknowledge
tone is obtained.Automatic storage – driver’s seatIf settings were changed after the driver’s door
was opened, these new settings are temporarily
stored when the vehicle is locked.
This storage is deleted if the vehicle is unlocked
with a programed key and the driver’s door is
opened. Then the settings of the key used is
recalled.
Page 66 of 420

66
Controls, Safety, Instruments
Function keys without telephone functionfPlease read the operating instructions sup-
plied for the Porsche communication systems
before operating the function keys.
Interior MirrorInitial position – lever forward
Anti-dazzle setting – lever back
Note on operation
When the interior mirror is being adjusted, anti-
dazzle lever A must point forward.
Manual tuning
– Set radio station manually.
Scan titles, radio stations
– Scan titles, radio stations briefly.
Increase the volume of the relevant
communication system
Decrease the volume of the relevant
communication system
Next radio station/title
– Select the next radio station or title.
Last radio station/title
– Select the previous radio station or tit-
le.
Switch off the sound
Source selection
– Select available audio source.
Depending on the equipment in your
vehicle, the following sources are avai-
lable:
radio, CDS (single CD player), CDC
(CD changer).
Page 67 of 420

Controls, Safety, Instruments
67
A- Door mirror setting – driver’s side
B- Heat door mirror
C- Door mirror setting – passenger’s side
D- Fold in door mirrorsDoor MirrorsThe convex mirror glass on the passenger's side
provides a larger field of view.
Warning!
Risk of accident. Vehicles or objects appear
smaller in convex mirrors and further away
than they are in reality.
fBear this distortion in mind when estimating
the distance of vehicles behind you and when
reversing into a parking space.
fAlso make use of the interior mirror for judging
the distance.
Risk of damage to the door mirrors when
washing the vehicle in a car wash.
fFold in door mirrors before using the car wash.Adjusting mirrors1. Switch ignition on.
2. Select A for the driver’s side or C for the
passenger’s side by turning the control switch.
3. Move the door mirrors in the appropriate
direction by tilting the control switch.
If the electrical adjustment facility fails
fAdjust the mirror by pressing on the mirror
face.Adjusting the door mirrors synchronously
In the multi-purpose display of the instrument pan-
el, you have the option of adjusting the door mir-
rors synchronously.
fPlease observe the chapter “MIRRORS” on
Page 121.
Folding in door mirrorfSwitch ignition on.
fTurn control switch to D.
Both door mirrors fold in automatically.
If the electrical adjustment facility fails
fFold in mirror manually.Unfolding door mirrorsfSwitch ignition on.
fTurn control switch to A or C.
Both door mirrors unfold automatically.
If the electrical adjustment facility fails
fUnfold mirrors manually.
Page 68 of 420

68
Controls, Safety, Instruments
Door mirror heatingThe door mirror heater is ready for operation
when the ignition is switched on.
Switching on
fTurn control switch to B.
Both door mirrors are heated.
Switching off
fChange the position of the control switch.Storing door mirror settingsOn vehicles with seat memory, individual door mir-
ror settings can be stored on the person buttons
of the seat memory and vehicle keys and recalled
with these.
fPlease observe the chapter “FRONT SEAT
WITH MEMORY” on Page 37.
fPlease observe the chapter “STORING PAS-
SENGER MIRROR SETTING AS A PARKING AID”
on Page 38.
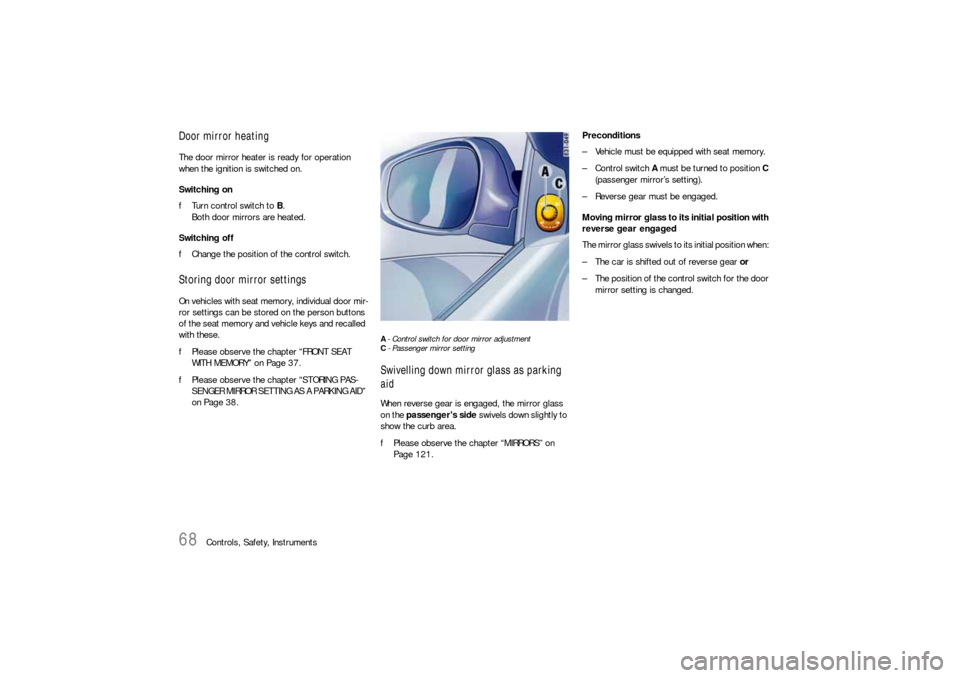
A-Control switch for door mirror adjustment
C- Passenger mirror settingSwivelling down mirror glass as parking
aidWhen reverse gear is engaged, the mirror glass
on the passenger's side swivels down slightly to
show the curb area.
fPlease observe the chapter “MIRRORS” on
Page 121.Preconditions
– Vehicle must be equipped with seat memory.
– Control switch A must be turned to position C
(passenger mirror’s setting).
– Reverse gear must be engaged.
Moving mirror glass to its initial position with
reverse gear engaged
The mirror glass swivels to its initial position when:
– The car is shifted out of reverse gear or
– The position of the control switch for the door
mirror setting is changed.
Page 69 of 420

Controls, Safety, Instruments
69
E- Light-emitting diodes (LED)
F- Button for automatic anti-dazzle operation
G- Light sensorsAutomatic Anti-Dazzle MirrorSensors on the front and rear sides of the interior
mirror measure the incident light. The mirrors au-
tomatically change to anti-dazzle position or revert
to their normal state, depending on the light inten-
sity.
Warning!
Danger of injury. Electrolyte fluid can
emerge from broken mirror glass. This fluid
irritates the skin and eyes.
fIf the electrolyte fluid should come into contact
with the skin or eyes, immediately rinse it off
with clean water.
See a doctor if necessary.
Risk of damage to paintwork and leather and
plastic parts, and clothing. Electrolyte fluid
can be removed only while it is still wet.
fClean the affected parts with water.Note on operation
The incident light in the area of light sensors G
must not be restricted (e.g. by stickers on the
windshield).
Switching off automatic anti-dazzle
operation
fPress button F.
Light-emitting diode E goes out.
Note on operation
Anti-dazzle operation switches off automatically,
if:
– Reverse gear is engaged or
– Interior lighting and/or
reading lights in the front are switched on.
Switching on automatic anti-dazzle
operation
fPress button F.
Light-emitting diode E lights up.
Page 118 of 420

118
Controls, Safety, Instruments
ComfortMAIN MENU > SETTINGS > COMFORT
The COMFORT menu offers the following
submenus:
–Alarm
– Door opening
–Mirrors
fSelect the entry with the rocker switch.
fPress RESET switch.
Note on operation
Comfort settings can be made only when the vehi-
cle is stationary.Alarm
MAIN MENU > SETTINGS > COMFORT > ALARM
The passenger compartment monitoring system
and the inclination sensor (protection against
towing) can be temporarily deactivated in the
ALARM menu.
When locked again, the ultrasound passenger
compartment monitoring system and inclination
sensor are activated once more.
fPlease observe the chapter “TEMPORARILY
DEACTIVATING PASSENGER COMPARTMENT
MONITORING SYSTEM AND INCLINATION SEN-
SOR” on Page 29.Passenger compartment
The alarm is triggered if motion is detected in the
interior with the doors closed (e.g. if a window is
broken in a theft).
fSelect INTERIOR with the rocker switch.
fPress RESET switch.
This activates/deactivates passenger com-
partment monitoring.
Inclination
The alarm is triggered if the vehicle is raised mark-
edly at one end with the doors closed (e.g. theft
attempt by towing).
fSelect ANGLE with the rocker switch.
fPress RESET switch.
This activates/deactivates the inclination sen-
sor.