seats PORSCHE CAYNNE TURBO 2005 1.G User Guide
[x] Cancel search | Manufacturer: PORSCHE, Model Year: 2005, Model line: CAYENNE TURBO, Model: PORSCHE CAYENNE TURBO 2005 1.GPages: 369, PDF Size: 3.17 MB
Page 48 of 369

48
Controls, Safety, Instruments Use only a child restraint system with the LATCH
system recommended by Porsche.
These systems have been tested and adjusted to
the interior of your Porsche and the appropriate
child age groups. Other systems have not been
tested and could entail an increased risk of injury.
You can obtain child seats that are LATCH-compat-
ible at your authorized Porsche dealer.
fAlways observe the separate installation in-
structions for your child seat.
Installing an LATCH child seat systemMarkings on the right and left for the Isofix child
seat anchorage can be found on the backrests of
the outer rear seats.
The anchor bars A for the LATCH child seat
anchorage can be found directly under the
markings between backrest and seat cushion.
1. Secure the child seat to retaining lugs A as
outlined in the operating manual for the child
seat.
2. Pull the child seat to check that both fastening
points are engaged correctly.
Danger!
The use of a child restraint system in the
front passenger seat can result in serious
personal injury or death to the child from an
airbag deployment.
To reduce risk of injury from an inflating
airbag in an accident, Porsche strongly
recommends:
fDo not use a child restraint system in the front
passenger seat
fPlease see your authorized Porsche dealer for
correct Porsche Child Seat availability.
fPorsche recommends the use of a Porsche
Child Seat with L
ower A
nchorage and T
ether
for Ch
ildren system (LATCH)
LATCH child seat system
Page 49 of 369

Controls, Safety, Instruments
49
Airbag SystemsThe Airbags in combination with the safety belts
makes up a safety system which offers the driver
and the passenger the best known protection
from injuries in case of accident.
Even if your vehicle is equipped with airbags, the
safety belts must be worn at all times,
because the front airbag system is only actuated
by frontal collisions with an impact of sufficient se-
verity.
Below the actuation threshold of the airbag sys-
tem, and during types of collisions which do not
cause the actuation of the system, the safety belts
provide the primary protection to the occupants
when correctly worn.
Therefore, all persons within the vehicle
must wear safety belts at all times (in many
states, state law requires the use of safety belts).
fPlease observe the chapter “SAFETY BELTS”
on Page 42.
Thefront airbags are located under the padded
steering wheel panel on the driver’s side and, on
the passenger's side, in the dashboard.
Theside airbags for the front seats are installed
on the side in the seat backrests.
Thehead airbags are installed above the doors
in the roof area.
FunctionThe front airbags are triggered during a frontal col-
lision of sufficient force.
In the event of a side impact of corresponding
force, the side airbag on the impact side is trig-
gered.
The inflation process generates the amount of gas
required to fill the airbags at the necessary pres-
sure in fractions of a second.
Airbags protect the face and upper body, while si-
multaneously damping the motion of the driver
and passenger in the impact direction in the event
of a frontal impact or side impact.
Your vehicle is equipped with a crash sensing and
diagnostic module. This module will record the
use of the seat belt restraint system by the driver
and front passenger when the side airbags and
head airbags are inflated.
Danger!
To provide optimal occupant protection, air-
bags must inflate at very high speed. If you
are not wearing your safety belt or are too
close to the airbag when its deployed, inflat-
ing airbags can result in serious personal in-
jury or death.
fMake sure there are no people, animals or ob-
jects between the driver or passenger and the
area into which the airbag inflates.
fSit back as far from the dashboard or steering
wheel as is practical, while still maintaining full
vehicle control.
fDo not lean against the inside of the doors.
fAlways hold the steering wheel by the outer
rim. Never rest your hands on the airbag panel.
fNever transport heavy or sharp objects on or
in front of the passenger seat.
fAlways keep the lid of the door storage com-
partment closed. Objects must not protrude
out of the door storage compartment.
fGive your passenger all of the information in
this chapter.
fNo changes must be made to the wiring or
components of the airbag system.
f f f
Page 172 of 369
172
Controls, Safety, Instruments
Storage
Warning!
Unsecured luggage and heavy objects may
come loose during braking, rapid directional
changes or in an accident and cause serious
personal injury or death.
fDo not carry items of luggage or objects in the
passenger compartment unsecured.
fDo not transport any heavy objects in open
storage trays.
fAlways keep the storage trays closed while
driving.
fAlways protect the passenger compartment
with a safety net and a luggage compartment cover.
fPlease observe the chapter “LOADING INFOR-
MATION” on Page 191.
Storage options– In the glasses case in the roof console
– In the glove compartment, pen holder
– In the front and rear armrests
– In the drawer underneath the passenger’s seat
– In the storage compartments at the sides of
the luggage compartment
– In the door trim panels
– In the center console, front and rear
– On the back of the front seats
– Coat hook on the rear grab handles
– Under the load compartment floor
– In the front and rear cupholders
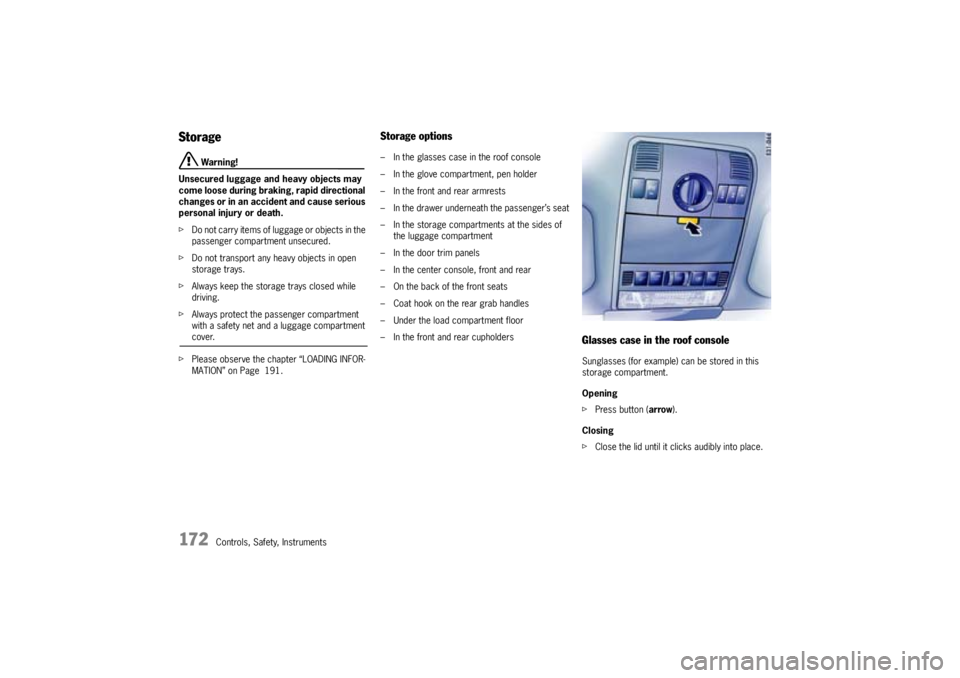
Glasses case in the roof consoleSunglasses (for example) can be stored in this
storage compartment.
Opening
fPress button (arrow).
Closing
fClose the lid until it clicks audibly into place.
Page 174 of 369

174
Controls, Safety, Instruments
Storage trays in the armrest between the
front seatsTwo storages trays are located in the armrest.
Opening the top tray
fPress button A and lift the cover.Opening the lower tray
fPress button B and lift top tray with the cover
closed.
Storage tray in the rear armrestOne storage tray is located in the armrest.
Opening the storage tray in the armrest
1. Fold down the armrest completely.
2. Press button C and lift the cover.
Page 185 of 369

Controls, Safety, Instruments
185
Luggage Safety NetfPlease observe the chapter “LOADING INFOR-
MATION” on Page 191.
The safety net can hold back only lightweight
items during braking, direction changes or in an
accident.
Warning!
Danger of injury. During braking, direction
changes or in an accident, an unsecured
load can slip and endanger the occupants.
fAlways secure the passenger compartment
with the luggage safety net.
fAlways fasten the load at the tie-down rings.
fThe load must never project over the top edge
of the seat backrest.
fIf the safety net was heavily stressed or dam-
aged during braking or an accident, etc., have
the luggage safety net and its bracket checked by an authorized Porsche dealer.
Permitted usesOption 1
Option 2
Option 3
fPlease observe the chapter “FOLDING REAR
SEATS FORWARD” on Page 37.
Securing interior with luggage safety netPulling out luggage safety net
fOpen covers of the luggage safety net
brackets.
fPull the luggage safety net out and engage the
fastening hooks on the left and right sides into
the rings on the ceiling.
The luggage safety net fastening hooks can be
pulled out at the sides.
fMake sure that the luggage safety net fasten-
ing hooks are properly engaged in the rings.
Page 186 of 369

186
Controls, Safety, Instruments
Removing luggage safety net assembly
from the rear seat backrest1. Open both rear doors.
2. Fold down the left seat backrest first, followed
by the right seat backrest. The seat cushions
need not be folded for this purpose.
fPlease observe the chapter “FOLDING REAR
SEATS FORWARD” on Page 37.
3. Push the luggage safety net assembly in the
direction of the arrow 1.
4. Lift the luggage safety net assembly off in the
direction of arrow 2.
Fastening luggage safety net assembly at
the bottom of the rear seat backrestIf you wish to make better use of the luggage
space, you can fasten the luggage safety net as-
sembly at the lower part of the rear seat backrest.
fInsert the luggage safety net assembly into re-
ceiversA and push it in up to the stop
(arrows).
Page 191 of 369

Controls, Safety, Instruments
191
Loading InformationDefinitionsThe towing capacity (gross weight of the trailer)
is the sum of the trailer's empty weight and the
weight of the load.
The vertical coupling load is the weight that the
trailer drawbar exerts on the trailer coupling of the
vehicle.
The rear-axle load is the vehicle weight on the
rear axle plus the weight of the transported load
and the vertical coupling load of the trailer.
The gross weight of the vehicle and trailer is
the sum of the weight of the towing vehicle and the
weight of the trailer.
The Curb weight - actual weight of your vehicle -
vehicle weight including standard and optional
equipment, fluids, emergency tools, and spare tire
assembly. This weight does not include passen-
gers and cargo.
The Gross Vehicle Weight is sum of the curb
weight and the weight of passengers and cargo
combined.
The Gross Vehicle Weight Rating is the maxi-
mum total weight of vehicle, passengers, lug-
gage, hitch, trailer tongue load and optional equip-
ment.The Gross Axle Weight Rating is the maximum
load limit for the front or the rear axle. This infor-
mation is located on the safety comliance sticker
located in the driver’s side door jamb.
For determining the compatibility of the tire and
vehicle load capabilities:
fPlease observe the chapter “TIRES, RIMS,
TRACKS” on Page 348.
The load capacity coefficient (e.g. “106”) is a mi-
nimum requirement.
The Gross Combined Weight Rating is the
maximum total weight rating of vehicle, passen-
gers, cargo and trailer.
The Vehicle Capacity Weight - Load Limit - is
the maximum total weight limit specified of the
load (passengers and cargo) for the vehicle. This
is the maximum weight of passengers and cargo
that can be loaded into the vehicle. This informa-
tion can be found on the tire pressure plate.
If a trailer is being towed, the trailer tongue weight
must be included as part of the cargo load.
The maximum loaded vehicle weight is the
sum of curb weight, accessory weight, vehicle ca-
pacity weight and production options weight.
The load rating is the maximum load that a tire
is rated to carry for a given inflation pressure.
The maximum load rating is the load rating for
a tire at the maximum permissble inflation pres-
sure.The cargo capacity is the permissible weight of
cargo, the substracted weight of passengers from
the load limit.
fNever exceed the permissible limits.
Gefahr!
Risk of personal injury or death.
Injuries are much more likely in an accident
if persons ride in the cargo area.
fPersons must ride only on the seats provided
for this purpose.
fMake sure that everybody fastens their safety
belts.
Risk of personal injury, loss of control and
damage to vehicle.
fNever exceed the specified axle loads.Overloa-
ding can shorten the service life of the tires
and car, as well as lead to dangerous vehicle
reactions and long braking distances. Damage
due to overloading is not covered by the vehic-le warranty.
Page 193 of 369

Controls, Safety, Instruments
193
Stowing load in the vehicle
Warning!
Danger of injury.
An unsecured or incorrectly positioned cargo
can slip out of place or endanger the vehicle
occupants during braking, direction changes
or in accidents.
Never transport objects which are not se-
cured.
fAlways transport cargo in the cargo area, nev-
er in the passenger compartment (e.g. on or in
front of the seats).
fSupport the cargo on the seat backrests when-
ever possible. Always lock the backrests into
place.
fPlace the cargo behind unoccupied seats
whenever possible.
fStow heavy objects as close to the front of the
cargo area as possible, with lightweight ob-
jects behind them.
fThe cargo must never project over the top
edge of the seat backrest.
fAlways protect the passenger compartment
with a luggage safety net and a luggage
compartment cover.
Do not drive with objects on top of the luggage
compartment cover.fIf the rear seats are not occupied, the back-
rests can be additionally secured with the safe-
ty belts. Simply cross the outer safety belts
and insert each into the opposite buckle.
fMake sure that the load cannot damage the
heating filaments of the rear window and the
TV antenna of the side window.
Luggage net
fLuggage must be stowed completely covered
by the luggage net.
The luggage net can prevent only lightweight
objects from slipping.
Tie-down belts
fDo not use elastic belts or straps to tie down
a load.
fDo not place belts and straps over sharp edg-
es.
fObserve the directions for use and information
for the tie-down equipment.
fUse only belts with a tear strength of at least
1543 lbs. or 700 kg and a maximum width of
1 in or 25 mm.
fCross the belts over the load.Driving
fThe car's handling changes depending on the
vehicle load. Adapt your driving style to the
changed driving behavior.
fDo not exceed the maximum gross weight and
the axle load.
fPlease observe the chapter “WEIGHTS” on
Page 352.
fNever drive with the rear window or rear lid
open.
Exhaust gases can enter the passenger
compartment.
fAdapt the tire pressure to the load.
fPlease observe the chapter “TIRE PRESSU-
RES, COLD” on Page 350.
Page 263 of 369

Maintenance, Car Care
263
Leather careCharacteristics and special features
The natural surface markings of leather, e.g.
creases, healed scars, insect sting marks, struc-
tural differences and slight variations in shade and
grain add to the attractiveness of the natural leath-
er product.
A special mention must be made here of natural
leather. For natural leather, carefully selected
hides of the highest quality are used. It is not
covered completely with dye on production. “Na-
ture’s signature” is therefore easily recogniz-
able.This fine material is distinguished by an out-
standing seating comfort, special suppleness and
a typical patina.Leather care and treatment
fClean all types of leather regularly to remove
fine dust using a soft, damp, white woollen
cloth or a commercially available microfibre
cloth.
fRemove heavy contamination with Porsche
leather cleaner.
Please always follow the instructions for use
given on the containers.
Caustic cleaners and hard cleaning objects
must not be used.
Perforated leather must under no circum-
stances get wet on its reverse side.
Once cleaned, leather (particularly the heavily
stressed leather seats) must be treated only with
Porsche leather care liquid.
Carpets and matsfUse only a vacuum cleaner or a medium stiff
brush.
fRemove stains and spots with Porsche stain
remover.
The Porsche range of accessories includes floor-
mats to protect the carpets in summer and winter.
Warning!
Risk of an accident.
fAlways check the movement of the pedals be-
fore driving and make sure that they are not ob-
structed by a floor mat or any other object.
fSecure the floor mat to prevent it from sliding
into positions that could interfere with the safe
operation of your vehicle - do not lie them
loosely in the vehicle.
Your Porsche dealer will be glad to offer you
floor mats of correct size including a securing possibility.
Page 264 of 369

264
Maintenance, Car Care
Airbags
Danger!
There is a danger of serious personal injury
or death if the airbag system is impaired by
improper cleaning work.
fDo not make any modifications whatsoever on
individual components such as the padded
covers of the steering wheel, the front seats,
the roof pillars and the rooflinings.
fLet your authorized Porsche dealer clean these components.
Fabric liningsFabric linings on pillars, headliner and sun visors,
etc., must be treated only using suitable cleaning
agents or a suitable dry foam and a soft brush.
AlcantarafDo not use a leather care product to clean Al-
cantara.
For regular care it is sufficient to clean the cover
with a soft brush.
Cleaning when lightly soiled
fWet a soft cloth with water or a neutral soap
solution and wipe off the dirt.
Cleaning when heavily soiled
fWet a soft cloth with lukewarm water or
thinned white spirit and dab the dirt from the
outside in.
Safety beltsfUse a mild detergent to clean soiled belts.
fWhen drying, avoid direct sunlight.
fOnly use suitable cleaning agents.
fDo not tint or bleach the belts.
The belt fabric could be weakened, thus affect-
ing safety.