tire pressure PORSCHE CAYNNE TURBO 2005 1.G Owner's Manual
[x] Cancel search | Manufacturer: PORSCHE, Model Year: 2005, Model line: CAYENNE TURBO, Model: PORSCHE CAYENNE TURBO 2005 1.GPages: 369, PDF Size: 3.17 MB
Page 108 of 369
108
Controls, Safety, Instruments
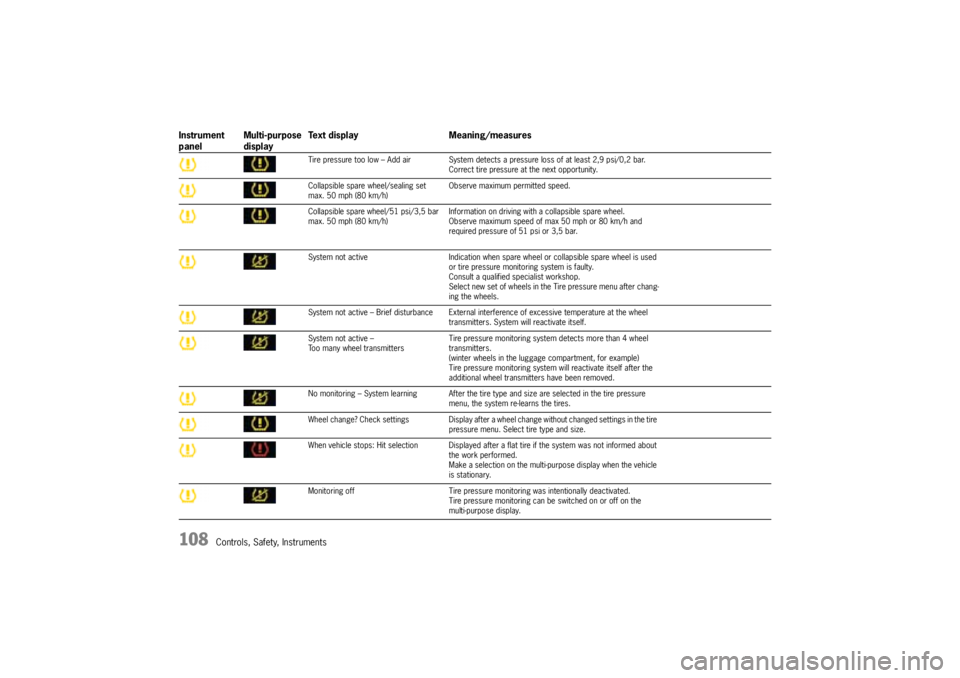
Tire pressure too low – Add air System detects a pressure loss of at least 2,9 psi/0,2 bar.
Correct tire pressure at the next opportunity.
Collapsible spare wheel/sealing set
max. 50 mph (80 km/h)Observe maximum permitted speed.
Collapsible spare wheel/51 psi/3,5 bar
max. 50 mph (80 km/h)Information on driving with a collapsible spare wheel.
Observe maximum speed of max 50 mph or 80 km/h and
required pressure of 51 psi or 3,5 bar.
System not activeIndication when spare wheel or collapsible spare wheel is used
or tire pressure monitoring system is faulty.
Consult a qualified specialist workshop.
Select new set of wheels in the Tire pressure menu after chang-
ing the wheels.
System not active – Brief disturbance External interference of excessive temperature at the wheel
transmitters. System will reactivate itself.
System not active –
Too many wheel transmittersTire pressure monitoring system detects more than 4 wheel
transmitters.
(winter wheels in the luggage compartment, for example)
Tire pressure monitoring system will reactivate itself after the
additional wheel transmitters have been removed.
No monitoring – System learning After the tire type and size are selected in the tire pressure
menu, the system re-learns the tires.
Wheel change? Check settings Display after a wheel change without changed settings in the tire
pressure menu. Select tire type and size.
When vehicle stops: Hit selection Displayed after a flat tire if the system was not informed about
the work performed.
Make a selection on the multi-purpose display when the vehicle
is stationary.
Monitoring off Tire pressure monitoring was intentionally deactivated.
Tire pressure monitoring can be switched on or off on the
multi-purpose display.
Instrument
panelMulti-purpose
displayText display Meaning/measures
Page 158 of 369
158
Controls, Safety, Instruments
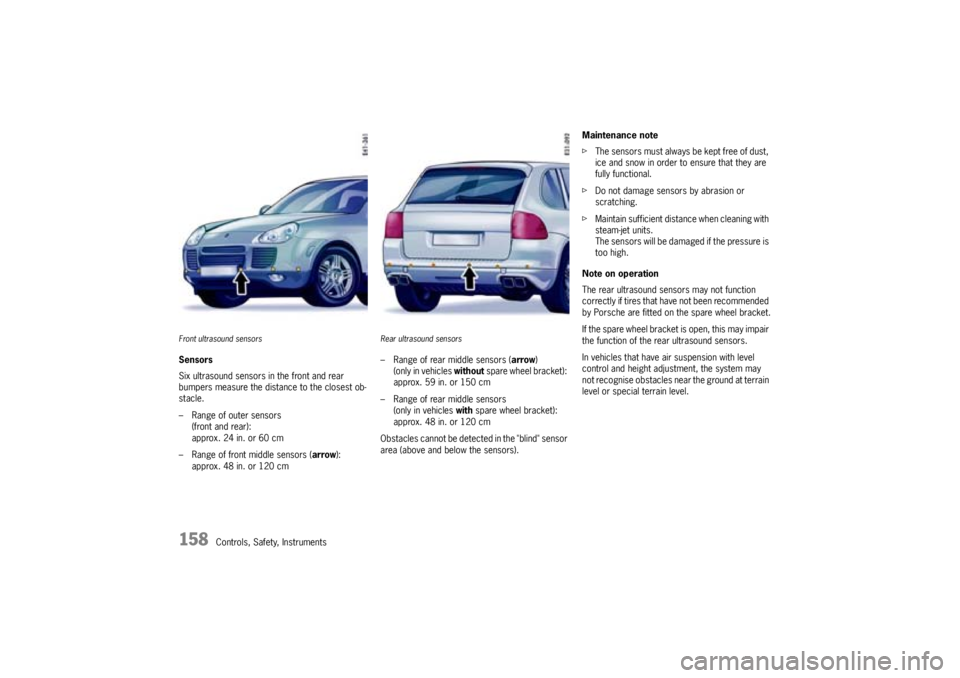
Front ultrasound sensorsSensors
Six ultrasound sensors in the front and rear
bumpers measure the distance to the closest ob-
stacle.
– Range of outer sensors
(front and rear):
approx. 24 in. or 60 cm
– Range of front middle sensors (arrow):
approx. 48 in. or 120 cm
Rear ultrasound sensors– Range of rear middle sensors (arrow)
(only in vehicles without spare wheel bracket):
approx. 59 in. or 150 cm
– Range of rear middle sensors
(only in vehicles with spare wheel bracket):
approx. 48 in. or 120 cm
Obstacles cannot be detected in the "blind" sensor
area (above and below the sensors).Maintenance note
fThe sensors must always be kept free of dust,
ice and snow in order to ensure that they are
fully functional.
fDo not damage sensors by abrasion or
scratching.
fMaintain sufficient distance when cleaning with
steam-jet units.
The sensors will be damaged if the pressure is
too high.
Note on operation
The rear ultrasound sensors may not function
correctly if tires that have not been recommended
by Porsche are fitted on the spare wheel bracket.
If the spare wheel bracket is open, this may impair
the function of the rear ultrasound sensors.
In vehicles that have air suspension with level
control and height adjustment, the system may
not recognise obstacles near the ground at terrain
level or special terrain level.
Page 191 of 369
Controls, Safety, Instruments
191
Loading InformationDefinitionsThe towing capacity (gross weight of the trailer)
is the sum of the trailer's empty weight and the
weight of the load.
The vertical coupling load is the weight that the
trailer drawbar exerts on the trailer coupling of the
vehicle.
The rear-axle load is the vehicle weight on the
rear axle plus the weight of the transported load
and the vertical coupling load of the trailer.
The gross weight of the vehicle and trailer is
the sum of the weight of the towing vehicle and the
weight of the trailer.
The Curb weight - actual weight of your vehicle -
vehicle weight including standard and optional
equipment, fluids, emergency tools, and spare tire
assembly. This weight does not include passen-
gers and cargo.
The Gross Vehicle Weight is sum of the curb
weight and the weight of passengers and cargo
combined.
The Gross Vehicle Weight Rating is the maxi-
mum total weight of vehicle, passengers, lug-
gage, hitch, trailer tongue load and optional equip-
ment.The Gross Axle Weight Rating is the maximum
load limit for the front or the rear axle. This infor-
mation is located on the safety comliance sticker
located in the driver’s side door jamb.
For determining the compatibility of the tire and
vehicle load capabilities:
fPlease observe the chapter “TIRES, RIMS,
TRACKS” on Page 348.
The load capacity coefficient (e.g. “106”) is a mi-
nimum requirement.
The Gross Combined Weight Rating is the
maximum total weight rating of vehicle, passen-
gers, cargo and trailer.
The Vehicle Capacity Weight - Load Limit - is
the maximum total weight limit specified of the
load (passengers and cargo) for the vehicle. This
is the maximum weight of passengers and cargo
that can be loaded into the vehicle. This informa-
tion can be found on the tire pressure plate.
If a trailer is being towed, the trailer tongue weight
must be included as part of the cargo load.
The maximum loaded vehicle weight is the
sum of curb weight, accessory weight, vehicle ca-
pacity weight and production options weight.
The load rating is the maximum load that a tire
is rated to carry for a given inflation pressure.
The maximum load rating is the load rating for
a tire at the maximum permissble inflation pres-
sure.The cargo capacity is the permissible weight of
cargo, the substracted weight of passengers from
the load limit.
fNever exceed the permissible limits.
Gefahr!
Risk of personal injury or death.
Injuries are much more likely in an accident
if persons ride in the cargo area.
fPersons must ride only on the seats provided
for this purpose.
fMake sure that everybody fastens their safety
belts.
Risk of personal injury, loss of control and
damage to vehicle.
fNever exceed the specified axle loads.Overloa-
ding can shorten the service life of the tires
and car, as well as lead to dangerous vehicle
reactions and long braking distances. Damage
due to overloading is not covered by the vehic-le warranty.
Page 192 of 369
192
Controls, Safety, Instruments
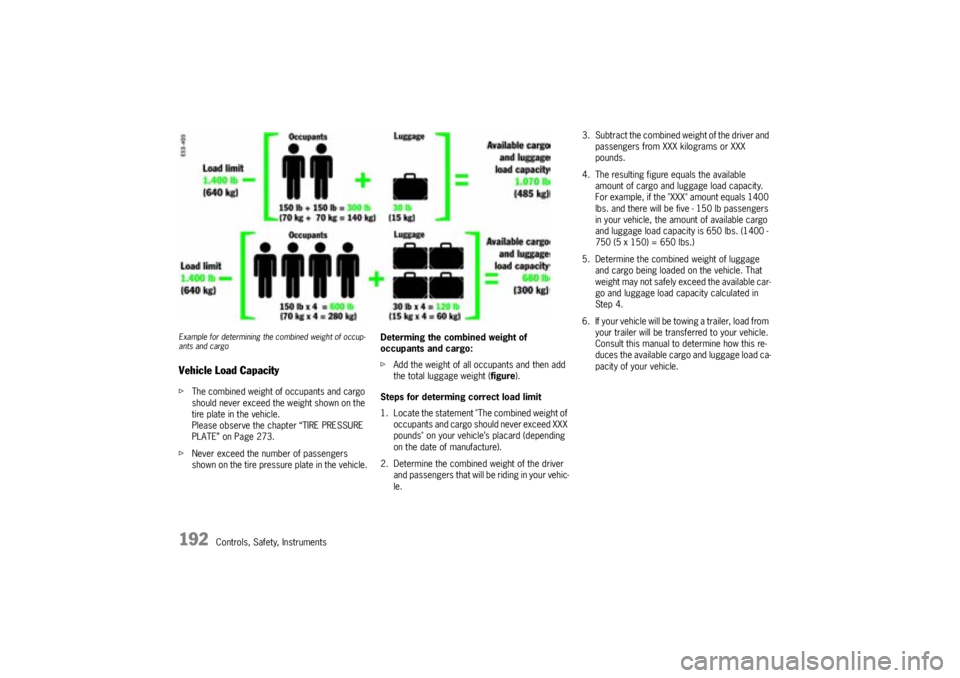
Example for determining the combined weight of occup-
ants and cargoVehicle Load CapacityfThe combined weight of occupants and cargo
should never exceed the weight shown on the
tire plate in the vehicle.
Please observe the chapter “TIRE PRESSURE
PLATE” on Page 273.
fNever exceed the number of passengers
shown on the tire pressure plate in the vehicle.Determing the combined weight of
occupants and cargo:
fAdd the weight of all occupants and then add
the total luggage weight (figure).
Steps for determing correct load limit
1. Locate the statement "The combined weight of
occupants and cargo should never exceed XXX
pounds" on your vehicle’s placard (depending
on the date of manufacture).
2. Determine the combined weight of the driver
and passengers that will be riding in your vehic-
le.
3. Subtract the combined weight of the driver and
passengers from XXX kilograms or XXX
pounds.
4. The resulting figure equals the available
amount of cargo and luggage load capacity.
For example, if the "XXX" amount equals 1400
lbs. and there will be five - 150 lb passengers
in your vehicle, the amount of available cargo
and luggage load capacity is 650 lbs. (1400 -
750 (5 x 150) = 650 lbs.)
5. Determine the combined weight of luggage
and cargo being loaded on the vehicle. That
weight may not safely exceed the available car-
go and luggage load capacity calculated in
Step 4.
6. If your vehicle will be towing a trailer, load from
your trailer will be transferred to your vehicle.
Consult this manual to determine how this re-
duces the available cargo and luggage load ca-
pacity of your vehicle.
Page 193 of 369
Controls, Safety, Instruments
193
Stowing load in the vehicle
Warning!
Danger of injury.
An unsecured or incorrectly positioned cargo
can slip out of place or endanger the vehicle
occupants during braking, direction changes
or in accidents.
Never transport objects which are not se-
cured.
fAlways transport cargo in the cargo area, nev-
er in the passenger compartment (e.g. on or in
front of the seats).
fSupport the cargo on the seat backrests when-
ever possible. Always lock the backrests into
place.
fPlace the cargo behind unoccupied seats
whenever possible.
fStow heavy objects as close to the front of the
cargo area as possible, with lightweight ob-
jects behind them.
fThe cargo must never project over the top
edge of the seat backrest.
fAlways protect the passenger compartment
with a luggage safety net and a luggage
compartment cover.
Do not drive with objects on top of the luggage
compartment cover.fIf the rear seats are not occupied, the back-
rests can be additionally secured with the safe-
ty belts. Simply cross the outer safety belts
and insert each into the opposite buckle.
fMake sure that the load cannot damage the
heating filaments of the rear window and the
TV antenna of the side window.
Luggage net
fLuggage must be stowed completely covered
by the luggage net.
The luggage net can prevent only lightweight
objects from slipping.
Tie-down belts
fDo not use elastic belts or straps to tie down
a load.
fDo not place belts and straps over sharp edg-
es.
fObserve the directions for use and information
for the tie-down equipment.
fUse only belts with a tear strength of at least
1543 lbs. or 700 kg and a maximum width of
1 in or 25 mm.
fCross the belts over the load.Driving
fThe car's handling changes depending on the
vehicle load. Adapt your driving style to the
changed driving behavior.
fDo not exceed the maximum gross weight and
the axle load.
fPlease observe the chapter “WEIGHTS” on
Page 352.
fNever drive with the rear window or rear lid
open.
Exhaust gases can enter the passenger
compartment.
fAdapt the tire pressure to the load.
fPlease observe the chapter “TIRE PRESSU-
RES, COLD” on Page 350.
Page 194 of 369
194
Controls, Safety, Instruments
Towing a trailer
Warning!
Driving with a trailer
fAlways observe the permissible towing capac-
ity, vertical coupling load and rear-axle load.
Please observe the chapter “WEIGHTS” on
Page 352.
fWhen connected, the trailer must always be
horizontal behind the towing vehicle. If neces-
sary, use a trailer with an adjustable drawbar.
fWhen the vehicle is driven in the mountains, the
engine output decreases as altitude increases.
The maximum weights stated are the values at
sea level. The total weight of the car-trailer
combination must therefore be reduced by
10% for each increment of 3,280 ft. or
1,000 metres altitude. A fractional increment
counts as the full 1,000 metres. Please take
this into consideration when planning your
route.Distributing the load
fDistribute the load in the trailer so that heavy
objects are as close to the axle as possible.
Always safeguard all objects against slipping
and tie them down securely.
fYou should make the best possible use of the
trailer coupling's rated vertical coupling load
when loading the trailer, but never exceed it.
Tire pressure
fSelect the vehicle tire pressure for full load
when towing a trailer.
fPlease observe the chapter “Tire pressure ta-
bles”.
fCheck the tire pressure of the trailer's wheels
according to the manufacturer's instructions.Door mirrors
fIf the width of the trailer obstructs your view of
the traffic behind the trailer, you must have ad-
ditional door mirrors fitted.
Headlights, lights
fCheck whether the plug of the trailer is
plugged into the towing vehicle and whether all
lights function.
Page 221 of 369

Shifting Gear, Traction Systems
221
Driving systems for off-road drivingSpecially adapted driving programs or power-
transmission and running-gear control systems
are available for off-road driving:
– Off-road program Low Range
–Off-road PSM
–Off-road ABS
– Center differential lock
– Rear differential lock
fPlease observe the chapter “POWER-TRANS-
MISSION AND RUNNING-GEAR CONTROL SYS-
TEMS” on Page 211.Before driving offTires
fCheck tread depth and tire pressure.
fCheck for damage and remove any foreign ob-
jects (e.g. stones) from the tread.
fReplace missing valve caps.
Rims
fReplace dented or damaged rims before
driving off road.
After driving off roadOff-road driving places a greater burden on the ve-
hicle than does normal driving on roads.
We recommend inspecting the vehicle after off-
road driving. Potential damage poses an accident
risk and impairs driving comfort. Damage on the
car is recognised in good time if the car is
checked.
Warning!
Car damage poses an accident risk for the
vehicle occupants and other road users.
fIn cases of doubt, have your vehicle checked
by your authorized Porsche dealer.
fExamine tires for signs of damage such as
cuts, tears, bulges or foreign objects stuck in
the tread. Replace a damaged tire if necessa-
ry.
fHave any damage to your vehicle repaired by an authorized Porsche dealer without delay.
Recommended procedure
fDeactivate Low Range.
fClean headlights and tail lights and check them
for signs of damage.
fClean the front and rear licence plates.fClean the tire tread with a jet of water and re-
move any foreign objects.
fClean wheels, wheel housings and the under-
body with a jet of water.
fCheck whether the car has picked up plant
parts or branches.
These materials increase the risk of fire and
can damage fuel lines, brake hoses, boots of
the axle joints and drive shafts.
fAfter off-road driving, always check the entire
floor assembly, tires, body structure, steering
system, running gear and exhaust system for
signs of damage.
fAfter driving for an extended period through
mud, sand, water or substances with a similar
soiling effect, check the brake discs, brake
pads, wheels and axle joints and have them
cleaned.
fIf you experience severe vibrations after
driving off road, check the wheels for foreign
substances.
These substances can produce an imbalance
which might be responsible for the vibrations.
Removing these deposits may remedy the
problem.
Page 249 of 369
Maintenance, Car Care
249
Fuel EconomyFuel economy will vary depending on where,
when and how you drive, optional equipment
installed, and the general condition of your
car.
A car tuned to specifications and correctly
maintained, will help you to achieve optimal
fuel economy.
fHave your vehicle tuned to specifications. Air
cleaner should be dirt free to allow proper en-
gine “breathing“.
Battery should be fully charged.
Wheels should be properly aligned.
Tires should be inflated at correct pressure.
fAlways monitor your fuel consumption.
fDrive smoothly, avoid abrupt changes in speed
as much as possible.
fAvoid jack rabbit starts and sudden stops.
fDo not drive longer than necessary in the lower
gears. Shifting into a higher gear early without
lugging the engine will help save fuel.
fProlonged “warm up“ idling wastes gas. Start
the vehicle just before you are ready to drive.
Accelerate slowly and smoothly.fSwitch off the engine if stationary for longer
periods.
fAny additional weight carried in the vehicle re-
duces fuel economy. Always keep cargo to a
minimum and remove all unnecessary items.
fOrganize your trips to take in several errands
in one trip.
fAll electrical accessories contribute to in-
creased fuel consumption.
fOnly switch on the air conditioning when neces-
sary.
fDo not drive with the Roof Transport System
mounted unless you need it.
The EPA estimated m.p.g. is to be used for
comparison purposes, actual mileage may
be different from the estimated m.p.g., de-
pending on your driving speed, weather con-
ditions and trip length. Your actual highway
mileage will probably be less than the esti-
mated m.p.g.
fPlease observe all local and national speed lim-
its.
Operating Your Porsche in other
CountriesGovernment regulations in the United States and
Canada require that automobiles meet specific
emission regulations and safety standards. There-
fore, cars built for the U.S. and Canada differ from
vehicles sold in other countries.
If you plan to take your Porsche outside the conti-
nental limits of the United States or Canada, there
is the possibility that
– unleaded fuel may not be available;
– unleaded fuel may have a considerably lower
octane rating. Excessive engine knock and se-
rious damage to both engine and catalytic con-
verters could result;
– service may be inadequate due to lack of prop-
er service facilities, tools or diagnostic equip-
ment;
– replacement parts may not be available or very
difficult to get.
Porsche cannot be responsible for the me-
chanical damage that could result because
of inadequate fuel, service or parts availabil-
ity.
If you purchased your Porsche abroad and want to
bring it back home, be sure to find out about ship-
ping and forwarding requirements, as well as cur-
rent import and customs regulations.
Page 257 of 369

Maintenance, Car Care
257
High-pressure cleaning units
Warning!
High-pressure cleaning units can damage
the following components:
–Tires
– Logos, emblems
– Painted surfaces
– Widened fenders
– Lock and latch of the removable towing attach-
ment
– Seals of the electrically retractable ball hitch
– Alternator, valve covers
– ParkAssist sensors.
fPlease observe the operating instructions from
the unit manufacturer.
fAlways cover the lid over the brake fluid reser-
voir prior to cleaning. Never point the cleaning
jet directly at the lid.
fWhen cleaning with a flat-jet nozzle or the like,
maintain a minimum distance of 50 cm
(21 in.).fNever use high-pressure cleaning units with a
round-jet nozzle.
A high-pressure cleaning unit with round nozzle
will damage your vehicle. The tires are particu-
larly susceptible to damage.
fDo not point the cleaning jet directly at any of
the aforementioned components.
WashingThe best protection for the car from the damaging
effects of the environment is frequent washing and
preservation. The underside of the car should also
be thoroughly washed for cinders, salt or sanding
at winter‘s end.
The longer salt, road dust, industrial dust, insect
remains, bird excrement, and tree exudations (res-
in, pollen), etc. are allowed to remain on the body-
work, the more serious is their harmful effect.
New cars should be washed carefully with plenty
of clear water to protect the new paint work.
Dark paint finishes show up the smallest of sur-
face damage (e.g. scratches) more readily than
lighter colors.
Dark colors are also more susceptible to scratch-
ing because of the composition of their pigments
and require particularly careful paint care.fDo not wash your car in bright sunlight or while
the bodywork is still hot.
fWhen washing by hand, use abundant water, a
soft sponge or wash brush and Porsche car
shampoo.
fBegin by spraying the body thoroughly with wa-
ter to rinse away loose dirt.
fAfter washing, rinse the car with plenty of wa-
ter and then dry with a chamois leather.
Do not use the same chamois leather for
drying as you use for cleaning the windshield
and windows.
f f f
Page 258 of 369

258
Maintenance, Car Care
Warning!
Moisture which gets on to the brakes during
a car wash can reduce braking efficiency or
make the brake pull unevenly which could in-
crease the danger of an accident, causing
serious personal injuries or death.
fAlways apply the brakes a few times after
washing the car to test braking efficiency and
dry the brake discs.
When doing this, take care not to hamper other
road users behind you (traffic conditions per-mitting).
Automatic car washes
Optional add-on parts or parts which project be-
yond the contours of the vehicle may be damaged
by design features (e.g. brushes) of automatic car
washes.The following parts are particularly
susceptible to damage:
– Windshield wipers (always switch them off to
prevent them wiping unintentionally in intermit-
tent or sensor operation).
– Door mirrors (always fold in).
– Roof Transport System (always remove com-
pletely).
– Spoiler.
– Wheels (the wider the rim and the lower the tire
height, the greater the risk of damage).
fPlease consult the operator before using
automatic car washes.
fWash and dry by hand all points not reached by
a car wash, such as door and lid seams or
door sills.
Note
Automatic car washes spray water at odd angles
and high pressures, which are not seen in normal
driving. Therefore, water can sometimes find its
way into the passengers compartment during or
shortly after the car wash.
Door lockfTo prevent the door lock from freezing during
the cold season, cover the lock barrel with a
suitable adhesive tape during washing.
fShould the locks freeze, use an ordinary de-ic-
er.
In many cases, a well warmed key can help.
Never use excessive force.