air condition PORSCHE CAYNNE TURBO 2005 1.G Owner's Guide
[x] Cancel search | Manufacturer: PORSCHE, Model Year: 2005, Model line: CAYENNE TURBO, Model: PORSCHE CAYENNE TURBO 2005 1.GPages: 369, PDF Size: 3.17 MB
Page 270 of 369
270
Practical Tips, Minor Repairs
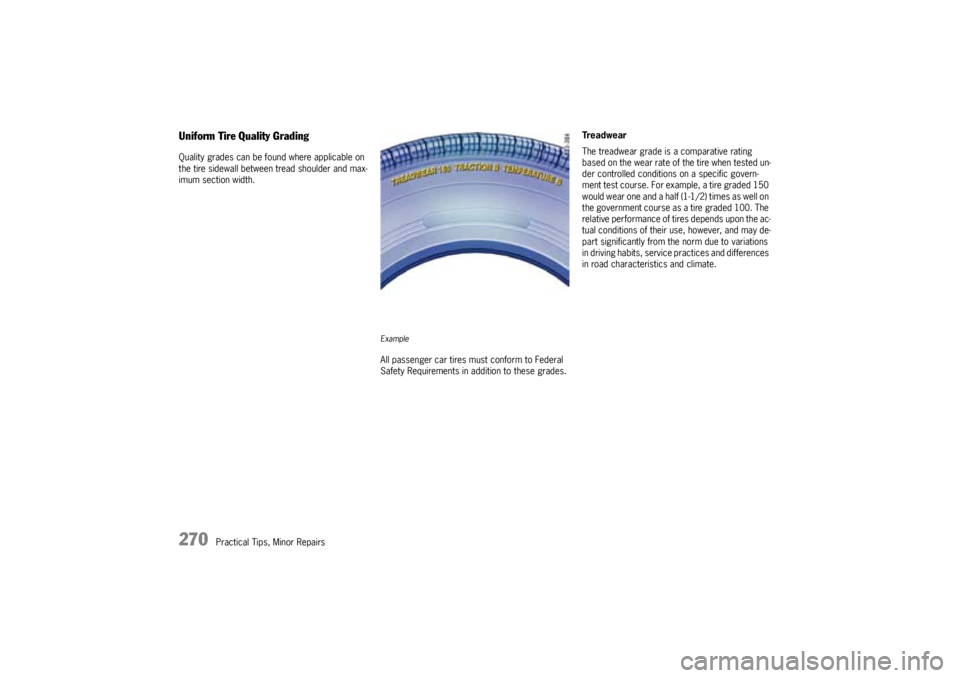
Uniform Tire Quality GradingQuality grades can be found where applicable on
the tire sidewall between tread shoulder and max-
imum section width.
ExampleAll passenger car tires must conform to Federal
Safety Requirements in addition to these grades.Treadwear
The treadwear grade is a comparative rating
based on the wear rate of the tire when tested un-
der controlled conditions on a specific govern-
ment test course. For example, a tire graded 150
would wear one and a half (1-1/2) times as well on
the government course as a tire graded 100. The
relative performance of tires depends upon the ac-
tual conditions of their use, however, and may de-
part significantly from the norm due to variations
in driving habits, service practices and differences
in road characteristics and climate.
Page 271 of 369

Practical Tips, Minor Repairs
271
Traction AA, A, B, C
The traction grades, from highest to lowest, are
AA, A, B, and C and they represent the tire's ability
to stop on wet pavement as measured under con-
trolled conditions on specified government test
surfaces of asphalt and concrete. A tire marked C
may have poor traction performance.
Warning!
The traction grade assigned to this is based on
braking (straight-ahead) traction tests and does
not include cornering (turned) traction, accelera-
tion, hydroplaning or peak traction characteris-
tics.Temperature A, B, C
The temperature grades are A (the highest), B and
C, representing the tire's resistance to the gener-
ation of heat and its ability to dissipate heat when
tested under controlled conditions on a specified
indoor laboratory test wheel.
Sustained high temperatures can cause the mate-
rial of the tire to degenerate and reduce tire life,
and excessive temperature can lead to sudden
tire failure.
The grade C corresponds to a level of perfor-
mance which all passenger car tires must meet
under the Federal Motor Vehicle Safety Standard
No. 109.
Grades B and A represent higher levels of perfor-
mance on the laboratory test wheel than the mini-
mum required by law.
Warning!
The temperature grade for this tire is estab-
lished for a tire that is properly inflated and
not overloaded.Excessive speed, underinfla-
tion, or excessive loading, either separately
or in combination, can cause heat buildup
and possible tire failure.
Page 274 of 369
274
Practical Tips, Minor Repairs
Tire traction
Warning!
When driving on wet or slushy roads, a
wedge of water may build up between the
tires and the road. This phenomenon is
known as “hydroplane“ and may cause par-
tial or complete loss of traction, vehicle con-
trol or stopping ability.
fReduce speed on wet surfaces to prevent this.Tire lifeTire life depends on various factors, i.e., road sur-
faces, traffic and weather conditions, driving hab-
its, type of tires and tire care.
fInspect your tires for wear and damage before
driving off. If you notice uneven or substantial
wear, wheels might need alignment or tires
should be balanced or replaced.
Tire wearThe original equipment tires on your Porsche have
built-in tire wear indicators. They are molded into
the bottom of the tread grooves and will appear as
approximately 1/2 in. (12 mm) bands when the
tire tread depth is down to 1/16 of an in (1.6 mm).
When the indicators appear in two or more adja-
cent grooves, it is time to replace the tires. We
recommend, however, that you do not let the tires
wear down to this extent.
Worn tires cannot grip the road surface properly
and are even less effective on wet roads.
In the United States, state laws may govern the
minimum tread depth permissible. Follow all such
laws.
Danger!
Driving on worn tires can result in loss of con-
trol of the vehicle and could cause serious
personal injuries or death.
fDo not drive with worn tires or tires showing
cuts or bruises as they may lead to sudden de-
flation and loss of control which could cause
severe personal injury.
fSpecialized high performance tires on high
performance sport utility vehicles exhibit more
wear than those on a family sedan, or even a
high performance sedan.
Therefore, it is important to check your tire
pressure and condition at least every two weeks.
fIf you notice that tires are wearing unevenly,
consult your Porsche dealer.
Uneven wear may not always be due to improper
wheel alignment. It can be the result of individual
driving habits such as cornering at high speeds. If
the tire pressure is not checked and adjusted reg-
ularly, abnormal tire wear can also occur.
Page 276 of 369

276
Practical Tips, Minor Repairs
Tire replacementsfUse only tire makes and types tested by
Porsche.
Only tires with the same manufacturer and
with the same specification code (e.g. “N0“,
“N1“...) should be mounted on the vehicle.
Tires should be replaced no less than on one axle
at the time. Only tires of the same make and type
must be used. Mixed tires are not permissible and
will affect vehicle performance, safety, and can
affect vehicle warranty.
Porsche dealers can recommend the most current
replacement tire options for your vehicle.
Initially, new tires do not have their full traction.
You should therefore drive at moderate speeds
during the first 60 - 120 miles (100 - 200 km).Tires should be replaced no less than on one axle
at the time. Only tires of the same make and type
must be used. Mixed tires are not permissible.
Initially, new tires do not have their full traction.
You should therefore drive at moderate speeds
during the first 60 - 120 miles (100 - 200 km).
If new tires are installed only on one axle, a notice-
able change in handling occurs due to the different
tread depth of the other tires. This happens espe-
cially if only rear tires are replaced. However, this
condition disappears as the new tires are broken
in.
fPlease adjust your driving style accordingly.
Installation of new tires should only be done by a
qualified tire technician.
Valves
fUse only plastic valve caps.
fThe rubber valves must be replaced whenever
the tires are changed.
fThe fitting and replacement specifications
must be observed for metal valves.
fOnly use Original Porsche metal valves.
Page 279 of 369
Practical Tips, Minor Repairs
279
Snow tiresThe installation of Porsche approved winter tires is
recommended.
Use Porsche approved winter tires for grip on
snow and ice. For optimum performance, stud-
ding can be considered.
Check with your local Motor Vehicle Bureau for
possible restrictions.
Danger!
Risk of loss of control and damage to the
vehicle as well as serious personal injury or
death.
The standard tires profile and rubber mixture
are optimized for wet and dry driving condi-
tions, and may not prove favorable for snow
conditions.
fInstall winter tires before driving in such condi-tions.
Before mounting winter tires, consult with your
Porsche dealer. He has the technical information
necessary to advise you on wheel and tire compat-
ibility.
Snow tires should have the same load capacity as
original equipment tires and should be mounted on
all four wheels.
Winter tires with studs should be run at moderate
speeds when new in order to give the studs time
to settle.
Danger!
Risk of serious personal injury or death.
Driving the vehicle with low tire pressure
increases increases risk of a tire failure and
resulting loss of control. Furthermore, low
tire pressure increases rate of wear of the
affected tires and cause damage.
Tires with badly worn treads and studs are
very dangerous and could cause accidents
resulting in serious personal injuries or
death.
fMake sure they are replaced immediately.
fDo not exceed the winter tire speed rating.
Snow tires do not have the same degree of trac-
tion on dry, wet or snowfree roads as normal tires.
Furthermore, snow tires wear rapidly under these
conditions.
Winter tires do not fulfill their purpose if the tread
depth is less than 5/32 in. (4 mm).
Comply with all state and local laws govern-
ing snow tire and tread depth requirements.
Danger!
Risk of accident and serious personal injury
or death due to excessive speed.
fAlways check the maximum speed rating on
the tire sidewall on any tire on the vehicle.
fNever exceed the maximum speed rating of the tires.
Wheel change
fWhen wheels are removed, mark the direction
of rotation and position of each wheel.
Example: FR (front right), FL, RR and RL.
fAlways fit the wheels in accordance with the
markings.
Page 300 of 369
300
Practical Tips, Minor Repairs
Opening spare wheel bracket
Warning!
Danger of injury and risk of accident if the
spare wheel bracket is operated improperly.
fMake sure that no persons or animals are with-
in the range of movement of the spare wheel
bracket. Operate the spare wheel bracket only
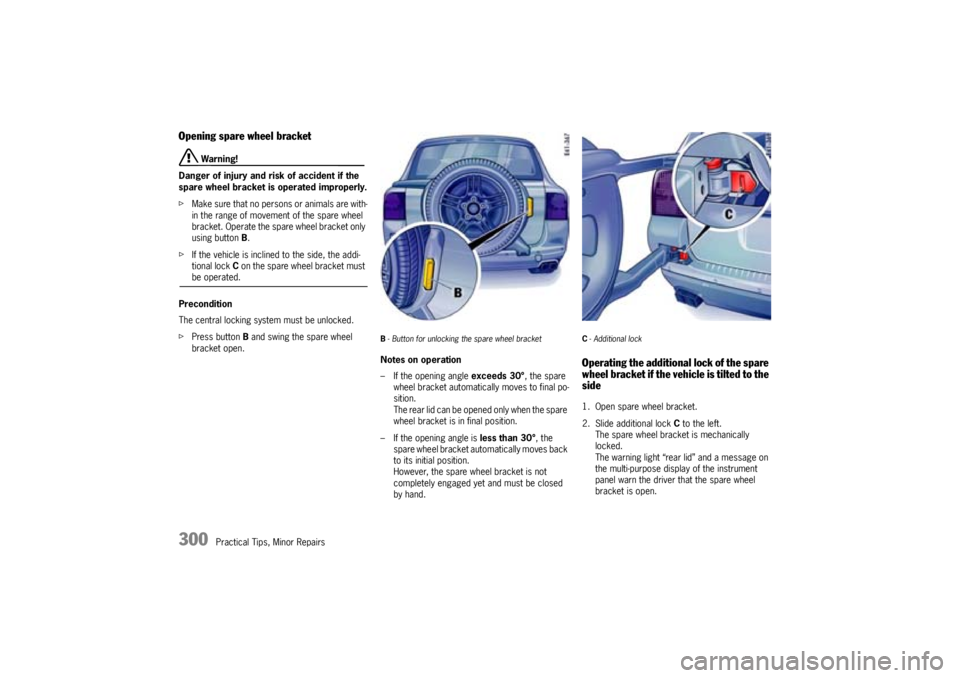
using button B.
fIf the vehicle is inclined to the side, the addi-
tional lock C on the spare wheel bracket must be operated.
Precondition
The central locking system must be unlocked.
fPress button B and swing the spare wheel
bracket open.
B- Button for unlocking the spare wheel bracketNotes on operation
– If the opening angle exceeds 30°, the spare
wheel bracket automatically moves to final po-
sition.
The rear lid can be opened only when the spare
wheel bracket is in final position.
– If the opening angle is less than 30°, the
spare wheel bracket automatically moves back
to its initial position.
However, the spare wheel bracket is not
completely engaged yet and must be closed
by hand.
C- Additional lock Operating the additional lock of the spare
wheel bracket if the vehicle is tilted to the
side1. Open spare wheel bracket.
2. Slide additional lock C to the left.
The spare wheel bracket is mechanically
locked.
The warning light “rear lid” and a message on
the multi-purpose display of the instrument
panel warn the driver that the spare wheel
bracket is open.
Page 307 of 369
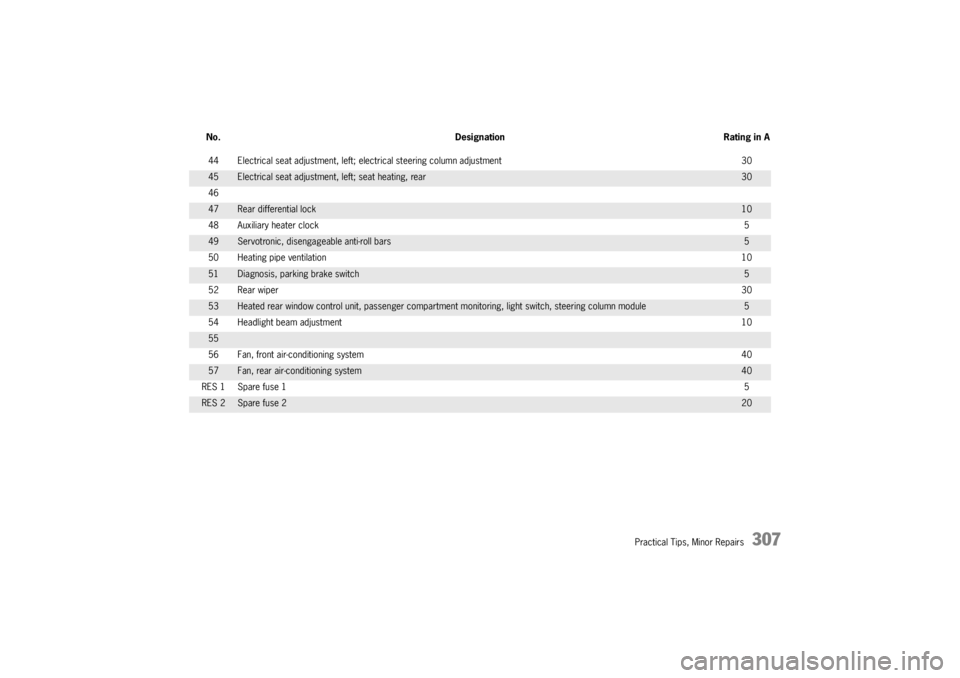
Practical Tips, Minor Repairs
307
44 Electrical seat adjustment, left; electrical steering column adjustment 3045
Electrical seat adjustment, left; seat heating, rear
30
46
47
Rear differential lock
10
48 Auxiliary heater clock5
49
Servotronic, disengageable anti-roll bars
5
50 Heating pipe ventilation10
51
Diagnosis, parking brake switch
5
52 Rear wiper30
53
Heated rear window control unit, passenger compartment monitoring, light switch, steering column module
5
54 Headlight beam adjustment10
5556 Fan, front air-conditioning system4057
Fan, rear air-conditioning system
40
RES 1 Spare fuse 15
RES 2
Spare fuse 2
20 No. Designation Rating in A
Page 309 of 369
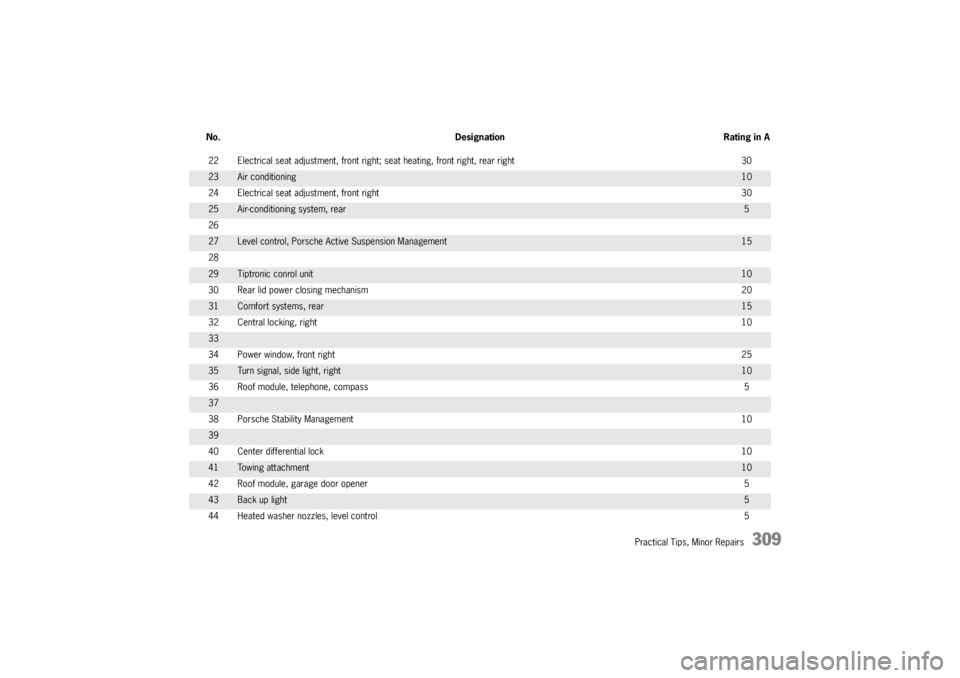
Practical Tips, Minor Repairs
309
22 Electrical seat adjustment, front right; seat heating, front right, rear right 3023
Air conditioning
10
24 Electrical seat adjustment, front right30
25
Air-conditioning system, rear
5
26
27
Level control, Porsche Active Suspension Management
15
28
29
Tiptronic conrol unit
10
30 Rear lid power closing mechanism20
31
Comfort systems, rear
15
32 Central locking, right10
3334 Power window, front right2535
Turn signal, side light, right
10
36 Roof module, telephone, compass5
3738 Porsche Stability Management103940 Center differential lock1041
Towing attachment
10
42 Roof module, garage door opener5
43
Back up light
5
44 Heated washer nozzles, level control5 No. Designation Rating in A
Page 314 of 369

314
Practical Tips, Minor Repairs
Replacing the batteryThe service life of the battery is subject to normal
wear; it depends greatly on care, climatic condi-
tions, and driving conditions (distances, loads).
fOnly use an original Porsche battery, with the
correct part number, as a replacement. Only
this battery meets the specific requirements of
the vehicle.
fPlease observe the disposal instructions for
batteries.
Battery chargingAutomotive batteries loose their efficiency when
not in use. The charge available in your battery can
be measured with a battery hydrometer. We rec-
ommend that the battery voltage be tested by
your Porsche dealer who has the appropriate
equipment.
If the car is not driven for prolonged periods, the
battery must be charged at least every 6 weeks.
A discharged battery allows rapid formation of sul-
fates, leading to premature deterioration of the
plates.
Danger!
Hydrogen gas generated by the battery
could cause an explosion, resulting in severe
personal injuries.
fCharge battery in a well ventilated area.
fNever charge a frozen battery. It may explode
because of gas trapped in the ice. Allow a fro-
zen battery to thaw out first.
fIf you get electrolyte, which is an acid, in your
eyes or on your skin, immediately rinse with
cold water for several minutes and call a doc-tor.
Note
Your authorized Porsche dealer will be pleased to
advise you about a suitable charger.Slow battery charging
1. Pay attention to all warnings and follow instruc-
tions that come with your battery charger.
2. When charging, ensure adequate ventilation.
3. Remove battery.
Please observe the chapter “REMOVING AND
INSTALLING BATTERY” on Page 315.
4. All vent caps should be open.The fluid level
should meet the indicator mark in each cell.
5. Ensure that charger is switched off – danger of
short circuit!
6. Connect charger cables.Charger cables must
be connected POSITIVE (+) to POSITIVE (+)
and NEGATIVE (–) to NEGATIVE (–).
7. Switch on charger. Normally, a battery should
be charged at no more than 10 percent of its
rated capacity. Rated capacity of the battery in
your vehicle is listed on the battery housing.
8. After charging, turn off charger and disconnect
charger cables.
9. Tighten the vent caps and reinstall battery.
Please observe the chapter “REMOVING AND
INSTALLING BATTERY” on Page 315.
Page 358 of 369

358
Index
IndexAABD ......................................... 211
,213
,215
ABS ......................................... 211
,214
,217
Off road ............................................. 218
Warning light ...................................... 217
After driving off road ................................... 221
Aftermarket Alarms ..................................... 169
Air cleaner.................................................. 245
Air conditioning
Central vents ............................. 129,135
Cover flap .......................................... 126
Disabling control panel (rear) ............... 132
Display ...................................... 127,131
Footwell .................................... 129,135
Four zone ........................................... 131
Fresh-air intake ................................... 125
Mono function ..................................... 128
Rear.......................................... 132,136
REST mode ............................... 130,136
Sensors ............................................. 126
Setting air quantity ..................... 128,134
Setting temperature ................... 128,133
Side vents ................................. 129,135
Two zone ........................................... 127
Vents ................................................. 125
Windshield ................................. 129,135
Air quantity
Setting ...................................... 128,134
Air suspension ................. 158
,175
,211
,228
Airbag ................................................. 49,264
Disposal ............................................... 50Function ............................................... 49
Unit ...................................................... 51
Warning light......................................... 50
Air-conditioned areas
Rear................................................... 136
Air-conditioning compressor....... 127
,130
,135
Alarm button................................................. 17
Alarm system ............................... 21
,23,27,
.......................................... 28
,30,190
,302
Alcantara.................................................... 264
All-Season tires ........................................... 348
All-Terrain tires ............................................ 348
All-wheel drive ........................... 111
,211
,213
Anti-freeze content ...................................... 240
Anti-lock brake system .............. 211
,214
,217
Anti-roll bars
Disengageable .................................... 209
Armrest............................................. 172,174
Assembly aid ..................................... 293,299
Assistance when driving downhill .................. 219
Audio
Tips ................................................... 167
AUTO button .................... 127
,128
,131
,133
AUTO-LOCK .................................................. 23
Automatic anti-dazzle operation...................... 57
Automatic brake differential ....... 211
,213
,215
Automatic circulating-air mode ............ 129,134
Automatic mode, air conditioning127
,128
,133
Automatic transmission fluid ........................ 245
BBattery ......................... 58
,60,77,170
,312
After charging ..................................... 325
Car key .............................................. 326
Care................................................... 312
Charge state....................................... 312
Charging ............................................ 325
Installing ............................................. 322
Putting vehicle into operation ...............313
Removing .................................. 320,321
Removing/installing .................... 315,319
Replacing ........................................... 314
Warning light....................................... 109
Winter driving...................................... 313
Before driving off .................................12,221
Belts ............................................................ 42
Fastening ............................................. 44
Height adjustment ................................. 45
Opening ............................................... 44
Tensioner ............................................. 43
Warning light......................................... 43
Brake ...........................................................63
Booster ................................................ 65
Discs ................................................... 66
Pads .................................................... 66
Warning light......................................... 64
Brake fluid
Changing ............................................ 243
Brake light .................................................. 336
Brake tests................................................. 219